New beginnings. A place we find ourselves from time to time throughout life. When it’s a celebratory new beginning, I like to mark the occasion with cake. So when my food blogger friend, Cheryl, invited me to participate in a friend’s virtual baby shower with other fabulous bloggers, I had my hand up; no hesitation here! What better way to celebrate a new beginning… lets. eat. cake! Melissa, this one’s for you and your new beginning!
Oh my goodness, y’all. If you’re due for a layer cake or there’s a special occasion coming, you’ve gotta give this recipe a try. I mean, just the name, hot milk cake with lemon curd and Italian meringue buttercream, makes me weak in the knees! This one is well worth the time and effort, especially for a celebration… or new beginning.
The hot milk cake is an adapted recipe from the pastry book Miette. I had never made hot milk cake before reading Meg Ray’s book, although I had heard about it. What I like most about this cake is that it’s sturdy, holding up to brushed on simple syrup, curds or pastry cream and buttercream. It is rich, yet light and has a tender crumb.
I’ve included a general tutorial and photographs for each component of the cake, just in case you need a bit of help along the way. I’ve also included a list of tools with links (affiliates) to help you find what you need to build a layer cake. While these tools are not required, they definitely make the job easier.
There are several steps in making the cake, so mise en place is a must! Be sure to read the entire recipe before beginning and plan on giving yourself enough time for each component. I made the cake over a three day period, doing a little each day and finally constructing the cake on day three.
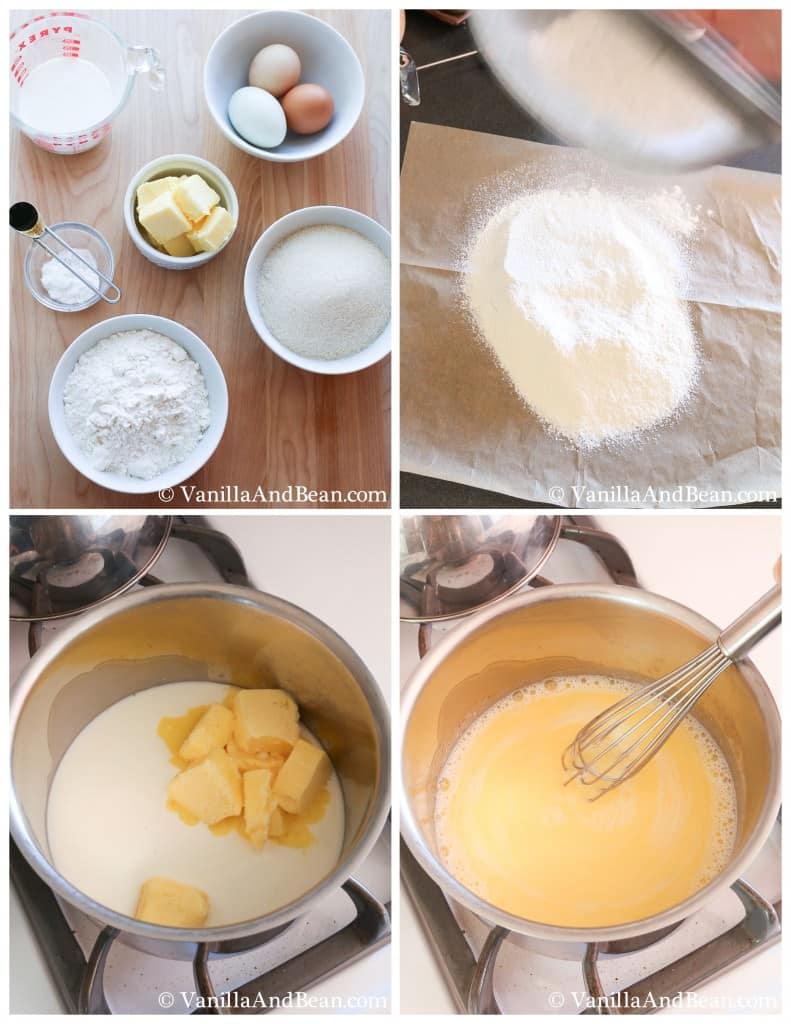
(Above) Prepping the cake for mixing involves several steps. Here, I have mise en place, sifted flour and melted butter in warmed milk.
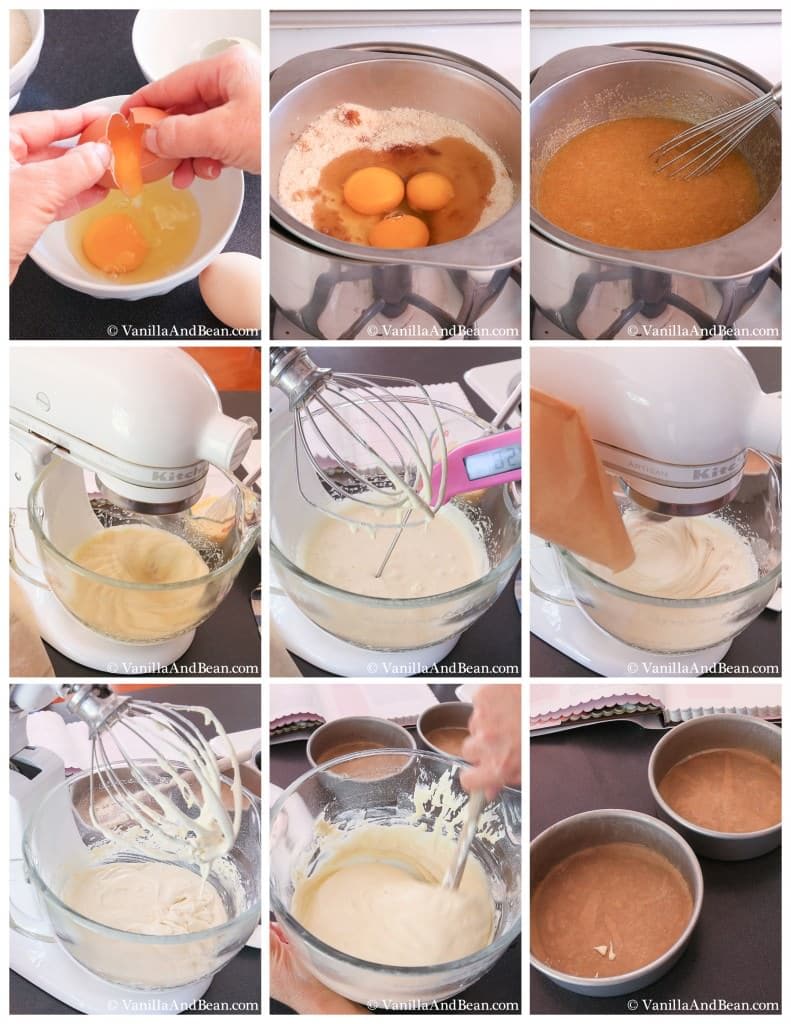
(Above) Warming the eggs, sugar and vanilla bean paste in a bain marie before whisking helps build volume during and after mixing. You’ll see how the eggs change from yellow to a cream color as you whip and begin to cool the egg mixture down. Then the sifted ingredients are added and the cooled milk/butter mixture is gently mixed in. Now, it’s time to bake the cake!
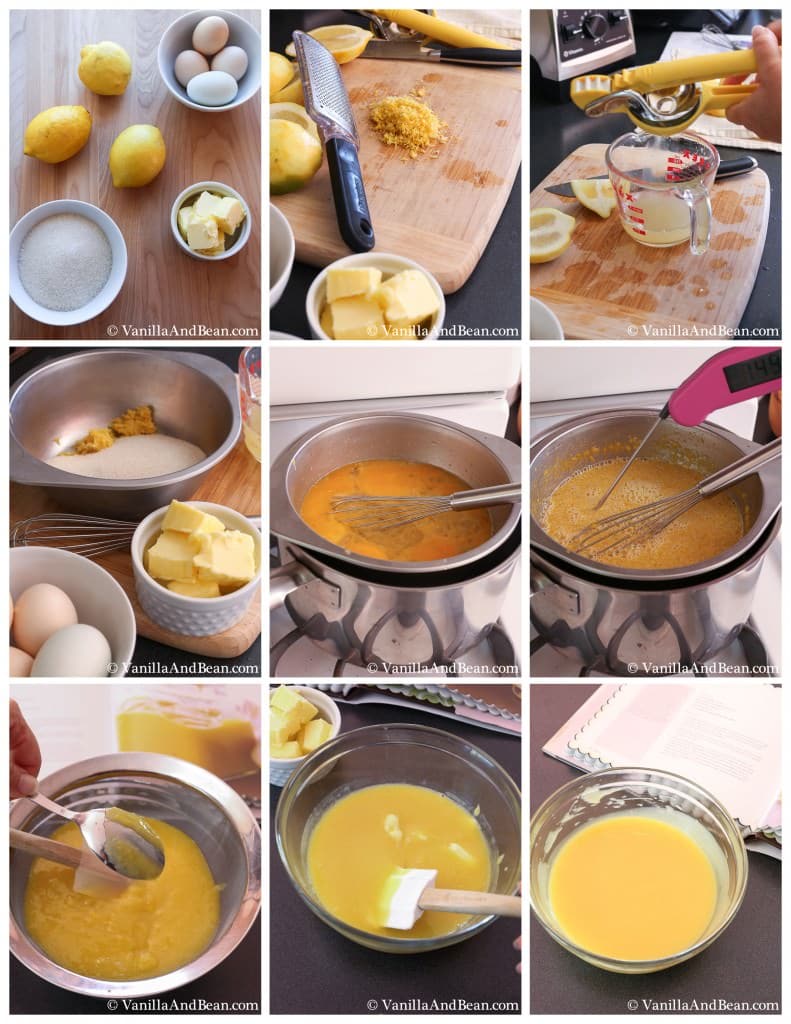
(Above) For lemon curd, all the ingredients except the butter are added to a stainless steel bowl and placed in a bain marie. The ingredients are cooked to temperature and stirred through a fine mesh sieve. When slightly cooled, butter is slowly stirred in. Chill until set and cooled in the refrigerator.
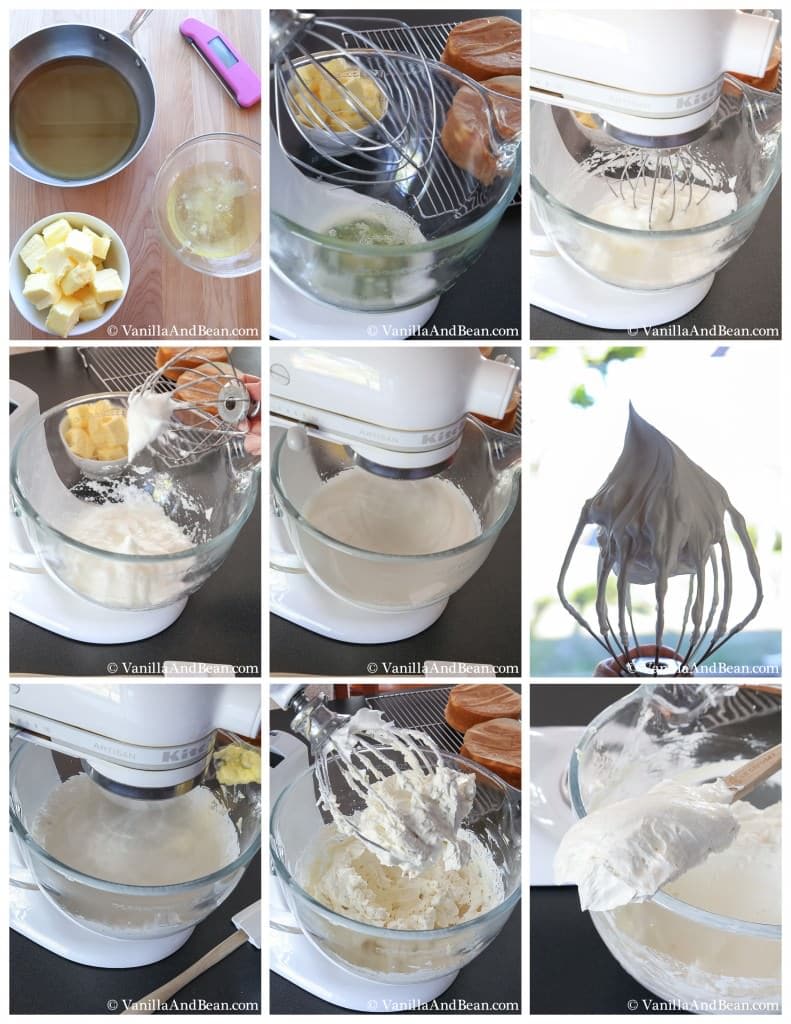
(Above) Italian meringue buttercream is mise en place. The sugar syrup is cooked to 238F while the the egg whites are slightly warmed in a bain maire (not shown) and whipped to soft peaks. The sugar syrup is added to the whipped egg whites (not shown, as I was pouring in the hot syrup) and whipped until cooled to room temperature (pictured on the upside down whisk – it’s beautiful!). This is the meringue.
Butter is added to the meringue to create a silky, light, beautiful buttercream. Later, some of the lemon curd will be added to the buttercream to make an over-the-top lemon curd Italian meringue buttercream (not pictured).

(Above) All the tools are out and ready to start building the cake, one layer at a time. Each layer is split in two to create four layers. Each layer gets brushed with lemon simple syrup, a piped buttercream barrier, filled with lemon curd and topped with pipped buttercream. While building the cake, be sure to keep a clean work area as stray crumbs need to be avoided. I use a pastry brush to brush off stray crumbs.
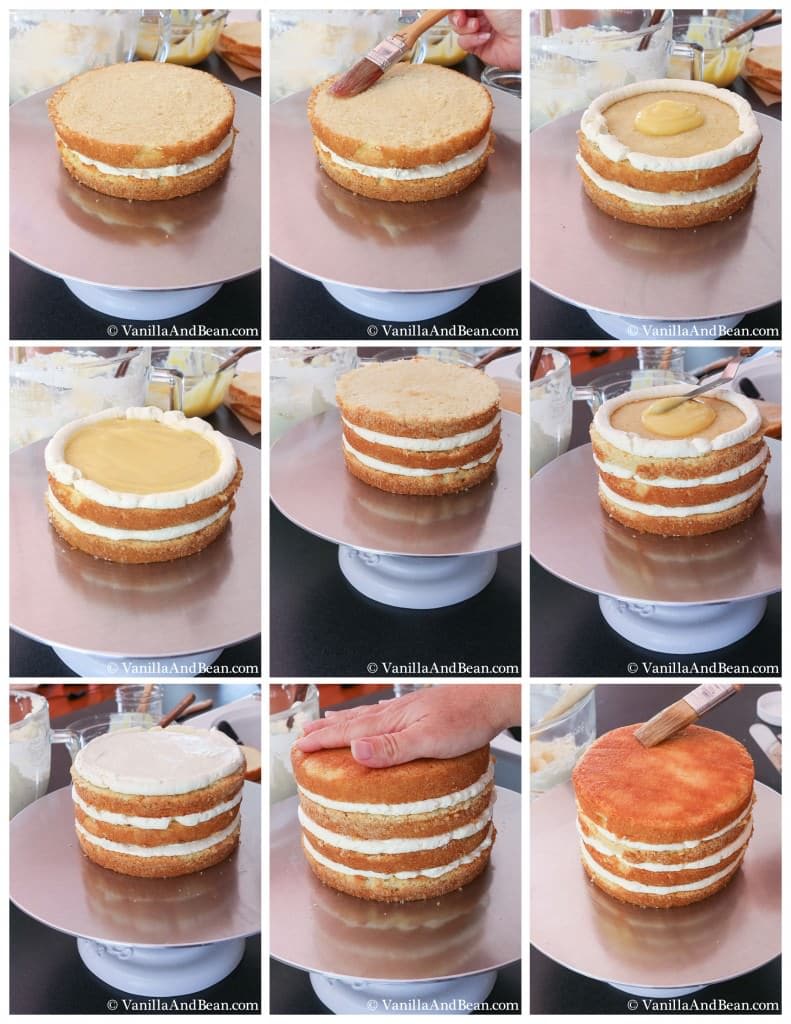
(Above) Each layer receives same treatment until the top layer is added. Once topped, give the layers a light yet firm push down. Brush the top with simple syrup and begin the crumb coat. A crumb coat ensures the final coat of icing doesn’t have any stray crumbs in it and helps create a smooth, beautiful finish.
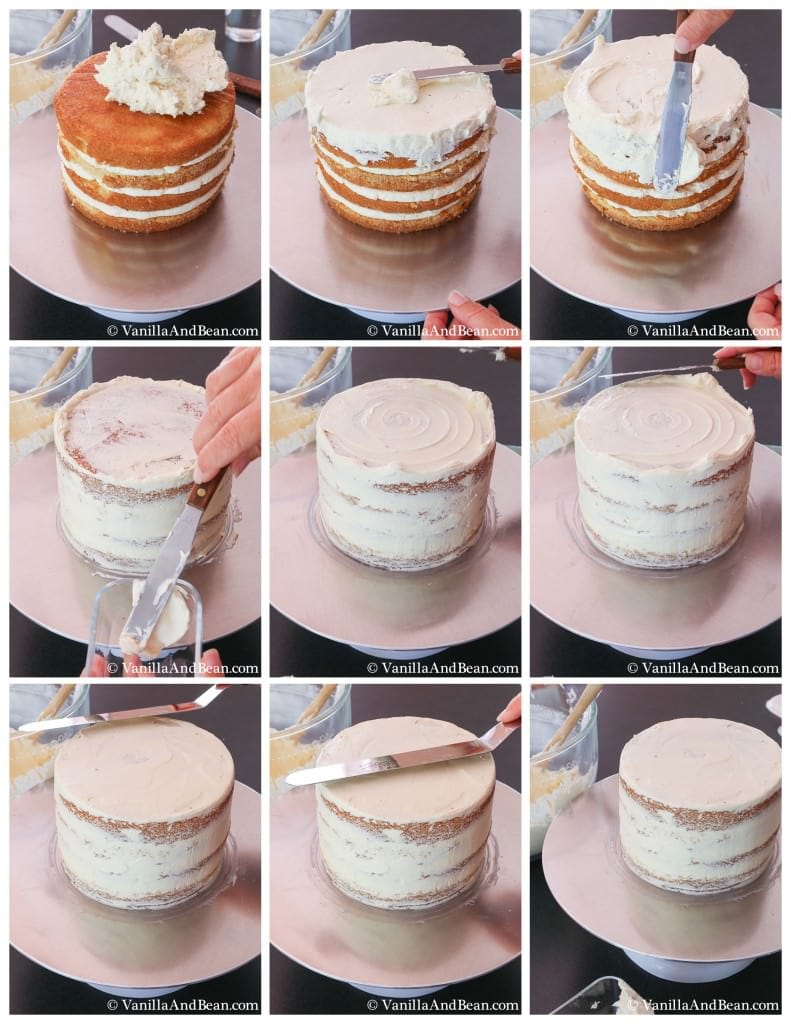
(Above) The crumb coat needs to be thin. This is the foundation for your beautiful final icing coat, so the top needs a smooth finish as well as clean edges. As you work the crumb coat, you’ll notice a bit of build up of crumbs accumulating on your pallet knife. Scrape the offset spatula off in a separate, small bowl so that those crumbs don’t end up in your final layer of icing. You want those stray crumbs contained somewhere (later you can eat it up or use it on cookies)! Pop your crumb coated cake in the refrigerator and let it set for at least 30 minutes before the final coat.
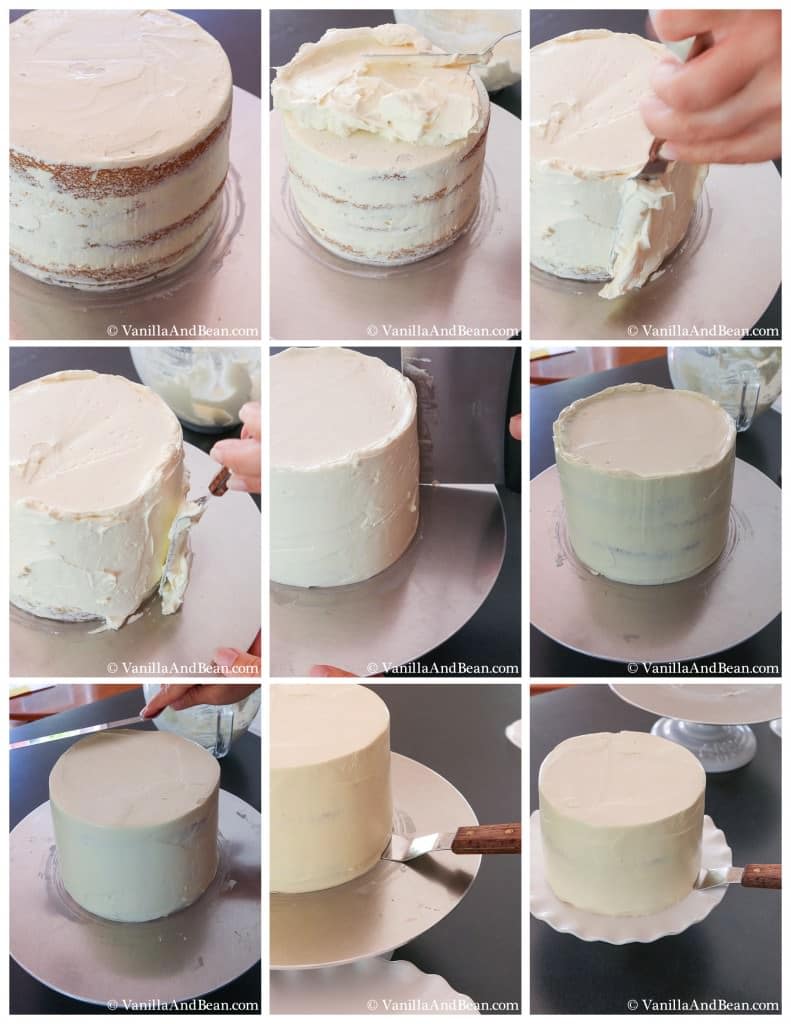
(Above) To ice the cake a large dollop of icing is piled on the top layer. The top is smoothed first, then the sides adding more buttercream as needed to patch bare spots.
Once the sides are smooth, it’s time to cut off the excess on the top edges using an offset spatula. This may take some practice, but if you need to, you can start again, smoothing the sides and then the top, if your not satisfied.
An offset spatula is used to clean the edges around the base of the cake. Refrigerate for at least 30 minutes before transferring the cake to a decorative cake stand.

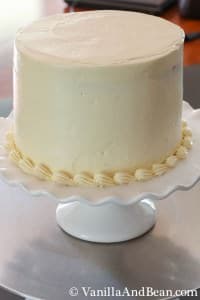
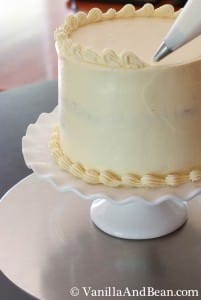
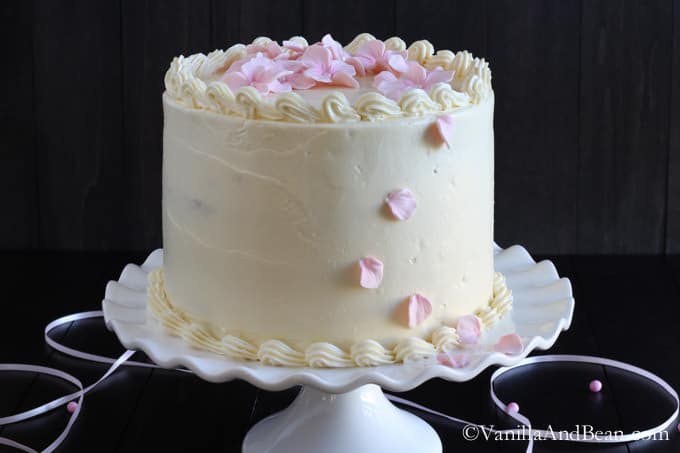
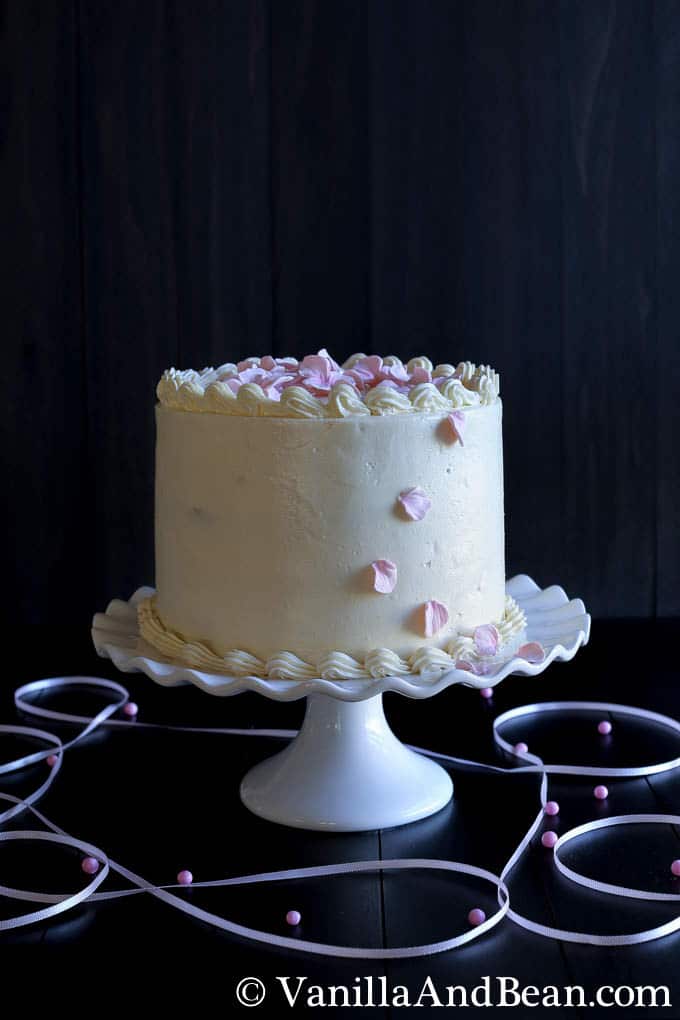
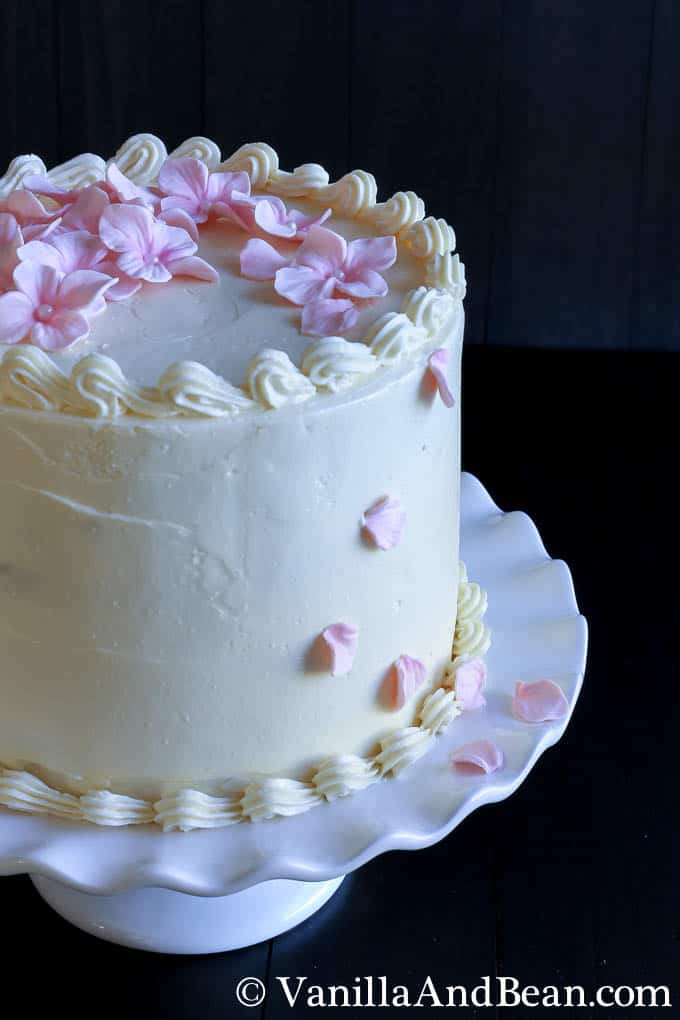
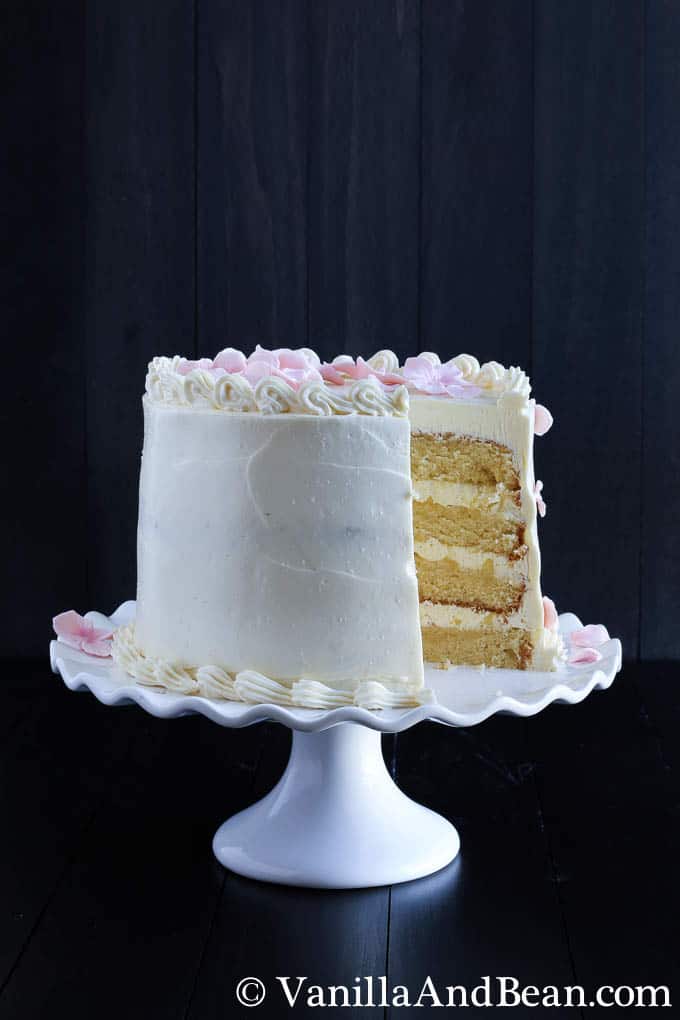
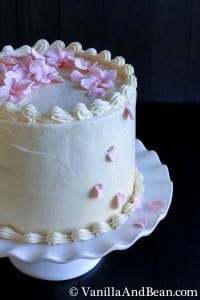
(Above) To create the shell boarders, use an open star tip and a paper or cloth pastry piping bag to create shells around the base and top edge of the cake. I find that practicing on a piece of parchment paper helps me get the technique down. If you find you just can’t stand one or two of the shells you piped, use an offset spatula to gently scoop it off and repipe.
It’s a labor of love, yes, but worthwhile!
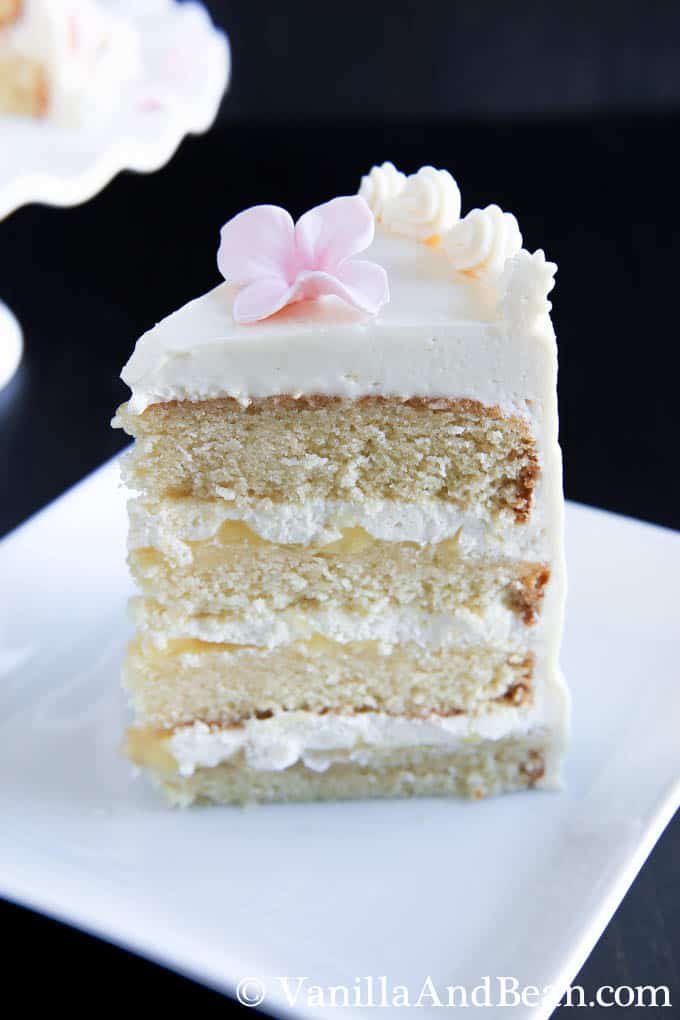
Rich, decadent, over-the-top lemony and creamy. Every. Last. Bite.
Cheryl over at 40 Aprons got all of us bloggers together for Melissa’s virtual baby shower to help celebrate! Below the hot milk cake recipe, if you haven’t already, check out what other bloggers made for the party! All the best to you, Melissa! Wishing you a smooth transition on your new adventure!
Tools for Constructing the Cake (affiliate links): Parchment Paper Pastry Bag, Paper or Cloth 6″ Round Cake Pans Rotating Cake Stand Pastry Brush Instant Read Thermometer or Candy Thermometer Offset Spatula, Large and Small Bench Scraper Round Tip, #806 Open Star Tip, #18 Like the second to smallest in this set. Serrated Knife Fine Micoplane for Zesting Decorative Cake Stand Sugar Flowers (not an affiliate: similar to mine, same artist, not sure if she is making them any more)
Hot Milk Cake with Lemon Curd and Italian Meringue Buttercream
Ingredients
Hot Milk Cake:
- Coconut Oil Cooking Spray
- 1 1/2 C All Purpose Flour 6 3/4 oz
- 2 tsp Baking Powder
- 1/4 tsp Sea Salt
- 1/2 C Unsalted Butter 4 oz
- 1/2 C Whole Milk 4 oz
- 1 1/3 C Granulated Sugar 10 1/2 oz
- 3 Large Eggs
- 1/2 tsp Vanilla Bean Paste or vanilla extract
Lemon Curd:
- 3 Tbs Lemons zested or 2 of zest
- 1/2 C Lemon Juice 4oz or about 3 lemons
- 1 C Granulated Sugar 8 1/4 oz
- 4 Large Eggs
- 1 Tbs Stick of Unsalted Butter room temperature sliced into 1 pieces (4 oz)
Italian Meringue Buttercream:
- 1 1/8 C Granulated Sugar 9 oz
- 1/3 C Water 3 oz
- 4 1/2 oz egg whites 4 1/2 or 1/2 C + 1 Tbs
- 3 Tbs Sticks Unsalted Butter room temperature sliced into 1 pieces (16 oz)
Lemon Simple Syrup
- 1/8 C Water 1 oz
- 1/8 C Lemon Juice about 3/4 of a lemon (1 oz)
- 1/8 C Sugar 1 1/2 oz
- 1 Tbs Lemon Cello optional
Instructions
For the Cake
- Preheat oven to 350F.
- Spray the bottoms and sides of two 6" round cake pans with coconut oil. Cut out two parchment rounds and line the bottom of each pan with parchment paper and spray again.
- Set up a bain marie by filling a 4 quart sauce pan 1/2 full with water. Bring water to steaming, not to a boil. A stainless steel bowl will need to fit in the bain marie, touching the water, without touching the sides.
- Set up a stand mixer with a whisk attachment.
- Sift flour, baking powder and salt into a bowl or on parchment paper. Set aside.
- In a 2 quart sauce pan, warm the milk and butter on low just until the butter is melted. Whisk. Pour into a spouted container and place in the refrigerator to cool for about 10 minutes.
- In the stainless steel bowl, over the bain marie, whisk the sugar, eggs and vanilla bean paste. Warm to 110F.
- Pour egg mixture into the stand mixer and whip on medium high speed for about 10 minutes or until the egg mixture has cooled to between 80F-85F. The color will change from a yellow to pale yellowish cream and the batter will be thicker.
- With the mixer on low, pour in the sifted flour mixture. Stop the mixer and scrape down the sides using a silicon spatula. Fold the batter making sure there is no visible flour.
- Check the temperature of the mixture and compare it to the butter/milk mixture. You want these two components to be within 5 degrees of each other.
- When the temperatures have aligned, give the butter/milk mixture a good whisk. With the mixer on low, pour in the butter/milk mixture. Once poured in, finish mixing by using the silicon spatula, just until all ingredients are incorporated.
- Split the batter evenly between the two prepared pans.
- Bake at 350F for 35-40 minutes, on the center rack in the oven checking the cake for doneness at around 30 minutes. A toothpick inserted in the middle should come out clean and the cake should just slightly spring back when pressed gently in the center.
- Cool in pans for 15 minutes, then remove the cakes from the pans by flipping the pan upside down and tapping the pan allowing the cake to gently fall on to a cooling rack. When completely cool double wrap snugly in plastic wrap, keeping the parchment paper on. If not using the cakes the same or next day, freeze.
For the Lemon Curd:
- Set up a bain marie, just like with the cake. Have ready a storage bowl, a fine mesh strainer and silicone spatula.
- In the stainless steel bowl, add the zest, lemon juice, sugar and 4 large eggs. Whisk. Cook in bain marie until the mixture reaches 172F. This will take about 20-25 minutes. Whisk and check the temperature of the curd occasionally. Make sure water in the bain marie does not boil. The mixture will begin to thicken. You'll know it is done when the curd reaches 172F. Also, dip a stainless steel spoon in the curd. On the back of the spoon, swipe the tip of your finger across the lemon curd making a line. When the curd is done, it will leave a clean swipe.
- Pour the curd into a storage bowl through the fine mesh strainer. Allow to cool slightly for about 3 minutes and begin to add the butter, one Tbs at a time, stirring, allowing the butter to incorporate completely before adding another Tbs.
- Cover the surface of the curd with plastic wrap so a skin does not form. Cover the bowl and place in the refrigerator. The curd will thicken as it cools. You want the curd cold when applied to the cake.
For the Buttercream:
- Set up a bain marie, just like with the cake. Have a stand mixer ready with whisk attachment.
- In a 2 qt sauce pan add the sugar and water. Cook on high heat until sugar syrup reaches 238F. Do not stir. This will take about 7-8 minutes.
- Meanwhile, place the egg whites in the bowl of the stand mixer and place over bain marie. Bring the egg whites to room temperature.
- Place the egg whites on the stand mixer and whip until soft peaks form. Turn mixer off and wait for sugar mixture to come up to temperature.
- When the sugar is ready, turn mixer on medium-high and pour the sugar syrup down the inside side of the mixing bowl. Do not allow the sugar syrup to hit the whisk as it will splatter everywhere. Continue to pour with mixer running. You are creating a meringue at this point.
- Turn the mixer to high and whip until the meringue is room temperature. This will take about 20 minutes.
- Once the buttercream is room temperature, turn the mixer to medium-high and start adding the butter, one Tbs at a time to the meringue. Add more butter once the previous amount has been incorporated. Continue whipping once all the butter has been added until the butter cream is light and fluffy.
- Store in a covered container at room temperature if using the following day. For longer storage, place it in the refrigerator or it can be frozen.
- *After the buttercream has been in the refrigerator or has been sitting for a period of time, it needs to be remixed to create a smooth silky texture. If the buttercream has been in the refrigerator, bring it to room temperature by setting it out on the counter, before remixing it. Place the buttercream on a stand mixer. With a paddle attachment, mix on low to work out the air bubbles. This should be done before icing the cake.
For the Simple Syrup:
- Place the water, sugar, lemon juice and lemon cello (optional) in a 2 qt sauce pan. Bring to a boil. When all the sugar has dissolved, remove from heat. Pour in a lidded jar to cool. Store in the refrigerator for up to one month.
To Assemble:
- Congratulations if you made it this far!! You're a rock star! Now relax and enjoy the process of putting together a delicious cake! Remove the cake from the freezer to thaw if it is frozen. If the buttercream has been in the refrigerator, allow it to set at room temperature for a few hours before remixing the buttercream and assembly.
- Meanwhile, to remix the buttercream, fit a stand mixer with a paddle attachment. Place all the buttercream into the stand mixer and mix on low to get most, if not all of the air bubbles out. While mixing to reduce the air bubbles, add 12 Tbs of lemon curd, one at a time, to the buttercream. Mix for about 5 minutes, on low, or longer to achieve the desired consistency.
- Using a serrated knife, slice each 1/2 of cake into two equal rounds. Place the cake on a revolving cake stand with one hand on top of the cake while the other hand begins to cut with a serrated knife. Put a bit of pressure on the cake to turn the cake stand while the serrated knife begins to cut. Let the knife do the work. Be aware of the knife tip and make sure it doesn't float upwards while cutting as it should be kept level the entire time. Cut the two cake rounds into 4 rounds. Set aside.
- Take the top of one of the rounds and place it upside down on the revolving cake stand. Remove the parchment. Brush the top with the lemon simple syrup, covering the entire top. I do this twice for each layer.
- Fill a pasty bag fitted with round tip #806 with buttercream. Pipe a boarder/barrier around the top edge of the layer. Spoon 3 Tbs of lemon curd in the center and spread to the barrier. Pipe an even layer of buttercream in a circular motion over the lemon curd. Use an offset spatula to smooth out.
- Repeat this procedure until the top layer of the cake is placed on, saving a bottom piece for the top layer.
- Place the top layer on. This should be an inverted bottom 1/2 of one of the cake rounds. After placing the top layer of cake, put your hand, flat, on the top of the cake. Press gently, yet firmly, down making sure the cake is symmetrical and the layers are aligned. Make adjustments now if needed.
- Brush two coats of lemon simple syrup over the top layer. You are now ready for the crumb coat which is a thin base layer of buttercream that is the foundation of the final coat of buttercream. Have a spare 'dump' bowl ready to clean the offset spatula off. The buttercream that is being cleaned off in the dump bowl will have crumbs in it. This is not something you want mixed in with the 'clean' buttercream. So keep it separated!
- Place about 1/2 C buttercream on top on the cake. Begin working the buttercream by spinning the cake stand and using an offset spatula to smooth and move the buttercream over the sides of the cake. Wipe the offset spatula in the dump bowl as needed. Spin the cake stand as you create a smooth, thin finish, covering all areas of the cake. If more buttercream is needed, use it.
- Using your largest offset spatula, flat side down, 'cut' the buttercream off the top edge, gently, while moving the spatula towards the center of the cake then lifting the spatula off the cake like an airplane taking off. Wipe the spatula clean. Spin the cake stand to the next section and repeat until all edges are clean and neat. Repeat if needed.
- Place the crumb coated cake in the refrigerator for at least 30 minutes.
- For the final coat, using about 1 C of buttercream, start smoothing out the top of the cake by rotating the cake stand and using a pallet knife to push the buttercream over the edge. Smooth out the top. Use a pallet knife to smooth the buttercream around all sides of the cake, stopping to patch areas that need more. While you're doing this, you'll notice that the top edges have buttercream taller than the top of the cake. This is fine. We'll 'cut' that buttercream off shortly. The focus now is to get the sides as smooth as possible. Use a bench scraper held perpendicular to the cake stand, and 45 degrees to the cake and rotate the cake stand, smoothing out the sides. When you're satisfied, move on to the top. If you find there are still some air bubbles in the icing, fill a tall glass with hot water, dip the offset spatula in the water, wipe dry and smooth over the cake. The warmth of the spatula helps smooth the bubbles.
- Using your largest offset spatula, flat side down, 'cut' the buttercream off the edge, gently, while moving the spatula towards the center of the cake then lifting the spatula off the cake like an airplane taking off. Wipe the spatula clean. Spin the cake stand to the next section and repeat until all edges are clean and neat. Repeat if needed.
- Use an offset spatula to clean the edges around the base of the cake by placing the spatula at a slight angle with just the tip of the spatula under the edge of the buttercream yet still touching the revolving cake stand. Spin the cake stand to clean the edge. This will be covered with piping. Refrigerate for at least 30 minutes before transferring to the serving stand.
- Transfer the cake to a cake stand by sliding a large offset spatula under the cake. Very gently, lift the cake and place the cake on the cake stand. Gently slide the offset spatula out from under the cake, pressing the offset spatula down so the tip is pressing against the cake stand rather than the cake. Gently slide the offset spatula out. Patch up any areas that may have suffered a bit of damage.
- Fit a piping bag with the open star tip #18 and fill it with buttercream. Practice piping shells on a piece of parchment first, then on the cake. Place your cake that is on the decorative cake stand on the rotating cake stand so that you can spin the cake as you pipe. For the base, hold the piping bag at a 45 degree angle to the cake, and hover the tip just over the cake. Apply steady, even pressure to the bag pushing away from your body slightly, then pulling the bag up and down towards you. Release the pressure as you pull down. Start the next shell the same way, at the base of the shell you just created.
- For the top of the cake, hold the bag perpendicular to the cake and pipe as indicated above. Finish the base and the top of the cake all the way around. If you find that you just can't stand one or two of the shells you piped, use an offset spatula to gently scoop it off and repipe. Place the cake in the refrigerator for about 30 minutes before placing sugar flowers or other decoration on top.
- Place in the refrigerator.
To Serve:
- If the cake has been in the refrigerator, remove at least 45 minutes before serving so the buttercream has time to soften.
- Fill a large glass with very hot water. Place a chefs knife in the water to warm before cutting. Remove the knife, wipe it dry and cut the cake. Dip, wipe and cut again. Doing this will ensure clean, flawless cuts every time.
- Store in the refrigerator with the exposed cake covered with plastic wrap, directly on the surface. Cover the remaining cake with plastic wrap or a cake dome. Store for up to 3 days.
Notes
Nutrition is provided as a courtesy and is an estimate. If this information is important to you, please have it verified independently.
Baked Apple Cider Donuts with Pomegranate Glaze (Vegan) from 40 Aprons
Strawberry White Chocolate Macarons from Culinary Couture
Grapefruit Mint Spritzer (Non-Alcoholic) from Tattooed Martha
Chocolate Raspberry Pop Tarts (Vegan) from Yup, It’s Vegan
Pumpkin Chocolate Chip Muffins (Vegan) from Jessica in the Kitchen
Strawberry Cupcakes Cream Cheese Frosting from Inspiration Kitchen
This sounds incredible! Do you think I could use King Arthur gluten free flour?
Hi Karen, thank youuuu! Since I’ve not tried it, I’m not sure. If you give it a go, please let us know how it goes 🙋🏻♀️
I have a question about the lemon curd. The recipe calls for 4 eggs. I’ve made lemon curd many times, but have always used the yolks only. Should I be using the whole egg for this recipe?? Thanks
Hi Dana! This recipe is for whole eggs. I hope this helps!
I lost a similar recipe several years ago and asked Google for a replacement. Google directed me here! Yay for Google! Quick question, if I don’t have access to 6″ cake pans, could I use two 9″ cake rounds with the amount listed here? It won’t be as beautiful, but maybe it will still be yummy!!
Hello Andi! So happy you found your cake! Yes, use two 9″ pans. Divide the batter evenly between pans and bake at 350F. Your bake time will be reduced, by how much exactly I’m not certain, but I would start checking for doneness at around 15-18 minutes (use the toothpick method). Please let us know how you do and how long you baked your cakes for! Yummy yes and still gorgeous! Enjoy!
I tried it this weekend. There was enough batter for 2 9″ cake pans. They were done at 14 minutes. Unfortunately, they did not rise, and were quite dense. I think, however, my baking powder is no good as 2 other things I’ve made in the last few weeks also failed to rise.
Giiiiirl, you make it look so easy! I love the tutorial because I would totally need it. Cake & icing is not my forte…baking wise. I’ll happily eat of course. :)
This cake is gorgeous beyond belief!
Hey Tina! Likewise! Thank you my dear. If you’re ever in the area, let me know. I’ll bake us a cake! :D
What an incredible beautiful cake! And your photos! Wow, so amazing!
Oh my goodness! Can I just hire you to bake me one? It is my birthday month!
Love your stuff; keep at it!
Aw, Lynne. Lets get together for your birthday! I’ll cover the cake! Let me know!
I would love to get together again! I will be in touch. You’re the best!
PS–you don’t really have to make me a cake…but what an amazing offer!
:D
That is stunning. I love to cook, but I don’t have the patience for works of art like that!!
Thanks, Michelle! Decorating cakes is a whole different beast! You definitely need a bit of motivation and patience for sure!
This is a seriously stunning cake! The name alone promises some serious deliciousness. The decorating is lovely :)
Thank you for your kind words, Medha! Yeah, that name… I know!
What a cool cake, my dear! This post is awesome. I love all the tutorial pictures! This cake looks so delicious and I wish I could reach into the screen and take a bite out!
Thank you, Olivia! Perhaps one day we’ll at least have smell-o-vision!
wonderful photography …. extreme attention to detail ….. and a presentation to die for.
……. imo, thoughtful instruction is a lost art ……. an art you seem keen to re-discover at vanilla & bean.
Hi Chuck! :) Thank you! We all have something to teach… thank you for your encouragement and kindness!
This is the ultimate layer cake!! It is so beautiful too! I love all the layers and the pretty pink flowers on top. All the step by step photos are so helpful, that is awesome that you included them because otherwise I might have been a little intimidated by all those layers! I love the lemon curd between the layers, this cake is just so awesome, Traci!
Hi Izzy! Thank you for your kind words! I swear lemon curd is going to be my downfall! It’s like chocolate.. it makes everything better!
Traci,
That is AMAZING!!!! How far in advance do I need to order? LOL!
Hi Laura! Thank you! My thinking is, you’ll tackle this mouthwatering cake! It really is worth the effort! I hope you’ll consider going for it for that next extra special occasion. Perhaps if you ever make it to Whidbey, we can make this happen! Thanks for stopping by!! :)
My goodness!! thats a gorgeous gorgeous cake.. Looks so beautiful! love the amazing layers. :)
Hi Aripta! Awh, thank you! The layers! Oh the layers! :D
Wow, you have amazing cake skills! I’m so impressed by the perfect appearance of this cake, but also by how detailed and helpful your step-by-step instructions and pictures are. Really awesome job – such a lovely, elegant baby shower contribution :)
Awh, thanks Shannon! It was fun joining you for this event! Thanks for stopping by!
I don’t think I have seen a layer cake look as delicious as this in a while! Thanks for posting step by step instructions too.. it makes it so much easier for me when I attempt to tackle the recipe!
Hi Thalia! Thanks so much! It was fun to make, and a layer cake recipe is always a good thing to have on hand for a special occasion! I hope the instructions are helpful. Sometimes a layer cake can be a bit intimidating.. I hope I’ve demystified it a bit here.
Trace ~ This cake is breathtakingly beautiful!! When you set it out to share for dessert, I could hardly believe it was real (and that we were about to eat it! :-). It looked like Faberge’.
And delicious…. oh my! The lemon bursting forth with ambrosial verve, the cake wonderfully moist, and your buttercream… (oof!)… full of flavor and decadence. An exquisite creation!
Awwh, thanks Jen! :D I loved sharing this cake with you because I know how much you appreciate good cake! We should have more!
Oh my! What a beautiful, stunning, crazy-amazing, presentation! I wish I were there to have a slice, or two, and enjoy this delightful looking cake.
It’s over the top! I can’t get over how beautiful it is and the time you must have put into making it. Just a masterpiece!
Oh Am, you’re so sweet. Thank you! :D We’ll have to do something over the top when we’re together again!
Such a beautiful cake! I wish this was a REAL shower because I would definitely be going in for a second slice of this!
Hi Sasha! Thank you! Yeah, I know what you mean. I went for a few too many! I’d have a few too many macarons too! :D
Oh my goodness, THIS is a cake. It’s like eleven layers tall and the description itself like almost satisfies my sweet tooth.. but makes it twenty times worse, too. Ah! Thank you SO MUCH for your amazing creation!
STOP it, Cheryl! Just stop! Hehe. Thank you! You know, it was you and Melissa behind my motivation for this cake, so THANK YOU!!! I think my sweet tooth was satisfied for the next 6 months with this cake… well, maybe 1 month. :D
WOW – this is so impressive, Traci. Not only the extensive tutorial but the beautiful photos as well – just awesome! Next time I have to make a fancy cake, I’m making this one since you’ve broken down all the steps there’s no way to go wrong. Just LOVE the first photo with the pink petals. Great job!!
Hi Geraldine! Awwwh, thank you. Your so sweet. Haha… fancy cake! :D
Its sooo perfect and beautiful…! I love the idea of a virtual baby shower! So cute!
Thanks so much Tash! Everyone did such a lovely job on their goodies! Fun!
This cake is a show stopper for sure!! It makes a stunning presentation! And the combo of flavors sounds amazing! I love the addition of lemon curd, I bet it makes the recipe!
Hi Annie! Thanks so much! Oh yes, the combo of flavors… Yes! The lemon curd takes this cake wayyy beyond ordinary!
We had white cake with lemon curd filling for my son’s birthday this week, and I may have had a piece for breakfast today. I was so struck by your gorgeous photo on Pinterest now and had to investigate. I’m thrilled to find your step-by-step photos and look forward to comparing the recipe with the one my son found! Pinned for sure.
Hi Andrea! Thank you! How lovely that you just experienced lemon curd! It’s such a pleasure, right? Thanks for your pin and stopping by! I hope you enjoy the recipe.
Beautiful cake Traci!! Definitely a labour of love!
Thank you, Jessica!
Traci! This is just SO IMPRESSIVE! You CAN bake and cook. You are one of my favourite bloggers because your kitchen skills are so intense!!! This takes a lot of patience, time, care, and love. I am going to pin this one for my next special occasion birthday. I love any dessert with lemon curd–it totally provides that tart edge to the sweet vanilla. I’m in love. SWOON.
And a happy baby shower to Melissa! Congrats :)
Hi Allison! Awwwh, thank you! Oh yeah, the lemon curd really shines in this recipe. I think I can easily say it’s one of my favorite things. Your right about layer cakes.. patience and time. But its like shucking peas or favas, I get in this zen zone. And then… the results. Awwwwhhhh, only for a moment, until it is demolished by the cake mongers!!