Emilie's Everyday Sourdough Recipe
**Advanced Prep Required - you'll need a sourdough starter** New to sourdough or simply improving your craft? Emilie's Everyday Sourdough from her book Artisan Sourdough Made Simple is a fabulous starting point for new sourdough bakers or simply to hone your sourdough skills. This recipe is vegan friendly. (Recipe reprinted with permission). Total time below does not include the amount of time for fermentation and proofing which takes between 8-14 hours, depending on ambient temperature. Got leftover sourdough bread? This loaf makes fabulous Sourdough Croutons. _____________________________Example Bakers Schedule:1. Thursday-Saturday: Feed your starter until bubbly and active. 2. Saturday Evening: Make the dough and let rise overnight. 3. Sunday Morning: Shape the dough, let rise again, score and bake. _____________________________In baking, I recommend weighing ingredients. Volume measurements are offered as a convenience.Lightly adapted from Emilie Raffa's Artisan Sourdough Bread Made Simple.
Servings 1 loaf
Calories 1862kcal
Ingredients
- 1/4 cup (50g) Sourdough Starter previously fed, active and bubbly
- 1 1/3 cup + 2 tablespoons (350g) Warm Water about 80f (26c)
- 4 cups (500g) Bread Flour
- 1 1/2 teaspoons Fine Sea Salt
Instructions
- Make the Dough: In the evening, whisk the starter and water together in a large bowl with a fork. Add the flour and salt. Combine until a still dough forms, then finish mixing by hand to fully incorporate the flour. The dough will feel dense and shaggy, and it will stick to your fingers as you go. Scrape off as much as you can. Cover with a damp towel and let rest for 30 minutes. Replenish your starter with fresh flour and water, and store according to preference. After the dough has rested, work the mass into a fairly smooth ball. To do this, grab a portion of the dough and fold it over, pressing your fingertips into the center. Repeat, working your way around the dough until it begins to tighten, about 15 seconds.
- Bulk Rise: Cover the bowl with a damp towel and let rise overnight at room temperature. This will take about 8-10 hours at 70F (21C). The dough is ready when it no longer looks dense and has doubled in size. (Traci's Note: Mine generally takes 12-13 hours to rise, but I have a chilly kitchen!).
- Shape: In the morning, coax the dough into a lightly floured work surface. To shape it into a round, start at the top and fold the dough over towards the center. Turn the dough slightly and fold over the next section of dough. Repeat until you have come full circle. Flip the dough over and let rest for 5 to 10 minutes. Meanwhile, line an 8-inch (20cm) bowl with a towel (or use a banneton) and dust with flour. With floured hands, gently cup the dough and pull it toward you in a circular motion to tighten its shape. Using a bench scraper, place the dough into the bowl, seam side up.
- Second Rise: Cover the bowl and let rest for 30 minutes to 1 hour. The dough is ready when it looks puffy and has risen slightly but has not yet doubled in size. Preheat the oven to 450F (230C). Cut a sheet of parchment paper to fit the size of your baking pot leaving enough excess around the sides to remove the bread. **UPDATE (5.20)** Place a sheet pan on an oven rack directly under the oven rack you'll be baking the bread on. This protects the baking vessel from the intense heat of the oven and helps prevent a too-dark or burnt bottom. (See notes for more information).
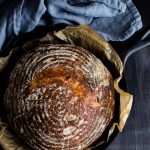
- Score: Place the parchment over the dough and invert the bowl to release. Sprinkle the dough with flour and gently run the surface with your hands. Using the tip of a small, serrated knife or a razor blade, score the dough with a cross-cut pattern about 1/3" (8mm) deep and about 2-3" (5-7cm) on the top or any way you like. Use the parchment to transfer the dough to the baking pot.
- Bake: Bake the dough on the center rack for 20 minutes, covered. Remove the lid and continue to bake for 30 minutes. Then, carefully remove the loaf from the pot and bake directly on the oven rack for the last 10 minutes to crisp the crust. (To check if the bread is ready, check the internal temperature of the loaf. It should read between 190F-205F when done.) When finished, transfer to a wire rack. Cool for 1 hour before slicing. Sourdough is best consumed on the same day it's baked. To maximize freshness, cool completely and store at room temperature in a plastic bag for up to one day (My sourdough is generally storing for between 3-4 days.)
Notes
**Too Dark Bottom Crust Update: I've received several notes regarding a too dark bottom crust. I’ve read about this before, and it seems it's not an uncommon problem. I find the bottom crust gets darker for me when I use my Staub DO vs my Lodge double cast iron set up, but it's still too dark. I imagine different materials can yield different results.
PROBLEM SOLVED: Taking a que from Kelly, who made this recipe and commented below, she “started putting a tin pan like you would make lasagna in under my dutch oven. Sit the dutch oven right on the tin pan. This allows more air flow under the dutch oven and it also takes the direct heat off the bottom of the dutch oven.”
So, after testing several other methods to prevent a too dark bottom, I found Kelly's method the most effective. I place a sheet pan on the rack just under the rack I'm baking on. No more too-dark bottom!
I used to put a layer of cornmeal down on or under the parchment paper before baking - although after using the sheet pan method, I no longer do this. When all else fails, I've use a serrated knife to skim off the bottom. The Perfect Loaf has an article about this problem (it’s not uncommon – scroll about 1/2 way down).
GOT DISCARD? Give my Sourdough Oat Pancakes and Easy Sourdough Biscuits Recipe a go!
Nutrition
Serving: 1loaf | Calories: 1862kcal | Carbohydrates: 375g | Protein: 62g | Fat: 8g | Saturated Fat: 1g | Sodium: 2354mg | Potassium: 500mg | Fiber: 12g | Sugar: 2g | Calcium: 86mg | Iron: 4.5mg