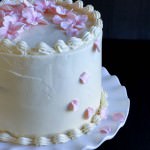
Hot Milk Cake with Lemon Curd and Italian Meringue Buttercream
Rich, lemony, decadent and creamy, this layer cake is a perfect way to celebrate any occasion.
Servings 9 slices
Calories 598kcal
Ingredients
Hot Milk Cake:
- Coconut Oil Cooking Spray
- 1 1/2 C All Purpose Flour 6 3/4 oz
- 2 tsp Baking Powder
- 1/4 tsp Sea Salt
- 1/2 C Unsalted Butter 4 oz
- 1/2 C Whole Milk 4 oz
- 1 1/3 C Granulated Sugar 10 1/2 oz
- 3 Large Eggs
- 1/2 tsp Vanilla Bean Paste or vanilla extract
Lemon Curd:
- 3 Tbs Lemons zested or 2 of zest
- 1/2 C Lemon Juice 4oz or about 3 lemons
- 1 C Granulated Sugar 8 1/4 oz
- 4 Large Eggs
- 1 Tbs Stick of Unsalted Butter room temperature sliced into 1 pieces (4 oz)
Italian Meringue Buttercream:
- 1 1/8 C Granulated Sugar 9 oz
- 1/3 C Water 3 oz
- 4 1/2 oz egg whites 4 1/2 or 1/2 C + 1 Tbs
- 3 Tbs Sticks Unsalted Butter room temperature sliced into 1 pieces (16 oz)
Lemon Simple Syrup
- 1/8 C Water 1 oz
- 1/8 C Lemon Juice about 3/4 of a lemon (1 oz)
- 1/8 C Sugar 1 1/2 oz
- 1 Tbs Lemon Cello optional
Instructions
For the Cake
- Preheat oven to 350F.
- Spray the bottoms and sides of two 6" round cake pans with coconut oil. Cut out two parchment rounds and line the bottom of each pan with parchment paper and spray again.
- Set up a bain marie by filling a 4 quart sauce pan 1/2 full with water. Bring water to steaming, not to a boil. A stainless steel bowl will need to fit in the bain marie, touching the water, without touching the sides.
- Set up a stand mixer with a whisk attachment.
- Sift flour, baking powder and salt into a bowl or on parchment paper. Set aside.
- In a 2 quart sauce pan, warm the milk and butter on low just until the butter is melted. Whisk. Pour into a spouted container and place in the refrigerator to cool for about 10 minutes.
- In the stainless steel bowl, over the bain marie, whisk the sugar, eggs and vanilla bean paste. Warm to 110F.
- Pour egg mixture into the stand mixer and whip on medium high speed for about 10 minutes or until the egg mixture has cooled to between 80F-85F. The color will change from a yellow to pale yellowish cream and the batter will be thicker.
- With the mixer on low, pour in the sifted flour mixture. Stop the mixer and scrape down the sides using a silicon spatula. Fold the batter making sure there is no visible flour.
- Check the temperature of the mixture and compare it to the butter/milk mixture. You want these two components to be within 5 degrees of each other.
- When the temperatures have aligned, give the butter/milk mixture a good whisk. With the mixer on low, pour in the butter/milk mixture. Once poured in, finish mixing by using the silicon spatula, just until all ingredients are incorporated.
- Split the batter evenly between the two prepared pans.
- Bake at 350F for 35-40 minutes, on the center rack in the oven checking the cake for doneness at around 30 minutes. A toothpick inserted in the middle should come out clean and the cake should just slightly spring back when pressed gently in the center.
- Cool in pans for 15 minutes, then remove the cakes from the pans by flipping the pan upside down and tapping the pan allowing the cake to gently fall on to a cooling rack. When completely cool double wrap snugly in plastic wrap, keeping the parchment paper on. If not using the cakes the same or next day, freeze.
For the Lemon Curd:
- Set up a bain marie, just like with the cake. Have ready a storage bowl, a fine mesh strainer and silicone spatula.
- In the stainless steel bowl, add the zest, lemon juice, sugar and 4 large eggs. Whisk. Cook in bain marie until the mixture reaches 172F. This will take about 20-25 minutes. Whisk and check the temperature of the curd occasionally. Make sure water in the bain marie does not boil. The mixture will begin to thicken. You'll know it is done when the curd reaches 172F. Also, dip a stainless steel spoon in the curd. On the back of the spoon, swipe the tip of your finger across the lemon curd making a line. When the curd is done, it will leave a clean swipe.
- Pour the curd into a storage bowl through the fine mesh strainer. Allow to cool slightly for about 3 minutes and begin to add the butter, one Tbs at a time, stirring, allowing the butter to incorporate completely before adding another Tbs.
- Cover the surface of the curd with plastic wrap so a skin does not form. Cover the bowl and place in the refrigerator. The curd will thicken as it cools. You want the curd cold when applied to the cake.
For the Buttercream:
- Set up a bain marie, just like with the cake. Have a stand mixer ready with whisk attachment.
- In a 2 qt sauce pan add the sugar and water. Cook on high heat until sugar syrup reaches 238F. Do not stir. This will take about 7-8 minutes.
- Meanwhile, place the egg whites in the bowl of the stand mixer and place over bain marie. Bring the egg whites to room temperature.
- Place the egg whites on the stand mixer and whip until soft peaks form. Turn mixer off and wait for sugar mixture to come up to temperature.
- When the sugar is ready, turn mixer on medium-high and pour the sugar syrup down the inside side of the mixing bowl. Do not allow the sugar syrup to hit the whisk as it will splatter everywhere. Continue to pour with mixer running. You are creating a meringue at this point.
- Turn the mixer to high and whip until the meringue is room temperature. This will take about 20 minutes.
- Once the buttercream is room temperature, turn the mixer to medium-high and start adding the butter, one Tbs at a time to the meringue. Add more butter once the previous amount has been incorporated. Continue whipping once all the butter has been added until the butter cream is light and fluffy.
- Store in a covered container at room temperature if using the following day. For longer storage, place it in the refrigerator or it can be frozen.
- *After the buttercream has been in the refrigerator or has been sitting for a period of time, it needs to be remixed to create a smooth silky texture. If the buttercream has been in the refrigerator, bring it to room temperature by setting it out on the counter, before remixing it. Place the buttercream on a stand mixer. With a paddle attachment, mix on low to work out the air bubbles. This should be done before icing the cake.
For the Simple Syrup:
- Place the water, sugar, lemon juice and lemon cello (optional) in a 2 qt sauce pan. Bring to a boil. When all the sugar has dissolved, remove from heat. Pour in a lidded jar to cool. Store in the refrigerator for up to one month.
To Assemble:
- Congratulations if you made it this far!! You're a rock star! Now relax and enjoy the process of putting together a delicious cake! Remove the cake from the freezer to thaw if it is frozen. If the buttercream has been in the refrigerator, allow it to set at room temperature for a few hours before remixing the buttercream and assembly.
- Meanwhile, to remix the buttercream, fit a stand mixer with a paddle attachment. Place all the buttercream into the stand mixer and mix on low to get most, if not all of the air bubbles out. While mixing to reduce the air bubbles, add 12 Tbs of lemon curd, one at a time, to the buttercream. Mix for about 5 minutes, on low, or longer to achieve the desired consistency.
- Using a serrated knife, slice each 1/2 of cake into two equal rounds. Place the cake on a revolving cake stand with one hand on top of the cake while the other hand begins to cut with a serrated knife. Put a bit of pressure on the cake to turn the cake stand while the serrated knife begins to cut. Let the knife do the work. Be aware of the knife tip and make sure it doesn't float upwards while cutting as it should be kept level the entire time. Cut the two cake rounds into 4 rounds. Set aside.
- Take the top of one of the rounds and place it upside down on the revolving cake stand. Remove the parchment. Brush the top with the lemon simple syrup, covering the entire top. I do this twice for each layer.
- Fill a pasty bag fitted with round tip #806 with buttercream. Pipe a boarder/barrier around the top edge of the layer. Spoon 3 Tbs of lemon curd in the center and spread to the barrier. Pipe an even layer of buttercream in a circular motion over the lemon curd. Use an offset spatula to smooth out.
- Repeat this procedure until the top layer of the cake is placed on, saving a bottom piece for the top layer.
- Place the top layer on. This should be an inverted bottom 1/2 of one of the cake rounds. After placing the top layer of cake, put your hand, flat, on the top of the cake. Press gently, yet firmly, down making sure the cake is symmetrical and the layers are aligned. Make adjustments now if needed.
- Brush two coats of lemon simple syrup over the top layer. You are now ready for the crumb coat which is a thin base layer of buttercream that is the foundation of the final coat of buttercream. Have a spare 'dump' bowl ready to clean the offset spatula off. The buttercream that is being cleaned off in the dump bowl will have crumbs in it. This is not something you want mixed in with the 'clean' buttercream. So keep it separated!
- Place about 1/2 C buttercream on top on the cake. Begin working the buttercream by spinning the cake stand and using an offset spatula to smooth and move the buttercream over the sides of the cake. Wipe the offset spatula in the dump bowl as needed. Spin the cake stand as you create a smooth, thin finish, covering all areas of the cake. If more buttercream is needed, use it.
- Using your largest offset spatula, flat side down, 'cut' the buttercream off the top edge, gently, while moving the spatula towards the center of the cake then lifting the spatula off the cake like an airplane taking off. Wipe the spatula clean. Spin the cake stand to the next section and repeat until all edges are clean and neat. Repeat if needed.
- Place the crumb coated cake in the refrigerator for at least 30 minutes.
- For the final coat, using about 1 C of buttercream, start smoothing out the top of the cake by rotating the cake stand and using a pallet knife to push the buttercream over the edge. Smooth out the top. Use a pallet knife to smooth the buttercream around all sides of the cake, stopping to patch areas that need more. While you're doing this, you'll notice that the top edges have buttercream taller than the top of the cake. This is fine. We'll 'cut' that buttercream off shortly. The focus now is to get the sides as smooth as possible. Use a bench scraper held perpendicular to the cake stand, and 45 degrees to the cake and rotate the cake stand, smoothing out the sides. When you're satisfied, move on to the top. If you find there are still some air bubbles in the icing, fill a tall glass with hot water, dip the offset spatula in the water, wipe dry and smooth over the cake. The warmth of the spatula helps smooth the bubbles.
- Using your largest offset spatula, flat side down, 'cut' the buttercream off the edge, gently, while moving the spatula towards the center of the cake then lifting the spatula off the cake like an airplane taking off. Wipe the spatula clean. Spin the cake stand to the next section and repeat until all edges are clean and neat. Repeat if needed.
- Use an offset spatula to clean the edges around the base of the cake by placing the spatula at a slight angle with just the tip of the spatula under the edge of the buttercream yet still touching the revolving cake stand. Spin the cake stand to clean the edge. This will be covered with piping. Refrigerate for at least 30 minutes before transferring to the serving stand.
- Transfer the cake to a cake stand by sliding a large offset spatula under the cake. Very gently, lift the cake and place the cake on the cake stand. Gently slide the offset spatula out from under the cake, pressing the offset spatula down so the tip is pressing against the cake stand rather than the cake. Gently slide the offset spatula out. Patch up any areas that may have suffered a bit of damage.
- Fit a piping bag with the open star tip #18 and fill it with buttercream. Practice piping shells on a piece of parchment first, then on the cake. Place your cake that is on the decorative cake stand on the rotating cake stand so that you can spin the cake as you pipe. For the base, hold the piping bag at a 45 degree angle to the cake, and hover the tip just over the cake. Apply steady, even pressure to the bag pushing away from your body slightly, then pulling the bag up and down towards you. Release the pressure as you pull down. Start the next shell the same way, at the base of the shell you just created.
- For the top of the cake, hold the bag perpendicular to the cake and pipe as indicated above. Finish the base and the top of the cake all the way around. If you find that you just can't stand one or two of the shells you piped, use an offset spatula to gently scoop it off and repipe. Place the cake in the refrigerator for about 30 minutes before placing sugar flowers or other decoration on top.
- Place in the refrigerator.
To Serve:
- If the cake has been in the refrigerator, remove at least 45 minutes before serving so the buttercream has time to soften.
- Fill a large glass with very hot water. Place a chefs knife in the water to warm before cutting. Remove the knife, wipe it dry and cut the cake. Dip, wipe and cut again. Doing this will ensure clean, flawless cuts every time.
- Store in the refrigerator with the exposed cake covered with plastic wrap, directly on the surface. Cover the remaining cake with plastic wrap or a cake dome. Store for up to 3 days.
Notes
Hot Milk Cake recipe and cake design adapted from Miette. Buttercream, lemon curd recipe and build adapted and inspired by my favorite pastry chef, Kimberly Smith.
Nutrition
Calories: 598kcal | Carbohydrates: 99g | Protein: 9g | Fat: 19g | Saturated Fat: 11g | Cholesterol: 169mg | Sodium: 148mg | Potassium: 244mg | Fiber: 1g | Sugar: 82g | Vitamin A: 680IU | Vitamin C: 9mg | Calcium: 91mg | Iron: 2mg