Apple Pie - Gluten Free + Vegan Recipe
Apple packed, slightly sweet with a hint of bourbon, this Apple Pie is gluten free + vegan, but you'd never know it. A tender-flaky coconut oil pastry with an easy cut out top crust makes this Apple Pie simple to assemble and fun to share. *Read recipe notes in the blog post above and in recipe notes for additional tips, and options regarding bourbon. *Please note, prep time does not reflect individual experience/comfort level when working with the ingredients and/or pastry. *UPDATE* Due to timing notes/comments received on this recipe, I've increased the prep time to reflect what others have experienced. (THANK YOU for your notes!)
Servings 6 - 8 slices
Calories 375kcal
Ingredients
For the Pastry:
- 1/2 C + 1 1/2 Tbs (135g) Nut Milk I use Homemade Cashew Milk
- 1 Tbs Apple Cider Vinegar
- 2 C (310g) Bob’s Red Mill Gluten Free 1-to-1 Baking Flour
- 1/2 C (70g) Tapioca Flour I use Bob's Red Mill
- 2 Tbs Cane Sugar
- 1 tsp Fine Sea Salt
- 1 C (195g) Coconut Oil unrefined, solid
For the Apple Filling:
- 5 lbs (2.3kg) Whole Apples about 11 medium apples, a mix of three sweet-tart and firm varieties. I use Granny Smith, Gravenstein and apples from my neighbor’s tree, an heirloom variety of Golden Delicious* (see note)
- 1/2 C (105g) Brown Sugar packed
- 1/4 C (60g) Cane Sugar
- 1/4 C (65g) Bourbon, Apple Juice or Apple Cider optional* See Note
- 1 tsp Cinnamon ground
- 1/4 tsp Nutmeg ground
- 1/4 tsp Fine Sea Salt
- 2 tsp Vanilla Bean Paste or 2 tsp Vanilla Extract
- 1 1/2 Tbs Lemon Juice
- 1 Tbs Corn Starch
For Finishing:
- Nut Milk to brush the top of the pastry
- 3 Tbs Cane Sugar
- 1/2 tsp Cinnamon ground
Instructions
For the Pastry:
- Whisk the nut milk and apple cider vinegar together in a spouted measuring cup. Set aside to rest for 5 minutes.
- Meanwhile in the bowl of a food processor fitted with the S blade, add the gluten free flour, tapioca flour, sugar, and salt. Pulse 5-6 times to combine. Add the solid coconut oil and pulse until chunky, about 7-8 pulses. With the processor running, add the nut milk mixture, holding out about one to two tablespoons and process about 10-15 seconds or until the mixture starts to come together (it will look crumbly). To see if the dough is ready, grab a fist-full and squeeze. It should hold together. If not, add the remaining nut milk, process again and retest until it clumps in your fist.
- Dump the dough out onto a large piece of parchment paper. Use the parchment paper to work the dough into a pliable piece, press and fold the bits together - folding and pressing the dough over and on top of itself until the dough comes together in one piece. Shape into a smooth thick disk, then divide in half. Shape the two new halves, patting and rounding into a 1-2" thick (2.5-5cm) disk. You want the pastry to be smooth with no cracks if possible. Wrap the pastry in parchment paper or turn a bowl over the top of the of the disks (they can be stacked). The dough should be tacky, not sticky. If the dough is sticky, pop it in the refrigerator for about 15 minutes, then bring it out to room temperature again. Rest the pastry at room temperature while you prepare the apples.
For the Apples:
- Peel, core and slice the apples 1/4" thick (a little over is okay). You'll have about 16 C (1.5kg) of apples after slicing. Use your hands to gently toss the apples with the sugars, bourbon if using, cinnamon, nutmeg, salt, vanilla paste or vanilla extract, and lemon juice. Place the apples and juices into a large heavy bottom Dutch oven or large stock pot and cook on medium, gently stirring frequently, allowing the juices to simmer for 10-15 minutes. The apples should be just fork tender. I prefer a tender crisp apple so I cook for about 11 minutes. For a softer set, cook for 13-15 minutes. Remove from heat and gently stir in the corn starch.
- Pour the apples and all their juices onto a parchment lined sheet pan and spread the apples into an even layer. Place in the freezer for about 12-15 minutes to cool to room temperature. Set aside.
Roll out the Pastry:
- While the apples are cooling, melt a bit of coconut oil and brush onto the bottom, sides and edges (very important (!!) get those edges) of a 9" (22cm) pie plate (I prefer glass* - see note). Roll out the pastry between two sheets of parchment to about 1/8" (3mm) thick - no thinner and about a 12" (30cm) circle. Sometimes I add a sprinkle of water (1/4 tsp) over the pastry if there's too much cracking. Gently remove the top parchment piece and using the rolling pin, roll up the pastry with the bottom layer of parchment in tact. Flip the pin over so that the pastry is now facing the pie plate, center the pastry and gently unroll. Carefully remove the parchment that is now on top of the pastry. There will be some breaking. Gently form the dough into the pie plate. Trim the edge of the pastry to about 1" beyond the edge of the plate. Tuck the pastry edges under as best you can, patching any thin areas with dough that has broken off (think play dough). We want the dough to be of about the same thickness all the way around. A dab of water here and there will help smooth any rips, tears or rough edges. Also, if there are any tears in the pastry inside the dish, patch those up with a dab of water and a small piece of pastry where needed. Crimp the edges into a pretty shape. Here's a tutorial, it's not gluten free, but it works as long as your dough on the edges of the pie plate are built up (remember play dough). Start at 33:00 for the rope crimp. Run a knife around the outermost edge of the pastry to trim off any excess being careful not to cut into the crimping. Set aside at room temperature while you roll out the top crust.
- Roll out the top crust between two pieces of parchment to about 1/8" (3mm) thick. Gently remove the top parchment, sprinkle a bit of flour over the top and cut out shapes using a cookie cutter or knife. Brush off any flour that remains on top of the cut outs. Set aside at room temperature.
Assemble the Pie:
- Strain the apples, shaking the apples to drain off juices. Discard the juice. Pour the apples into the pastry lined pie plate. Nudge the apples into the pastry, arranging them so that there are few gaps between apples. Arrange the curved sides of the apples along the edges as best you can to maximize space. Use your hands to gently press the apples down, wiggling and nudging, while creating a smooth dome.
- Gently lift the pastry cut outs with an offset spatula, and arrange one at a time on top of the apples. There should be some overlapping, so use a dab of water to 'glue' the pieces of pastry together. We don't want any sliding off the pie. Arrange the cutouts in a decorative pattern leaving gaps between as steam vents.
- Place the pie in the freezer for about 15 minutes. Meanwhile, set an oven rack in the center of the oven and preheat to 425F (218C). Set a parchment lined sheet pan on the center rack while the oven preheats. Just before the oven is ready, pull the pie from the freezer and brush the pie with nut milk making sure to cover the edges and all the cut outs. Mix the cinnamon and sugar and generously sprinkle over the pie.
Bake the Pie:
- Bake the pie on a preheated parchment lined sheet pan in a 425F oven for 45-55 minutes rotating the pan 1/2 way through baking. If the pie begins to get too dark on the edges or top, cover the edges with foil or a pie protector. For the top, tent a piece of foil with a hole cut in the top for a steam vent. The pie is done when it's fragrant, the pastry is golden brown (some dark edges are okay) and you can see a bit of the juices bubbling in the center.
- Cool the pie completely, at least two hours, before cutting or covering it. A practice in patience. Just before cutting the pie, ease the edges of the pastry from the pie plate by running a pairing knife all around the edge. Then, set the pie in a shallow pool of hot tap water for one minute. This allows the fats to soften, making it easier to cut and release from the bottom.
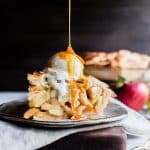
- Rewarm individual slices in a 350F (180C) for about 15 minutes. Serve with ice cream and your favorite caramel sauce. Store apple pie covered, at room temperature for up to two days. It's best rewarmed as it refreshes the pastry and makes it crisp again. Otherwise the pastry will soften as it sets.
Notes
*Bourbon/Whiskey or Leave Out? Opt to use what best fits your diet/needs whether a traditional bourbon/whiskey or a sorghum based whiskey, you can leave it out or sub in apple cider (nonalcoholic) or apple juice. Conflicting information remains regarding distilled spirits being okay to consume for some gluten free individuals, but may not be okay for all.
What Type of Pie Plate to Use: I use glass, mostly, and for this recipe I prefer it so I can keep an eye on the crust. However, a note of caution about putting a pie in a glass pan just pulled from the freezer on a preheated pan for baking. After making this recipe and others using this technique, I had a fleeting thought about thermal shock and the possibility of a glass pie pan cracking. I've not had this happen in a Pyrex glass pan, but it's something to be aware of. Use a metal pie plate if this is of concern.
What Apples to Choose: Choose a mix of firm, tart and sweet apples such as Cortland, Granny Smith, Honey Crisp, Gravenstein, Cameo, Jonagolds or Pink Lady. These varieties tend to hold their structure well in Apple Pie.
Using a mix of at least three different types of apples yields flavor interest, texture variety and a lovely fragrance. For this pie, I use Granny Smith, Gravenstein and apples from my neighbor's tree, an heirloom variety of Golden Delicious.
A Note on Freezing: I've frozen individual slices of this pie after baking and completely cooling. Store in a lidded container for up to two weeks. Thaw at room temperature and reheat in a 350F oven for about 10-15 minutes.
About Oven Temperature Variations: I enthusiastically recommend an oven thermometer! I’ve baked in commercial bakery and home ovens, old, lightly used and brand new ovens – they all have their own personalities with temperature variations and fluctuations. Knowing the temperature of your oven is important for the best outcome, especially when it comes to baking.
Nutrition
Calories: 375kcal | Carbohydrates: 91g | Protein: 1g | Fat: 1g | Saturated Fat: 1g | Sodium: 23mg | Potassium: 429mg | Fiber: 9g | Sugar: 76g | Vitamin A: 205IU | Vitamin C: 18.8mg | Calcium: 44mg | Iron: 0.6mg