It was through other bloggers that I learned How to Start a Food Blog and found resources I use today to run Vanilla And Bean. If you’re interested in starting your own blog or are already blogging, I’ve shared the resources I used (and still use) to get my blog going.
Many of the links below are affiliate links which means Vanilla And Bean receives a commission should you purchase through clicking on a link (the price is the same regardless if you buy direct or though my affiliate links). Please leave a comment below if you have any questions about my experience with these resources.
Getting Started:
First things first! You’ll need a domain name (URL) for your blog. Your domain name should follow the name of your blog, so people can find you easily. Head to godaddy.com and search for the domain name you want and grab it!

WordPress.org is a free web platform software to run your blog on. It’s basically the car without the interior (we’ll get to the interior). They offer many free and for purchase themes (the interior). A free theme is a great place to start if you’re not quite ready to purchase a theme. Check out the reviews on the themes before you choose. There are other options for themes below (like Foodie). You’ll find a great deal of online support forums here if you need help along the way.

You’ll have to have a host to store all the content you’ll add to your blog. WPOPT is my host of choice. Charles and his team are super responsive and can fix anything I’ve thrown at them! Their customer service is fast and outstanding and gives me peace of mind should something go wrong. WPOPT has teared options to fit the need and size of your blog as well as options for additional support beyond web hosting.

Studio Press Themes is where I purchased my initial theme. They have so many for purchase themes to choose from, offer excellent support and expert advise through a blog with all kinds of tips and how to’s on running a seamless blog for us who are a little less techy.
 MailChimp is my choice for managing Vanilla And Bean’s email list and sending out my weekly updates to subscribers. MailChimp’s interface is somewhat clunky and takes some getting used to, but I like their price point. MailChimp offers its services free with tiered pricing as your readership grows. They have practical analytics and good customer support.
Photography Equipment:
The equipment I use has been acquired over time. Some was bought new, others through careful shopping on Craigslist. Renting equipment is a great way to get to know what kinds of camera and/or lenses will fit your budget and photography needs. Local camera shops are excellent resources for equipment expertise. If you are in the greater Seattle area, Kenmore Camera is my go to store for equipment and support.
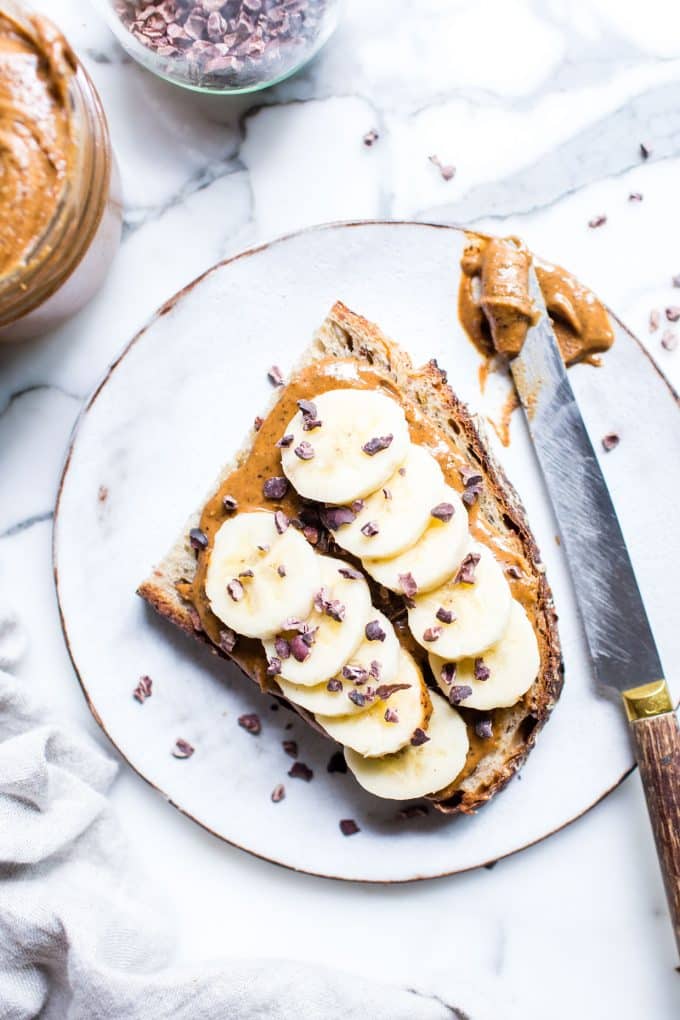
I shoot in 100% natural light and all my images are captured in RAW. Shooting in RAW helps me bring out the best in each photo when editing. I used to shoot in natural light when my workspace accommodated this; however, most recently, I started to use artificial light. I use two continuous light soft boxes for stills using my DSLR while also simultaneously shooting Instagram reels with iPhone.
Camera: I first started taking food photos with a Cyber Shot point and shoot, and my iPhone. I realized I needed a something a bit more powerful so I eventually purchased a DSLR, Canon 6D. This camera continues to surprise me every time I pick it up by all that it can do. It produces incredibly sharp images and handles low light and moving subjects with ease (think food action shots!). This camera does not disappoint!
Lenses: My go to lens is a Canon 50mm f/1.2 L. It is an excellent lens for low light situations and continues to impress me, especially when shooting at low f stops. This lens can capture light that you’d swear is not even there. It produces sharp, bright images with beautiful bokeh. It makes a fabulous portrait lens as well if food is not your only subject.
I also shoot with a Canon 35mm f/1.4 L for most of my overhead shots. I chose the 35mm because I wanted another fast prime lens since I shoot indoors mostly and in natural light, that would capture a wider area, and one that I could also use for landscape photography.
Closeup Filters: I use this Macro Filter Set occasionally to get up close with my food photography. They’re easy to use by simply attaching the filter to the lens and shooting my subject much closer than I’m able to with the lens’ I currently own.
Tripod: I rarely shoot free-hand mainly due to the low light situations I encounter of the year. For overhead shots, I use a C stand like this one on Amazon.com, with a boom arm and runway stand base. Overkill maybe, but this allows me to work without having to worry about moving the camera around by hand and to get up high for overhead shots without stumbling over a chair or ladder. I can simply set it and forget it. I use an older Giottos tripod that was purchased years ago for shots other than overhead. It’s still sturdy and continues to function well despite the demands I place on it.
Essential Blog PlugIns:
WP Recipe Maker Premium is the recipe plugin I use for all my recipes. Their customer service is responsive, interface simple to use and optimized for SEO. It’s rich snippet ready and includes easy affiliate links so you can link your visitors directly to ingredients or products used in the recipe.
Askimet checks each incoming comment to make sure it’s not spam. This will save you a great deal of time once comments start coming in. Less time sorting through comments, more time creating content and building community!
WordPress SEO Plugin by Yoast is an essential plugin if SEO is not something you’re familiar with. It’s an easy way to see if your copy is optimized for search engines and is essential in keyword support. This plugin is a must!
Inviting Readers to Your Site:
TailWindApp: Pinterest is by far my top driver of traffic. However, pinning takes loads of time. After testing several apps for automatic pinning, I finally chose TailWindApp . They make is so easy to schedule pins far in advance so I can focus on other things, like, writing content, photography and making drool-worthy recipes for my readers! I highly recommend them!
Pinterest is my go-to for photo/recipe sharing.
Next Steps:
After choosing a domain, setting up hosting, choosing a theme and getting my email list management system in order, I turned to learning more about the tech side of blogging, and food photography.
I have read Plate to Pixel cover to cover and continue to use it as a reference. Helene’s book covers everything a beginning food photographer should consider to get that perfect shot. From lighting and styling to aperture and ISO. This book is thorough and written so that anyone can quickly improve their food photography when applying her advice.
Processing and Editing Software:
 PicMonkey is a free application I use mostly to build pins for use on Pinterest and to add text graphics to images. The interface is super simple to navigate and has excellent customer service if you get stuck! The application is free with upgrades available.
After editing in free apps for a while, like Picasa, I wanted to produce much higher quality images. I purchased Lightroom 5 before it became available only on Creative Cloud and started working with it to develop my photographs. While it took me quite some time to become comfortable working with the program, and there is still much I don’t know, it helps me pull out the best qualities in my photographs. Shooting in RAW helps as well. I also use Photoshop on Creative Cloud to create GIFs and some text elements.
i am actually looking for any information as to how to resize or crop various images on the blog so they all look the same…. my images on the blog are all over the place……………… I cant a step by step videos or instructions as to how someone is creating a post with recipe and images…. no idea how to resize them and what size they should be… would you have any resources on that? I would really appreciate it
Hi Hanna… there are several ways to approach this and it depends on what you’re using for editing and if you’re using wordpress or not. When exporting photos from your editor (I use Lightroom), under “image sizing”, check “resize to fit” w = 1200 x h = blank. Also, resolution should be at 68 pixels. I export to a folder on my desktop, then, import images into wordpress. These are the full size hero shot sizes you see on my blog. For side by side images or images that come in a block of four, you can create and export these from the “print” module in Lightroom. You’ll have to import the image back into Lightroom (because it’s so huge from the print module), then export it to properly size it for the blog just like I shared “when exporting the photos” above. I don’t have a resource specifically. I watched a lot of Lightroom videos and played with importing/exporting and sizes a lot before I got my workflow down. I hope this helps! Good luck to you.
Thank you for sharing you experience to help people like me that are starting in the blogging world. I was wondering what plug in do you use for your recipes? Thank you in advance.
Hi there Diana! So happy to help! I use WP Recipe Maker Premium (This is my affiliate link) I’ve used three recipe plugins and by far this is my favorite – easy to use, great support and allows you to link out to ingredients. I hope this helps!!
Thank you so much for taking the time to share this information. I have been wanting to start a blog but don’t know enough about it, so this is a start for me.
So happy to help, Diane! I hope you start that blog soon! :D
Hola, hoy me he inscrito en tu pagina desde una pequeña ciudad en España, Zaragoza, un ciudad bilimenaria, una tierra de buenos aceites y vinos y de larga tradicion en comida arabe.
Practico y soy activista vegetariana y vegana en mi entorno y con mis circulos sociales, y ayudo a las personas a ese cambio.
Gracias por tu generosidad al compartir.
Hola, Teresa! Gracias por compartir y todo lo que está haciendo para apoyar a su comunidad y estilo de vida vegetariano ! Estoy tan feliz de que estés aquí!
Thank you for this! I have been thinking about maybe starting my own food blog, so these tips are very helpful!
You’re most welcome Alyssa! It’s a lot to take in, but remember, one step at a time! :D