How To Make an All Butter Buttermilk Pie Dough
All butter pie dough hydrated with buttermilk makes the most tender of pastries. Grab your pastry cutter and rolling-pin and let's get started! | This recipe makes one or two 9 1/2" Pie Crusts.For this recipe, I make mock buttermilk (milk + vinegar). If using real buttermilk, see recipe notes. I've included instructions for par baking (partially baking) the crust. However, if the recipe you're using for pie includes par baking instructions, use them instead.
Servings 8 Servings
Calories 179kcal
Ingredients
- Pan Spray
For One Disk (11-12 oz / 311g -340g):
- 1/2 cup (113 grams) Unsalted Butter refrigerated
- 3 tablespoons Milk
- 1 1/2 teaspoons Apple Cider Vinegar see note on buttermilk
- 1 1/4 cups (190 grams) All Purpose Flour
- 1 tablespoons Organic Cane Sugar
- 1/2 teaspoon Sea Salt
For Two Discs (22-24 oz / 311g-340g each)
- 1 cup (226 grams) Unsalted Butter refrigerated*
- 6 tablespoons Milk
- 3 teaspoons Apple Cider Vinegar
- 2 1/2 cup (380 grams) All Purpose Flour
- 2 tablespoons Organic Cane Sugar
- 1 teaspoon Sea Salt
Instructions
To Make The Dough:
- For a mealy, bottom crust, cut the butter into 1/4 inch (6mm) square pieces. For a flaky top crust, cut the butter into 1/2 inch (12mm) pieces. Place the butter in the freezer for at least five minutes. *note: if making a double crust, I use the flaky top crust method cutting the butter into 1/2" pieces.
- Whisk the milk and apple cider vinegar together until it bubbles. It will thicken as it sets for five minutes. This is your buttermilk.
- In a large bowl, whisk the flour, sugar and salt. Using a pastry cutter, cut in the butter, coating the butter with the flour. Alternatively, use your thumb and pointer finger to squish the butter pieces into flat disks, about the size of a quarter (working quickly). For a bottom crust, mealy consistency, cut/squish in the butter until it is about pea sized. For a top crust, the butter should remain in larger chunks, such as hazelnut size (or squished, quarter size).
- Because flour and butter contain varying amounts of water, we don't want to add the milk mixture in all at once. An over-hydrated dough creates a tough pastry. Pour in all but about 1 tablespoon for a single crust, 2 tablespoons for a double crust of the milk mixture. Use your hand to incorporate the buttermilk, folding and pressing the mixture. Flattening out the butter is fine. To test hydration, grab a hand full of dough and squeeze it. If it holds together, don't add any additional milk. If it's still crumbly or falls apart, drizzle in the remaining milk and continue folding and pressing to a shaggy consistency. If the butter is starting to get a bit warm at this point, put the mixture in the freezer for about 5 minutes.
- On a lightly floured work surface, dump out the shaggy dough. Using a bench scraper, fold and press the dough at least 6-8 times, eventually shaping the mixture into a rough rectangle about 1/2" (12mm) thick. Use the heal of your hand to press the dough away from you, smearing the dough between your hand and work surface. Do this in three increments working from one end of the rectangle to the other. Use a bench scraper to gather the dough once again and shape into a rectangle. Fold and press the dough over and on top of its self 7-8 more times. This helps to hydrate the dough and build flaky layers.
- Use a bench scraper to gather the all the bits and shape in to about a 5 inch disc. Update: You can use a flour sac to do this, putting the dough in the center, then gathering the ends of the towel twist the dough ball tight so that the pie dough is forced into a tight ball. The disk should be approximately 1/2" (12mm) thick. Wrap snugly in plastic wrap or wax paper and rest in refrigerator for at least 2 hours, but preferably overnight.Ready For: The dough is now ready for making a galette, to use in your favorite pie recipe or continue on to make a par baked pie crust.
To Roll Out The Dough:
- Lightly spay the pan with pan spray, bottom, sides and rim.
- Take the dough out of the refrigerator and rest at room for a about 20 minutes to warm up the pastry as to make it more pliable to roll out. Before unwraping the dough to roll out, turn it on its side, and gently roll it like a wagon wheel to seal any cracks along the edges. Dust your work surface and top of the pastry with flour and dust your rolling pin.To condition the dough, you can give it a few whacks with the rolling pin, turning quarter turns ever few whacks so that it keeps it's circular shape.Begin rolling the dough from the middle out, taking care not to roll off the top and bottom edges. This helps shape the dough into a circle in the end. After 3-4 rolls, turn the dough, clockwise one quarter of the way around. Roll again, 3-4 times, from the center out. Quarter turn again. The turning helps monitor for a sticky bottom. Keep repeating this process dusting with flour under, on top of the dough and rolling pin as needed so that the dough doesn't start sticking.
- Roll the dough to 1/8 inch (3mm) thick and about 1 inch (.5cm -1 1/4cm) beyond the top edge of your pie plate (turn the plate upside down on the dough to measure). You can trim the rough edges with kitchen sheers as needed or just leave them craggy, depending on how you plan on crimping your dough. Roll the dough over and onto your rolling pin to transfer the dough to the pie plate. Gently press the dough into the plate without stretching it. For the bottom pastry, roll the edges under to create the crust's edge and crimp as desired. Place in the refrigerator for at least 30 minutes before par baking or while rolling out the second disk for the top of the pie.
Par Bake a Single Crust Pie:
- Note some pie recipes have instructions on how to par bake. If using a recipe that provides those instructions, use them. Otherwise this is how I par bake most of my crusts. Preheat oven to 375F (190C). Set the baking rack in the center.
- Remove the pie plate from the refrigerator. Dock the dough by pricking the bottom of the dough with a fork. This will prevent the dough from rising up. Cover the chilled crust with a piece of parchment paper and fill it with 2-3 cups of either pie weights or dried beans. If you can fill it to the rim of the pie dough, all the better. Place the pie pan on a parchment lined sheet pan.
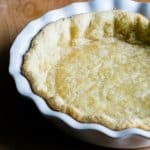
- Lower the oven temperature to 350F (180F) and place the pie in the oven. Bake for 25 minutes, rotating the pan 1/2 way through baking. Remove the partially baked crust from the oven, carefully remove the beans or pie weights and parchment and return the crust to the oven for an additional 5-8 minutes or until the edges are lightly browned, and the bottom of the crust is somewhat transparent and lightly golden. If there are any shiny patches, pop the crust back in the oven for a few more minutes.
- Cool, then use for a pie that will be filled and baked again such as pecan, quiche or pumpkin among others, following the directions for the pie recipe.
Making a Double Crust Pie:
- Before refrigerating the bottom crust, fill it with your pie filling, cover it and place it in the refrigerator. While the bottom crust is in the refrigerator resting, roll out the top crust in the same fashion as the bottom, rolling to 1/8 inch (3mm) thick and the diameter to about 1/2 inch beyond the top of the pie pan.
- Roll the dough over and onto your rolling pin to transfer the dough to cover the contents of the pie. Trim as needed to match the top crust with the bottom crust and crimp with a fork or flute with fingers to seal in the contents. Use a pairing knife to make about five or six steam vents in the center of the crust.
- Chill for at least 30 minutes, but up to one hour is fine. Do not hold in fridge longer than one hour as the filling will start to hydrate the dough and yield a soggy bottom.
- Egg wash then bake according to pie directions.
Notes
*Butter is an essential component of pastry. It plays an important role in flavor and texture. I use American style Organic Unsalted Butter like Organic Valley.
A Note on Buttermilk: I make my own in this recipe using milk and apple cider vinegar. To use store bought buttermilk:
~ single crust: 1/4 cup (62 grams)
~ double crust: 1/3 cup + 2 tablespoons (110 grams) Inspired by The Grand Central Bakery and Chef Kimberly Smith
~ single crust: 1/4 cup (62 grams)
~ double crust: 1/3 cup + 2 tablespoons (110 grams) Inspired by The Grand Central Bakery and Chef Kimberly Smith
Nutrition
Serving: 1slice of crust | Calories: 179kcal | Carbohydrates: 16g | Protein: 2g | Fat: 12g | Saturated Fat: 7g | Polyunsaturated Fat: 1g | Monounsaturated Fat: 3g | Trans Fat: 0.5g | Cholesterol: 31mg | Sodium: 151mg | Potassium: 25mg | Fiber: 1g | Sugar: 2g | Vitamin A: 355IU | Calcium: 7mg | Iron: 1mg