
In this tutorial and recipe, I share my tips and techniques on How to Make Pie Crust using butter and DIY buttermilk (milk + vinegar) for a flaky pie crust. This recipe makes a single or double crust and can be made ahead. Hand-made dough creates the flakiest crust!
Making flaky pie crust from scratch can be intimidating. But as with anything, practicing improves skill over time. I make pie dough from scratch because it’s relaxing, rewarding and tastes like it is homemade, my preference. I’m not a fan of prepackaged pie crust simply because I only want the freshest, natural ingredients in my food, and ones I can pronounce. An all butter dough is my preference simply because it tastes so good.
Hand Making Pie Dough vs Food Processor Pie Dough
While I find making pie dough in a food processor quick and easy, and convenient (there’s a place for this), the end pastry just doesn’t have the flakiness of a hand made crust. A food processor tends to break the butter down far too much especially after adding the water. Layers of flaky goodness is achieved by layers of larger flat-chunky pieces of butter that are surrounded by flour. Taking time to hand make pie dough is truly worth the effort.
Why Buttermilk?
I DIY buttermilk to hydrate pie dough in all my crust recipes because the acidity helps tenderize gluten and yields a more pliable dough and tastier crust. Homemade simply because it’s so darn easy to make and I hardly ever have buttermilk on hand. Homemade buttermilk is simply a mixture of milk and either apple cider vinegar, white vinegar or lemon juice.
If you’d like to use real buttermilk, you can! You’ll need just about a teaspoon more liquid in your pie dough.
Make Ahead Ready
Pie dough is freezer friendly. The dough can be made weeks ahead and frozen then thawed in the fridge the night before you need it. It also holds well in the refrigerator for at least two days prior to use.
What Type of Pie Pan to Use
The type of pie pan you use can make a difference in your crust. I use stoneware and glass, both of which seem to bake more evenly than metal.
With stoneware, the dough tends to slide down a bit, since there’s no lip on the edges of the pan to hold the dough up, which makes crust look shrunk once baked.
With glass, the edges tend to keep their shape better and you can keep an eye on the bottom of your crust while baking; an advantage if like to keep an eye on the bottom of your crust.
How to Make a Flaky Pie Crust
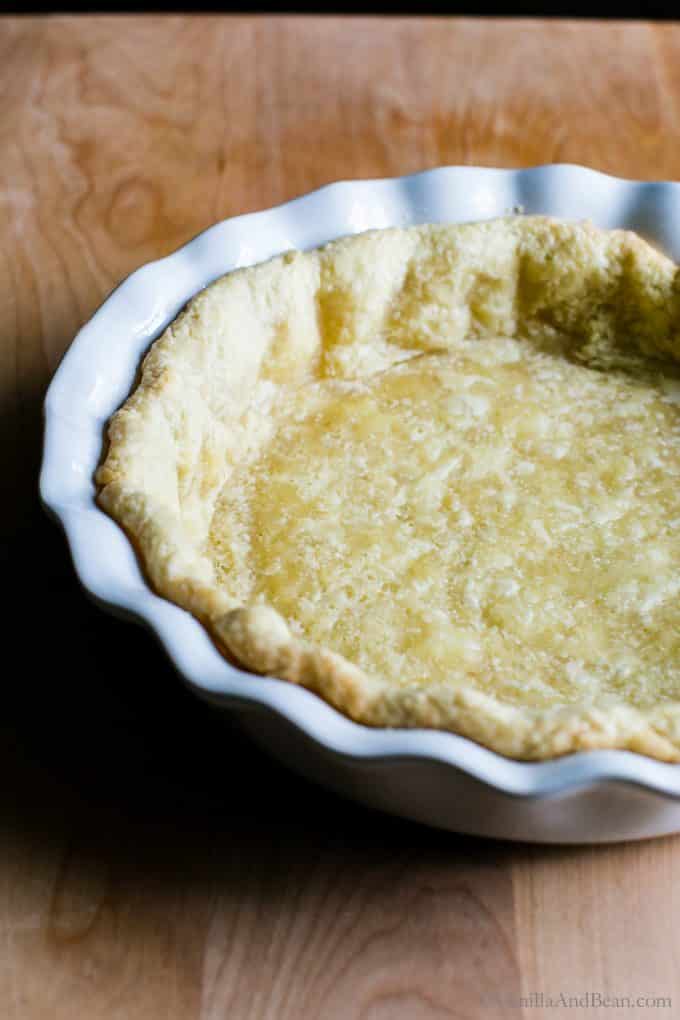
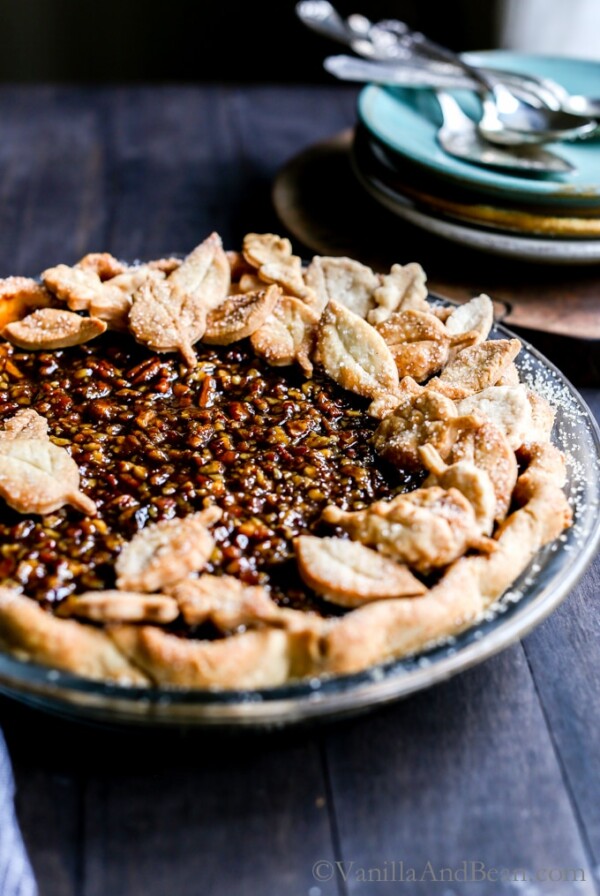
Below, I share my process, tips and recipe for a delicious flaky par baked single pie crust (pictured) and double crust dough.
Helpful Tools: Pastry Cutter, Bench Scraper, Rolling Pin (affillate links)
Start with cold ingredients. If baking during Summer, I put my flour mixture in the fridge for at least 30 minutes before starting.
Size of Butter Chunks Matter
When cutting the butter into the flour, use a pastry cutter, fork or your hands. The advantage of using a tool rather than you hands is that the butter will stay colder longer. However, using your hands allows you to control the size of butter chunks and feel how to dough changes as you work. If you use your hands, work quickly pressing the dough in between your thumb and index finger to flatten the chunks. The goal is to smoosh the pieces flat, into about quarter size pieces.
Pay attention to how the size of the butter chunks change as you cut the butter into the dough. For the bottom crust, you can make a mealy flour-butter mixture where the butter will be pea size. For the top crust of a double crust pie, when cutting in the butter, the chunks should remain larger, such as almond or hazelnut size.
However, when I make a double crust, I always make the dough like a top crust – leaving the butter in larger pieces – like flat quarters. You’ll get a terrific crust either way.
For the images below, I am working on a bottom crust to par bake (partially bake). You’ll notice the chunks are a little smaller, after cutting in the butter because I used a pastry cutter in this example.
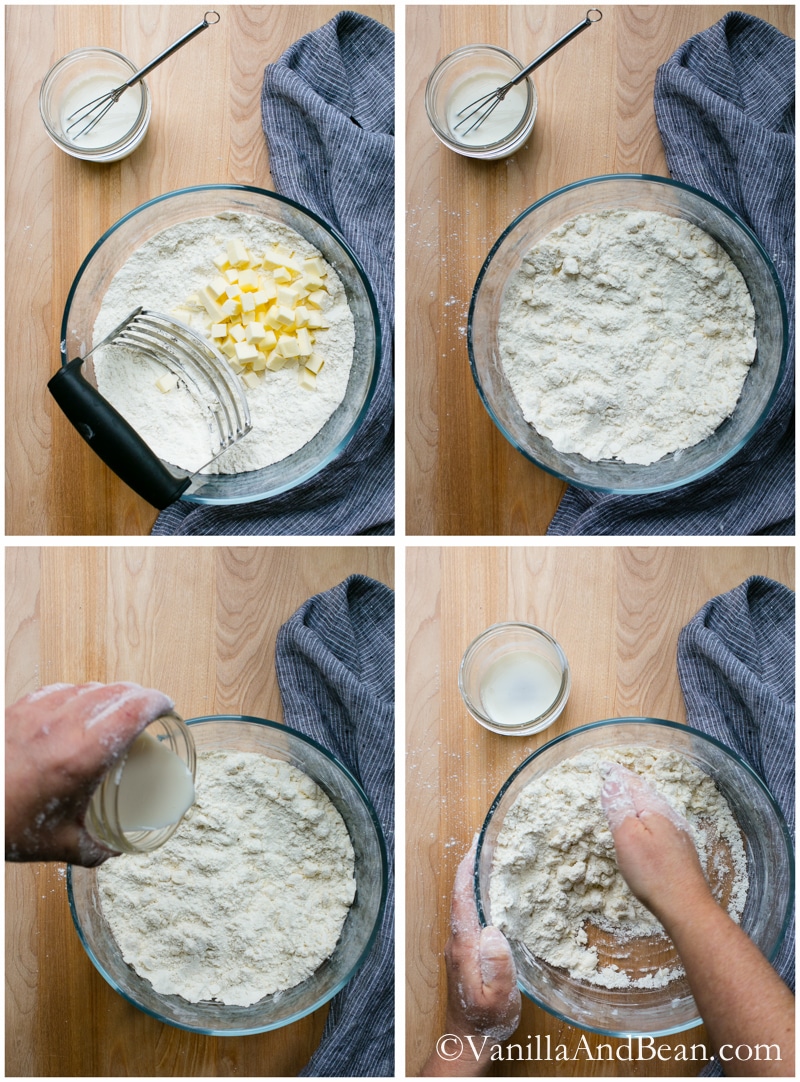
Incorporating the Buttermilk
Once the butter is cut into the flour, pour in the buttermilk. Be sure to hold out a few teaspoons as hydration will differ between flours and season. Incorporate the buttermilk by using your hands, tossing and lifting the bits from the bottom of the bowl, bringing them up and over the top of the ingredients, then using your palm to press down. Fold again and again adding the remaining buttermilk if needed. But not too much. An over-hydrated dough creates a tough dough.
To test the dough to see if it needs more moisture, grab a fist full of dough and squeeze it. If it holds together, it has enough liquid. If it doesn’t hold together, add more liquid, 1 teaspoon at a time until it’s ready. One teaspoon doesn’t sound like much, but in pastry making, it is!
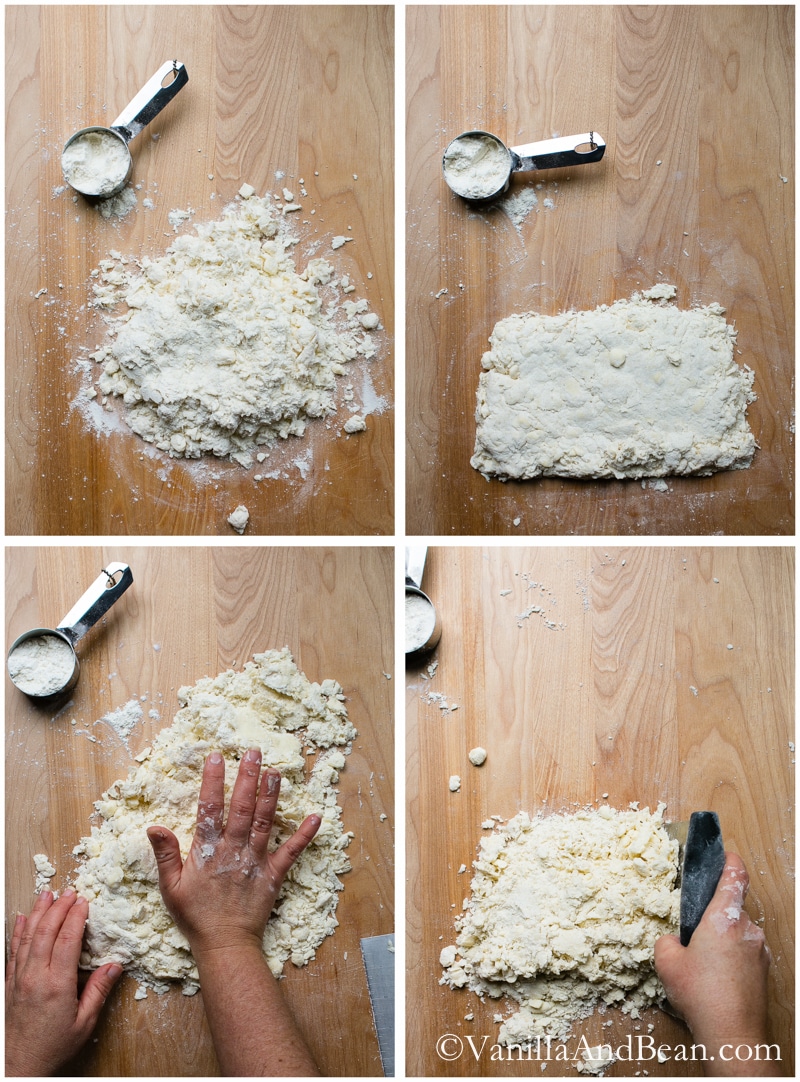
Building Those Flaky Layers
The dough is shaggy at this point. The idea here is that we start to build layers so folding and pressing the dough is key. Using a bench scraper will make the job of gathering bits and pieces much easier.
Gather the dough into a 1/2 inch thick rectangle. Use the heel of your hand to press the dough away from you. Do this three times from left to right on the rectangle. Then gather the dough again into a rectangle and press and fold the dough 7-8 more times. I use this method for both a bottom and top crust. It’s a classic French pastry technique that only takes minutes to do.
Remember if the dough starts getting sticky, pop it in the freezer for 5 minutes.
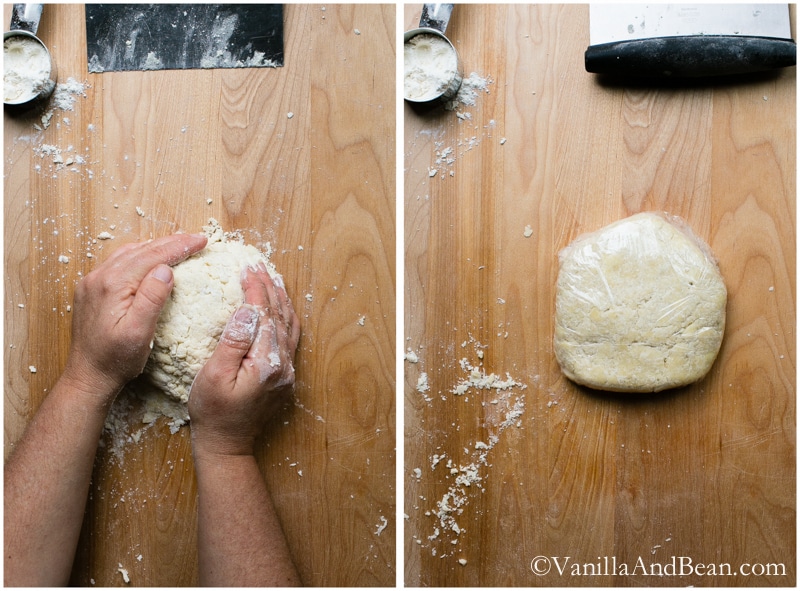
Divide the dough in half if making a double crust. Shape dough into a rough ball and then into a disk about 1/2″ thick (1.2cm). You can use a flour sack towel to do this, placing the dough in the center of the flour sack. Gather the ends of the towel like a purse and twist the dough ball tight so that the pie dough is forced into a tight ball. Wrap tightly in plastic wrap, wax paper or double wrapped parchment paper and rest in refrigerator for at least 2 hours, but preferably overnight or up to two days.
The dough will seem dry, but will hydrate as it rests. At this point the dough can be frozen for up to a month. To thaw the dough, let it rest in the refrigerator overnight.
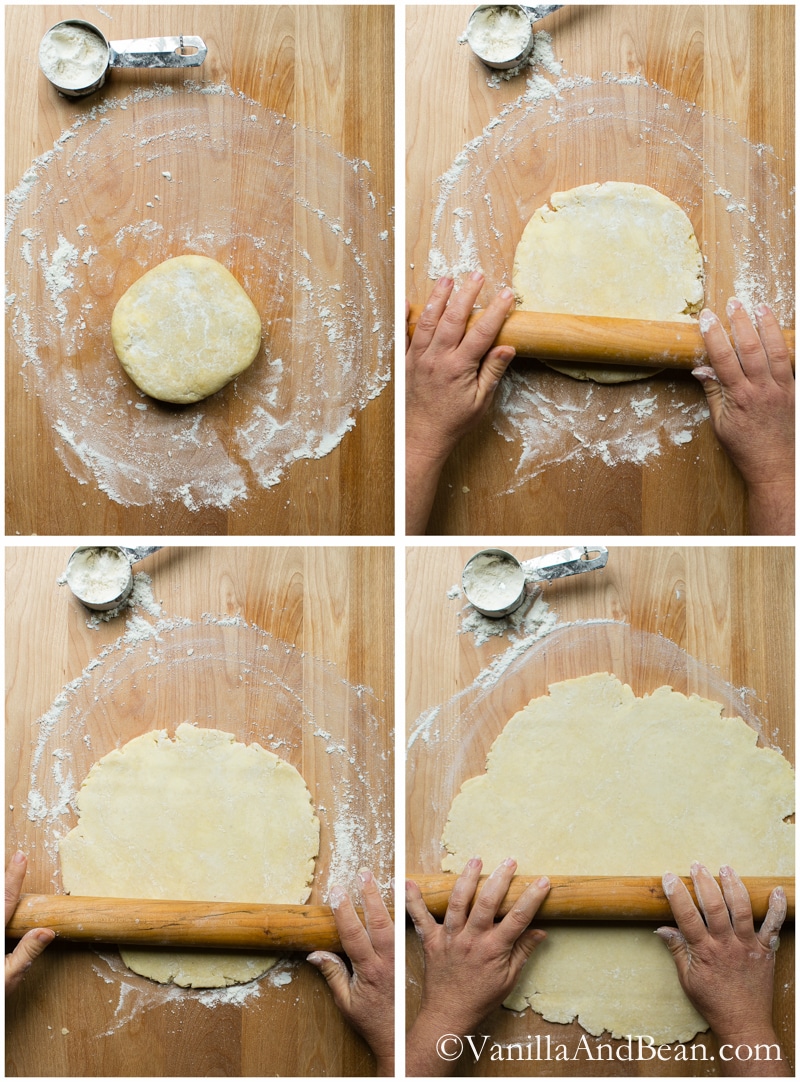
Rolling Out The Dough
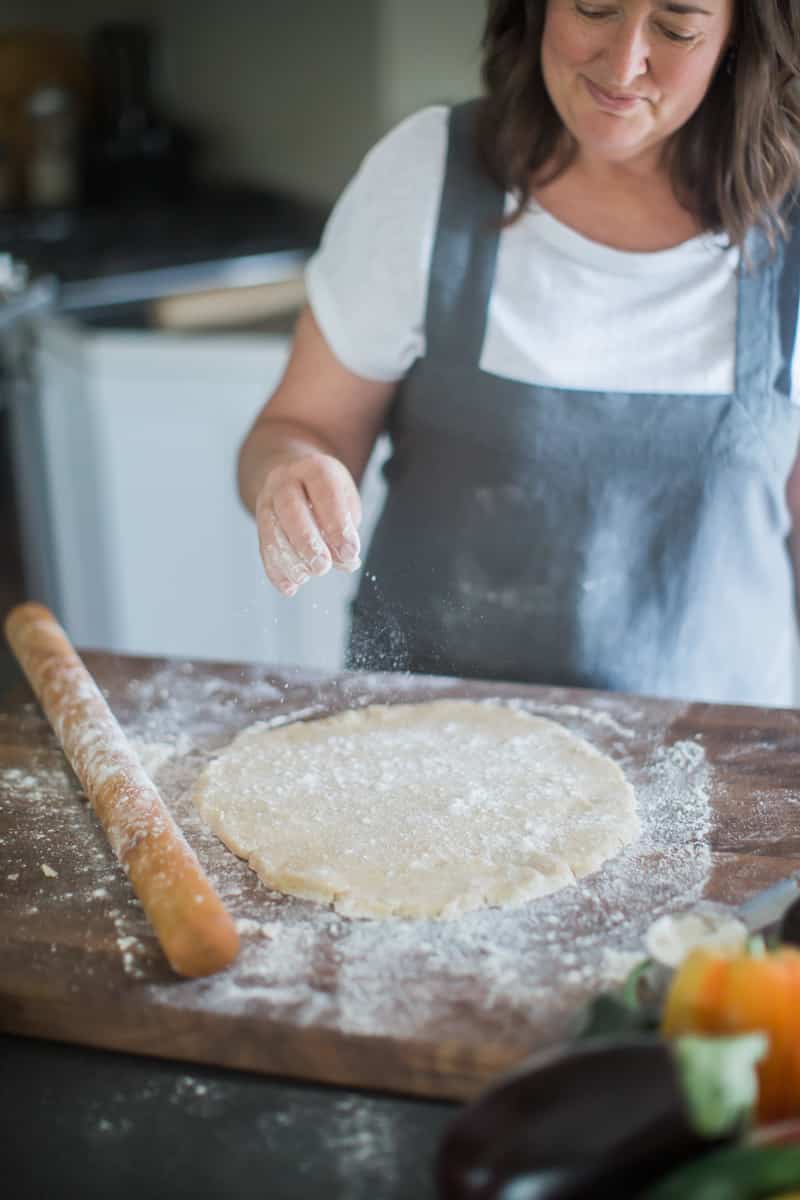
Before rolling out the buttermilk pastry, remove it from the refrigerator and let it set for about 20 minutes at room temperature. This will help soften the dough and making rolling a bit easier. Place the dough on a lightly floured work surface. Dust the top, and rolling pin with flour. Beat the dough a few times with the pin to start to soften the dough.
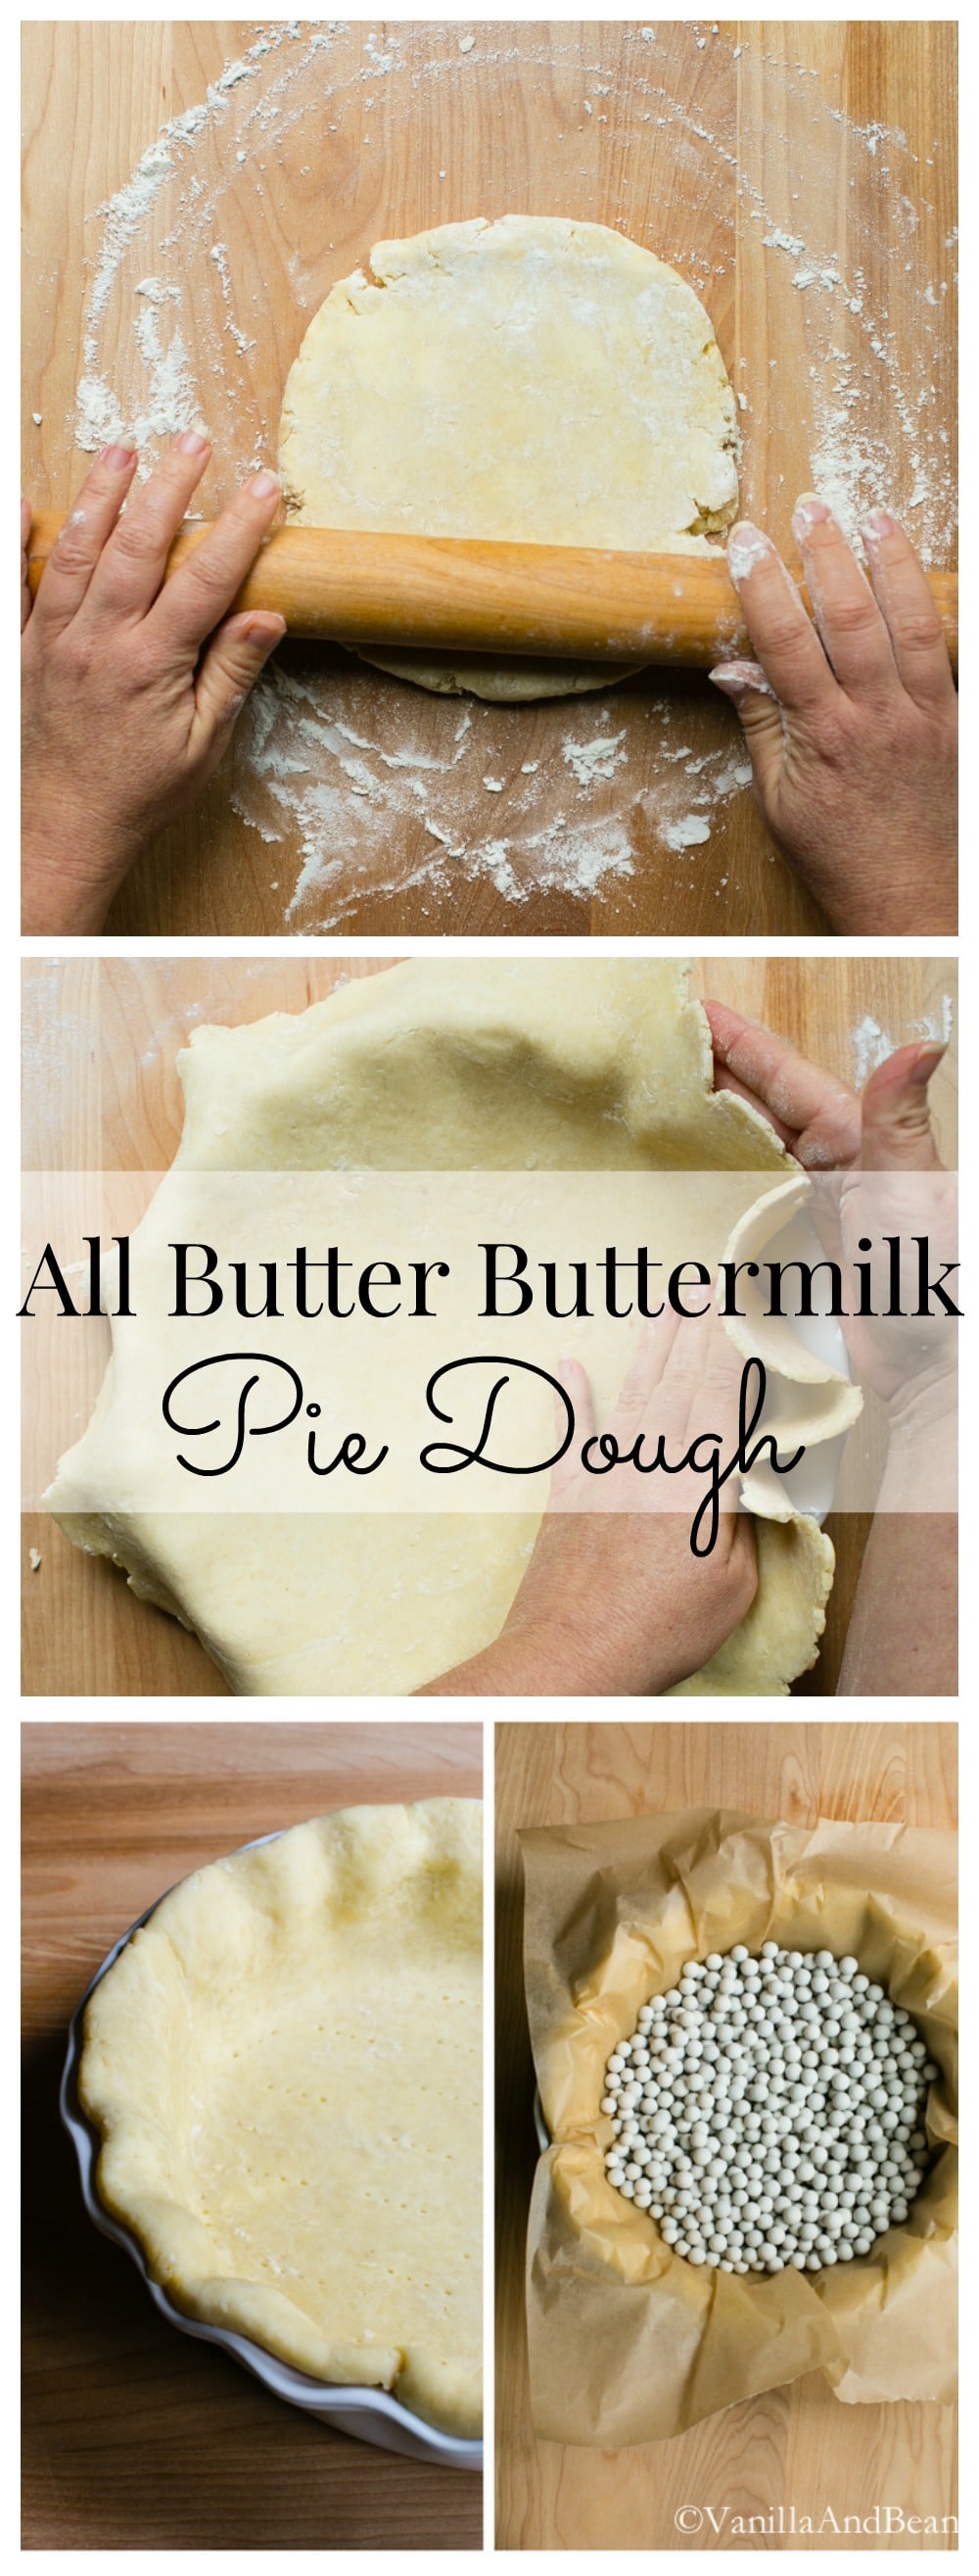
Begin rolling the dough, firmly but gently, from the middle out, taking care not to roll off the top and bottom edges. This helps shape the dough into a circle in the end.
After 7-8 rolls, turn the dough one-quarter of the way around (same direction each time). Roll again, 7-8 times, from the center out. Quarter turn again. Keep repeating this process lightly dusting with flour under, on top of the dough and rolling-pin as needed so that the dough doesn’t start sticking.
Roll the dough to 1/8″ (3mm) thick and about 1 inch (.5cm -1 1/4cm) beyond the top edge of your pie plate (turn the plate upside down on the dough to measure). Trim the rough edges with kitchen sheers as needed.
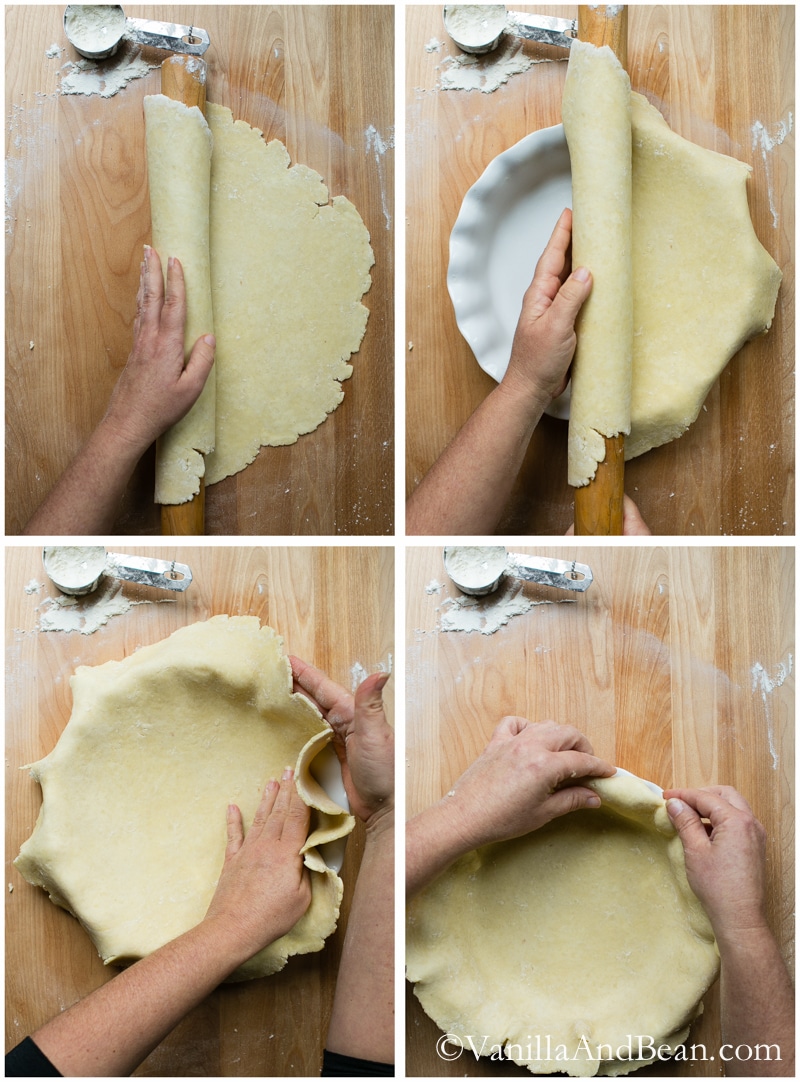
Roll the dough over and onto your rolling-pin to transfer the dough to the pie plate. Gently press the dough into the plate without stretching it. For the bottom pastry, roll the edges under to create the crust’s edge and crimp as desired.
Refrigerate for at least 30 minutes before baking, par baking or blind baking. If only refrigerating for 30 minutes, I do not wrap the dough. If refrigerating longer, wrap in plastic.
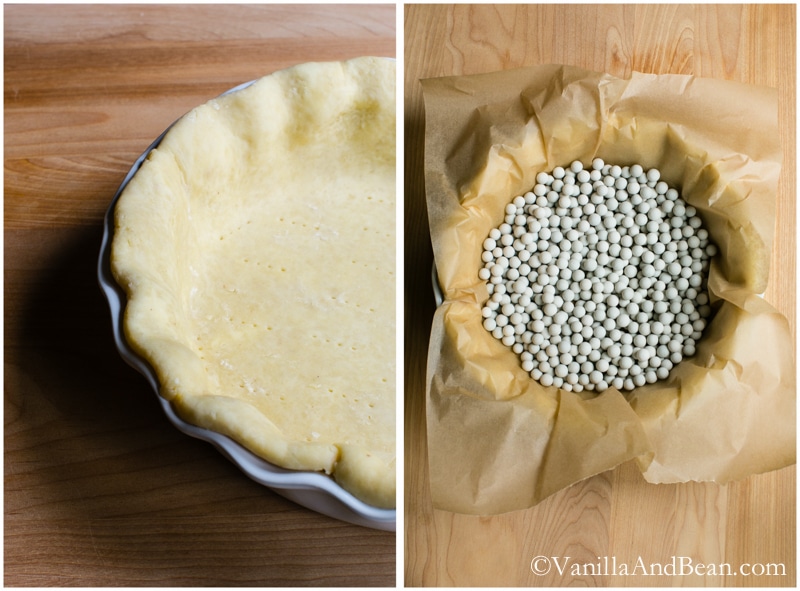
Prepare the Dough for Par or Blind Baking
Dock the dough by using a fork to poke small holes in the bottom crust. This will help release the steam that would otherwise make your dough puff up. We want that surface to be flat and to contain all the goodness you’ll add to it later.
Crumple a piece of parchment paper and place it over the top of the dough in the pie plate. Fill with either dried beans or ceramic pie weights. If you can, fill to the rim or top edge of the dough. This helps prevent the pie from shrinking. Now you’re ready to bake.
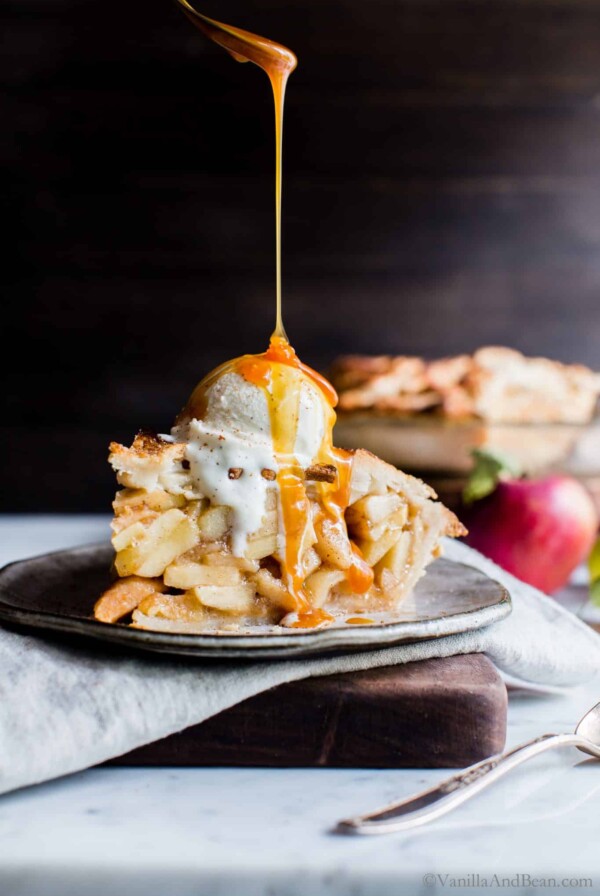
Your finished par baked pie crust (pictured above) will be lightly golden and not fully baked. It will finish baking after it’s filled with whatever recipe you’re using such as pecan pie, quiche or pumpkin pie.
Shew, that sounds like a lot! But hand made flaky pie crust truly comes together quickly and is worth the effort!
How To Make an All Butter Buttermilk Pie Dough
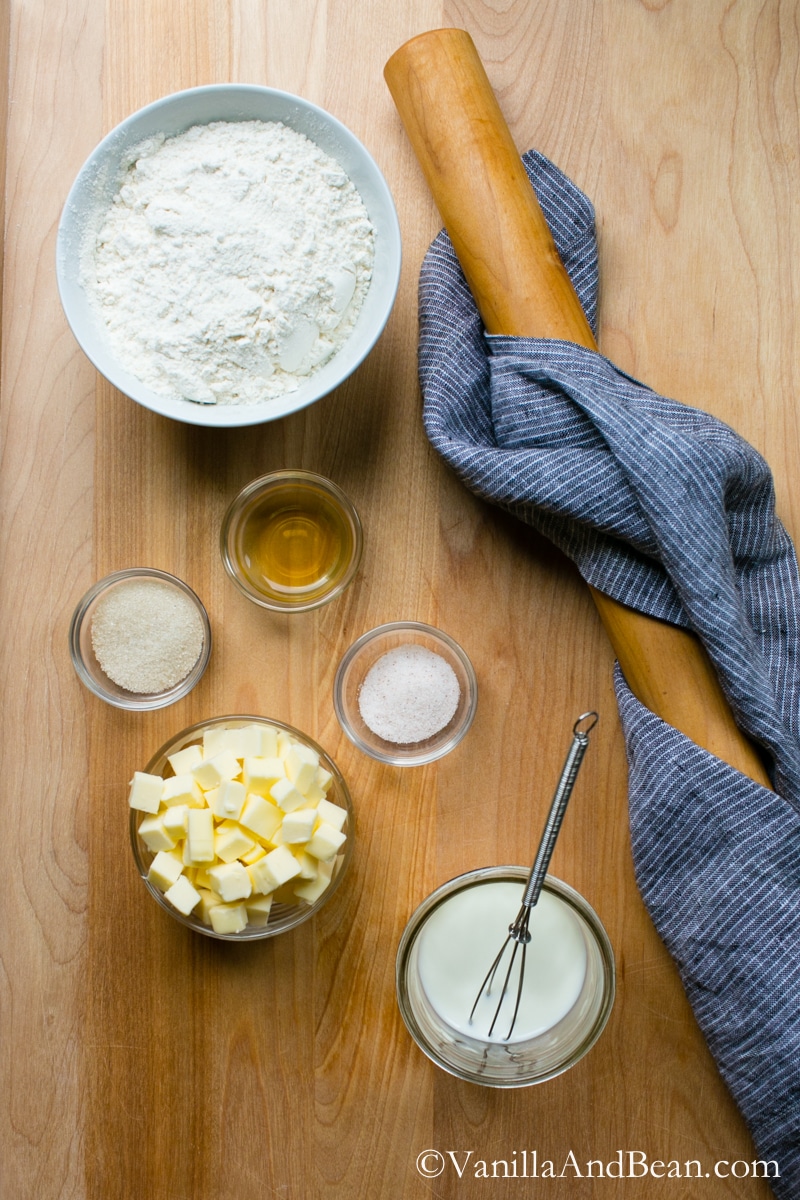
Ingredients
- Pan Spray
For One Disk (11-12 oz / 311g -340g):
- 1/2 cup (113 grams) Unsalted Butter, refrigerated
- 3 tablespoons Milk
- 1 1/2 teaspoons Apple Cider Vinegar, see note on buttermilk
- 1 1/4 cups (190 grams) All Purpose Flour
- 1 tablespoons Organic Cane Sugar
- 1/2 teaspoon Sea Salt
For Two Discs (22-24 oz / 311g-340g each)
- 1 cup (226 grams) Unsalted Butter, refrigerated*
- 6 tablespoons Milk
- 3 teaspoons Apple Cider Vinegar
- 2 1/2 cup (380 grams) All Purpose Flour
- 2 tablespoons Organic Cane Sugar
- 1 teaspoon Sea Salt
Instructions
To Make The Dough:
- For a mealy, bottom crust, cut the butter into 1/4 inch (6mm) square pieces. For a flaky top crust, cut the butter into 1/2 inch (12mm) pieces. Place the butter in the freezer for at least five minutes. *note: if making a double crust, I use the flaky top crust method cutting the butter into 1/2" pieces.
- Whisk the milk and apple cider vinegar together until it bubbles. It will thicken as it sets for five minutes. This is your buttermilk.
- In a large bowl, whisk the flour, sugar and salt. Using a pastry cutter, cut in the butter, coating the butter with the flour. Alternatively, use your thumb and pointer finger to squish the butter pieces into flat disks, about the size of a quarter (working quickly). For a bottom crust, mealy consistency, cut/squish in the butter until it is about pea sized. For a top crust, the butter should remain in larger chunks, such as hazelnut size (or squished, quarter size).
- Because flour and butter contain varying amounts of water, we don't want to add the milk mixture in all at once. An over-hydrated dough creates a tough pastry. Pour in all but about 1 tablespoon for a single crust, 2 tablespoons for a double crust of the milk mixture. Use your hand to incorporate the buttermilk, folding and pressing the mixture. Flattening out the butter is fine. To test hydration, grab a hand full of dough and squeeze it. If it holds together, don't add any additional milk. If it's still crumbly or falls apart, drizzle in the remaining milk and continue folding and pressing to a shaggy consistency. If the butter is starting to get a bit warm at this point, put the mixture in the freezer for about 5 minutes.
- On a lightly floured work surface, dump out the shaggy dough. Using a bench scraper, fold and press the dough at least 6-8 times, eventually shaping the mixture into a rough rectangle about 1/2" (12mm) thick. Use the heal of your hand to press the dough away from you, smearing the dough between your hand and work surface. Do this in three increments working from one end of the rectangle to the other. Use a bench scraper to gather the dough once again and shape into a rectangle. Fold and press the dough over and on top of its self 7-8 more times. This helps to hydrate the dough and build flaky layers.
- Use a bench scraper to gather the all the bits and shape in to about a 5 inch disc. Update: You can use a flour sac to do this, putting the dough in the center, then gathering the ends of the towel twist the dough ball tight so that the pie dough is forced into a tight ball. The disk should be approximately 1/2" (12mm) thick. Wrap snugly in plastic wrap or wax paper and rest in refrigerator for at least 2 hours, but preferably overnight.Ready For: The dough is now ready for making a galette, to use in your favorite pie recipe or continue on to make a par baked pie crust.
To Roll Out The Dough:
- Lightly spay the pan with pan spray, bottom, sides and rim.
- Take the dough out of the refrigerator and rest at room for a about 20 minutes to warm up the pastry as to make it more pliable to roll out. Before unwraping the dough to roll out, turn it on its side, and gently roll it like a wagon wheel to seal any cracks along the edges. Dust your work surface and top of the pastry with flour and dust your rolling pin.To condition the dough, you can give it a few whacks with the rolling pin, turning quarter turns ever few whacks so that it keeps it's circular shape.Begin rolling the dough from the middle out, taking care not to roll off the top and bottom edges. This helps shape the dough into a circle in the end. After 3-4 rolls, turn the dough, clockwise one quarter of the way around. Roll again, 3-4 times, from the center out. Quarter turn again. The turning helps monitor for a sticky bottom. Keep repeating this process dusting with flour under, on top of the dough and rolling pin as needed so that the dough doesn't start sticking.
- Roll the dough to 1/8 inch (3mm) thick and about 1 inch (.5cm -1 1/4cm) beyond the top edge of your pie plate (turn the plate upside down on the dough to measure). You can trim the rough edges with kitchen sheers as needed or just leave them craggy, depending on how you plan on crimping your dough. Roll the dough over and onto your rolling pin to transfer the dough to the pie plate. Gently press the dough into the plate without stretching it. For the bottom pastry, roll the edges under to create the crust's edge and crimp as desired. Place in the refrigerator for at least 30 minutes before par baking or while rolling out the second disk for the top of the pie.
Par Bake a Single Crust Pie:
- Note some pie recipes have instructions on how to par bake. If using a recipe that provides those instructions, use them. Otherwise this is how I par bake most of my crusts. Preheat oven to 375F (190C). Set the baking rack in the center.
- Remove the pie plate from the refrigerator. Dock the dough by pricking the bottom of the dough with a fork. This will prevent the dough from rising up. Cover the chilled crust with a piece of parchment paper and fill it with 2-3 cups of either pie weights or dried beans. If you can fill it to the rim of the pie dough, all the better. Place the pie pan on a parchment lined sheet pan.
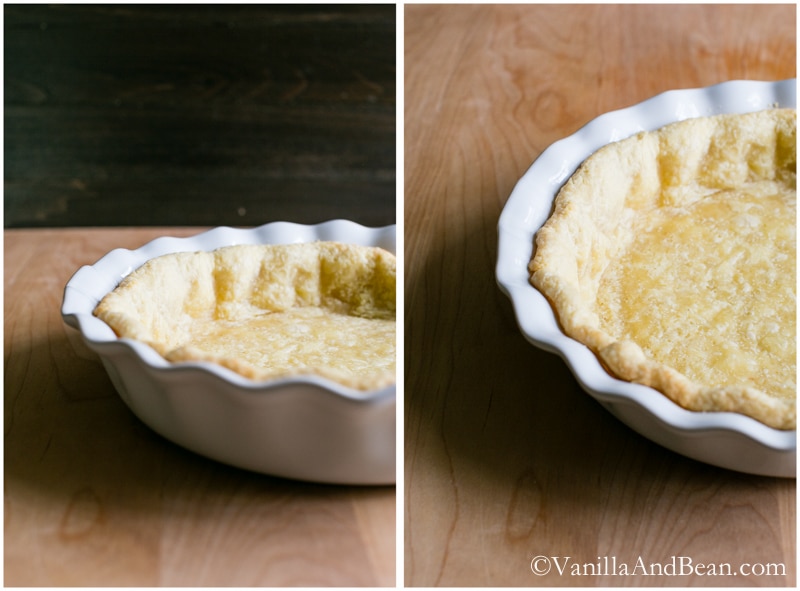
- Lower the oven temperature to 350F (180F) and place the pie in the oven. Bake for 25 minutes, rotating the pan 1/2 way through baking. Remove the partially baked crust from the oven, carefully remove the beans or pie weights and parchment and return the crust to the oven for an additional 5-8 minutes or until the edges are lightly browned, and the bottom of the crust is somewhat transparent and lightly golden. If there are any shiny patches, pop the crust back in the oven for a few more minutes.
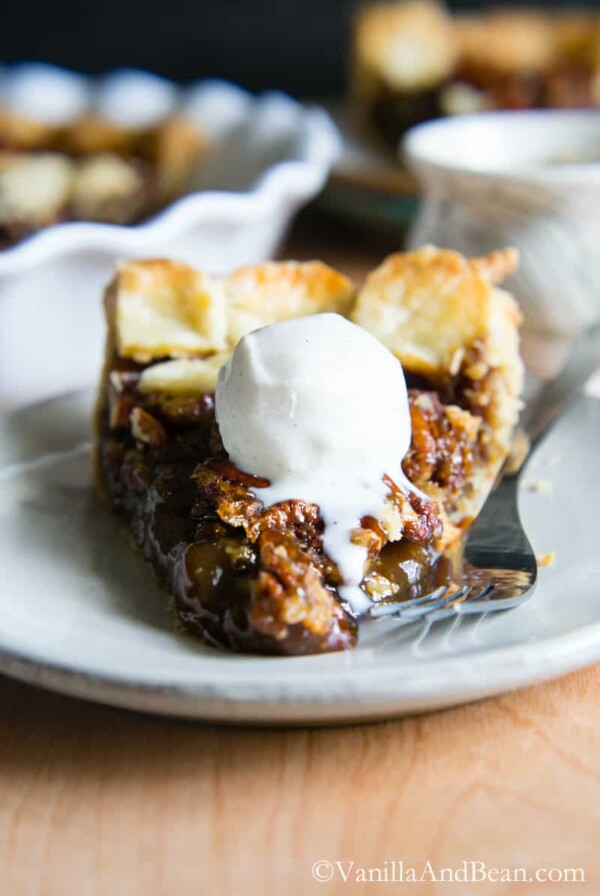
- Cool, then use for a pie that will be filled and baked again such as pecan, quiche or pumpkin among others, following the directions for the pie recipe.
Making a Double Crust Pie:
- Before refrigerating the bottom crust, fill it with your pie filling, cover it and place it in the refrigerator. While the bottom crust is in the refrigerator resting, roll out the top crust in the same fashion as the bottom, rolling to 1/8 inch (3mm) thick and the diameter to about 1/2 inch beyond the top of the pie pan.
- Roll the dough over and onto your rolling pin to transfer the dough to cover the contents of the pie. Trim as needed to match the top crust with the bottom crust and crimp with a fork or flute with fingers to seal in the contents. Use a pairing knife to make about five or six steam vents in the center of the crust.
- Chill for at least 30 minutes, but up to one hour is fine. Do not hold in fridge longer than one hour as the filling will start to hydrate the dough and yield a soggy bottom.
- Egg wash then bake according to pie directions.
Notes
~ single crust: 1/4 cup (62 grams)
~ double crust: 1/3 cup + 2 tablespoons (110 grams) Inspired by The Grand Central Bakery and Chef Kimberly Smith
Nutrition
Nutrition is provided as a courtesy and is an estimate. If this information is important to you, please have it verified independently.
Made it? Leave a comment below!
The most helpful comment may include recipe rating, feedback, any modifications or helping other commentors.

This is my go to pastry recipe! Although I reduce or even skip the sugar.
Love hearing this Laurie! Thank you for your note and sending a smile!
I’m making a couple of these for an upcoming event- it’s a little risky since I haven’t tried the recipe before but I’m feeling up for the challenge!
What I want to know is how long would this keep in the fridge before the crust gets soggy or the texture changes?
Hi R! For an unassembled pie, I wouldn’t go more than two days in the fridge. Three days may be pushing it, since the dough may turn a greyish color (from oxidation).
Reading through this recipe has resurrected many memories of my Grandma Edna and Grandma Jenny, the blackberry pie on the one hand, and the rolled potica (in a bundt pan) on the other! Thank you Traci… I will try this TONIGHT!
I make special note of “docking” the crust–reminds me that I’m building a Thoreau-style 16 foot flat bottom boat this winter–and why? you may ask. (For delivering pies across the Sound, of course.)