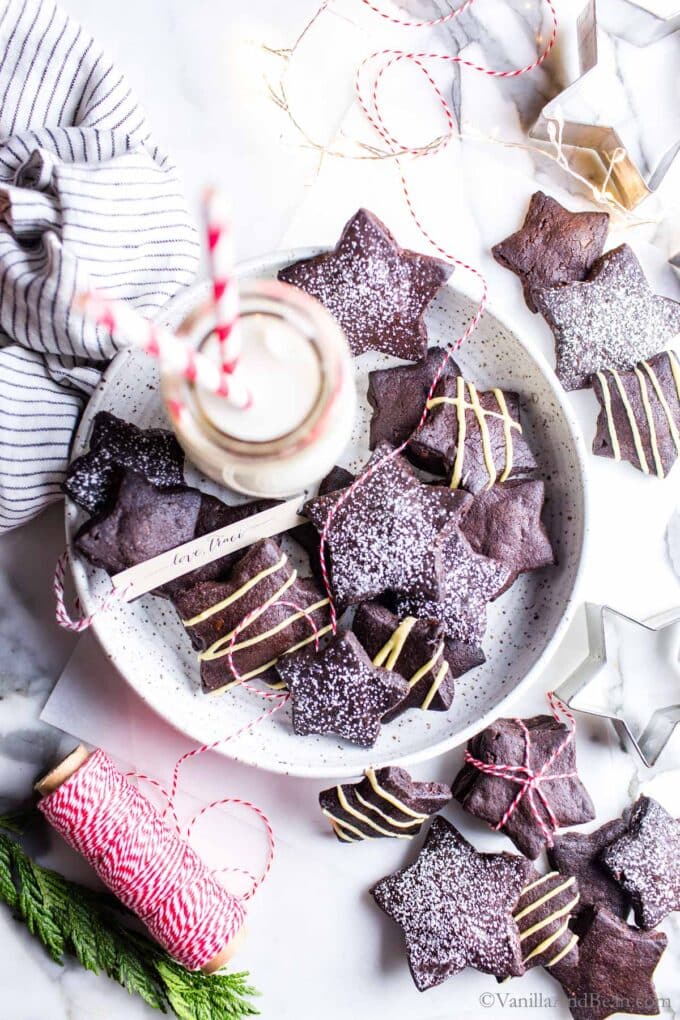
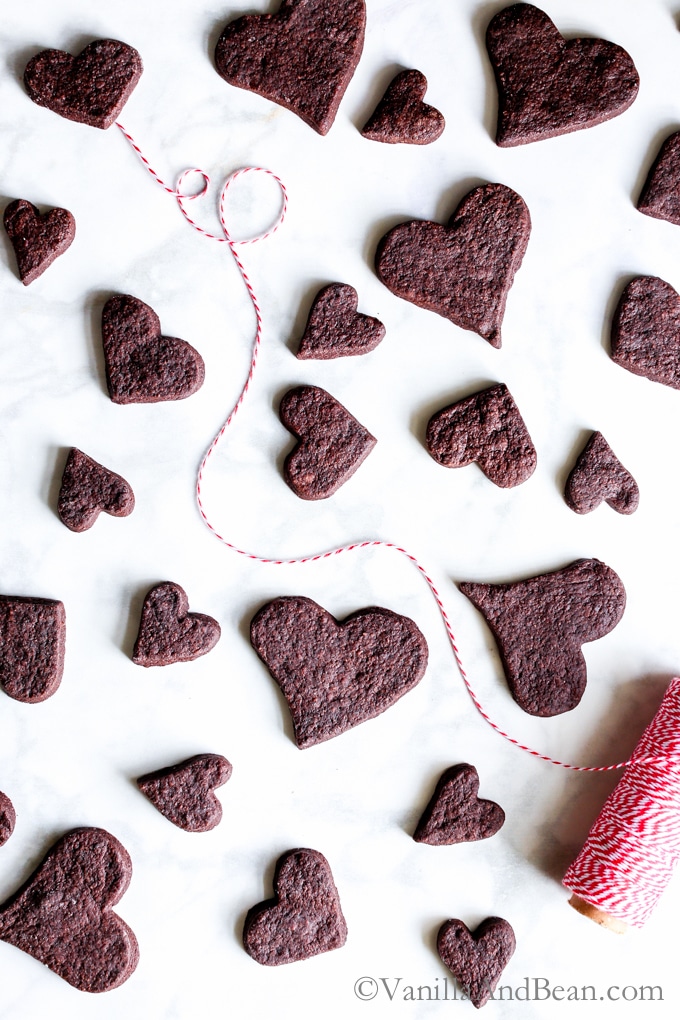
Looking for a fabulous and indulgent gift or a rich chocolatey treat? Dark Chocolate Shortbread Cookies with Cacao Nibs make a generous holiday gift and a tasty treat. They’re like brownies in shortbread cookie form! These cookies are make ahead ready and last weeks in the cookie jar. This recipe is vegetarian and easily vegan.
For the Love of Chocolate Shortbread Cookies
People respond with delight when they receive a gift of shortbread cookies, more so than any other type of cookie. Perhaps it’s all the buttery goodness or the crunchy, crumbly texture or the sheer simplicity of the cookie itself that brings up memories of the holiday season. Chocolate shortbread always seems to be a favorite.
With just a few ingredients, a bit of time in the fridge and a gentle touch one can make the most delicious cookies. A delightful cookie for the holidays, but also, anytime you want a dark chocolate treat.
This Recipe Is
- quick to pull together
- make ahead ready
- freezer friendly
- has a long shelf life
- sturdy enough to package up and send to friends and family
If you make homemade cookie recipes and enjoy shortbread, you’ll love these grown-up rich and chocolatey cookies.
Ingredients You’ll Need
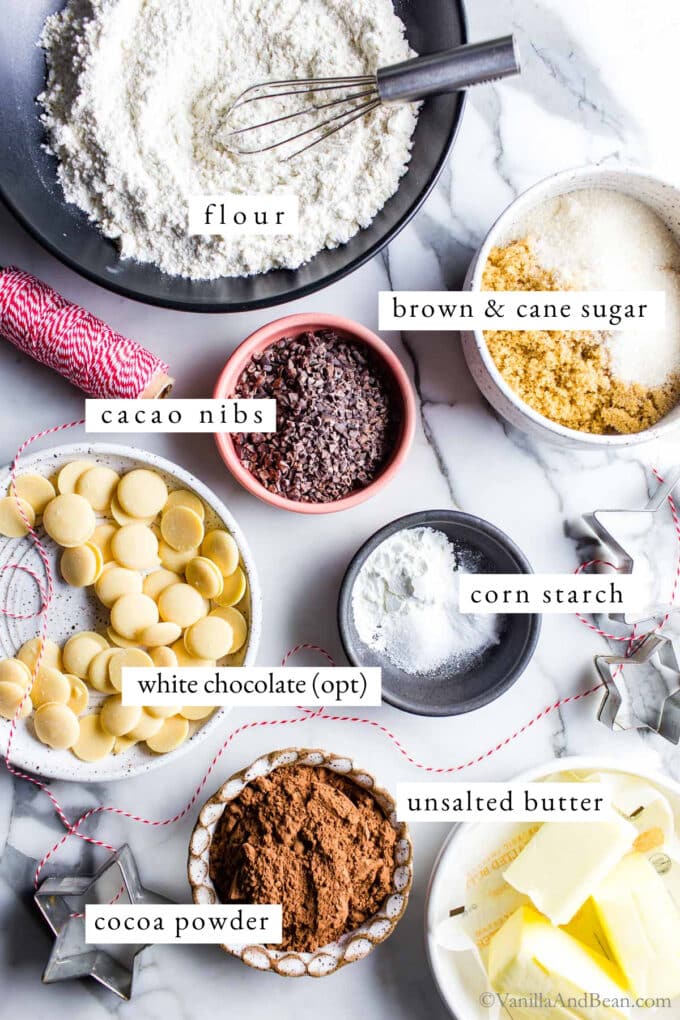
- Unbleached All Purpose Flour – use your tried and true baking flour here, my favorite is Bob’s Red Mill Unbleached Organic All Purpose Flour.
- White Whole Wheat Flour (Ivory Wheat Flour) – adds a bit of earthy texture to these cookies. You can omit it and use AP flour in its place if desired.
- Unsweetened Cocoa Powder – use Dutch processed for the richest, dark chocolate flavor. I like Rodelle Kitchen’s Dutch Process Gourmet Baking Powder.
- Corn Starch – a secret ingredient in many shortbread recipes. It helps keep them crisp and snappy!
- Unsalted Butter – use your favorite, high quality butter. For dairy free, try Earth Balance Buttery Sticks.
- Cane and Brown Sugar – offers a bit of sweet and also, the brown sugar adds caramely flavor interest.
- Vanilla Extract – real vanilla extract!
- Cacao Nibs – these crushed cacao beans are rich in flavor and super crunchy. Find them in the bulk bins of your well stocked grocery store or you can buy them online. I like Terrasoul Cacao Nibs. They are optional, but recommended!
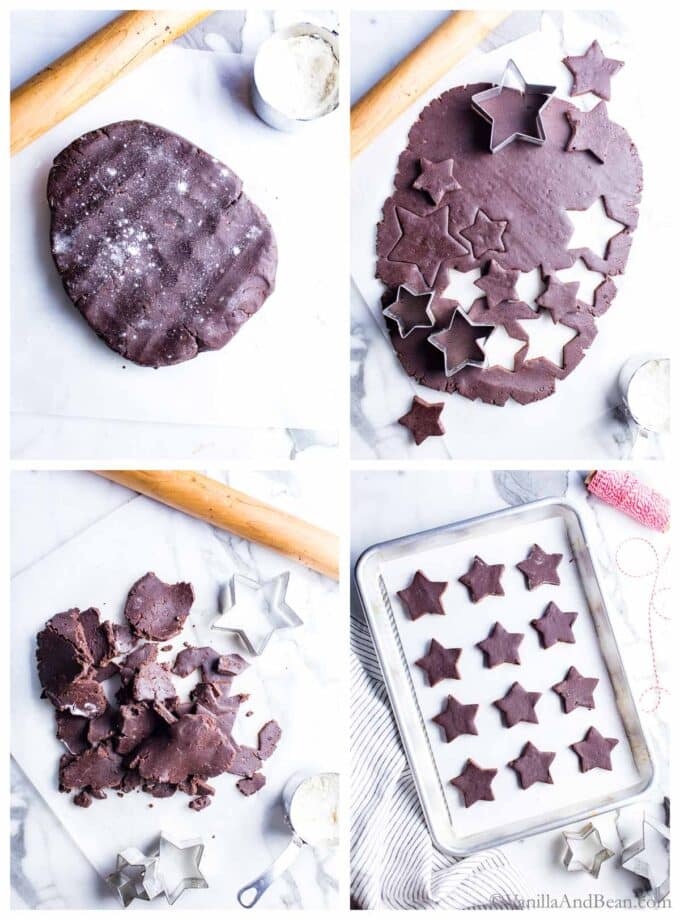
Quick Guide: How to Make Chocolate Shortbread Cookies
Plan ahead! These cookies need to rest in the fridge after mixing and before baking, but they’re SO worth the fuss! Here’s how to make these scrumptious chocolate shortbread cookies (see recipe card for details):
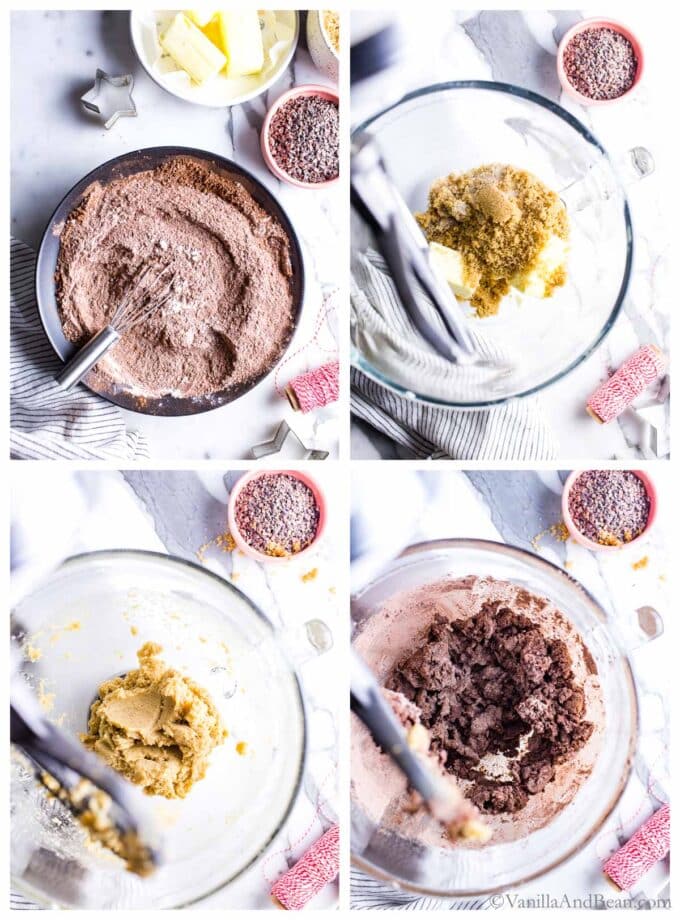
- First, whisk the dry ingredients together.
- Second, in a stand mixer, mix the butter, sugar and vanilla together.
- Third, add the dry ingredients to the butter/sugar mixture, drizzle in a bit of water and mix until a dough forms.
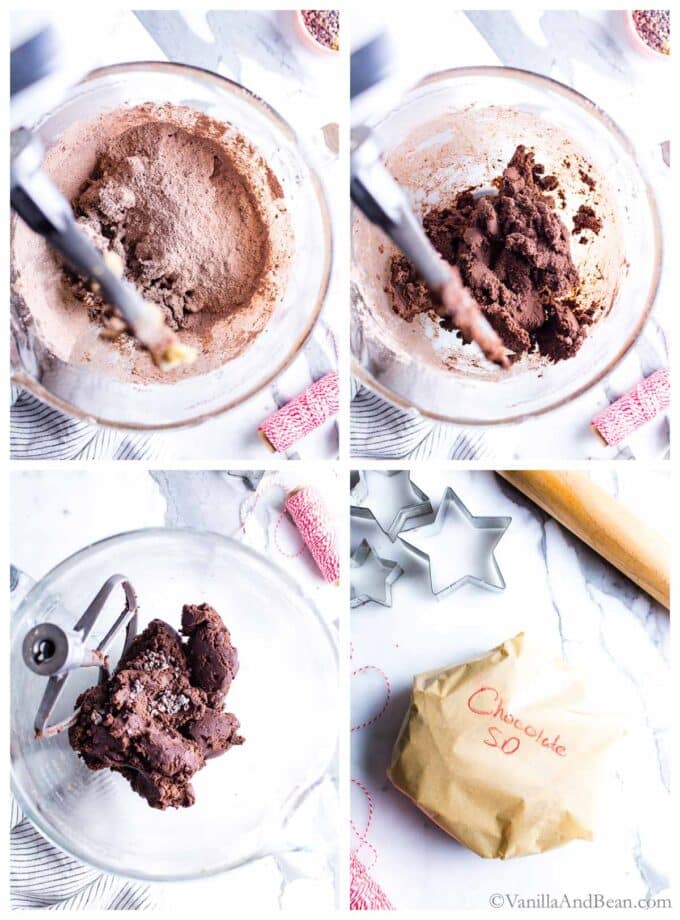
- Fourth, add the cacao nibs and pulse into the dough.
- Next, rest the dough in the fridge, roll, then cut the dough using a cookie cutter.
- Last, rest in the fridge again, then bake!
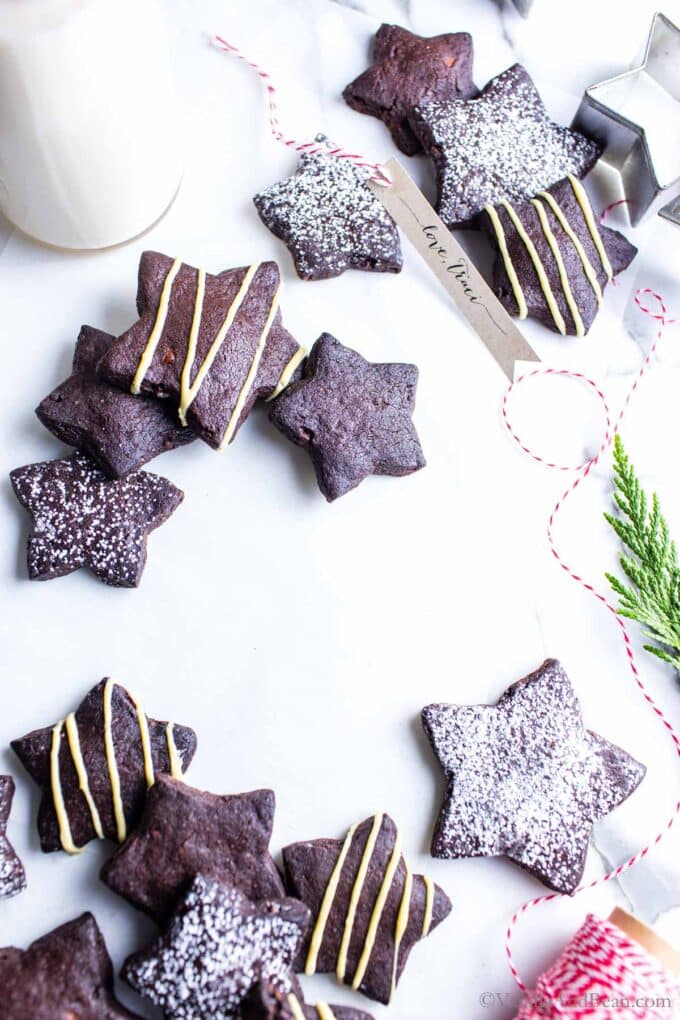
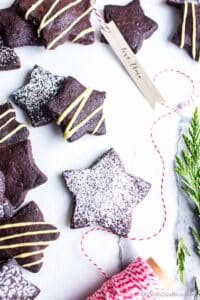
Cool completely then decorate with powder sugar or white chocolate. They’ll keep about two weeks at room temperature!
Pro Tips
- Cookie Cutters: I use 1 1/2 inch and 2 1/2 inch star cookie cutters for this recipe. But you can use whatever cookie cutter you like! Depending on the size of the cookie cutter used, yields may vary.
- Slice & Bake: If slice and baked chocolate shortbread cookies are preferred, roll the dough into a 2 inch thick log, then refrigerate it for at least two hours. Brush egg white on the outside of the log, sprinkle it in raw sugar then slice 1/2 inch thick cookies. Refrigerate again for 20 minutes then bake for about 23-26 minutes or until cookies are barely soft in the center to the touch. You can opt to leave the egg wash and sugar sprinkle off for an egg free cookie. You can see my process for this in my Bourbon Vanilla Bean Shortbread Cookies.
- Plan Ahead: Be sure to chill the dough for at least 20-30 minutes prior to baking, otherwise the cookies are prone to losing their shape.
Makers Notes
- Cara “used dark chocolate chips instead of cacao nibs.”
- No cacao nibs on hand? Feel free to leave them out.
Dark Chocolate Shortbread Cookies
Ingredients
For the Cookies:
- 3/4 cup (110 grams) Unbleached All Purpose Flour + more for dusting
- 1/2 cup (80 grams) White Whole Wheat Flour, aka Ivory Wheat Flour or All Purpose Flour
- 1/2 cup (60 grams) Unsweetened Cocoa Powder Dutch Processed
- 1 tablespoon Corn Starch
- 1/2 teaspoon Sea Salt
- 1/2 teaspoon Baking Soda
- 12 tablespoons (170 grams) Unsalted Butter room temperature, 1 1/2 sticks of butter
- 1/4 cup (58 grams) Granulated Sugar
- 3/4 cup (150 grams) Light Brown Sugar
- 1 1/2 teaspoons Vanilla Extract
- 1/3 cup (45 grams) Cacao Nibs optional
For Decorating:
- Powder Sugar
- 1/2 cup (90 grams) High Quality White Chocolate Chips/Wafers
- A few drops of Olive Oil
Instructions
For the Cookies:
- Whisk the all purpose flour, whole wheat flour, cocoa powder, corn starch, sea salt and baking soda together. Set aside.
- In a stand mixer fitted with a paddle attachment, beat the butter, granulated sugar, brown sugar and vanilla extract for about 2 minutes or until smooth and incorporated, stopping to scrape down bowl once while mixing. Add the dry ingredients in two batches pulsing in the ingredients just until all the ingredients are incorporated. The dough will be very crumbly. Turn the mixer to medium and mix until dough pulls away from sides of bowl. If the dough is not coming together and is crumbly, sprinkle in a 1 tablespoon of water to help it come together while mixing. Add the cocoa nibs and pulse in until the nibs are evenly distributed.
- Dump the dough out on a sheet of plastic wrap or parchment paper. Use the plastic wrap/paper to help you press the dough together into a 1/2 inch (1.2cm) thick circle. Double wrap tightly and rest it in the refrigerator for at least 30 minutes or up to two days. Freezer Tip: At this point you can freeze the dough for up to two months. When ready to use, thaw overnight in refrigerator, rest on the counter until pliable enough to roll then, roll out as needed.
- Set the dough out at room temperature to soften a bit before working it, about an hour. On a sheet of parchment paper, condition the dough by beating it with a rolling pin to start flattening it out. If the dough seems too crumbly at this point, knead the dough by folding it over onto itself and beating it with the pin, eventually working it back into a disk. You'll notice it will start holding together. Roll the dough out to 1/4 inch (6mm) thick on a piece of parchment paper. You'll notice some cracking in the dough; simply press the dough back together. Dip the cookie cutter into flour and cut the cookie. Transfer the cookies to the lined baking sheet leaving at least 1/2 inch (1.5cm) between each cookie. Once all the cookies are on the baking sheet, transfer pan to the refrigerator to chill the cookies for 30 minutes (do not skip this step otherwise the cookies can lose their shape).
- While the dough is resting, preheat oven to 350 Fahrenheit (180 Celsius).
- Meanwhile, gather up the remaining dough, knead and press the dough, using the pin to condition the dough again. Roll out and cut again. Do this until all remaining dough has been used or wrap remaining dough in double plastic wrap or double parchment paper and freeze for future use. Note: If the dough gets too warm while reworking, pop it in the freezer for 5-8 minutes, then work the dough as needed.
- Bake chilled cookies for 18-22 minutes. The cookies should be just barely soft, almost firm to the touch when done. They'll continue to firm up as they cool. Transfer individual cookies to a cooling rack. Cool completely before decorating. Transfer to a covered container or to gift bags and store for up to three weeks.
To Decorate:
- Powder Sugar: Dust cookies through a fine mesh strainer with powder sugar.
- White Chocolate: Melt the white chocolate gently in a bain marie or microwave for 30 seconds at a time stirring throughly each time until melted. This is a slow process. If the white chocolate seems to thick, add a few drops of oil and mix well. Do not heat white chocolate to over 105-108 F or it can scorch. Once melted and pipe-able, pour white chocolate into a pastry bag or into a plastic zip bag. Cut a very small hole in the pastry or plastic bag and drizzle white chocolate over cookies. Place cookies in the fridge for about 10 minutes to allow the chocolate to set up.
I finally made these for the first time a few weeks ago and I loved them from the first bite. I should have been making these for the past two and a half years since I first spotted the recipe. They are delicious and perfect for dark chocolate lovers like myself, I tried them with the powdered sugar dusting but preferred them without it. I used cacao powder and cacao nibs and these cookies came out amazing! I made them a second time a week later. Thank you for posting this delicious recipe!
Hiii C.C.! Thank you for your note and giving the cookies a go! It’s never too late for tasty chocolate cookies 😊. SO glad you enjoyed the reicpe!
Just wondering if you think I can substitute GF 1-1 flour in this, and your other cookie recipes as well?
Hi Pennie! I wish I could say 100% yes, but without testing the recipe first, I hesitate to say one way or the other. If you give it a go, however, please keep us posted!
Another great recipe, melt in your mouth buttery chocolate, will definitely be making again.
SO happy to hear, Jill! Thank you for your note, rating and giving the recipe a go! Day made!
Wonder if this recipe could be used to make a linzer type cookie….if so ideas of filling?
Hello Camille! Are you referring to how they’re shaped/sandwiched? If so, I can imagine marmalade, cherry or strawberry jam would be delightful! I hope this helps?
If you can’t get cocoa nibs should you leave out completely or substitute for something?
Hi Olivia! Cara (below) used dark chocolate chips instead of cocoa nibs. You can leave the nibs out altogether, if you wish.
I’m curious about the cornstarch. I want to make this recipe, but I’m hesitant because of the cornstarch in the dough. Does it leave any kind of odd feel or taste on the palate? What is its function? Thanks so much, and hoping to make these for Christmas. They look fabulous!
Hi Ruth! Cornstarch is not uncommon in shortbread or homemade bake goods and, IMO, does not leave an odd feel or taste on the palate. I use it quite a bit in baked goods to tenderize the gluten giving cookies a soft/chewy on the inside, crunchy on the outside texture (and cakes a softer, cake flour like texture). Specifically in shortbread, it assists in drying out the cookie, giving it a nice sandy crumb. I hope this helps.
It doesn’t. I make regular shortbread all the time and you can’t taste it.
I used the dark chocolate chips and they worked wonderfully!!
My dough was very crumbly and wasn’t coming together, so I added a tablespoon of water and put it back in the mixer and that helped out a lot. These are officially my new favorite cookie!!!
Oh this is great! I love your addition of dark chocolate chips; I’m going to have to give it a go! Thank you for your tip on the addition of water. Flour hydration can vary depending on humidity and brand, so your water addition is smart and good to note. Thank you for sharing your success with us Cara! :D