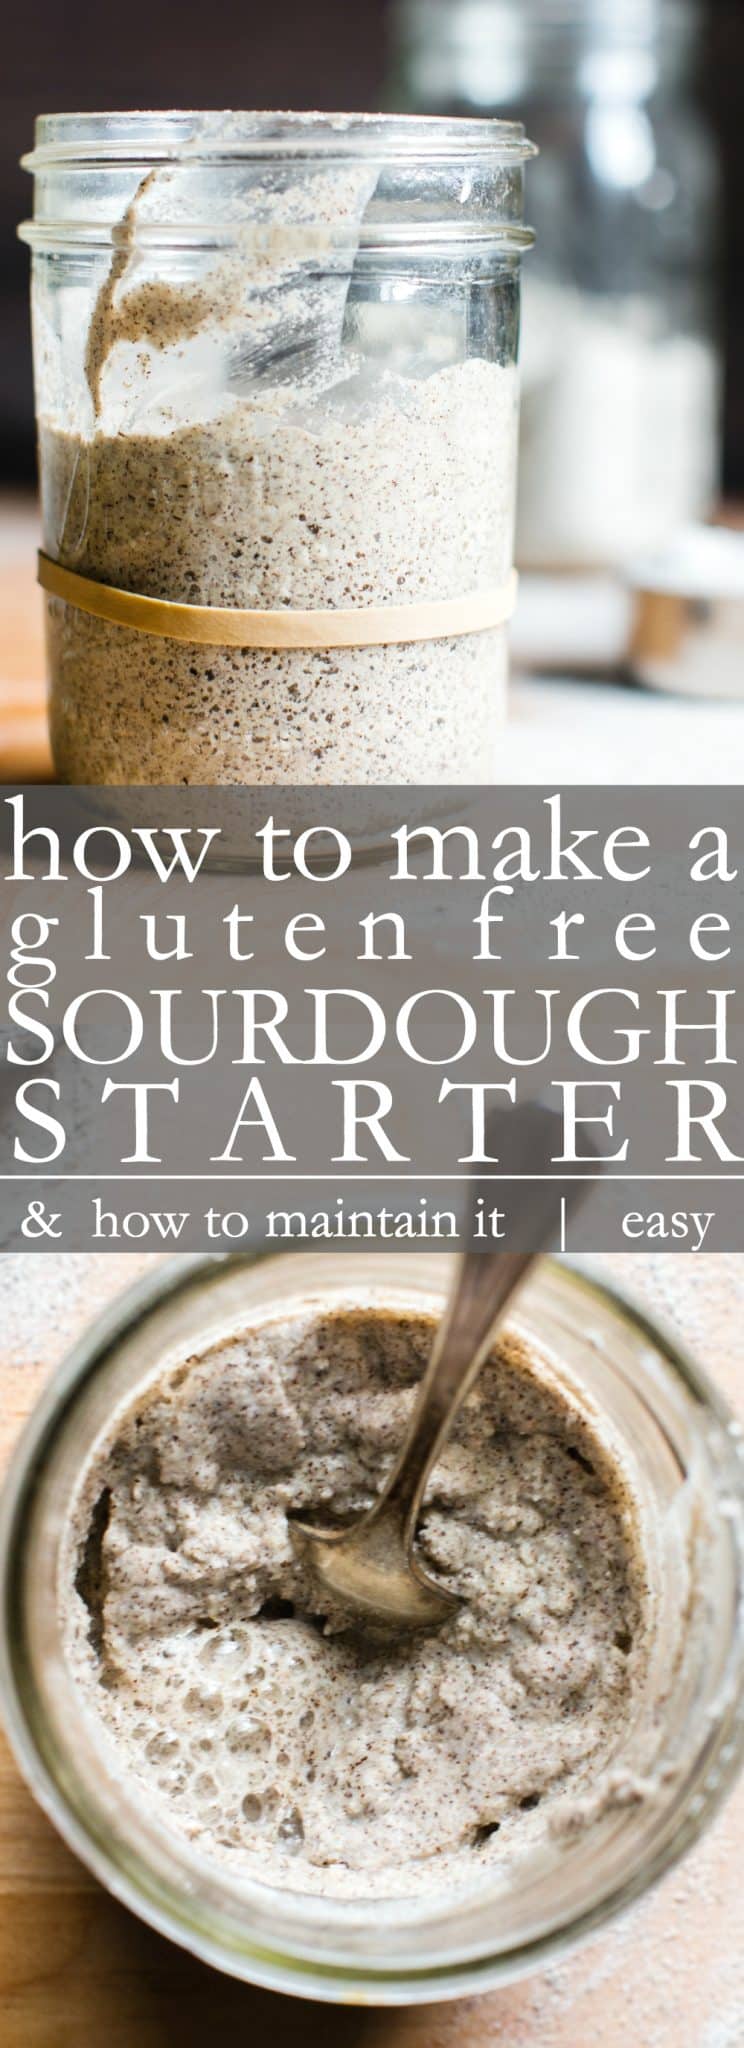
Making a gluten free sourdough starter couldn’t be easier. Start with a few simple ingredients, a little time and patience, soon you’ll be making delicious homemade gluten free sourdough bread, pizza, pancakes, and waffles!
A Gluten Free Journey
I started my gluten free sourdough journey in the summer of 2018. At the time I had just recently become proficient at sourdough bread when my doctor declared she wanted me to give a gluten free trial a go. And so the journey began.
I’m eating gluten again, but through the development of this gluten free starter, and consequently seeded gluten free sourdough bread and gluten free sourdough pizza crust, the Vanilla And Bean community has shown interest.
Gluten free sourdough starter is simple to make, but it took a bit of trial and error for me to get to this point. While it’s similar to developing a glutenous sourdough starter, I found some gluten free flours to be more reliable than others in producing a consistent GF sourdough bread starter result. After months of testing, I’m sharing with you my best gluten free sourdough starter.
If you want to learn how to make delicious and flavorful homemade gluten-free sourdough bread recipes, then a strong GF sourdough starter is where to begin.

How to Make a Gluten Free Sourdough Starter
This simple recipe generally takes about 5-7 days to complete, but it could take longer. You’ll think about it more than the time it takes to make it: checking on it periodically, looking for bubbles, taking a whiff for a bit of that sweet and sour aroma we’re after. The key is patience and consistency (see recipe card below for details).
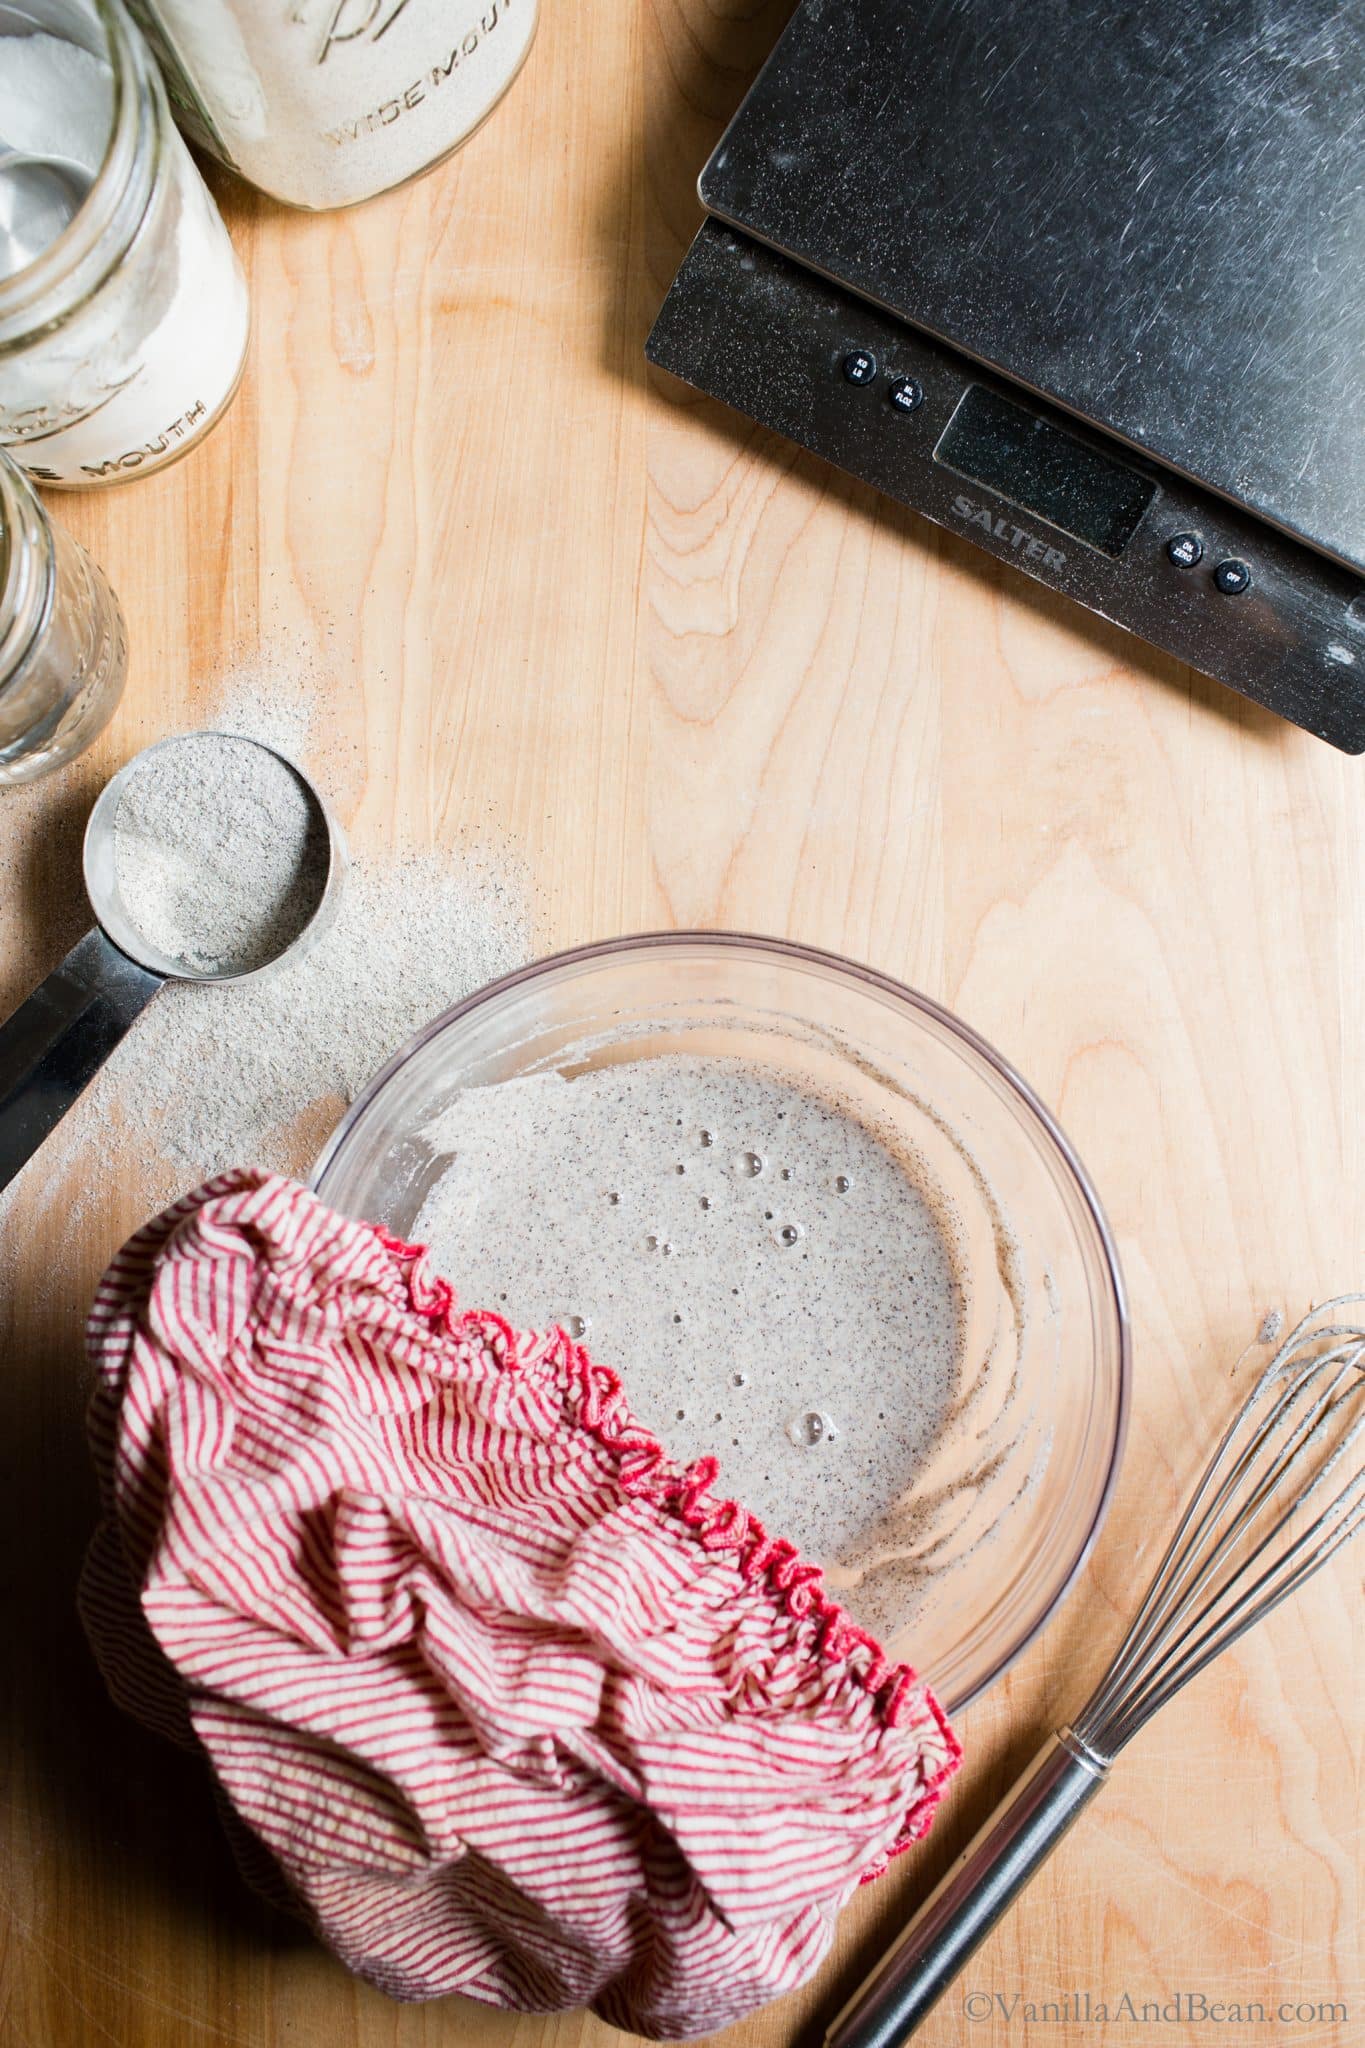
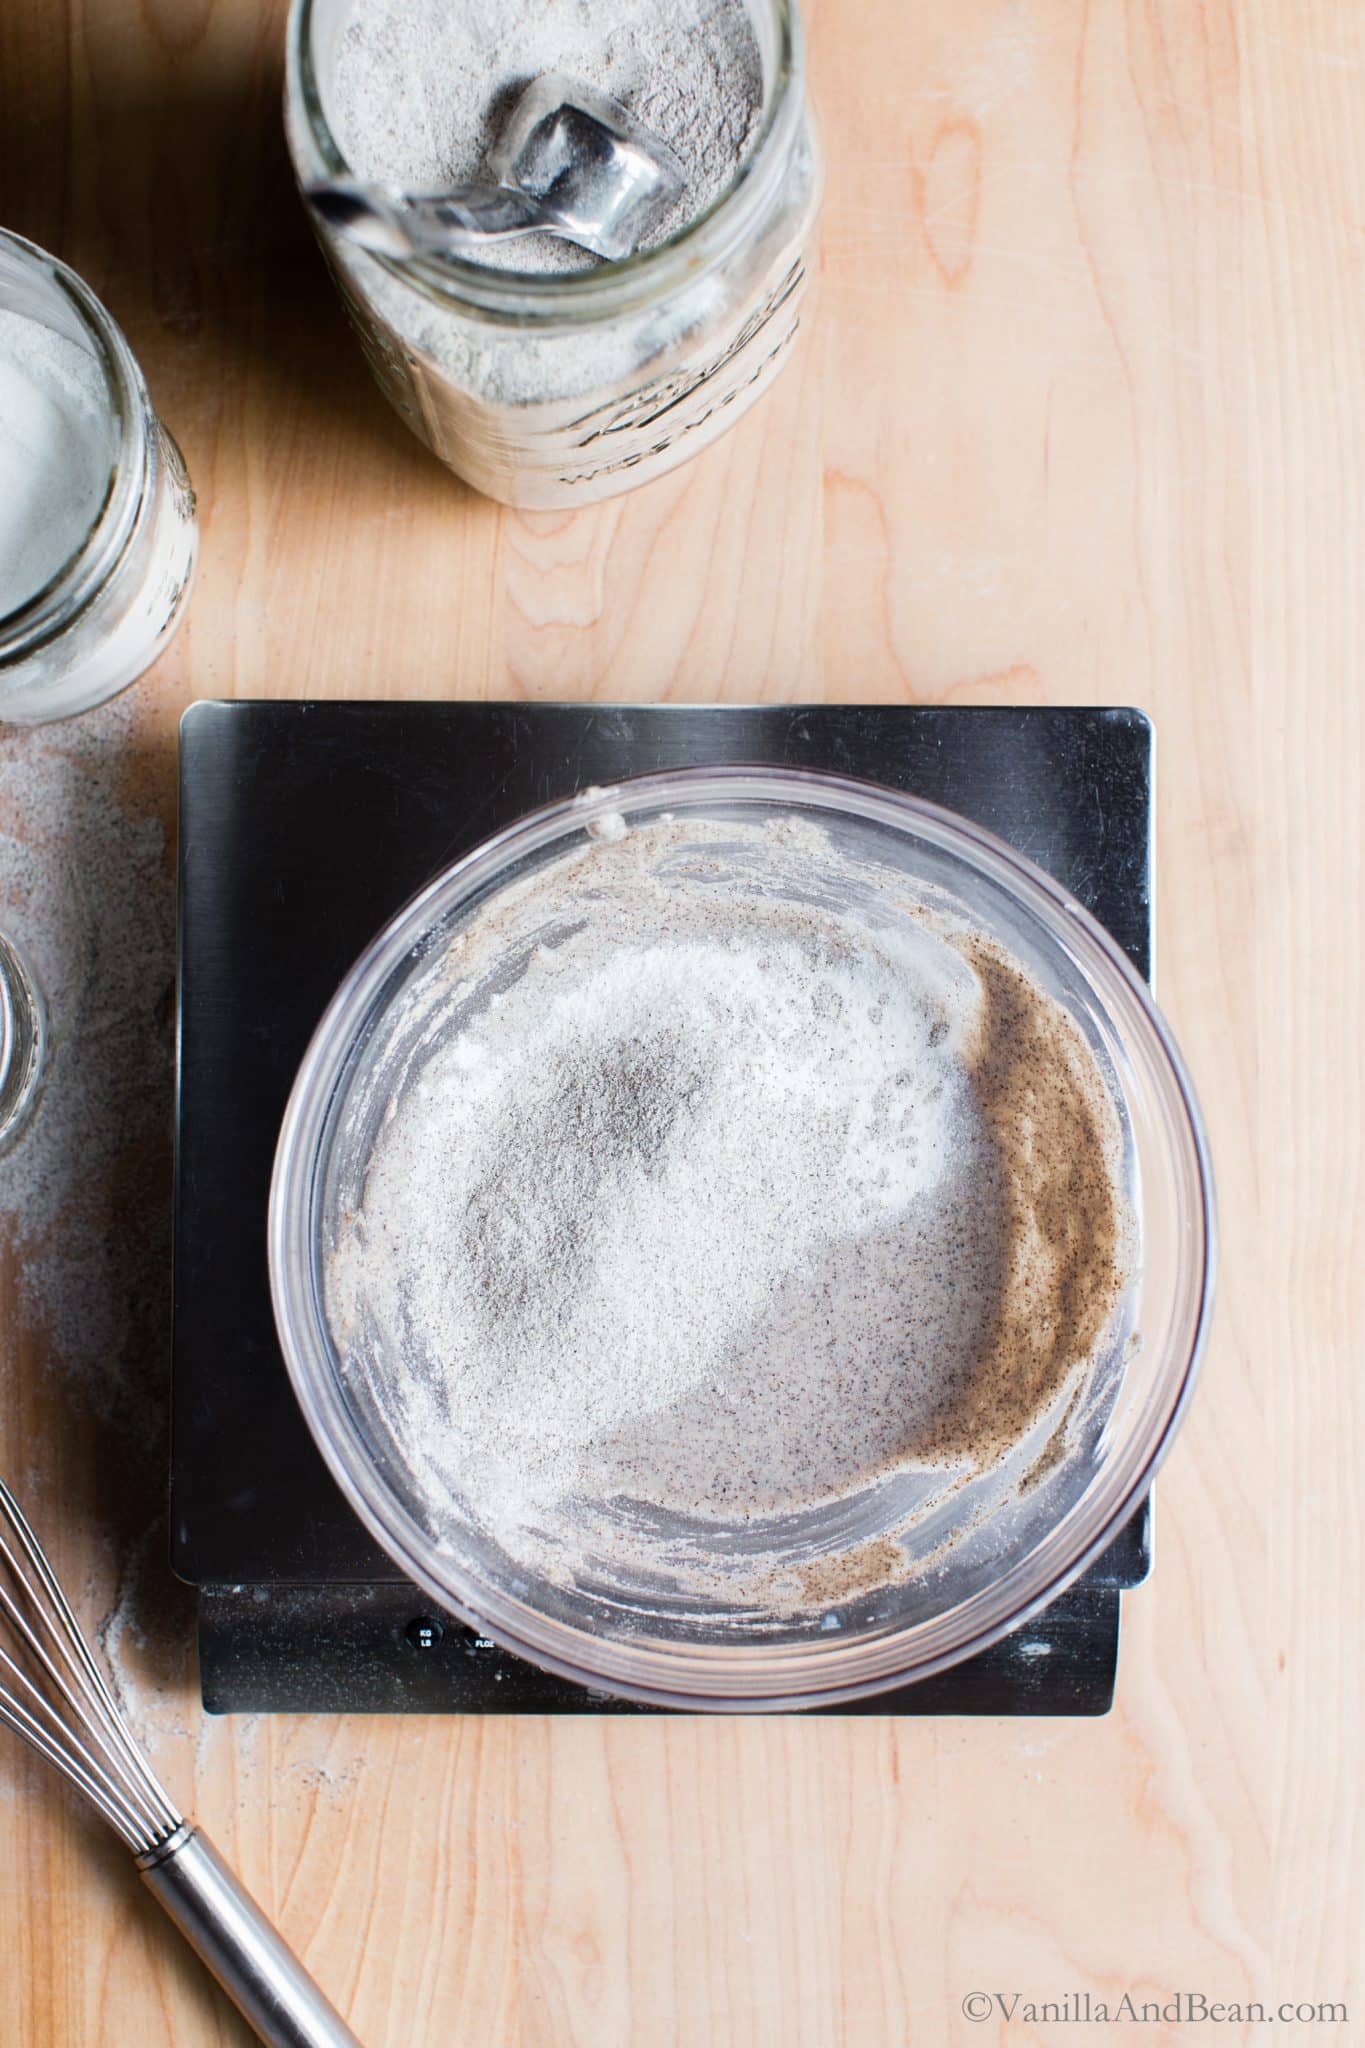
- Day 1: In a medium glass bowl or jar, whisk buckwheat or brown rice flour with sweet rice flour and water. Lid or cover with a damp tea towel and set aside at room temperature 24 hours.
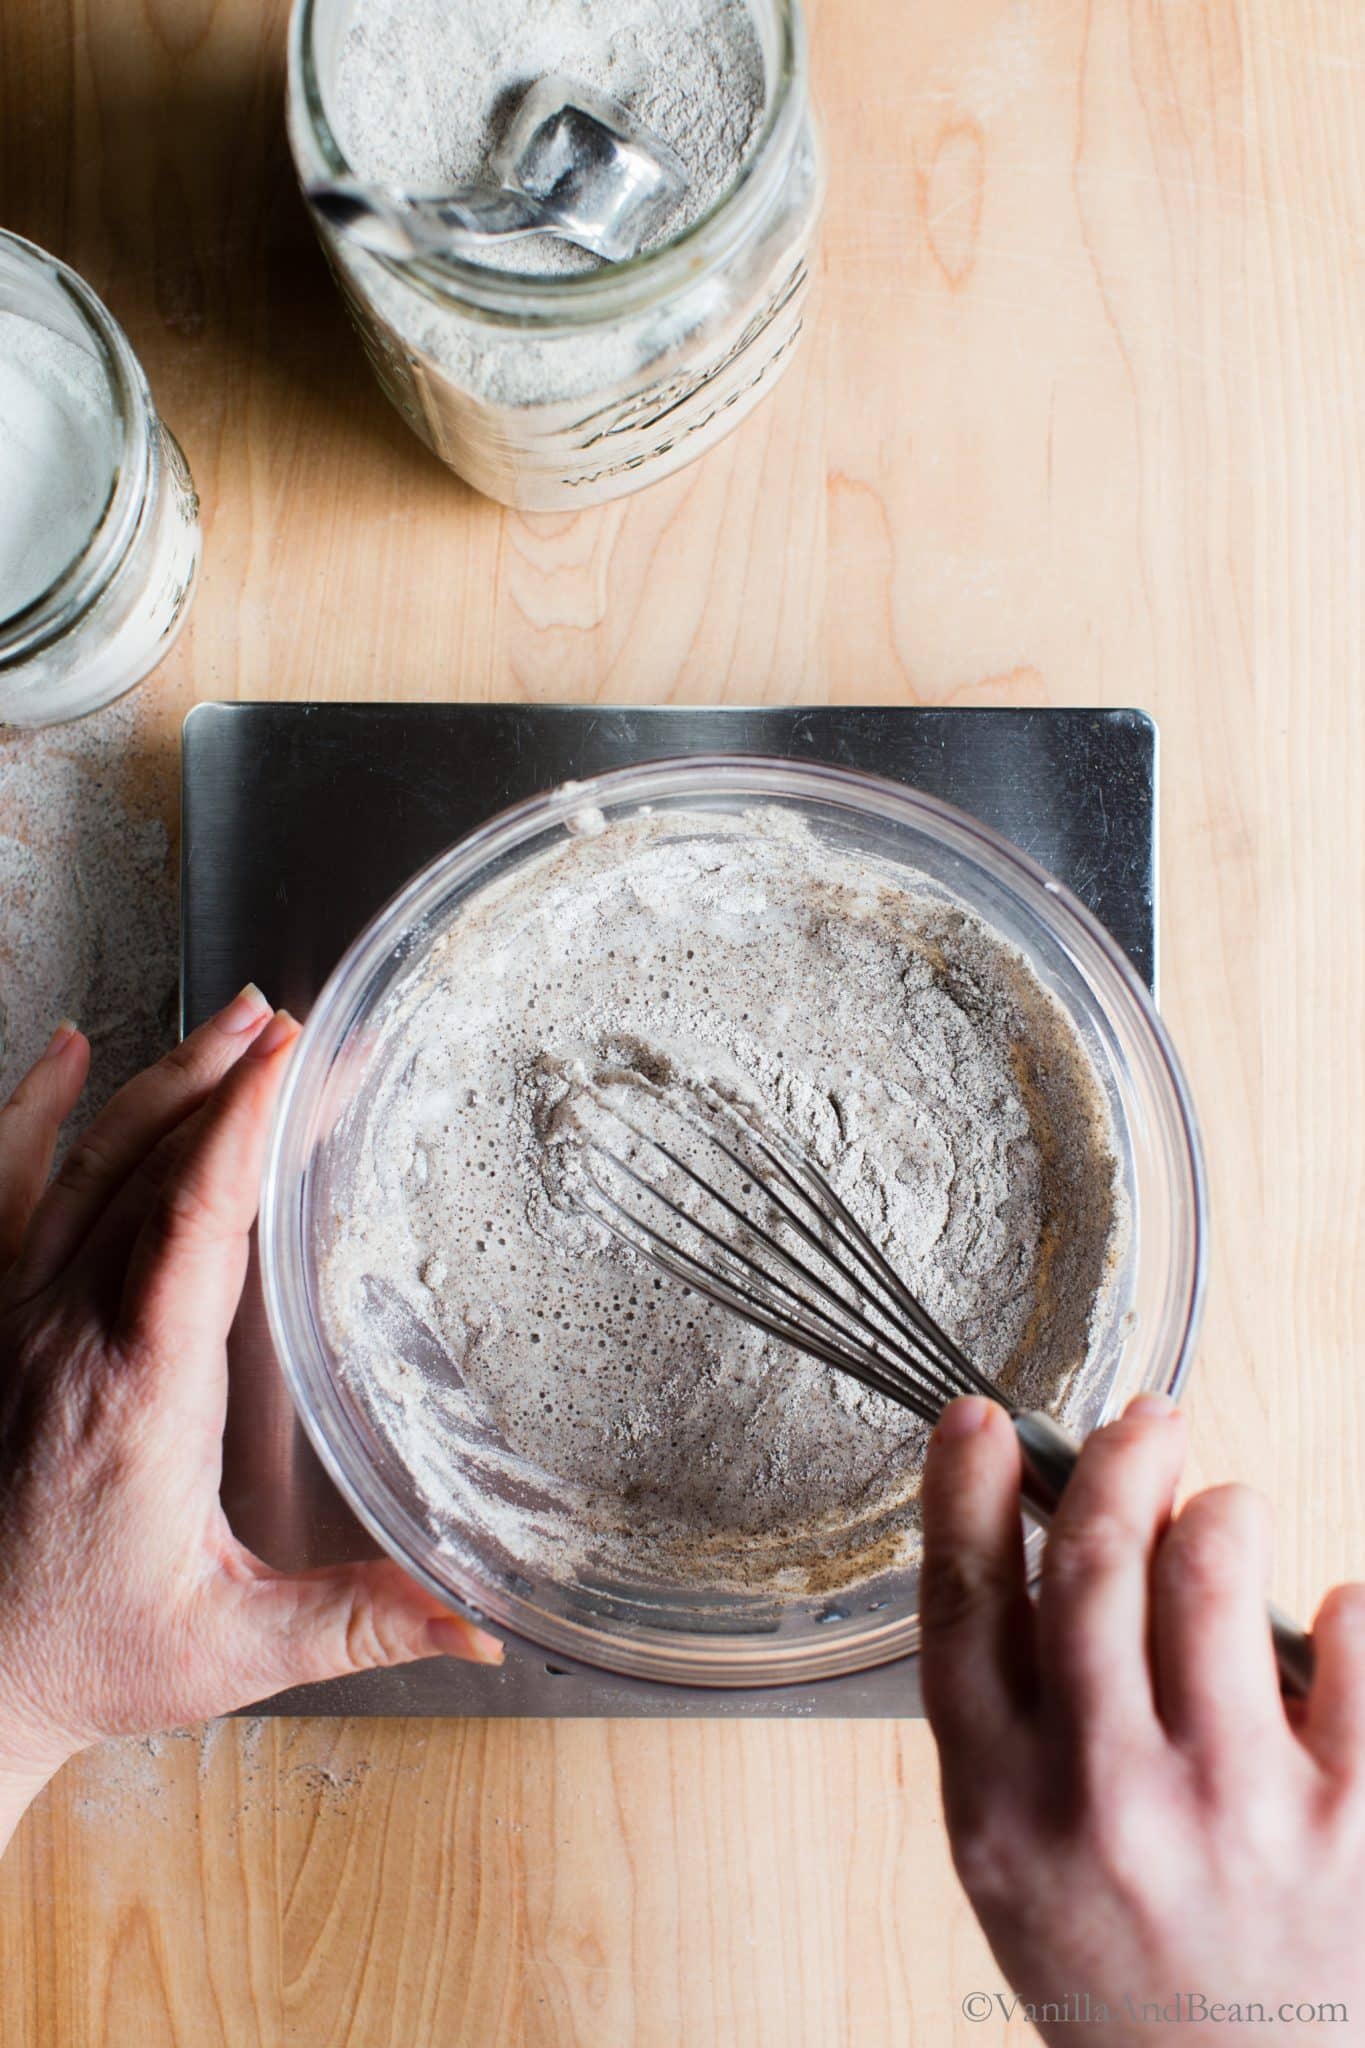
- Day 2: Take a portion of the previous days mix (discard the leftover), and in a clean jar or bowl whisk in previous days mix, water and buckwheat and sweet rice flour. Lid or cover with a damp tea towel and set aside at room temperature for 24 hours.
at about day three or four, your starter will begin to smell unpleasant, like sweaty socks. keep going… it will change for the better!
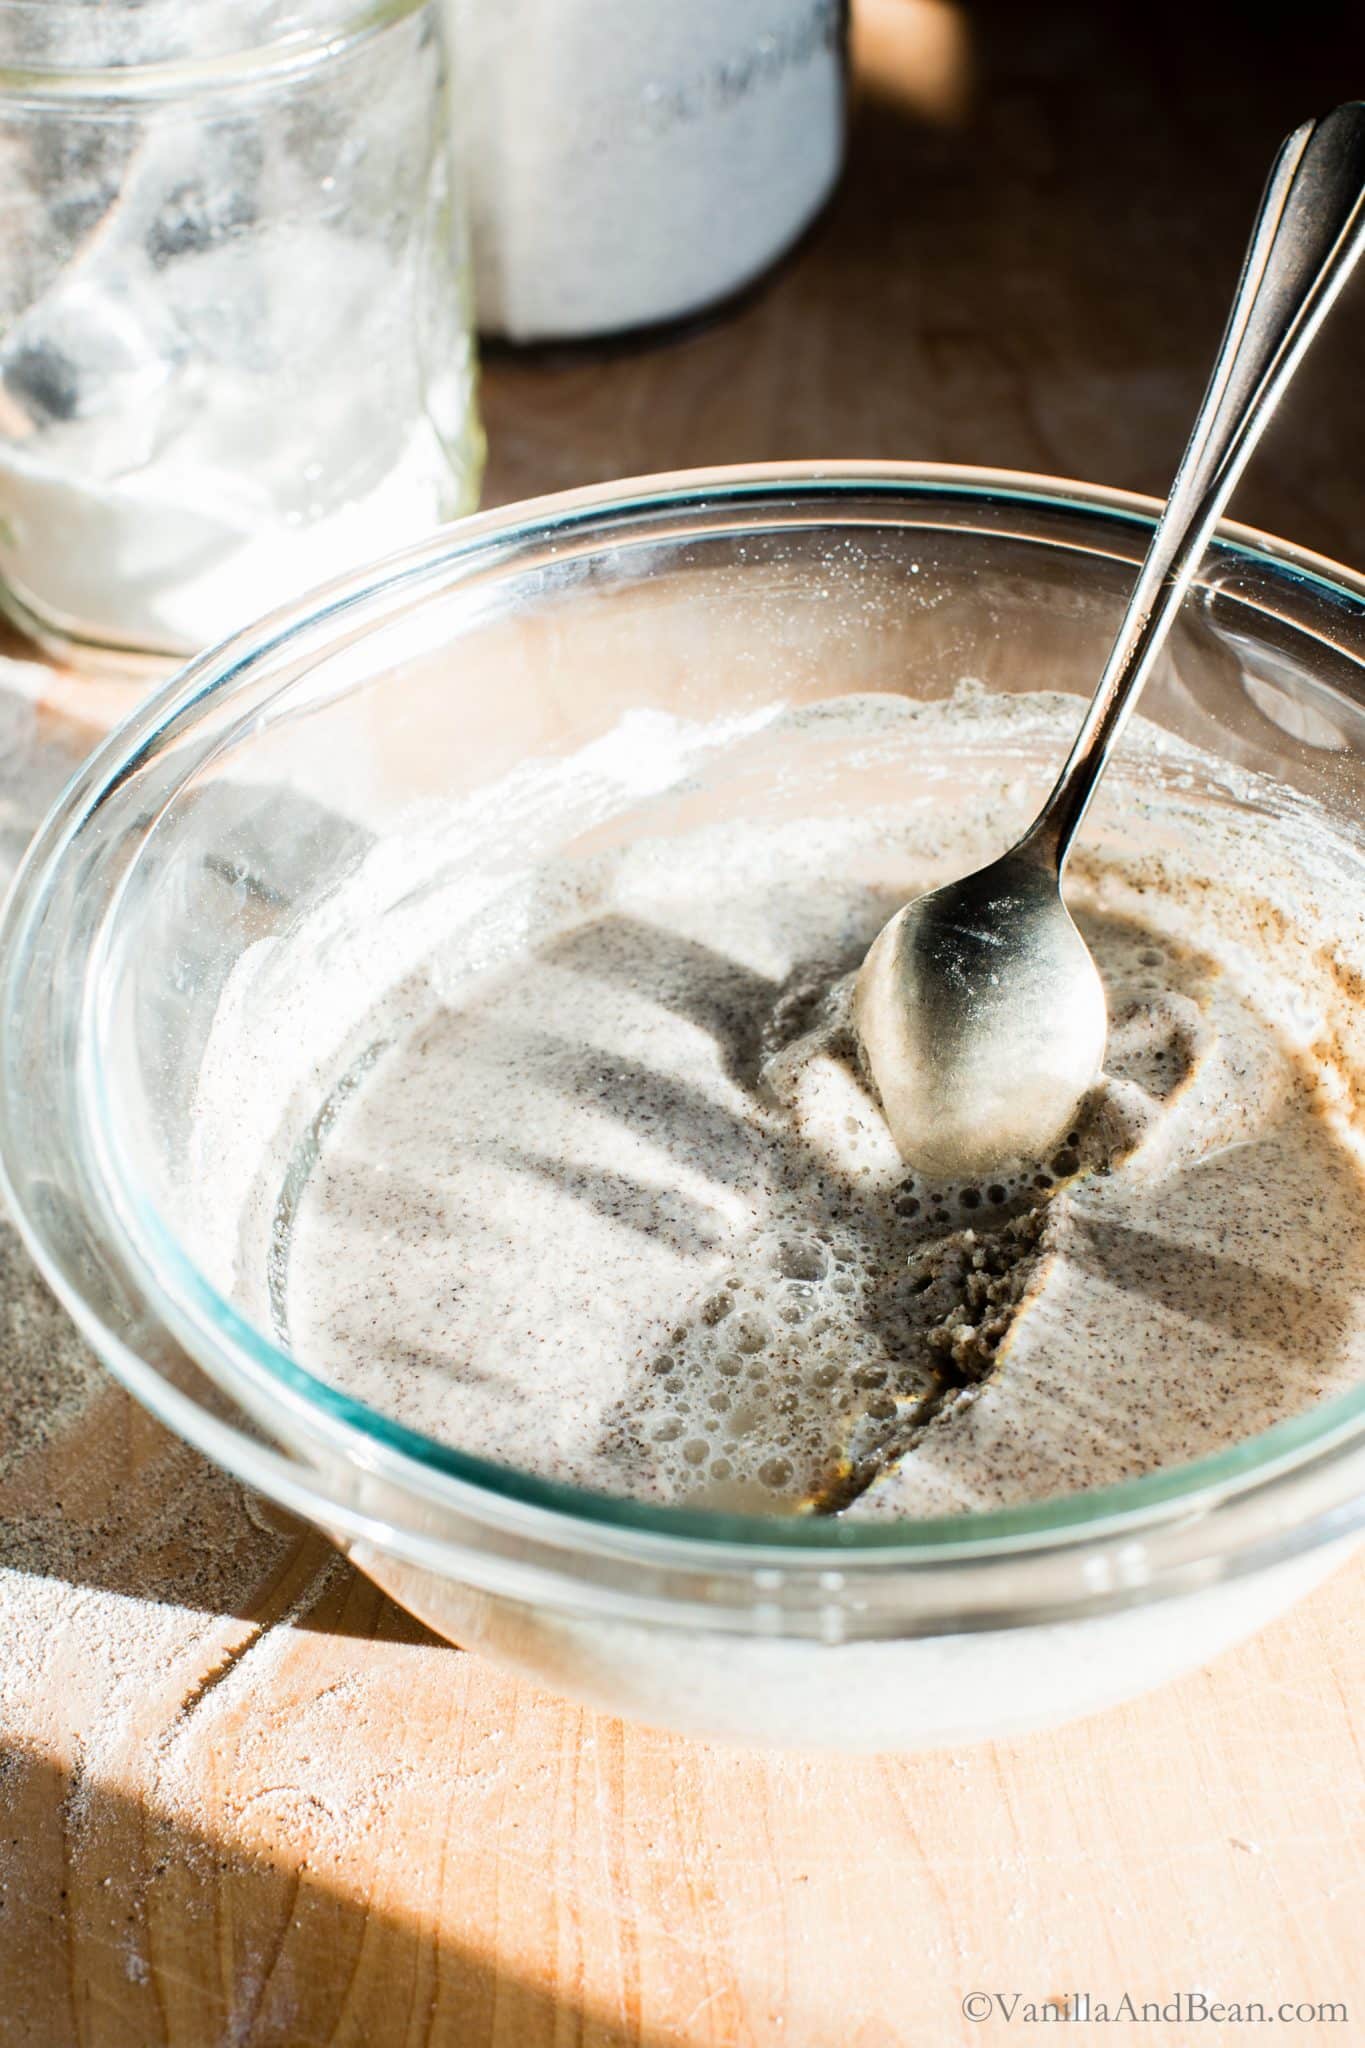
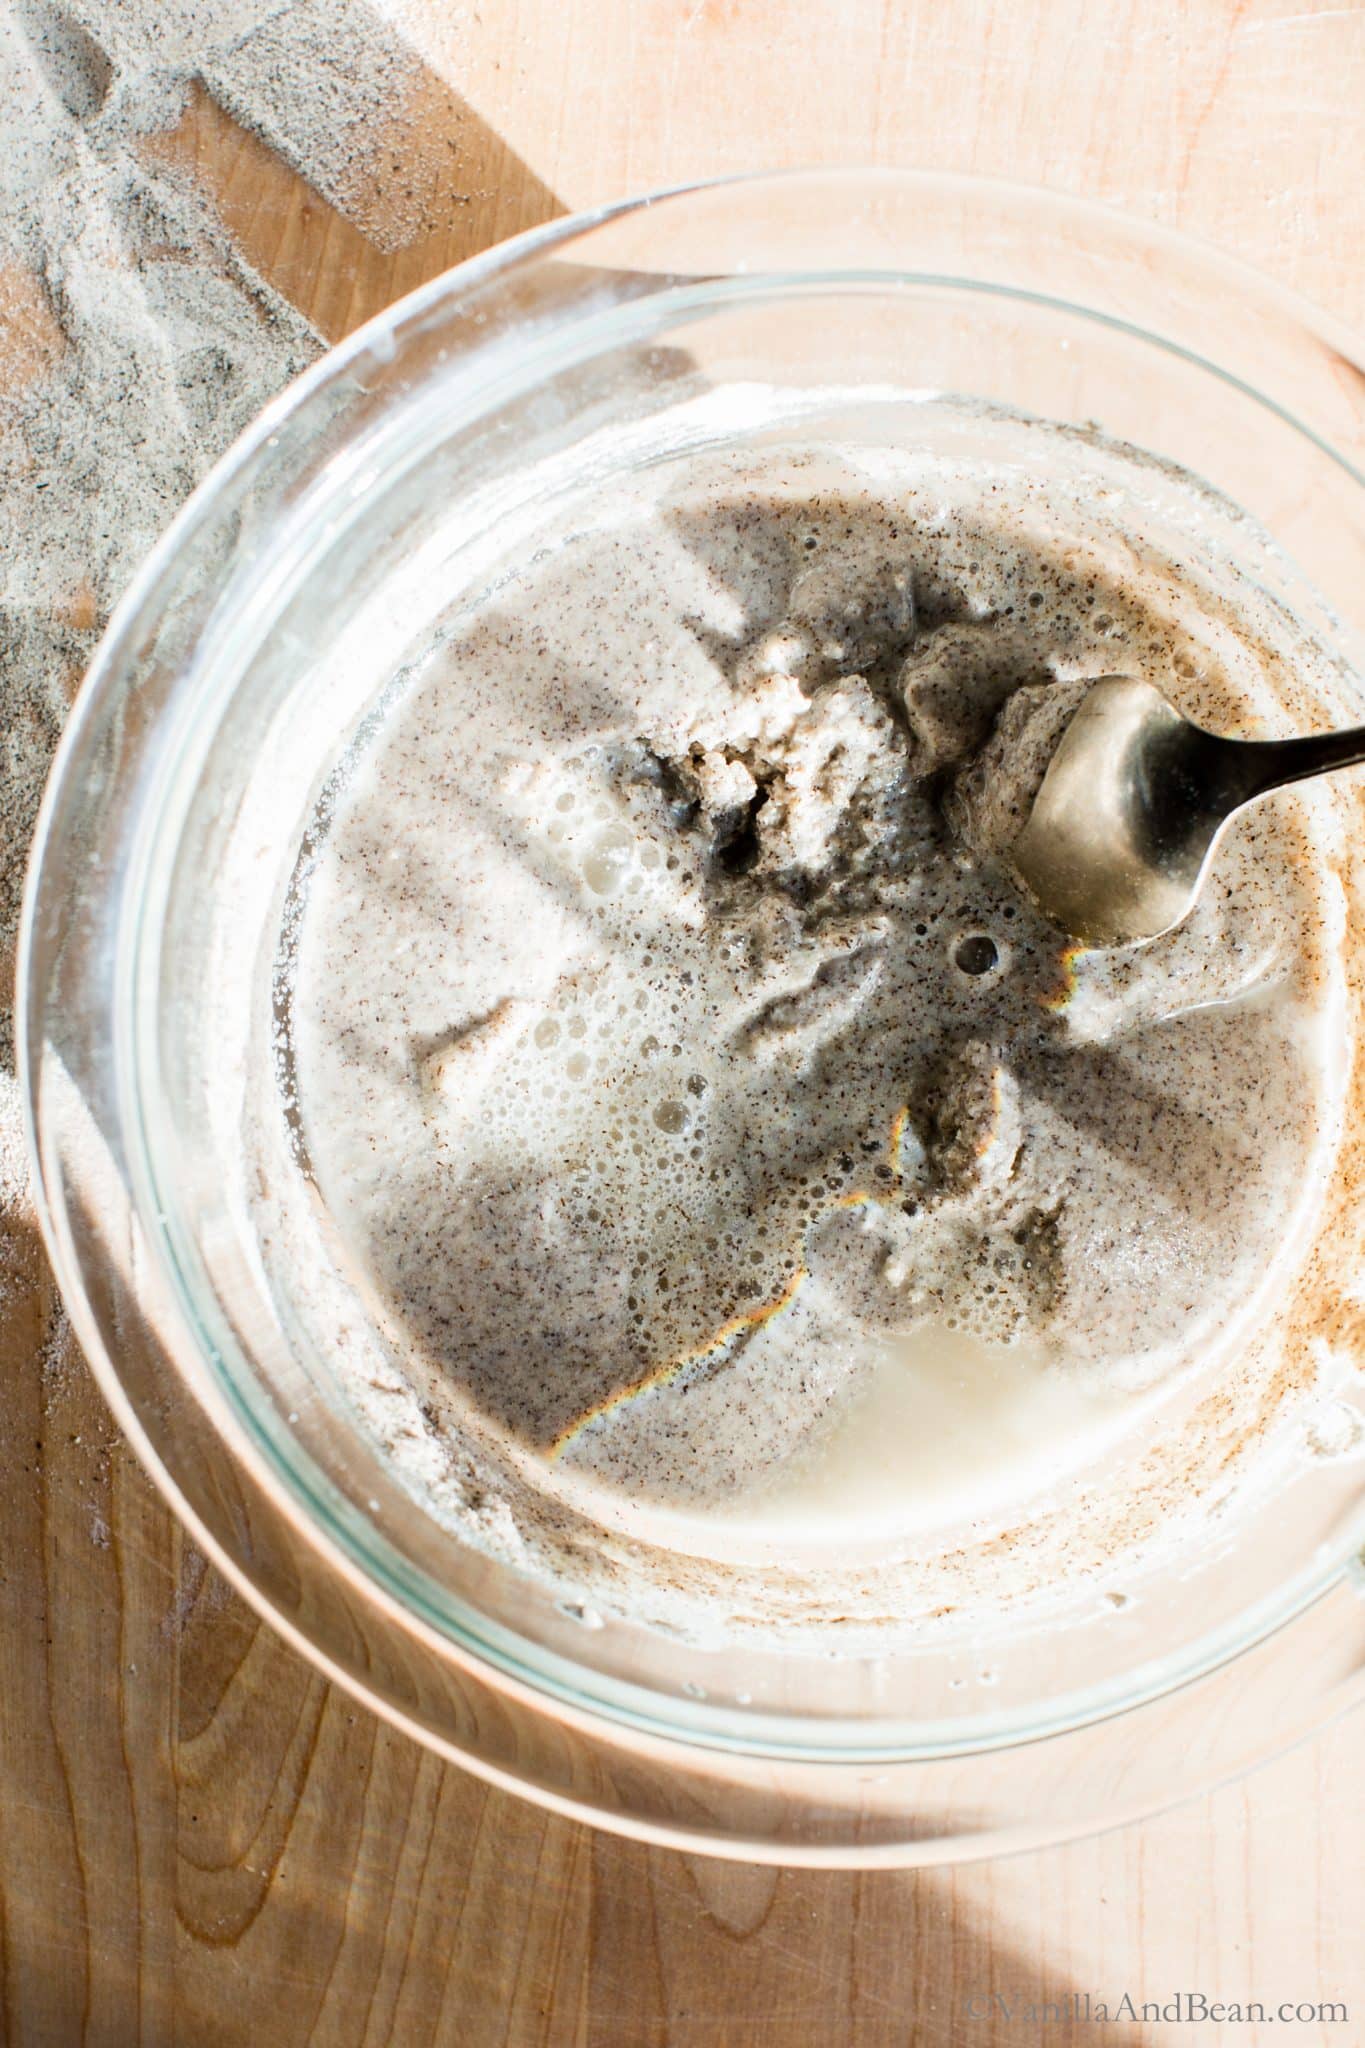
- Day 3 through 6…or 7 (or beyond): Repeat day two until the mixture becomes puffy, has a pleasant sweet-sour aroma and bubbles begin to form under the surface. How many days it takes to complete to get to this point depends on ambient temperature and available, naturally occurring yeast and bacteria. Six to seven days has been my experience.
- Note: Time mentioned here is a guide rather than a determining factor for when the starter is ready. Use the cues and your senses to determine when it’s ready. It may take longer than seven days.
It’s ready when it’s ready.
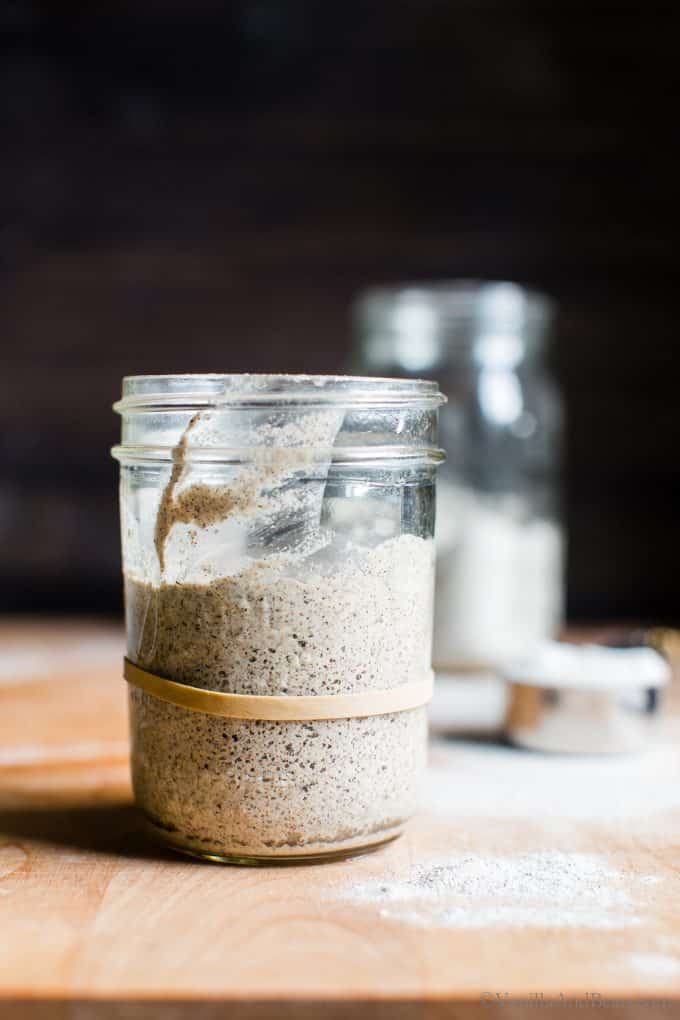
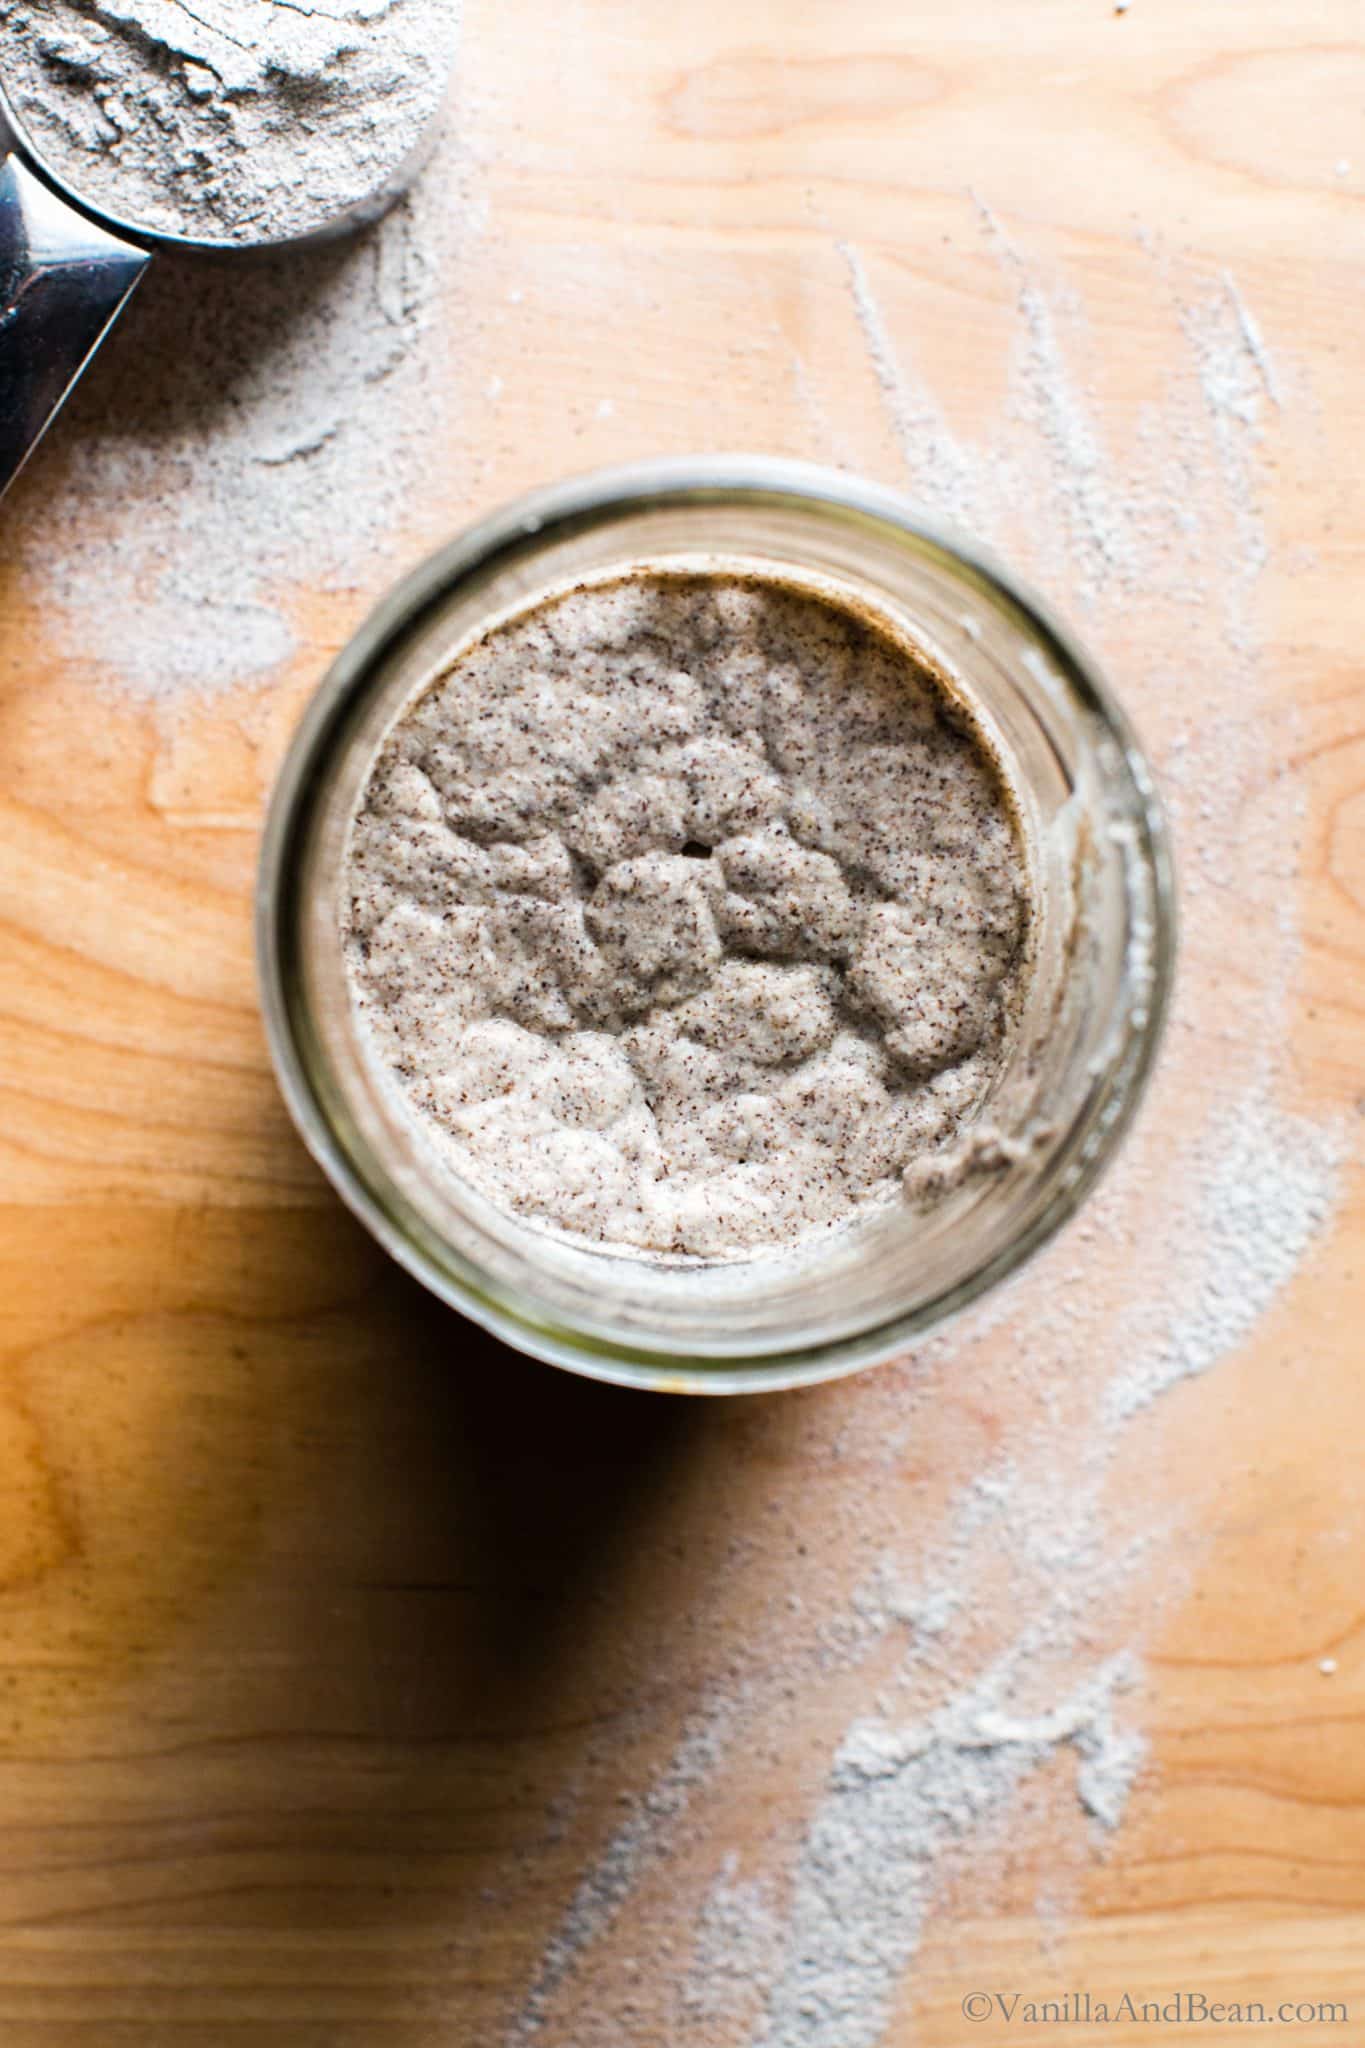
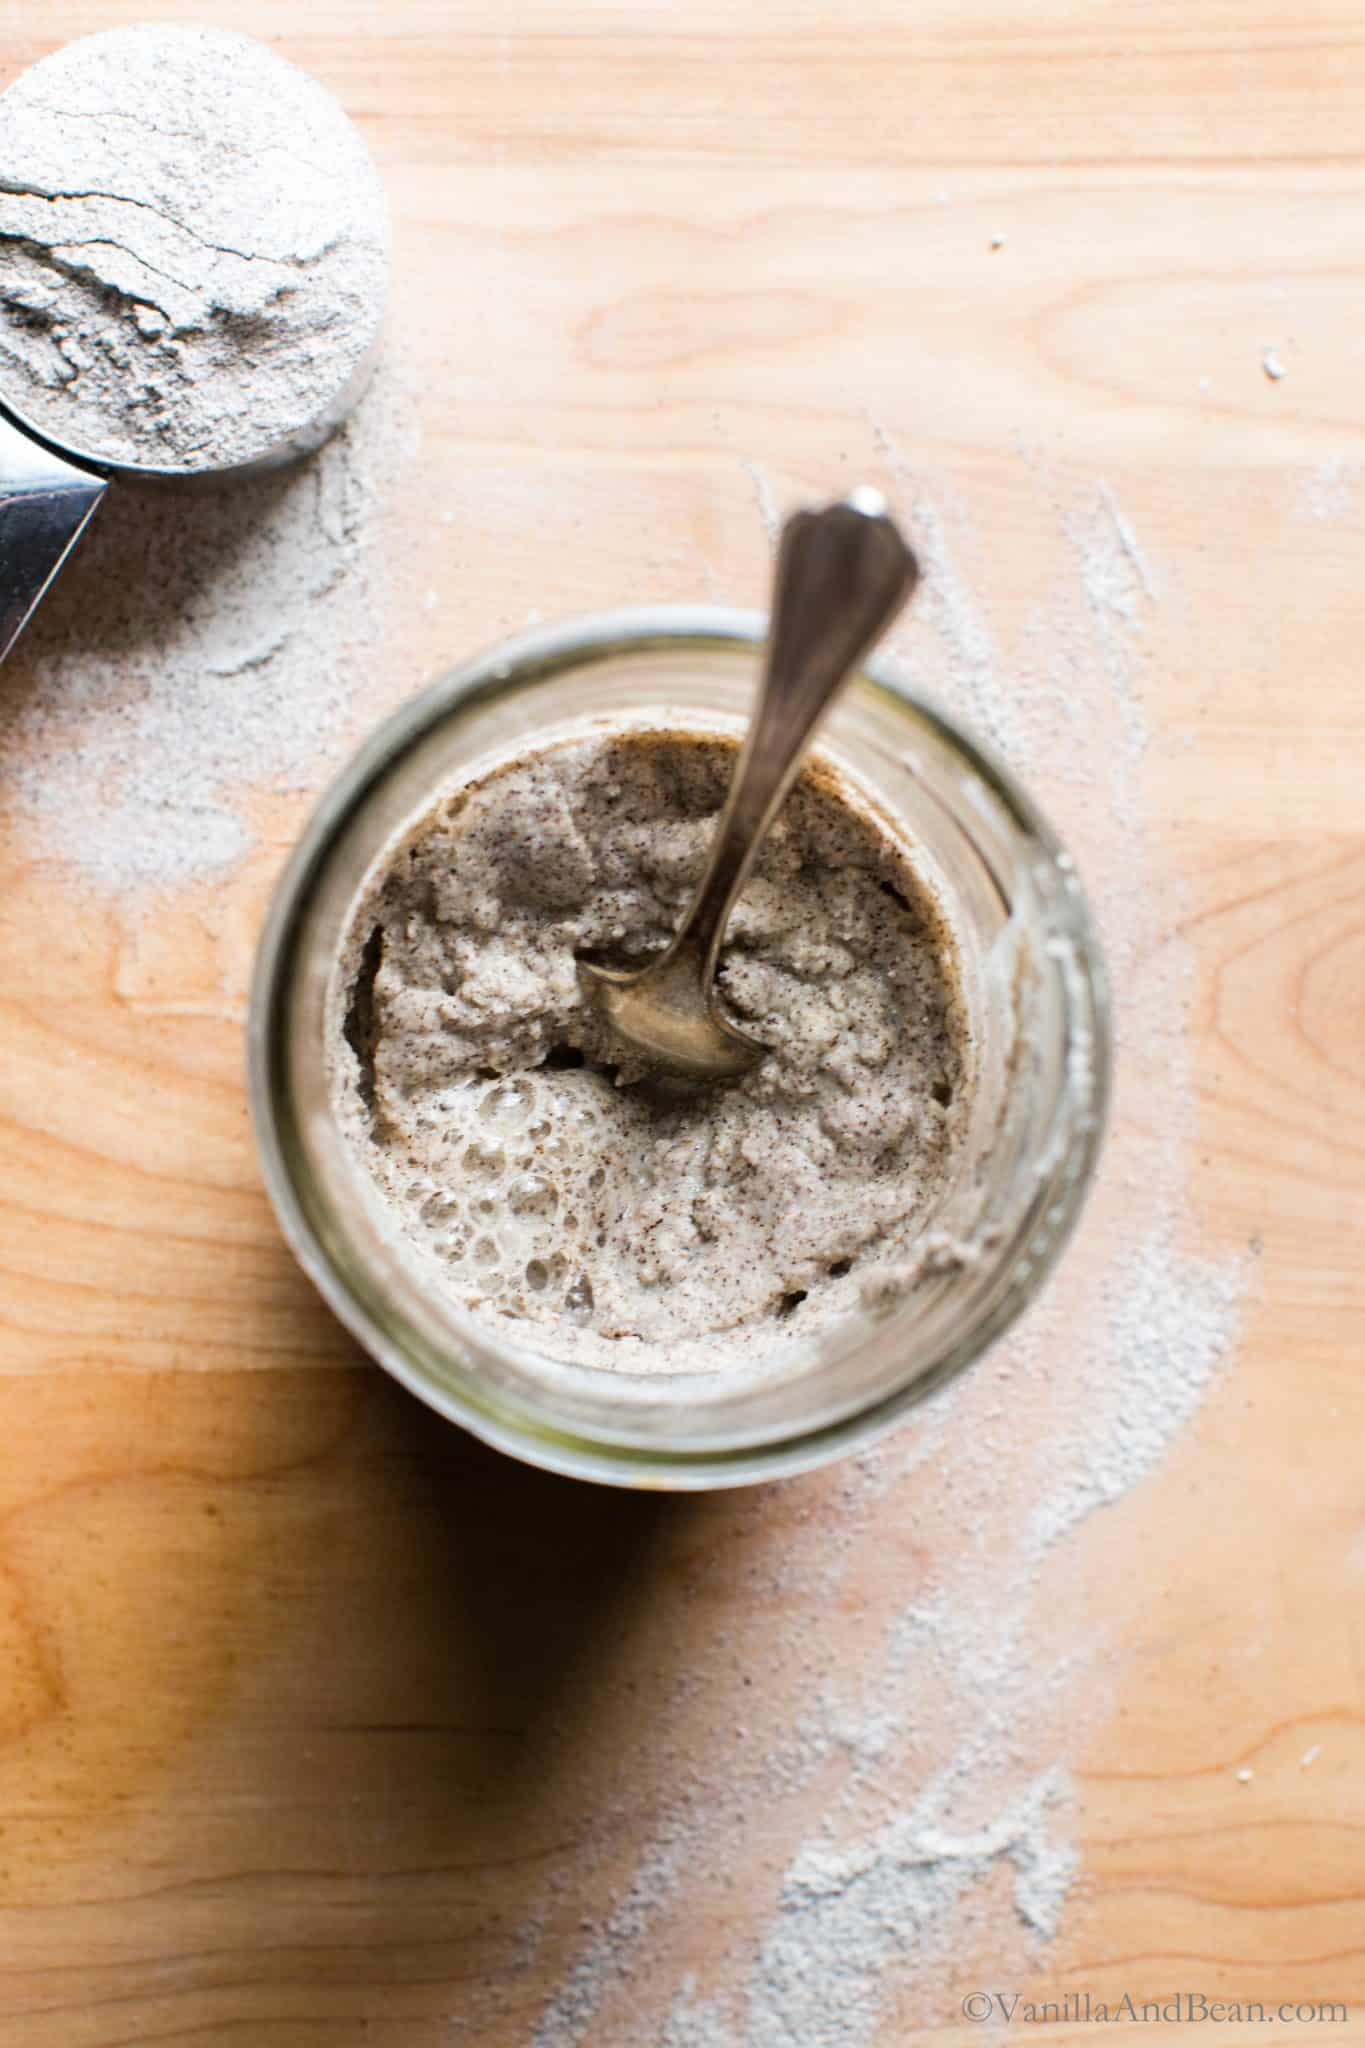
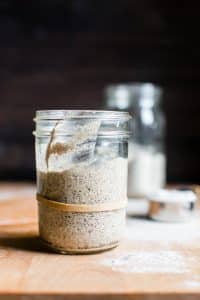
- Once the starter is puffy, has a sweet-sour aroma and bubbles are present under the surface (see pictures below), your initial starter is ripe or ready.
- Last, to keep your starter balanced and strong, you’ll need to refresh it, or feed it before using it in a recipe.
How to Refresh Your Gluten Free Sourdough Starter
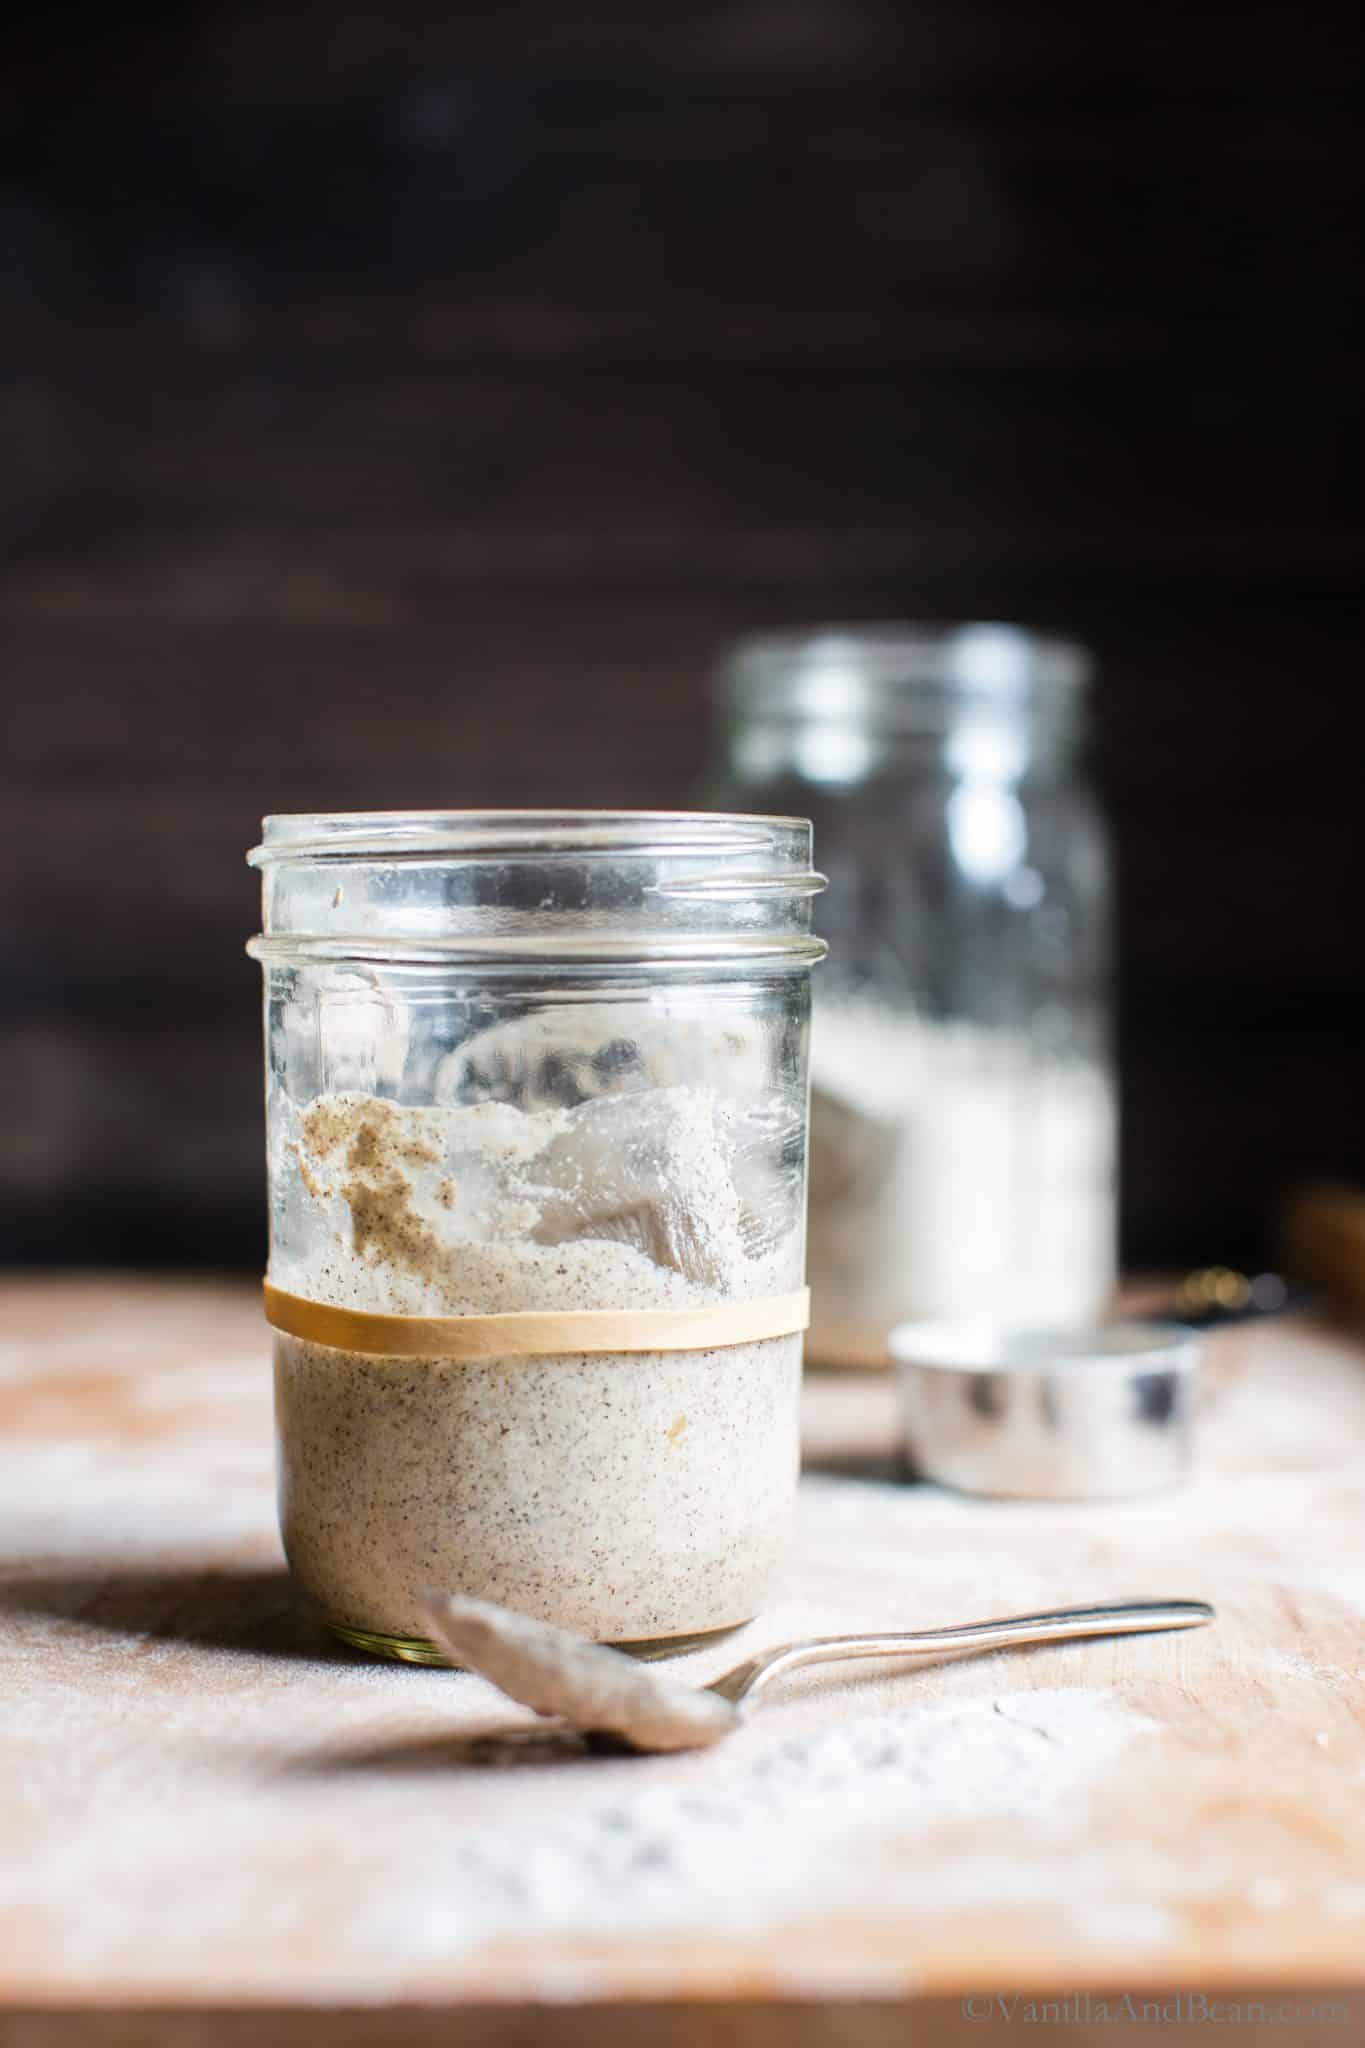
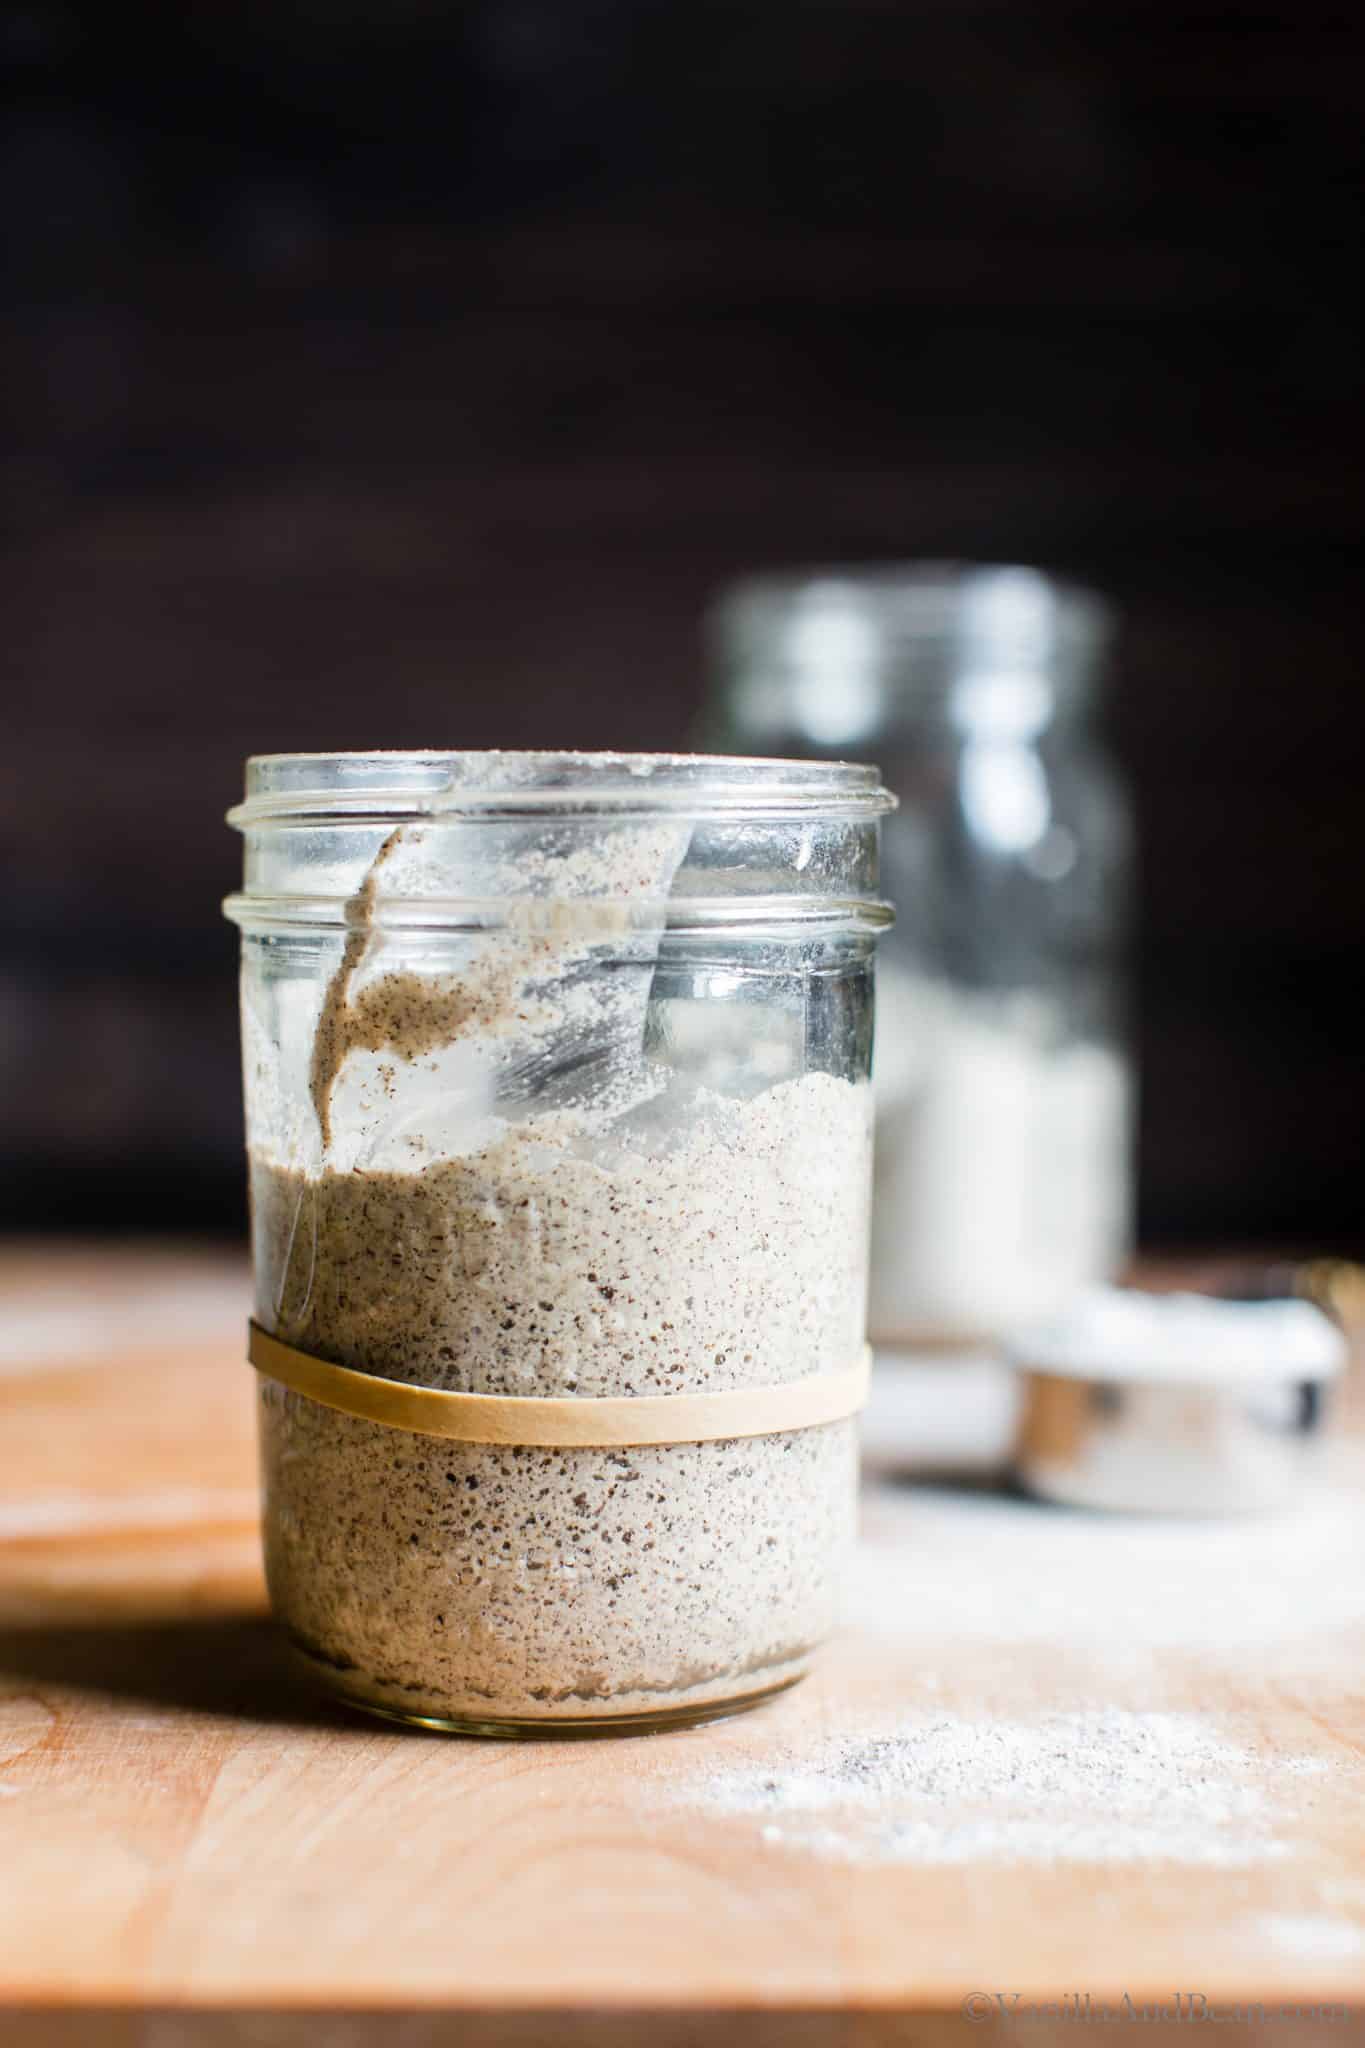
Refreshing a gluten free starter keeps it strong. I refresh mine at least every other week, once a week if I remember, when stored in the fridge, but always 8-12 hours before I’m ready to mix the sourdough. Also, I keep the starter in a glass jar with a rubber band around the starting level (after I refresh it) so I can track its progress as it develops.
To Refresh Your Starter
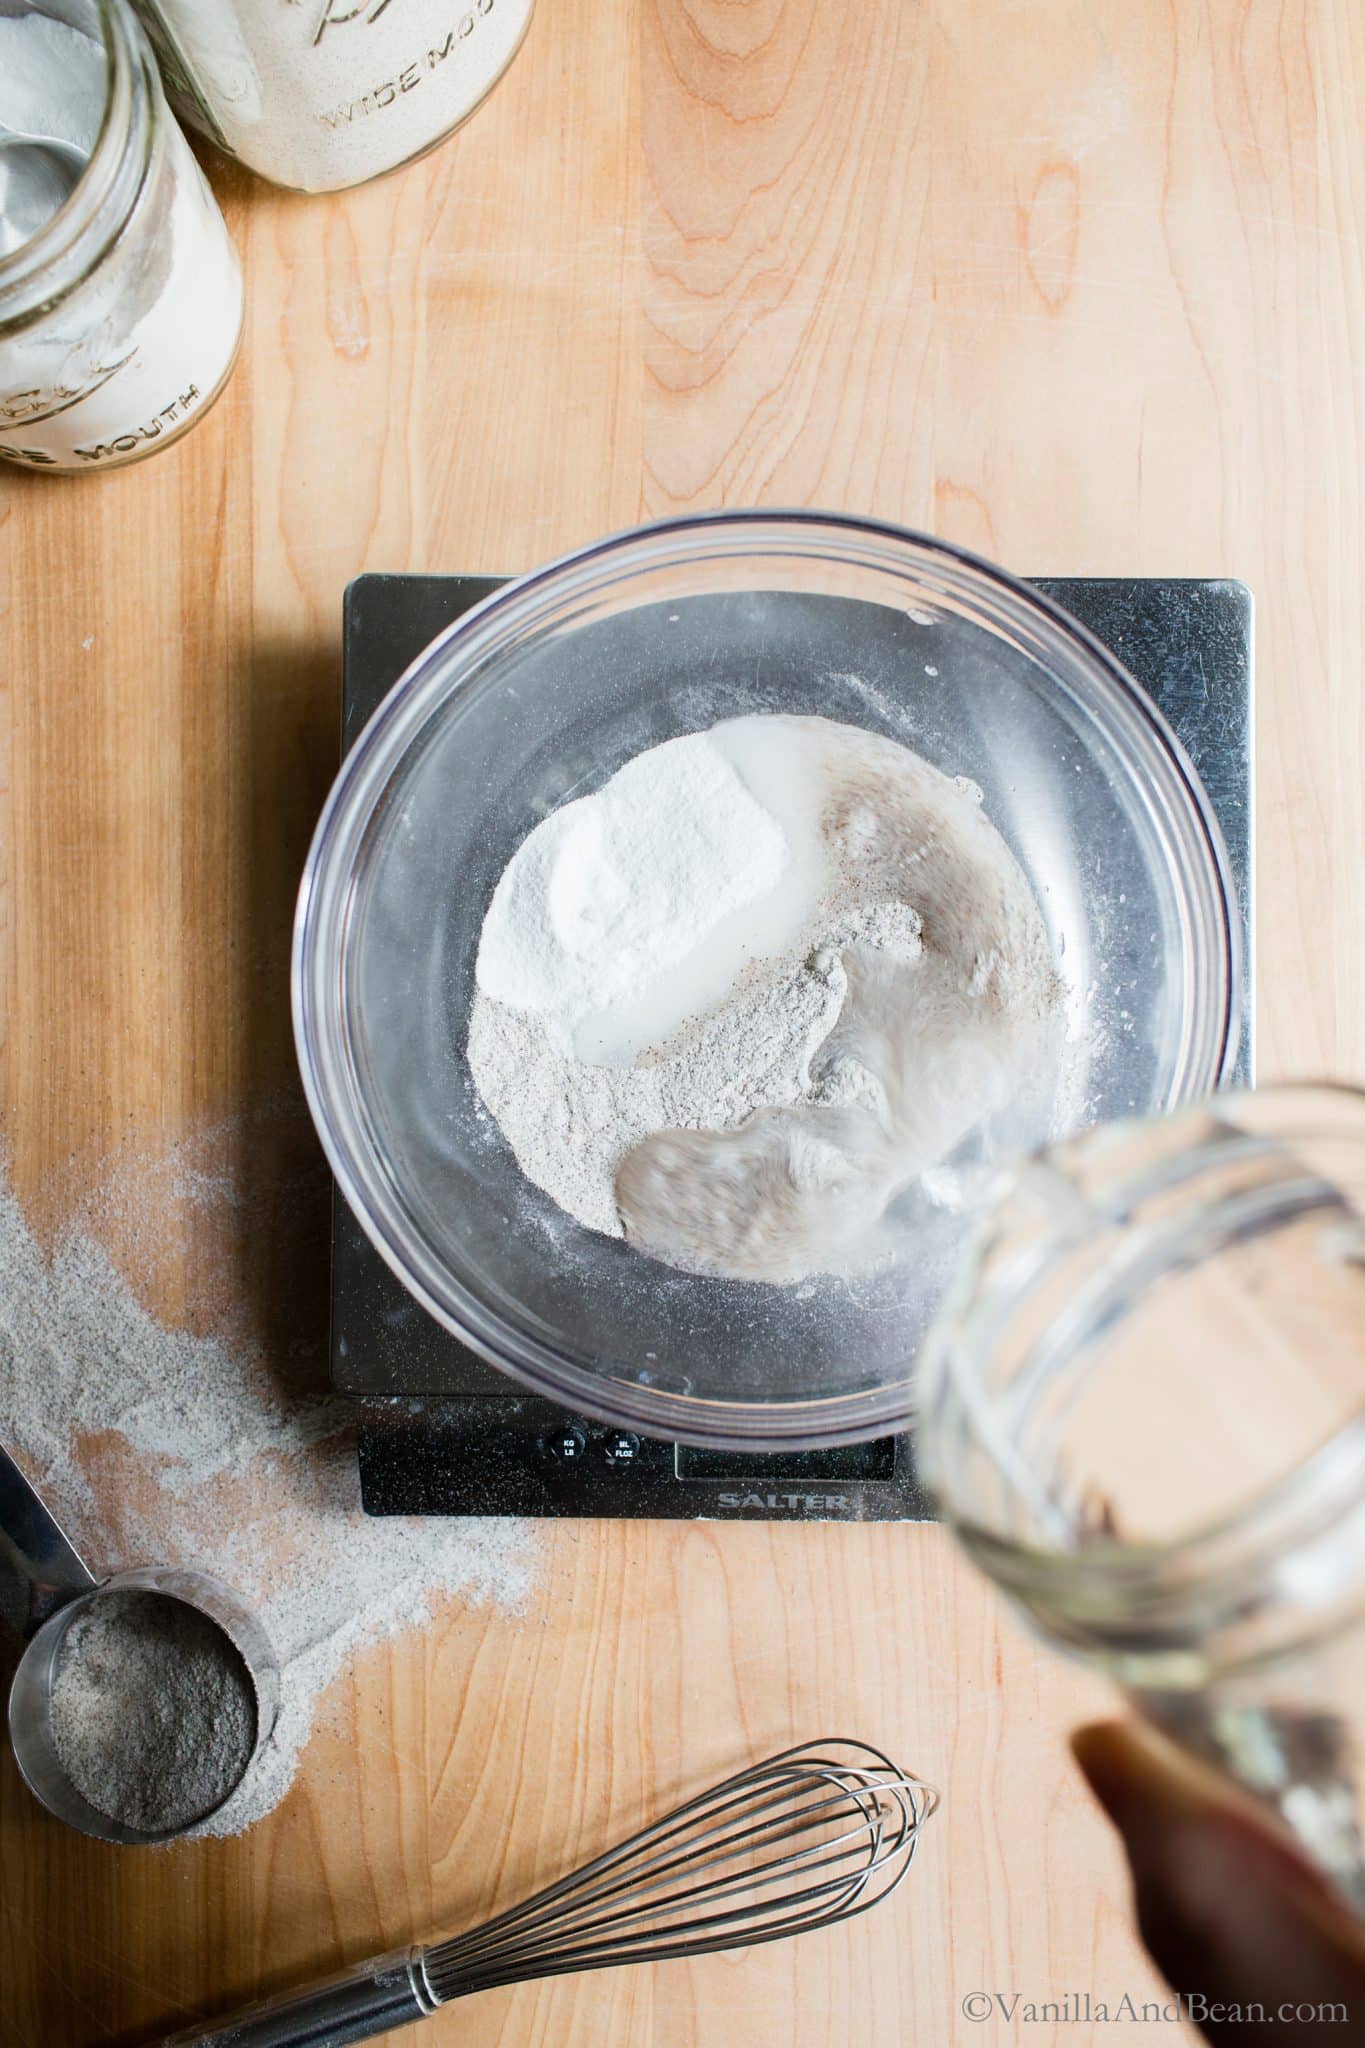
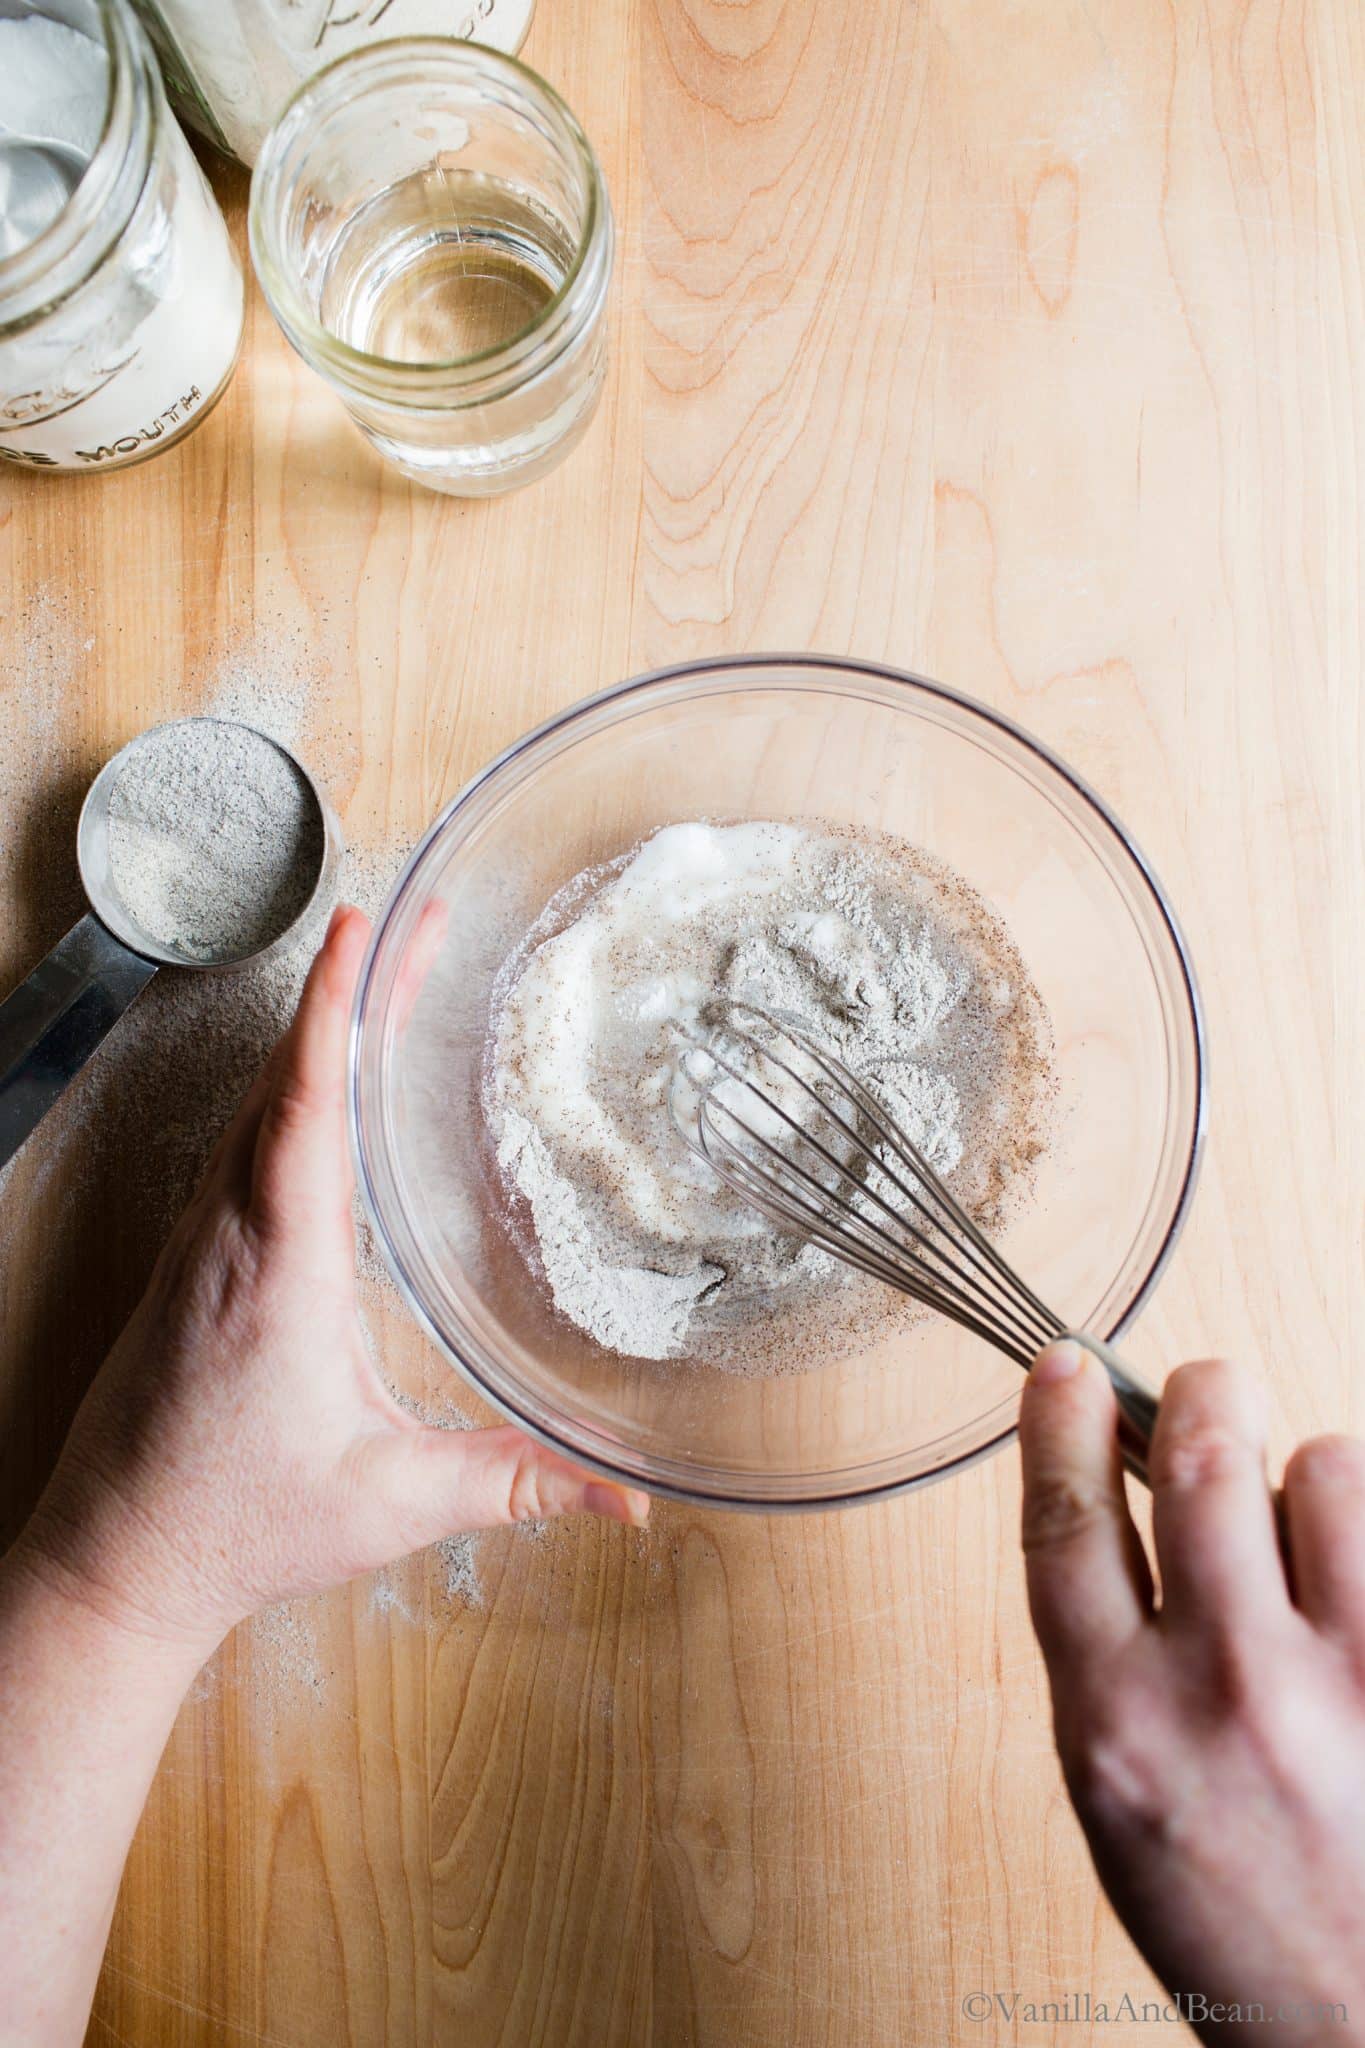
- First, in a clear jar you’ll add part of your sourdough starter (throw out or save the leftover to make gluten free sourdough pancakes or sourdough waffles using your discard). Then you’ll whisk in the water and add the flours. Mix well until the flours are hydrated.
- Next, loosely lid and wrap a rubber band around the jar at the height of the starter. This will give you a visual indication of how much the starter has grown as it grows to double in size.
- Last, allow the starter to develop at room temperature for about 8-12 hours. The time will vary due to ambient temperature.
When is the Starter Ready?
Once your GF sourdough bread starter has doubled in size, is bubbly and has a sweet-sour aroma, it’s ready to use in this gluten free sourdough bread recipe. After measuring out the portion needed for your recipe, refresh the starter, as indicated above and store in the fridge until your next feeding.
The starter will not stay in this doubled in size state for long. At some point after doubling in size, it will begin to lose its strength and fall. The exact amount of time will vary from starter to starter but I’ve typically observed a few hours window, at room temperature, where the starter will remain doubled in size. On warm days, it’s shorter. But in the refrigerator, it’ll hold for quite a while. I’ve observed at least over eight hours! Once it starts falling back down after doubling in size, you’ll need to refresh (or feed) it and allow it to double in size again before using it in a sourdough bread recipe.
If your starter is struggling to double in size, you’ll need to go through a few cycles of refreshment to build strength in the starter. You can even refresh twice within a 12 hour period if needed. Doing this builds flavor and will help later in the development of your gluten free sourdough bread. I do a series of refreshments after freezer storage or a long period of neglect in the refrigerator before using it in a recipe.
How to Maintain Gluten Free Sourdough Starter
Think of your sourdough starter as a refrigerator pet that needs regular attention. There’s yeast and bacteria that make up the starter so it needs to be fed (refreshed) on a regular basis. Your starter can be stored at room temperature if you’re baking daily.
However, I use mine about once every two weeks, so I store my starter in the refrigerator. I’ve gotten away with refreshing it only before and after I bake and this system of an every other week feeding/baking schedule works well for me. In a perfect world, it should be fed weekly.
What is That Layer of Liquid?
Sometimes while you’re building your starter and/or after your starter is established, you may notice a layer of liquid that forms on the surface. This liquid is called hooch, a naturally occurring alcohol that indicates your starter is hungry, that it’s a little past time to feed your starter, and is an indication of a weak (hungry) starter. Hooch should have a pleasant sweet-sour aroma. You can pour it off or stir it into your starter and carry on with refreshment.
If you notice hooch after refreshing your starter, and you’ve missed the doubled in size bake window, you’ll need to feed your starter twice a day, about every eight hours, which will remedy hooch and build strength in your starter. Putting your starter in a cooler area of the house should help too. This will slow down the fermentation process.
Freeze Your Starter to Preserve It!
If you’ll be away from baking for a while and need to store your starter longer than a few weeks, it can go in the freezer, unfed. When ready to use it again, thaw it out in the refrigerator and refresh it a few times within a window of 12-24 prior to baking with it. Be sure to allow it to double in size again.
Remember, your starter is ready when it doubles in size, is bubbly and has a pleasant sweet-sour aroma.
Traci’s Tips
- Time is a guide rather than a determining factor for when the starter is ready. Use the cues and your senses to determine when it’s ready. It may take longer than seven days. It’s ready when it’s ready.
- For leftover sourdough starter (discard), you can keep it in a jar for use in other recipes, give some away or throw it out. It can be used in gluten free sourdough pancakes, sourdough waffles or my gluten free sourdough pizza crust recipe without having to double it in size… and it’s absolutely delicious! I keep a jar in my refrigerator and refill it as I discard the leftover starter at refreshment time. The discard can be frozen too.
- If you see any mold or a layer of pinkish/orange/white slimy color on the top of your starter, throw it out and make a new starter. This can be avoided simply keeping your starter happy and well fed, refreshing it weekly in the fridge or daily at room temperature.
- Float Test: If you’re a glutenous sourdough baker and have used the float test in the past to observe when your sourdough starter is ready, the same idea doesn’t work for gluten free sourdough starter. So, you’ll need to go on observation alone. Remember: the starter doubles in size, smells of a sweet-sour aroma and has air pockets within the starter (or is bubbly).
Through testing this recipe I found sweet white rice flour or Bob’s Red Mill AP 1-1 Gluten Free Baking Flour to be an essential component in developing a strong and consistent gluten free starter. Mixed with buckwheat or brown rice flour yields consistent results.
Gluten-Free Sourdough Starter (Beginner Friendly!)
Ingredients
- Buckwheat Flour or Brown Rice Flour
- Sweet White Rice Flour or Bob's Red Mill AP 1-1 gluten free baking flour
- Water room temperature **see note
Instructions
- Day One: In a medium glass bowl or jar, whisk together 2 T (20g) buckwheat or brown rice flour, 2 T (20g) sweet rice flour and 1/4 C (60g) of water. Cover with a damp tea towel and rest at room temperature for 24 hours.
- Day Two: In a clean medium glass bowl or jar, whisk 2 T (40g) of mixture you made yesterday (throw out the leftovers), 2 T (20g) buckwheat or brown rice flour, 2 T (20g) sweet rice flour and 1/4 C (60g) of water. Cover with a damp towel or loose fitting lid and rest at room temperature for 24 hours.
- Day Three Through Day Six or Seven (or beyond): Repeat step two using the previous days starter until the mixture becomes puffy, has a pleasant sweet-sour aroma and bubbles begin or air pockets are visible under the surface. This process takes about six to seven days (as this has been my experience) - but it may take longer. Time is not a determining factor for when the starter is ready, it's simply a guide. It's ready when it's ready. Use the cues and your senses to determine when your starter is ready. This is the nature of sourdough. Before using your new starter in a recipe, you'll need to refresh (feed) it.
How to Refresh your Gluten Free Sourdough Starter:
- Once you have an established starter, you'll need to feed it.In a clean lidded jar, add 1/4C (60g) of sourdough starter (throw out or save the leftover 'discard'). To the starter, mix in 1/3 C (80g) room temperature water. Add 3 T (30g) buckwheat flour and 3 T (30g) sweet white rice flour to the water mixture. Mix well until the flours are hydrated. Wrap a rubber band around the jar at the height of the starter. This will give you a visual indication of how much the starter has grown. Put a lid on the jar (it doesn't need to be loose - just regular) and allow the starter to develop at room temperature for about 8-12 hours* or until it doubles in size. The time will vary due to ambient temperature.If your starter is struggling to double, place it somewhere warm, like inside a turned off oven with a light on. You can also try feeding twice a day to nudge the starter along.Once the starter has doubled in size, is bubbly, and has a sweet-sour aroma, it's ready to use in your gluten free sourdough bread recipe.After measuring out the portion needed for your recipe, refresh the starter, as indicated above and store it until ready to use again.
How to Store Your Starter:
- Room Temperature: The starter can be stored at room temperature if you bake daily, which also means it will need to be refreshed daily. Store it in a glass jar with a lid. Refrigerator: Ideally, you'll want to refresh your starter (feed it) each week if stored in the refrigerator. When preparing for mixing, and after pulling the starter from the fridge, you may need to refresh it twice within a 12 hour period to get it going again. This is not always the case, but sometimes the starter can be sluggish. Store it in a glass jar with a lid. Freezer: For longer storage, place your starter in the freezer. It will revive after it thaws in the refrigerator and goes through a few refreshments. Store it in a glass jar with a lid.
How to Store Your Discard if Saving:
- Once you have an established starter, you can use it for bread, and your discard for pancakes, waffles, pizza and other recipes to add that tangy sourdough flavor. Store it in the fridge, in a lidded glass jar, for up to two weeks. You may see a layer of hooch, and this is not unusual. You can pour it off or stir it in. If you see any white, orange or pink film or mold, toss it. You can also store your discard in the freezer for longer storage. Thaw it in the fridge before using in a recipe.


This is my first attempt & so far so good! Do you have a gluten free sourdough bread recipe you can share?
Hi Tiffany! So glad to hear so far so good! I do have a gluten free sourdough bread recipe: https://vanillaandbean.com/seeded-multigrain-gluten-free-sourdough-bread/. Keep us posted, okay?
Thank you! I have celiac disease & colitis so I have to be careful with some of those seeds & ingredients. Do you know of a good sourdough bread recipe without those?
Check out Bakerita.com. She has some gf sourdough recipes that may work for you.
Thank you!
Hello, I have never made my own gluten free starter but I note that from day 2, you’re adding more water than flour (different to what I am used to – to feed my normal starter I use 1:1:1 or slightly less water. It therefore looks runny to me on day 2 – is that right? Thanks
Hi Jane! Gluten free flours have different hydration needs than gluten full flours so that’s why I use more water to make and maintain a gf starter. I found more water to result in a more consistent rise and, you’ll find this reflected in my gf sourdough recipes as well. The ratios for gf and glutinous sourdough are not the same. The mixture is slack or sure. Please keep us posted on your progress!
Day 3, I keep getting a water layer (doesn’t smell like alcohol or acidic)… do I mix that in and add more flour or wait until time to do day 4?
Hi Carla! Can you tell me what the temperature is of where you’re keeping the starter? It sounds like it could be a warm environment due to the layer of liquid. If you can, put it in a cooler place so that activity slows, or you can switch to building your starter every 12 hours instead of every 24 hours. I would go ahead and pour the liquid off. Keep us posted, okay?
I’m using brown rice flour and Bobs red Mill 1to1. On day 3, bubbles formed. Today is day 4 and it’s bubbling with a sweet yeasty smell . Do you think it is ready? I live in SW Florida.
Hi Winn! Thanks for the update on your starter! It sounds like you’ve got a fair amount of activity. Is it doubling in size? If not, I’d wait and continue feeding three or four more days, until it’s doubling in size. If it is doubling in size, you want to make sure your starter is consistently doubling over a few feedings before using it in a recipe.
I’m trying to understand this recipe and I need your help. So why would I take only a portion of the previous days mixture and throw the rest out? Why not just add more of the recipe ingredients to what was created in day 1?
Hi Kathleen! When creating a starter (and feeding a starter) we remove part of the previous days mixture to maintain only a small portion of the culture, a more manageable portion. Additionally, this ensures that the remaining culture has enough food (flour and water) for building a strong starter and also support a balance of microorganisms. Otherwise the culture could become too acidic. Once your starter is ready for leavening bread, you can maintain a smaller starter (without discard, if you like) by feeding your starter only what you’ll use in your bread recipe, plus a touch more leaving enough behind to to feed it again.
Directions say repeat step 2 does that mean day 2 including discarding starter and a clean jar? Or just adding flour and water?
Hi Kathy! Step 2/day 2 includes discarding and clean jar. I found using a clean jar every time reduces the risk of mold forming.
Instead of sweet rice flour could I use brown rice flour instead?
Hi Sarah! Through testing this recipe I found sweet white rice flour or Bob’s Red Mill AP 1-1 gluten free baking flour to be an essential component in developing a strong and consistent gluten free sourdough starter. Mixed with another whole grain flour such as buckwheat or brown rice flour yielded consistent results for me.
I do not currently have sweet rice flour – would King Arthur GF Measure for Measure flour work in place of that or the baking flout?
Hi Jenny! I’ve not tested this recipe with KAGF Measure for Measure. I suspect if it has sweet white rice flour in the mix, it could work. If you experiment, please keep us posted!
Traci,
Thank you for this recipe. I used brown rice and buckwheat mixed flour. I noticed you use buckwheat and sweet rice, is there a reason? This is my sceconed attempt at making starter. I’m wondering if I should start over and purchase the sweet rice? I had to throughout my fist bach due to it not doing anything in 10 days. This time it doubled on the second day.
Hi Stacy! Through testing this recipe I found sweet white rice flour or AP 1-1 gluten free baking flour to be an essential component in developing a strong and consistent gluten free sourdough starter. Mixed with another whole grain flour such as buckwheat or brown rice flour yielded consistent results. But, if brown rice and buckwheat is working for you, and doubled on the second day, I wouldn’t through it out. However, that combination didn’t consistently work for me.
Can I use my rye sourdough starter and use sorghum flour yo make a ‘gluten free ‘ bread?
Hi Sheela! I’ve not tried this approach with rye sourdough starter and sorghum flour to make gluten free bread, so I don’t know if it would work.
I have followed all your instructions for the GF sourdough starter & it’s now been almost 2 weeks & all I’m getting is a small amount of excess water in the top? Has not risen much at all. Any suggestions? Titch
Hi Titch! Can you tell me the approximate temperature of your kitchen? Try putting the culture in a turned off oven with the light on. Starters perform better in warmish environments. Also, can you tell me what flours you’re using?
I’m using the sweet rice flour & buckwheat recipe. I’m keeping it in a room where the temperature is around 26.5C during the day. I will now try the oven light method. Should I feed it twice a day?
Hi Titch… that’s a warm and appropriate temperature for your starter. Feeding your starter twice a day can help too. Since it’s already warm, I’d go with feeding twice a day first. Keep us posted, okay?
Thanks Traci. Will give that a go 1st. Titch
Well Traci, I’ve been feeding it twice a day & I can small bubbles in the mixture but it still doesn’t rise at all!
Hi Titch… the bubbles indicate activity. Have you seen that kind of action since starting? If not, that tells me the conditions weren’t quite right for your starter, but now , the twice daily feedings are working. if you move your starter to a cooler place, you can reduce your feedings to once a day. One you get your starter established, there wont be this much maintenance. How does it smell?
I’ve been successfully using this for months now, & have shared my starter with a few friends! One question…if I haven’t fed it soon enough, it develops a white slimy coating on top, but still smells sweet & healthy, so I’ve just been skimming the top before feeding it again. Does it sound like mold or some equivalent of hooch?
Hi Cathy! So glad to hear you’re enjoying your starter and you’ve shared it with friends. Since I don’t know what the slimy coating is, in the past, I’ve erred on the side of caution, tossed it, and started a new starter. After I restarted and had a new starter, I decided I didn’t want to have to make another new starter again if possible, so I froze a portion of the new starter and also, when baking regularly, just make sure to feed the starter more regularly to keep it strong.