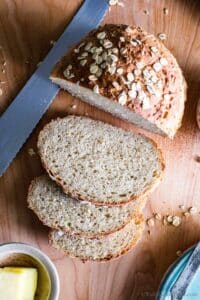
A soft, sturdy and hearty peasant bread with a tender crumb; Oatmeal-Maple Bread is no-knead and comes from Alexandra Stafford’s new cookbook Bread Toast Crumbs. This recipe is vegetarian, easily vegan.
Peasant Bread and a Concert
Before we get to this crave-worthy oatmeal bread, It’s birthday month y’all so you know what that means! Plenty of double chocolate devil’s food cupcakes on the agenda as well as copious bits of fun time sprinkled throughout.
Rob and I took a little weekend getaway to Seattle this past weekend to see a sold out U2 concert! It was their U.S. kickoff concert and I was completely blown away! The Seattle Times called it “Political. Passionate. Larger Than Life.” Of course we sat waaaay up in the stands at Century Link Field, but there wasn’t a bad seat in the house.
Imagine, an open roof, Seattle’s skyline, a dramatic sky and Bono singing Where the Streets Have No Name… I was completely undone. The energy was palpable, being with so many other fans, friends and chatting with strangers; it was a most memorable evening.
If they’re heading your way, and you’re a fan, this is something you don’t want to miss!!
A New Cookbook
Since it’s a bit of a trip to get to Seattle, I always pack snacks and sometimes lunches when we go. Oatmeal bread was one that went with us. This simple peasant bread so good with a bit of peanut butter and jelly slathered on.
One of the best things about food blogging is receiving cookbooks in the mail from bloggers you follow. Being able to share new cookbooks with y’all in this space makes receiving them even more fun.
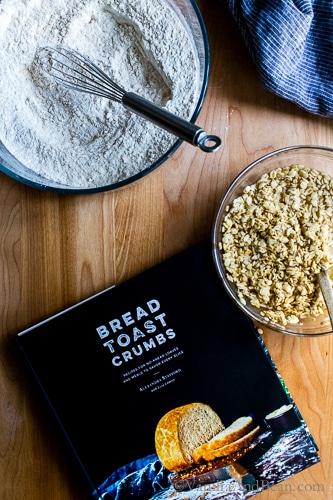
Ali’s cookbook, Bread Toast Crumbs; Recipes for No-Knead Loaves and Meals to Savor Every Slice is packed with inspiration and page-turning, drool-worthy photography. And while I finally landed on Ali’s peasant bread recipe, oatmeal bread, to share with y’all (hello – breakfast bread!), there are so many more recipes I can’t wait to try.
Simple ingredients transformed into the tastiest pleasures is part of what makes cooking and baking so rewarding. The process, time and love that goes into making a recipe goes a long way to feed the belly and soul.
When it comes to bread, this peasant bread recipe is as simple as baking gets.
In Bread Toast Crumbs, Ali starts with her Mother’s basic, 40 year old, peasant bread recipe. Then, she presents variations of this time tested and family treasured recipe. Spicy Jalapeño Corn and Jack Bread, Three Seed Bread and Cinnamon-Sugar Monkey Bread are just a few examples of how she transforms her mom’s peasant bread.
Ali’s cookbook doesn’t stop at sweet and savory bread recipes though. She shares how to put that delicious bread to work in recipes such as Savory French Toast, Panzanella Three Ways, Food Cart Grilled Cheese, and Strawberry Shortcake made out of Buttermilk Pull-Apart Rolls (!!) and much more.


While Bread Toast Crumbs is not a strictly vegetarian cookbook, there is plenty here to devour for vegetarians.
I chose Ali’s peasant oatmeal bread to share with y’all because a good sturdy breakfast loaf goes a long way in our home. I love the flavor and texture of oatmeal sweetened with maple so having that flavor profile in a breakfast bread flipped my switch!
How to Make Oatmeal Bread:
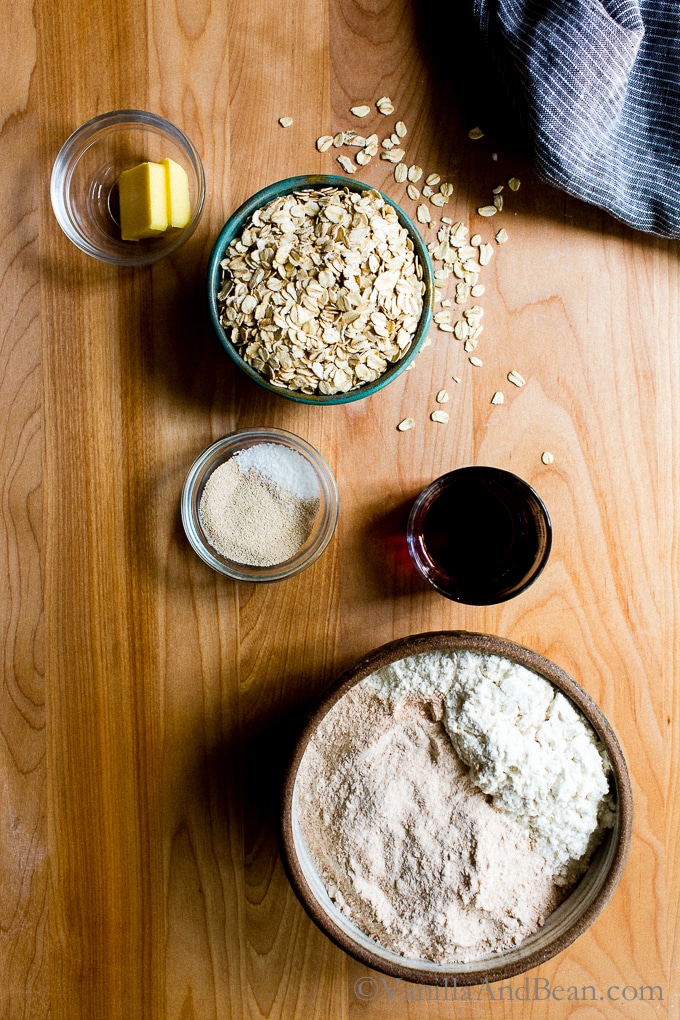
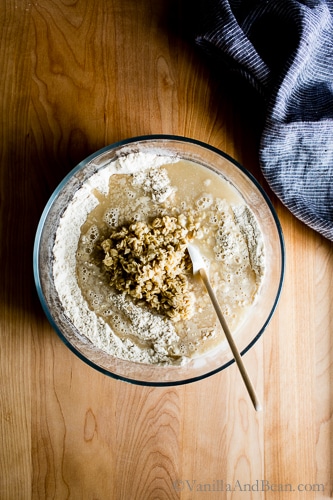
- First, hydrate the rolled oats in boiling water and a bit of maple.
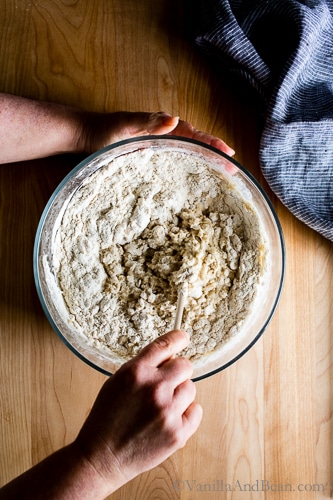
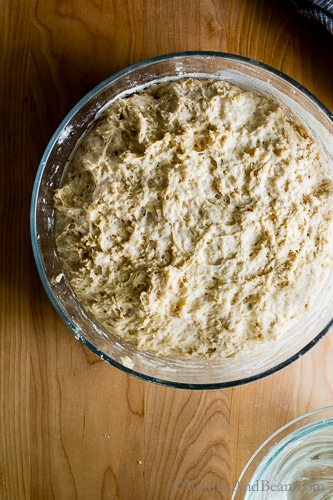
- Next, whisk together the flours, salt, instant yeast and add the oat mixture. Mix, and knead then cover the bowl with a damp tea towel and set aside in a warm spot to rise for 1 to 1 1/2 hours.
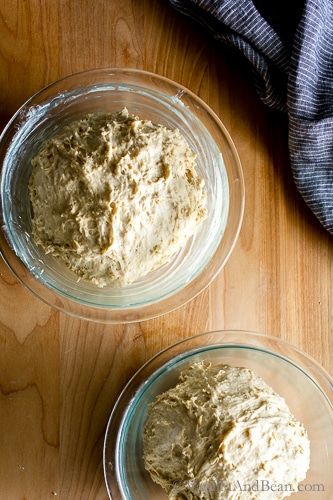
- Grease two, 1 quart (.94L) oven safe bowls. Punch down the dough and separate the dough into two equal pieces. Lift each half of dough into a prepared bowl. Set the bowls in a warm space (see tip below if your kitchen is cool) while the oven is pre-heating for 10-20 minutes.
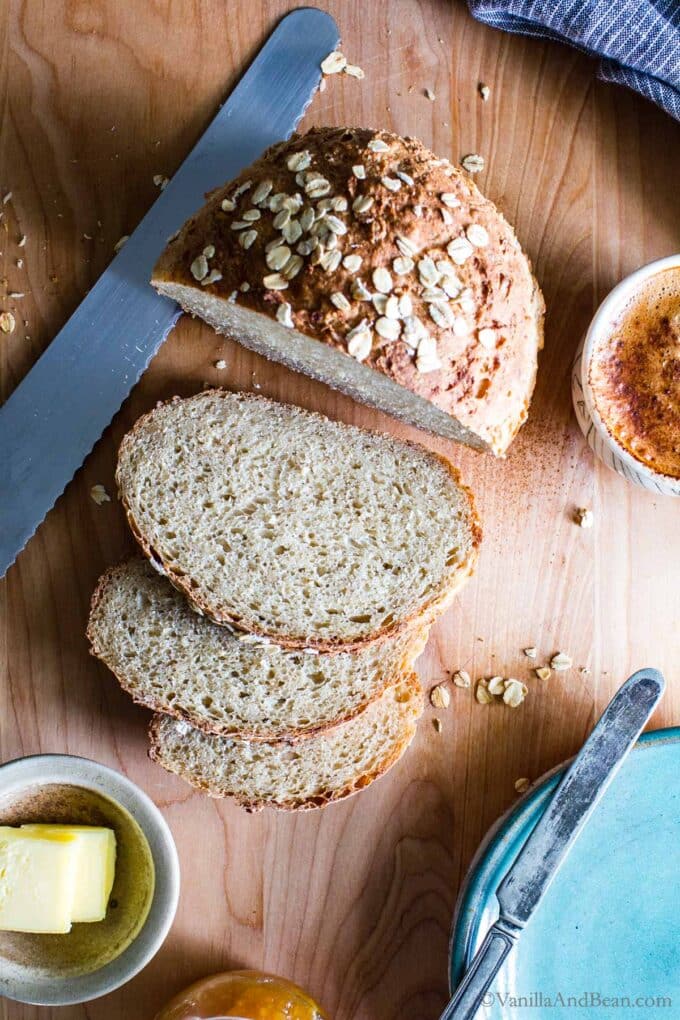
- Last, bake the loaves for 40 minutes, or until golden all around.
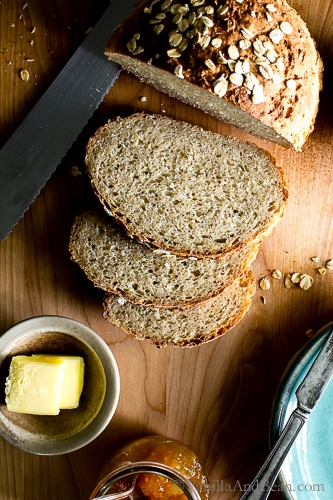
This easy rustic oatmeal bread is hearty, soft but chewy and has a tender crumb perfect for catching all the good stuff you’ll slather on it. Lightly sweetened, the crust has a slightly crunchy texture and is enjoyed best toasted served simply with butter and jam.

Pro Tips
- Because kitchen temperatures vary so widely, be sure to use the time suggestions in the recipe as such. Let the bread guide your process rather than the clock. My kitchen is chilly, so I use the following tip:
- TIP: Since kitchen temperatures vary, and in order to allow the bread to rise in a timely manner, you can use your oven or microwave to help control this process. Simply turn on your oven at the lowest setting for about 30 seconds, then turn it off. Place the covered dough into the oven. This will help the dough rise in a cool kitchen. This technique can be done for the first (fermentation) and second rise (proof). – OR – Place a heatproof bowl of boiling water in the microwave. Place the covered bread in the microwave next to the water. This creates a warm and humid environment which yeast thrive in! Do this for the first (fermentation) and second (proof) rise.
- For this oatmeal bread recipe, I use these two, 1 quart (.94L) oven safe bowls.
This peasant bread recipe is SO easy to make. If you’re new to bread baking, oatmeal-maple bread is a great place to start. I hope you’ll give this a go regardless. You’ll love it! For a little bit more of a challenge, try my Multigrain Bread. Their flavors are similar.
Oatmeal-Maple Bread Recipe
Ingredients
- 1 cup (114g) Rolled Oats not quick cook, + a bit more for topping the bread
- 1/4 cup (80g) Maple Syrup
- 1 cup (225g) Boiling Water
- 1 cup (225g) Room Temperature Water
- 2 1/4 cup (288g) Unbleached All Purpose Flour
- 1 cup (145g) White Whole Wheat Flour (aka Ivory Wheat Flour) *see note
- 2 teaspoon Kosher Salt
- 2 1/4 teaspoon Instant Yeast
- Softened Butter, or sub Coconut Oil, for greasing
Instructions
- In a small bowl, combine the rolled oats, boiling water and maple syrup. Let stand for 10 minutes to hydrate the oats. Add room temperature water and stir to combine.
- In a large bowl, whisk together the flours, salt, and instant yeast. Add the oat mixture. Using a rubber spatula and eventually your hands, mix and knead until the liquid is absorbed and the ingredients form a sticky dough ball. Cover the bowl with a damp tea towel or a plastic wrap and set aside in a warm spot to rise for 1 to 1 1/2 hours, until the dough has double in bulk. (see tip in notes if your kitchen is cool)
- Set oven rack in the center of oven and preheat the oven to 375F (190C). Grease two, 1 quart (.94L) oven safe bowls with butter or coconut oil - be generous here. Using two forks, deflate the dough by releasing it from the sides of the bowl and pulling it towards the center. Rotate the bowl quarter turns as you deflate, turning the mass into a rough ball. It doesn't have to be perfect.
- Using your two forks, and working from the center out, separate the dough into two equal pieces. use the forks to lift each half of dough into a prepared bowl. If the dough is too sticky, wet your hands with water and scoop each piece up and transfer each half to a bowl. Do not cover the bowls unless the bowls are in a drafty area. Otherwise set the bowls in a warm space (see tip below if your kitchen is cool) while the oven is pre-heating for 10-20 minutes, until the top of the dough just crowns the rims of the bowls. Sprits the dough with a few sprays water and sprinkle just a little bit of oats on the top of each loaf (about 1 tsp each).
- Transfer the bowls to the oven and bake for 40 minutes, or until golden all around. Remove the bowls from the oven and turn the loaves out onto cooling racks. If the loaves look pale, return them to their bowls and bake for an additional 5 minutes. Turn the bread out to cool for 15 minutes before cutting.
- Store in a brown paper or plastic bag for up to three days. These loaves freeze beautifully as well. Wrap them tightly in a plastic bag and freeze for up to two weeks. Thaw at room temperature overnight.
Notes
Nutrition is provided as a courtesy and is an estimate. If this information is important to you, please have it verified independently.
Disclosure: I received a complementary copy of Bread Toast Crumbs and chose to share it in this space because I admire Ali’s work. All opinions in this post are my own.


I am trying this recipe (from the book) tonight for the first time, it’s currently on the first rise. The book only indicates 1c boiling water – it was pretty confusing. Your recipe above helped me out a ton, thanks!!
Hi!! I love this bread and have been making it for years! Did you try it with an overnight rise already? Thanks!
Hi Joana! Thank you for your note and rating. SO happy to hear you’re enjoying the bread. I’ve not yet made it with an overnight rise. If you give it a go, place two damp tea towels over the top (touching the dough) to ensure the dough doesn’t dry out. If you give it a go, let us know how it goes!
It came out so perfect. I made half quantity in an anchor Hopkins small loaf pan.
Which oven-safe bowls did you use for this recipe? Like, what size were they? Amazon links please!!!! Is this big enough?? https://www.amazon.com/dp/B07LB7MGY5/?coliid=IO1PA02W41H8U&colid=289KQSCISNXWF&psc=0&ref_=lv_ov_lig_dp_it
Hi Bailee! I have two of these Pyrex 1 Qt bowls I use to make this bread recipe. I hope this helps, and you enjoy the bread!
Hi, Traci,
Great recipe; the dough for my first effort of this Oatmeal Maple Bread is rising as I write.
FYI, just wanted to make a suggestion for your Canadian readers. The bowls mentioned above are very expensive in Canada. I’ve been making my Peasant Bread in the cutest little 1 qt glass bowls, which are absolutely perfect; they are available for a very reasonable price here:
https://www.amazon.ca/Anchor-Hocking-77984-Quart-Mixing/dp/B003JS7VL6
Hope this helps.
Hiii Carol! Thank you for your note and tip about the bowls! Please let us know how you like the bread.
This was great and so easy – it makes a fantastic grilled cheese too. Next time, I may try adding sunflower seeds. It reminds me a lot of a bread I used to make from the King Arthur book that had sunflower in it. That one took much more effort. Thanks for sharing!
Hi Kate! Thank you for coming back and leaving a note! So happy you enjoyed the recipe and that it’s easier, hooray! I think sunflower seeds would be a delicious addition!
This looks fabulous. If I want to make it as one loaf, and use a dutch oven as you suggest, what size dutch oven would you use, and would you pre-heat it? Thanks!
Hi Donna… For one loaf, you can get away with using a standard 9×4 1/2″ loaf pan (for shaping, if needed, see: https://vanillaandbean.com/multigrain-bread/ ) or for a boule, a 9-10″ Dutch oven should work just fine. Bake until the bread reaches an internal temperature of 185F-190F (85C-87C). No need to preheat the Dutch oven. I hope this helps!
Lid on or off if I use the Dutch oven?
Hi Amanda! I’ve not tried baking this bread in a DO, but if I did, I’d try it with the lid on for 20 minutes. Remove lid and bake until the bread reaches an internal temperature of 185F-190F (85C-87C).
Also, Donna, be sure to use parchment paper if using a Dutch oven. I’ve had it stick before and it’s not fun trying to get the bread out.
Thank you! I have made that multigrain loaf recipe (love it!) but my shaping is still not quite right; I sometimes end up with a raw-ish bit in the center. But I do have a 4 qt Le Creuset, so I maybe I will try that instead, with parchment paper.
Oh, shaping… keep at it! You’ll get it! A kitchen thermometer is helpful when baking bread. You’re looking for that internal temperature to be at 190f and to allow the bread to cool completely before slicing into it (it’s SO hard to do!). I hope this helps, Donna.
Hi Traci. Do you think this bread could be made free form? Thank you!
Hey Carrie… I’m thinking perhaps you mean in a loaf pan or dutch oven as one loaf? Easily! The dutch oven would probably need to be on the smaller side if you go that route. I hope this helps!
Forgot to mention, if you do make it as one loaf, you’ll likely need to increase the bake time for about 10 minutes or so. The best way to tell is to temp. the bread aiming for an internal temperature of 190F.
Thanks Traci! Sorry I wasn’t more clear. What I meant by free form was shaped into a loaf and placed on a baking tray/cookie sheet. I am making it now…for my European bread loving step mom. Wish me luck :)
Can’t wait to hear Carrie!
I am really glad the recipe made two loaves! I ate almost 3/4 of one standing at the kitchen counter with the butter and jam as soon as it was out of the oven :) The full and deep flavor surprised me. It is delicious. Light and chewy texture. Such an easy recipe too. I made one loaf in an oven proof bowl and the other on a cookie tray (with lightly oiled parchment paper). The one in the bowl rose higher but the one on the cookie tray got a beautiful dark bottom crust.
For some reason I’ve always been intimidated by making yeasted breads. It’s a hurdle I’m trying to overcome. When I saw that Ali had a new book out I figured it would be the best place to start. Thanks for sharing such a great review and recipe. Happy birthday month! There’s nothing like a concert to get that energizing zap. What a great way to get out and celebrate. Glad to hear the chickadees are thriving!
I hope you’ll give this one a go, Jean. It is really easy to make and a good one to start with if you’re a bit un easy! Ali gives detailed instructions and has some fabulous tips for new bread bakers! Thank you for your kind words too, and hooray for the chickadees! They’re at it again this morning – in and out of that box! :D