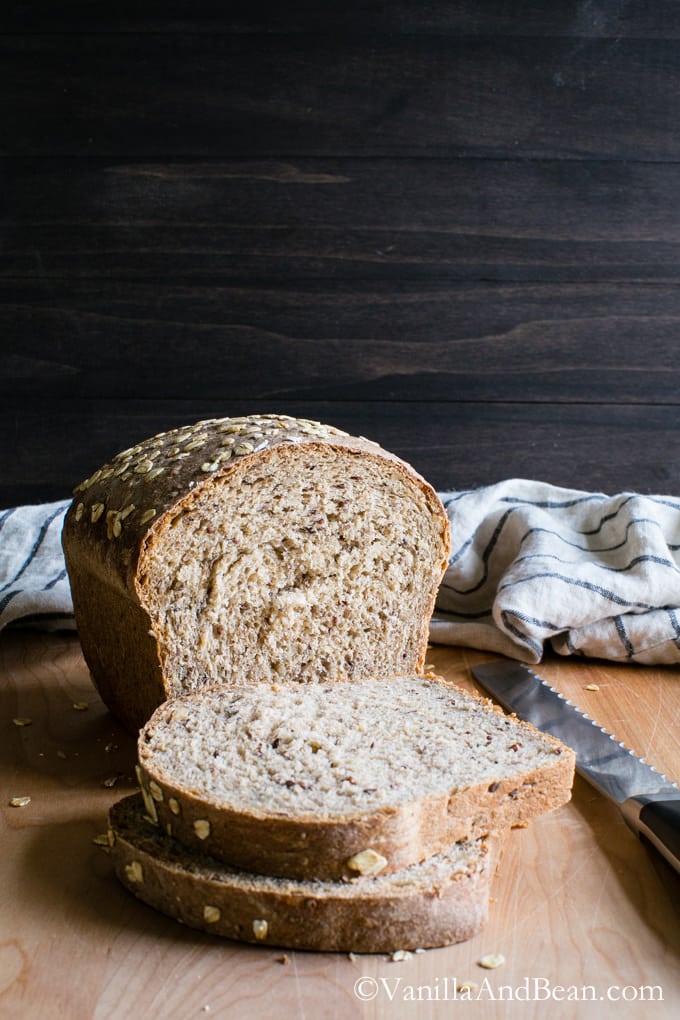
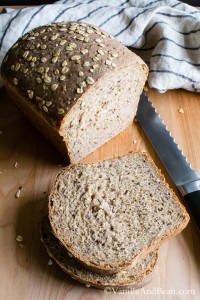
Multigrain Bread is packed with whole grains, seeds and whole wheat with just a touch of maple syrup and brown sugar. Leavened with commercial yeast, with little hands on time, this homemade sandwich bread recipe comes together in about 4 1/2 hours. Shaping is easy and forgiving, perfect for a beginning or advanced bread baker! This recipe is vegetarian or vegan.

The Satisfaction of Homemade Bread
Mmmmmm can you smell it?
Fresh-baked homemade, multigrain bread. I don’t do it often enough. But when I do, oh my goodness.
I just want to eat bread. All the time. Slathered with marmalade, blueberry jam… or pumpkin butter… or avocado… or, or….
I usually start the day with a green smoothie. But, when there’s fresh baked bread in the house, I have my green smoothie, and a slice. Or two.
I’m a bread hound and am sort-of particular about it. I like bread to be firmer than not, yet with a soft texture, and have lots of seeds and grains. This whole grain bread is what I call a quicker bread, because it only takes a few hours to make and it’s made with a quick yeast rather than a sourdough starter.
What is Multigrain Bread Made Of?
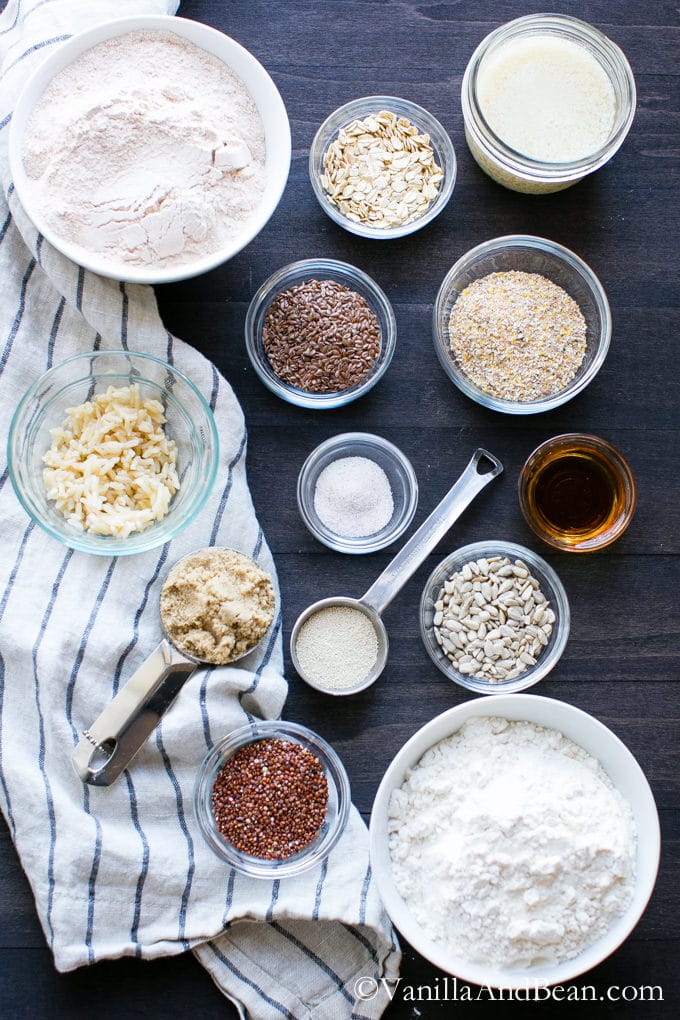
Simple ingredients come together to make a fabulous, soft sandwich loaf. Here’s what you’ll need to make homemade multigrain bread:
- 10 Grain Cereal (see recipe notes for alternatives)
- Rolled Oats
- Quinoa
- Whole Flax Seed
- Sunflower Seeds
- Cooked Brown Rice
- Unbleached Bread Flour
- Whole Wheat Flour
- Plant or Dairy Milk
- Maple Syrup
- Quick Rise Yeast
- Salt
- Brown Sugar
How to Make Multigrain Bread
Making yeast bread does require a bit of a time commitment. However, for this bread, hands on time is short while hands off time is much longer for fermentation, proofing and baking. I make this on a day I know I’ll be home for the morning or afternoon. Here’s how to make this multigrain bread recipe:
- First, make the soaker by placing the cereal, rolled oats, quinoa, flax, sunflower seeds and water into a small bowl. Leave out at room temperature overnight.
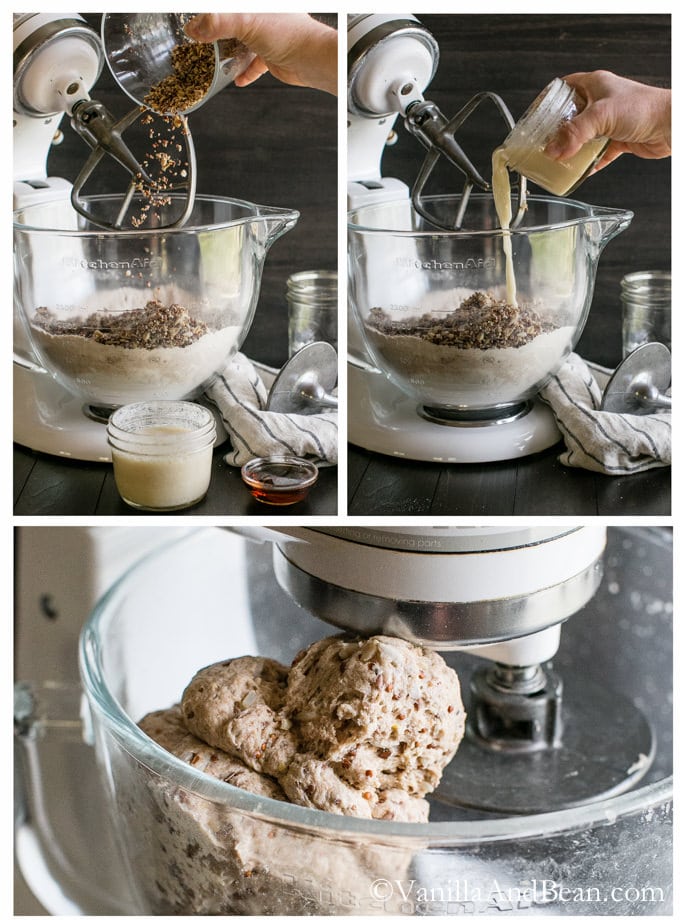
- The next day, mix the milk and apple cider vinegar in a small bowl. In a stand mixer, mix then knead the flour, brown sugar, salt, yeast and milk mixture. Add the soaker and brown rice and knead until all the ingredients are incorporated and the dough is tacky, not sticky.
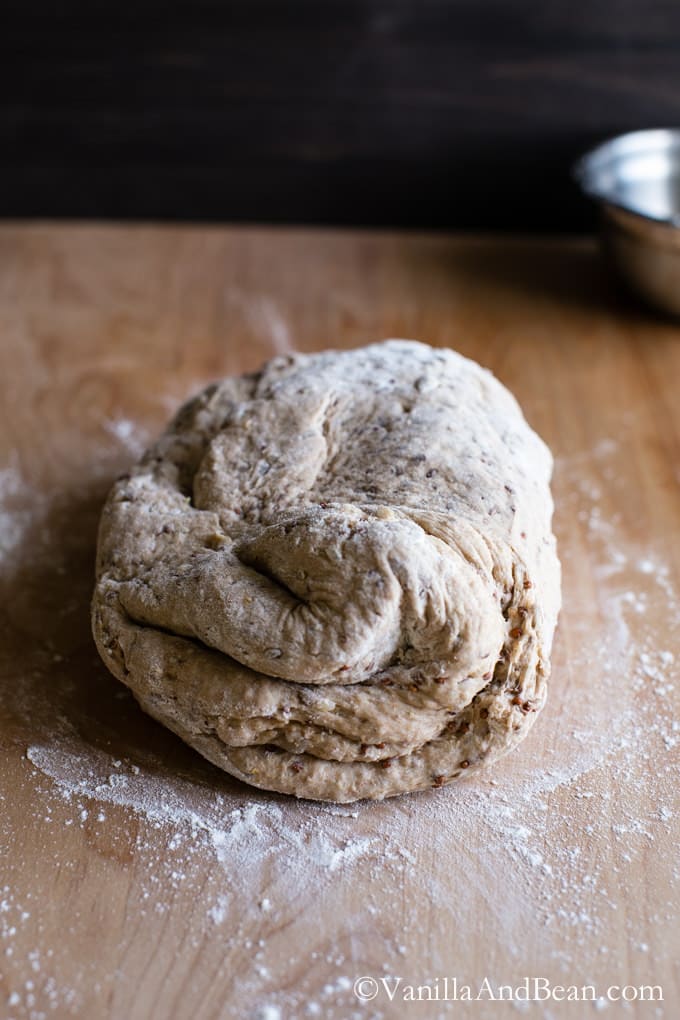
- Next, allow the bread to rise in a lightly oiled bowl for about 90 minutes.
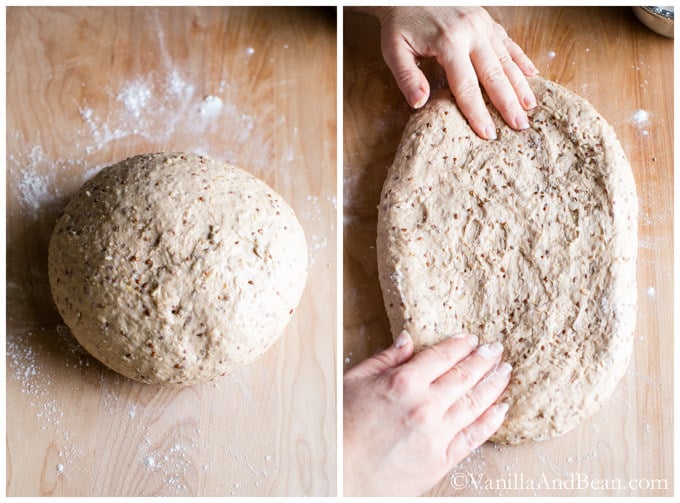
- Shape the dough then place in a lightly oiled pan. Rise again for about 90 minutes or until doubled in size.
- Last, bake the bread.
Allow the bread to cool completely before slicing into the loaf.
Recipe Development
I dinked around quite a bit with this whole grain bread recipe before deciding I was ready to share it. I changed the flour up a few times adding more whole wheat than white, made a loaf with way too many seeds and grains, then one with not enough and finally baked one far too long trying to achieve a darker crust. I also tried incorporating sesame seeds but their flavor was just too strong for this recipe.
We ate each loaf, but this is the loaf I saved for you and is my best multigrain bread recipe yet!
This bread is sturdy and makes an excellent vehicle for creamy condiments and crunchy veggies.
This homemade multigrain bread recipe had to pass the toast test. I think this is my favorite way to eat it, toasted, with the topping du jour. But this multigrain bread makes over-the-top delicious croutons for salads too.
If you’ve never made bread before, this loaf is a good introduction into bread making. It comes together with ease, and shaping it is quite forgiving.
Traci’s Tips
- This homemade whole grain bread recipe calls for 10 grain cereal. If unavailable, polenta, millet, quinoa, amaranth or a combination of these grains can be used.
- Whole wheat bread flour can be challenging to find. I buy from a local miller. If whole wheat bread flour is unavailable this recipe will also work using whole wheat flour with similar results or all unbleached bread flour can be used. Texture and flavor will vary if using all unbleached bread flour.
- You’ll need a small amount of cooked short grain brown rice. I pull the amount needed from a batch when I’m making it for something else because trying to cook 3 tablespoons of rice is cumbersome. The rice can be frozen and thawed for use when ready to make bread.
- Multigrain bread can be made vegan or vegetarian. Simply use your favorite milk, nut or dairy in this recipe. I typically use almond or homemade cashew milk.
Makers Notes
So happy to read y’all are enjoying the bread in the comments below. Keep those tips comin’! Here are a excerpts from the community:
- Tim used a bread machine to make this loaf. See his tips in the comments below the recipe card.
- Carolyn “used fennel seeds instead of flaxseed for a more savory flavor.”
- Pat said “use about 1/4 cup more flour to get the right consistency. Perfect for bread and awesome for buns.”
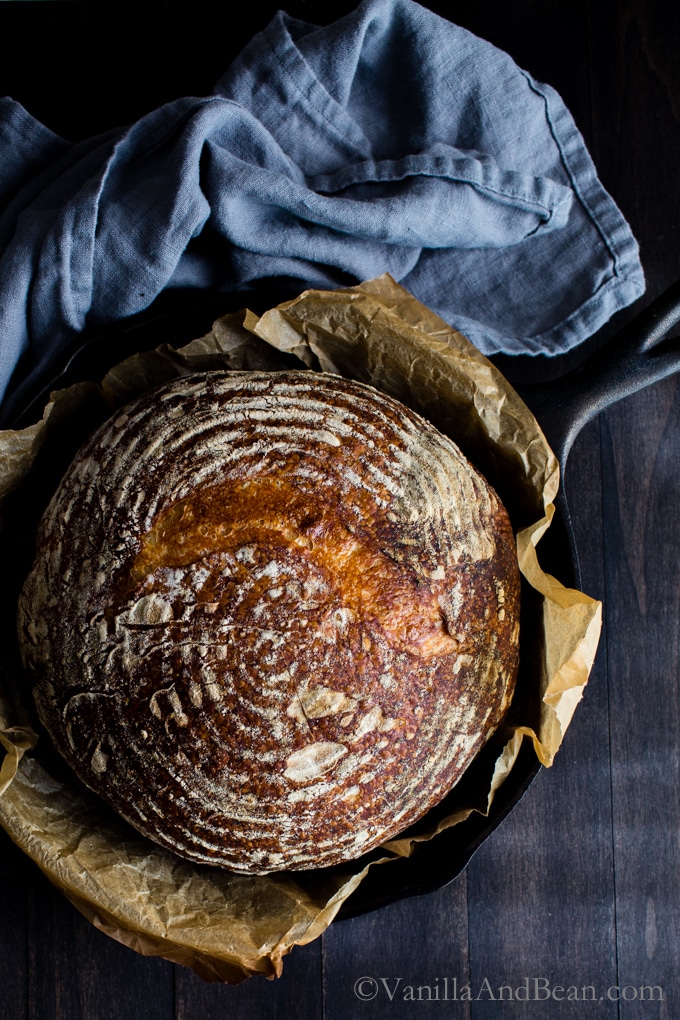
- Jeff said “I just finished baking this bread in a covered Dutch oven. It turned out fantastic. 450 degrees for 40 minutes then 10 with the lid off.”
- Susan said “I kneaded the dough by hand, and it was very easy to work with and rose beautifully. Besides tasting wonderful, this bread also freezes very well.”
More Bread Recipes to Love
- Sourdough Oat Sandwich Bread
- Seeded Multigrain Sourdough Bread
- Everyday Sourdough
- Yeasted Oatmeal Maple Bread
Soft Yeasted Multigrain Bread
Ingredients
For the Soaker:
- 1/4 C 10 Grain Cereal *See Note 40g
- 2 Tbs Thick Rolled Oats 18g
- 2 Tbs Quinoa 24g
- 2 Tbs Flax Seed 26g
- 2 Tbs Sunflower Seeds 22g
- 1/3 C Water 79g
For the Dough:
- 1/2 C Milk + 1 teaspoon apple cider vinegar 140g, use plant or whole milk, I use homemade cashew milk
- 1 1/2 C White Unbleached Bread Flour 264g
- 1 1/2 C Whole Wheat Bread Flour 258g **See Note
- 3 Tbs Brown Sugar 46g
- 1 1/2 tsp Sea Salt 10g
- 1 Tbs Quick Rise Yeast 6g ***See Note
- 3 Tbs Cooked Brown Rice 44g ****See Note
- 1 1/2 Tbs Maple Syrup
- 3/4 C Water room temperature 178g
For Finishing:
- Olive Oil for the bowl and pan
- 1 Tbs Rolled Oats 10g
- Bread flour for dusting
Instructions
For the Soaker:
- The day before making the bread, prepare the soaker by placing the cereal, rolled oats, quinoa, flax, sunflower seeds and water into a small bowl. It wont completely cover the grains, rather, just moisten them. Leave out at room temperature overnight.
For the Dough:
- Coat the inside of a large bowl and a 9x5" loaf pan with olive oil. Set aside.
- Mix the milk and apple cider vinegar together. Whisk vigorously. Set aside.
- In the bowl of a stand mixer with the paddle attachment, add both flours, sugar, salt, and yeast. Mix for 10 seconds. With the mixer off, add the soaker, brown rice, syrup, milk mixture, and water. Mix on speed 4 just until the dough comes together, and is hydrated. A chunky ball should form (if there's still some dry bits in the bottom of the mixer, add a tablespoon of water and mix just until a dough forms). Switch to the dough hook. Mix on speed 4 for 9-10 minutes, stopping occasionally to push the dough back down into the bowl. If the dough feels a bit too dry, add 1 tablespoon of water, if too wet, a few pinches of flour (don't worry, this dough is very forgiving).*If kneading by hand, knead for about 12-13 minutes on a lightly floured work surface.The dough is ready to remove from the mixer when it is more tacky, than sticky and registers 77-81 Fahrenheit (25-27 Celsius) on a instant read food thermometer (very important temperature). Finish the dough by kneading it on a lightly floured work surface for 1-2 minutes. Sprinkle with a bit of flour if needed.
- Tuck the dough into a ball making sure the surface is taught. Transfer the dough to the oiled bowl, rolling it around to coat it with oil. Cover the bowl with plastic wrap or moist doubled up tea towels.Set a timer for 90 minutes to allow the dough to ferment. It should double in size. If the dough is rising too fast, pop it in the fridge to cool it down for 10-15 minutes or set it in a cooler area of the house. It may take longer to rise, but we don't want it to rise too fast, as this is where flavor development occurs. The goal is not for it to rise in 90 minutes. The goal is for the dough to double in size. 90 minutes is only a guide.
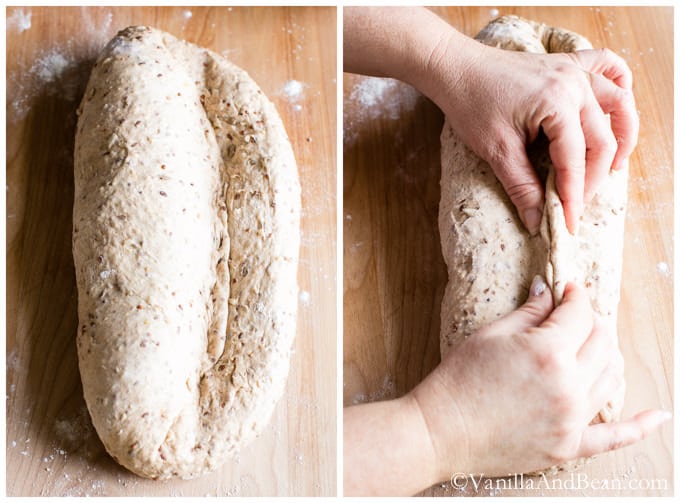
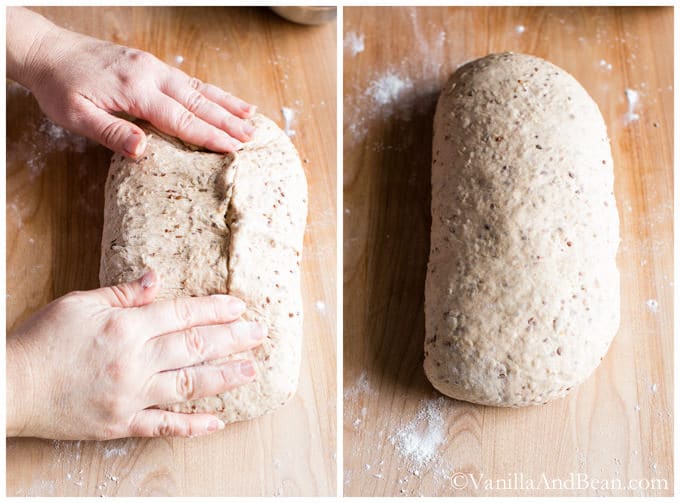
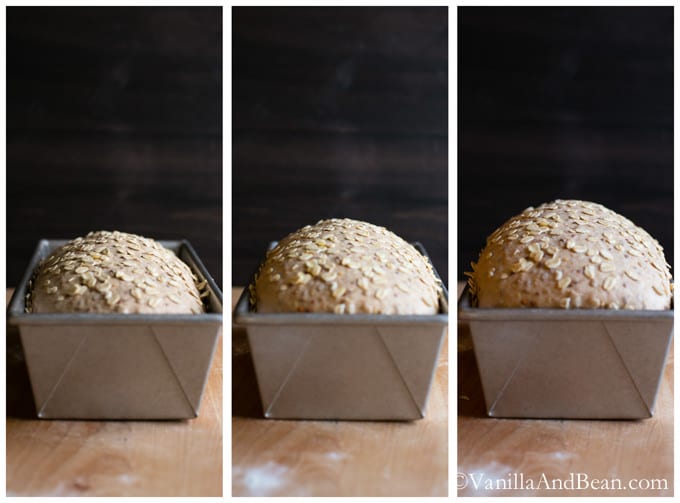
- To shape the dough, remove the dough from the bowl and place it on a lightly floured work surface. Use the illustrations in the blog post as a guide to shape the dough. Press the dough into a rough rectangle about 3/4 inches thick, 6 inches wide and 8-10 inches long. Fold the dough lengthwise 2/3 over onto itself and crease it firmly using the pinky side of your hand. Fold the 1/3 piece left towards the crease and pinch the seam closed. Fold in the ends, coming in about an 1 inch and pinch the seam closed. Turn the bread over and rock it back and fourth a bit and gently fluff the ends in a bit. Gently place the loaf, seam side down into the prepared loaf pan. Lightly spray or brush with water and sprinkle 1 tablespoon of rolled oats over the top. Cover with plastic wrap or moistened doubled up tea towels. Set the timer for 90 minutes and proof until the dough nearly doubles in size. I've had this dough take longer and much shorter to rise than 90 minutes (It's also risen right on time before too!). The amount of time will vary depending on the temperature of its surroundings. Just keep an eye on it and look for it to almost double in size or rise about 1 1/4 inches above the lip of the pan at the center. *Tip: if the dough is sloooow, you can pop it into a turned off oven with the light on to speed this along.
- Preheat the oven to 350 Fahrenheit (176 Celsius) with the oven rack in the center. Bake for 20 minutes, rotate the pan and continue baking for another 30-40 minutes or until the bread reaches an internal temperature of 185 -190 Fahrenheit (85-87 Celsius), and is golden brown. Tent with foil if needed at about 30 minutes if the bread is getting too dark.
- Turn the bread out of the loaf pan and onto a cooling rack. Allow to cool completely, for a least 2 hours. If the bread is cut before it's cool it will be gummy inside.
- Store cut side down on a cutting board, for a few hours of storage. For longer storage, store in a plastic bag for up to 2 days. Freeze sliced in a freezer bag for up to two weeks. The bread can go from freezer to toaster, or thaw covered at room temperature.


This is an AMAZING bread recipe! I make this once a month, slice it up and put it in the freezer. It toasts up like you just made it. This is eeeaaassyyyyy! Traci’s comments on how / when / if the bread rises are on point – it has been different with each loaf, but patience is your friend here. The maple syrup adds a touch of sweetness and again, if you let the loaf sit for a while before cutting, there’s no gumminess. Love this recipe!!
Love hearing this, Shannon! Thank you for your note and giving the bread a go!
Hi Traci
Awesome recipe, but in the article you refer to a Bread Machine version but for the life of me, I can’t find that info anywhere in the recipe card … help!!!
Hi Nicole! I have not made this recipe in a bread machine (I don’t have one), so I didn’t include how to do this in the recipe. However, Tim left a comment in the comment section that he did make this recipe in a bread machine. He shared his tips in the comments. His comment is what I refer to in the blog post. I hope this helps!
Hi Traci, I made this recipe for the first time and hadn’t made multigrain bread before. Was I supposed to soak the granulated yeast in warm water before adding it to the flour? I didn’t see that in the recipe. The flavor turned out bitter but it looked good!
Hi Alicia! Thank you for your note. There’s no need to soak the granulated yeast in warm water since it’s instant yeast. You can if you like, and, if you think your yeast may be expired, proofing your yeast may be helpful, but it’s not necessary with instant. I’m curious about the bitter flavor… although this bread recipe has an earthy flavor due to the whole grains, it shouldn’t taste bitter. Stale or old whole wheat flour can taste bitter however.
Turned out great! I used all purpose whole wheat flour for all 3 cups, and honey instead of maple syrup since that’s what I had. A great loaf. The instructions were perfect. Thanks! Next on to the sourdough!
Thank you for your note, tips on modifications and giving the bread a go, Georgianna! SO happy to hear you’re enjoying it!
SO GOOD! I made it yesterday with oatmeal and chopped pecans. Thanks for giving me the confidence to try these amazing recipes Sally!
Hooray! Thank you for your note and giving the recipe a go, Kenny! Oatmeal and chopped pecans sounds fabulous!
This is a wonderful bread! After making a few times I have a couple questions. Does the optimal dough temperature increase or decrease with kneading in the mixer? It seemed to increase with time which makes sense so perhaps checking the temp at 7 or 8 minutes would be good? Is there too little time in the mixer? I ended up putting the dough in the fridge for a few minutes because it began to rise pretty fast.
Hi Carolyn! Thank you for your note and giving the bread a go. This is a personal favorite of mine. The optimal dough temperature increases as the dough is mixed, so if stopping to measure the temp. before the time in the recipe indicates is a good practice. That is simply the time that that it took my bread, consistently to reach temperature. There is too little time in the mixer if the bread doesn’t reach temperature – so keep an eye on it. Also, the bread should be tacky not sticky. Good call on the refrigerator! I hope this helps. Please keep in touch!
Thanks Traci! The bread turned out well and I plan to check the temperature earlier next time. The differences in location, humidity and experience keeps things interesting. Happily, this time I got the timing of putting the loaf into the oven right. The simple things.
Hi! Can this recipe be successfully baked in a Pullman loaf pan?
Hi Eric… I’m afraid I’ve not made this recipe in a Pullman pan. What are the dimensions?
Hi! Thanks for getting back to me. It is 13” x 4” x 4” (using the lid).
Hi Eric! Thank you for the measurements. I’ve scoured the Interwebs and unfortunately I’m unable to find anything regarding this type of pan equivalent. Since I don’t have experience baking with a Pullman, I’m unable to say if it will work or not. I’m sorry I’m unable to help.
I appreciate you taking the time! If I give it a try…not sure that I will, I’ll let you know the result!
I still haven’t tried in the Pullman pan, but I want to reiterate what everyone else is saying here. Excellent bread and so happy to have found this recipe as every other multigrain I tried was not very tasty. Thank you for sharing it!!
Hi Eric! Thank you for your note. When I was finally able to make a decent loaf of all bread flour sourdough, this was the first recipe I started working on. I love it’s seedy bits and texture – you’ll almost always find slices in my freezer. SO happy others are enjoying it too! Keep us posted on that Pullman pan!
Hi!
I dont have brown rice- what can i use as substitute?
Thanks
Hi Bea! You can add 3Tbs more oats to the soaker! I hope this helps!
The bread came out so divine, the recipe is really good
Hi Diya! Thank you for your note. So happy to read you’re enjoying the bread!
Increasing the size to 16 servings was necessary to have some left for toast the next day. Overall an excelent loaf.
SO happy to hear Erika! Thank you for your note!
This recipe is awesome! I’m not much of a bread baker but I’ve had my moments of success (not to mention, failures! LOL), though I really wanted to hone this art of breadmaking. I do have most of the ingredients on hand except for the unbleached bread flour. Can all purpose flour be used instead of that? Thank you! I’ll surely have this on my to-do list when I have lots of time.
Hi Kareen! All purpose can be subbed but you’ll need to reduce the liquid in the recipe. By how much, I’m not exactly sure since I’ve not made this recipe with all purpose. Please keep in touch if you give it a go!
Thanks Traci, this is such a great recipe! I’ve been making this regularly for over a year and it’s definitely my favorite. One addition I’ve made is to add one to two teaspoons of nigella seeds (also known as kalongji or black onion seeds).
I’ve also found it works great in my bread machine. I use the delay start feature of the machine to let the soaker ingredients soak overnight and have the bread ready when I get up in the morning.
What I’ve found works for me is:
– start with a total of 14 ounces of water,
– add the soaker ingredients (except the oats and cereal which I add after the flour). I don’t often have cooked rice on hand so I usually substitute a couple of tablespoon of cracked wheat and add to the soaker as well.
– add 2 tbsps of dry milk powder, and the vinegar, sugars, and salt.
– add the flours, oats and 10 grain cereal
– add 1 to 2 tsps of nigella seeds
– add 2 tsps of bread machine yeast
– Set the machine to whole grain, 2 lb loaf, and delay the start so it’s ready in the morning
Hi Tim! This is so helpful! I’ve had others ask about making this recipe in a bread machine, so I’ll make a note of it. Thank you so much for sharing Tim, I’m thrilled to hear your enjoying this lovely loaf and appreciate your note!
Hi,
Can you use regular bread flour?
Hi Sally… do you mean for 100% of the flour in the recipe or just for the unbleached bread flour? You can sub it for unbleached, but the hydration may be off a bit if subbing for 100% of the recipe. By how much, I’m not sure because I’ve not tried it.
Great multigrain bread. I used fennel seeds instead of flaxseed for a more savory flavor.
This is ‘hands down’ the best multigrain recipe I have ever tried……and I have tried a lot! I had to use about 1/4 cup more flour to get the right consistency. Perfect for bread and awesome for buns. Thank you for sharing :)
Hi Pat! Thank you for coming back, leaving a note and rating! SO happy to hear you’re enjoying the recipe! Happy to hear you’re adjusting as needed and it’s working for you! But buns?! Now that sounds fabulous!
I used millet as the substitute for the 10-grain cereal and otherwise followed the recipe. I wanted to be wowed by this but it was not as flavorful and was softer in texture than what I wanted. I’m sure the 10-grain cereal would have added more texture. I’d also add another tsp of salt to see if that helps to bring out more flavor. It just tastes bland to me.
Hi Nancy! I’m sorry this didn’t work for you. For a firmer bread, have you given sourdough a go? It’s much sturdier/firmer than yeasted bread.
I’m on a low carb diet, but I have to say, I muss bread. I try to eat bread with the highest amount of Faber/protein I can find. That being said I wanted to try incorporating protein powder into a bread recipe. I’m going to try this one as it’s written the try the protein powder addition. I’m excited to try the sourdough too!
Thank you for your note, Sarah! Please let us know how it turns out!
I just baked this bread following the exact recipe and instructions, and it was…..perfect! I’ve had my ups and downs with breadmaking over the years, but this one is going to be my new go to recipe. I’ve always had issues with the bread rising properly. It has always come out very dense no matter what I do. Without a doubt, this was my most successful loaf ever. Just delicious. Thanks for the recipe!
Hi Vickie! Thank you for your note and rating! Hooray for fabulous bread – I’m thrilled to hear your results! No doubt bread making is a journey – I’m so happy to be a part of it!
Would the recipe still work if I omit the brown sugar?
Hi Theresa! The recipe will still work, but the bread may taste a bit bitter as the sugar balances the whole wheat flavors. Also, the color will be lighter as it’s the sugar that aids in browning. You can use maple syrup if you like! I hope this helps and you enjoy the bread!
Hi, I’m new to bread making. Been going crazy the past few months. I am relatively successful with Italian rustic
breads like Ciabatta and my sister’s potato rolls. However, I can’t get whole grain breads down. I’ve tried several recipes. I do it all by hand, no machine. I found this dough to be very wet and hard to handle. I know that adding too much flour can make a tough, dense bread. I was careful to add small amounts at a time but was never able to get a kneadable dough. Second rise was long and did not double. HELP!
Hi Bunnie! I’m sorry to hear you’re struggling with whole grain breads. From reading your note, it sounds like you may need to knead the dough longer. When done kneading, the dough should feel tacky (not sticky) and register the proper internal temperature (are you checking this?). Also, if the bread didn’t rise… this is a multifaceted issue. Is the baking pan the proper size? Could the yeast be dead? (to test this, proof the yeast). Was the dough placed in a warm environment? Rise time will vary depending on ambient temperature. I hope this helps.. please let me know if you have any other questions. traci@vanillaandbean.com
Hii Rosie! Thank you for your note. I wrote about this in another post, but didn’t include it here (why?)… “*I use Red Star Quick Rise Yeast. According to The Kitchen, you can use Quick Rise Yeast or Instant Yeast interchangeably.” I hope this helps and you enjoy the recipe!
Can I use my bread machine with this recipe?
Hi Carol! I’ve not tried it, but Chrystal and Sabine (commenters – see below) have and left notes on their experience. I hope this helps and you enjoy the bread!
Does the bread flour make it not 100% whole grain?
Hi Rainbow! Right. This bread is a multigrain bread but it’s not 100% whole grain. I hope this helps!
Hi Traci! I don’t have a mixer paddle or dough hook – any tips for mixing your multi-grain bread?
Hi Jill! You bet! *If kneading by hand, knead for about 12 minutes on a lightly floured work surface. The dough is ready when it is more tacky, than sticky and registers 77F-81F (25C-27C) on a thermometer (very important temperature to abide by!). Sprinkle with a bit of flour anytime if needed to prevent sticking to your hands and/or surface. I hope this helps Jill, and you enjoy the recipe!
Hi Traci, if I was making two loaves would you change the oven settings? I’ve made this recipe before and it is amazing, thanks!
Hi Fran! So happy you’re enjoying the bread. I looove this loaf too, but since going gluten free I’ve not had it… and I miss it terribly. Keep the settings the oven settings the same when baking two loaves. Temping the bread before pulling from the oven is always a good idea. Enjoy!
Thanks so much Traci! Will do that. This is the third time I make it, and want to make two since it goes so fast. I can understand you miss it, it is really delicious!
Thanks so much for sharing this recipe. It is by far my favorite whole grain bread! LOVE LOVE LOVE IT!
SO happy to hear, Kyle! Thank you for coming back and leaving a note! I love it too :D
Really, really great bread recipe! I’m going to try it all in the bread machine tomorrow just to see how it turns out. Thank you for sharing this recipe!
SO happy to hear, Sabine! Please let us know how it turns out in the bread machine! Thank you for your note.
Okay, so the bread machine did NOT work out so great! The loaf doesn’t look too appetizing although it still tasted the same, and even though I allowed for the two rise times, it was denser than when baked in a loaf pan. Back to the loaf pan!
Hi! This recipe looks AH-MAZING! Can’t wait to try it. Can I use ground flax instead of whole flax seed? If so, do the measurements change?
Hello Yroko! Thank you for your note. I worry about the ground flax seeds and how they tend to coagulate when ground and mixed with water. I’m not certain but I’m afraid it would affect the crumb. I would either leave them whole, or simply leave them out and add a different seed or more quinoa/oats to the soaker. I hope this helps and that you enjoy this scrumptious bread!
Wow! That’s a great point. I didn’t think of that. Thanks for your thoughts. Will let you know how the bread-baking goes!
I made this last week, I’m very new to breadmaking and I’m doing everything by hand, I was a little intimidated by this recipe but it looked so good and I love the fact it has so many wholesome ingredients that I decided to go for it. It turned out so delicious! The house smelled great while it was baking and this is by far the best bread I have made since starting out. Thanks so much for the recipe!
Love, love, love reading your note, Sarah! Hooray for new to bread making and thank you for giving this one a go! It’s still a favorite at my house. So excited for your bread journey and thank you for allowing me to be a part of it!
Please, please help. I understand the soaker start, but am completely lost with the starter sponge. I did not see a recipe for it. Would you please give me your starter sponge. I am really looking forward to making this bread. Thank-you, suzie
Suzie, a starter sponge is a sourdough starter. If you have a starter, I’m going with the assumption that it’s a 100% hydration, white AP flour starter kept in the fridge in between refreshing. You can make your own starter if you don’t have one- it takes a couple of weeks. Here’s the method I used to make mine. Good luck! https://www.thekitchn.com/how-to-make-your-own-sourdough-starter-cooking-lessons-from-the-kitchn-47337
Thank you for getting back to me. I have been out of pocket and have not been on the computer for awhile. Just getting back on, I will keep you posted as to my adventure . Thank-you again, Suzie
Hi Suzie. This recipe is not sourdough, therefore you do not need a starter. Simply make it as written. Rachel points to a sourdough starter recipe. You’ll need a sourdough starter + a sourdough recipe if you wish to make sourdough bread, like this one: https://vanillaandbean.com/emilies-everyday-sourdough/ I hope this helps.
This recipe looks great. I have been searching to no avail for something like this, but adapted for sourdough. Do you have any ideas about how this could be done with a starter? I’m currently doing an enriched whole grain oatmeal loaf but looking for something with a bit more flavor/ oomph. Something like this is exactly what I was hoping for. I’ll try the recipe as written above but would love to hear if you have ideas on adapting for sourdough use!
Hi Rachel! Thank you for your note. I SO wish I could help you out on this… but I’m currently working on perfecting a basic sourdough recipe. Once I do that and share it in this space, I can move on to a multigrain sourdough. As you know, sourdough is a whole other beast! If you do give it a go, with sourdough or as written, I’d love to hear how you do! At some point I hope my sourdough is good enough to share here… until then, I hope you enjoy this recipe! :D
I adapted this for sourdough, and it’s awesome! More robust flavor than the original. Here’s the altered recipe:
1. Soaker: (1 day before)
* 1/4 C (40 g) 10 Grain Cereal
* 2 Tbs (18 g) Thick Rolled Oats 18g
* 2 Tbs (24 g) Quinoa 24g
* 2 Tbs (26 g) Flax Seed 26g
* 2 Tbs (22 g) Sunflower Seeds 22g
* 1/3 C (79 g) Water (or half a cup)
2. Starter Sponge: (12 hours before)
* 4 oz (113 g) from fridge
* 6 oz (170 g) water
* 6 oz (170 g) bread flour
3. Dough:
* 1/2 C (142 g) Almond Milk + 1 tsp Apple Cider Vinegar, whole milk will work here too
* 350 g whole wheat flour
* 3 Tbs Brown Sugar 46g
* 1 1/2 tsp Sea Salt 10g
* 3 Tbs Cooked Brown Rice ***See Note 44g
* 1 1/2 Tbs Maple Syrup
Instructions
1. prepare the soaker the day before you plan to make the dough.
2. prepare the sponge at night, around 12 hours before you plan to make the dough.
3. prepare almond milk to curdle w/ apple cider vinegar in bowl of stand mixer and allow to sit for 30-60 minutes.
4. add sponge to bowl of stand mixer and mix with almond milk mixture.
5. add flour, brown sugar, and salt, mixing until dough comes together.
6. add soaker, brown rice, maple syrup.
7. Mix on speed 4 just until the dough comes together, and is hydrated. A chunky ball should form (if not, add a Tbs of water and mix just until a dough forms). Switch to the dough hook. Mix on speed 4 for 9-10 minutes, stopping occasionally to push the dough back down into the bowl. If the dough feels a bit too dry, add 1 Tbs of water, if too wet, a few pinches of flour (don’t worry, this dough is very forgiving. I’ve made this bread many times and the hydration fluctuates and is dependent on many variables). The dough is ready to remove from the mixer when it is more tacky, than sticky and registers 77F-81F (25C-27C) on a thermometer (very important temperature to abide by!). Finish the dough by kneading it on a lightly floured work surface for 1-2 minutes.
8. Tuck the dough into a ball, making sure the surface is taught. Transfer the dough to the oiled bowl, rolling it around to coat it with oil. Allow to rise until poofy, 3-4 hours?
9. Shape the dough into loaf pan , sprinkling a few oats on top for flare, and allow to nearly double in size.
10. Preheat the oven to 350F (176C) with the oven rack in the center. Bake for 20 minutes, rotate the pan and continue baking for another 30-40 minutes or until the bread reaches an internal temperature of 185F-190F (85C-87C), and is golden brown.
Oh my goodness Rachel! I’m going to give this a go! I just pulled the original recipe out of the oven, but this time, instead of a loaf pan, I used a Dutch oven and baked it at a much higher temperature to get that crusty crust! It’s perfect. Next, I’ll give your sponge method with my sourdough starter a go! How fabulous! Thank you for sharing! :D
I’ve been baking bread for over 40 years now, and this is probably the best whole-grain recipe I’ve tried.
The only thing I changed about the recipe was that I found 1/3 cup of water was not really enough to soak that large amount of grains/seeds in. So I doubled it to 2/3 cup. That worked just fine. I kneaded the dough by hand, and it was very easy to work with and rose beautifully. Besides tasting wonderful, this bread also freezes very well.
Thanks so much for sharing this!
Thank you for your notes and sharing with us Susan! I’m so happy you enjoyed the recipe. I love this bread too… easy to work with, packed with goodness and flavor. Well worth the wait time for it to develop flavor and rise. There’s nothing like a good loaf of bread!
I just finished baking this bread in a covered Dutch oven. It turned out fantastic. 450 degrees for 40 minutes then 10 with the lid off
Oh wow! I’ll give this a go next time… I’m thinking you got a nice crust on this! Thank you for sharing with us, Jeff! :D
Traci, you nailed it with this recipe. I cannot find whole wheat bread flour, so I use King Arthur stone ground whole wheat. It works great. The amount of soaker you call for is just perfect. Also, I do swap out two tablespoons of the water for orange juice, as King Arthur recommends for reducing the tannin flavor apparent in whole wheat. The resulting loaf is just delicious. Even my 5 year old can’t stop eating it! And the mama in me is just thrilled she’s getting her daily dose of whole grains. Win win! Now, if my other two kids would love it as much. lol
Thank you so much for this recipe! I had been on a search for a hearty multigrain bread when I found this recipe. You mentioned that the recipe/dough was ‘forgiving,’ so I decided to test that out. With some careful monitoring, I made it in a bread machine. I did the pre-soak, then added all the wet ingredient followed by the dry ingredients, finishing with the yeast on top. Of course it didn’t turn out pretty or artisan-looking, but it was amazingly delicious! Maybe a tiny bit too sweet for me, but still delicious. This will now become my go-to bread. I also see how this can be made into some healthy dinner rolls.
Hi Christina! Yay YOU!! In a bread machine no less – just fabulous! And it is sooo forgiving, especially on the shaping part. My bread hasn’t always looked so pretty, trust me! :D Reducing the amount of sugar in your next loaf will impact the color, depending on the adjustment, so just be aware as it bakes and possible lighter color. I love this bread too.. so easy and yes, dinner rolls would be just fantastic! Thank you for your kind note Christina! :D