Homemade pie starts with a delicious pie crust. Here’s my recipe for a tender, flaky and buttery handmade Sourdough Pie Crust using sourdough discard. Thanks to a quick (and easy) fraisage method I learned in pastry school, the crust features bite shattering layers with delicious flavor thanks in part to sourdough discard. Prepare a single or double crust at least one day in advance for easy handling, and it’s freezer-friendly for longer storage.

Hand Mixed, Tender and Flaky Sourdough Pie Crust
If you love to make and eat homemade pie and keep sourdough discard on hand to use in sourdough discard recipes, you’re in for a treat! My all butter recipe for sourdough pie dough is quick to make by hand and with pantry staples. It’s buttery, light, flaky and crisp. The discard renders the dough tender, pliable and easy to work with. Plus it has adds a bit of sourness to the dough that gives this recipe that little bit of extra flavor.
We’re taking an extra quick step in creating tender, flaky layers. But it only takes a minute, and it’s SO worth it! A technique called fraisage is a classic method I learned in pastry school, but later saw Julia Child applying this same technique to her pie dough in season one of The French Chef. I fraisage all my buttery pie dough recipes, including in my All Butter Buttermilk Pie Dough recipe.
You can use this crust recipe for pies, like my Bourbon Pecan Pie, for galettes like this Cherry Galette, or for dumplings like my Apple Dumplings with Cranberry Butter. Anywhere you need pie dough, this sourdough pastry crust can be enjoyed!
This Recipe Is
- make ahead ready
- freezer friendly
- tender, crisp and buttery
If you enjoy making homemade pie and have sourdough discard on hand, you’ll enjoy this tasty sourdough discard pie pastry recipe.

About the Key Ingredients
- Sourdough Discard – use 100% hydration sourdough starter discard. It should be runny and straight from the refrigerator. It adds moisture, flavor and aids in terderizing the dough.
- Ice Water – hydrates the dough so that it binds together. Ice for keeping the water added to the dough as cold as possible. Use only enough water to create a clump in your hand when you squeeze the dough together with your fist. Too much water results in a tough pastry, so err on the side of less is more, and give the dough a squeeze in multiple spots before adding more water.
- Apple Cider Vinegar: this is an optional ingredient but one that I use in all my butter pie doughs. It aids in tenderizing the dough, in addition to the sourdough discard. If using, replace 1 teaspoon of water with ACV.
_______________________
How to Make Sourdough Pie Crust
Step by Step


Pro Tip: When mixing the dough, work quickly to keep it cold. If it gets too sticky or the butter feels like it’s melting, pop the bowl in the refrigerator for 10-15 minutes so the butter can solidify.


The Fraisage Method
For an extra flaky pie crust without doing letter folds (similar to puff pastry), it takes just a minute or two to do, but is worth the effort. Here’s why I use this method:
- it aids in blending the flour and butter without overworking the dough.
- it aids in hydrating the dough so that there’s fewer dry edges or patches within the dough.
- once baked the pastry is tender, and shatters with each bite.


A Note on Food Processor Dough
While I find making pie dough in a food processor quick, easy, and convenient (there is a place for this!), the end pastry just doesn’t have the flakiness of a hand made crust. An advantage of a food processor is that it keeps the pastry cold, but it tends to break the butter down too much. And then there’s that food processor to clean.
Layers of flaky pastry is achieved by larger pieces of butter that are surrounded by flour. When rolled out, these pieces are stretched, and layered aided in our case by the fraisage method. As the pastry bakes, the moisture in the butter creates steam forcing dough to puff up creating a tender, crisp and flaky pasty. While this recipe could be made in a food processor, I prefer a slower approach. As a bonus, there’s no food processor to clean.


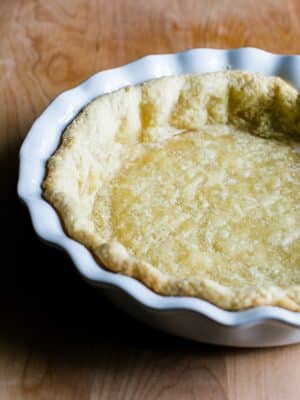
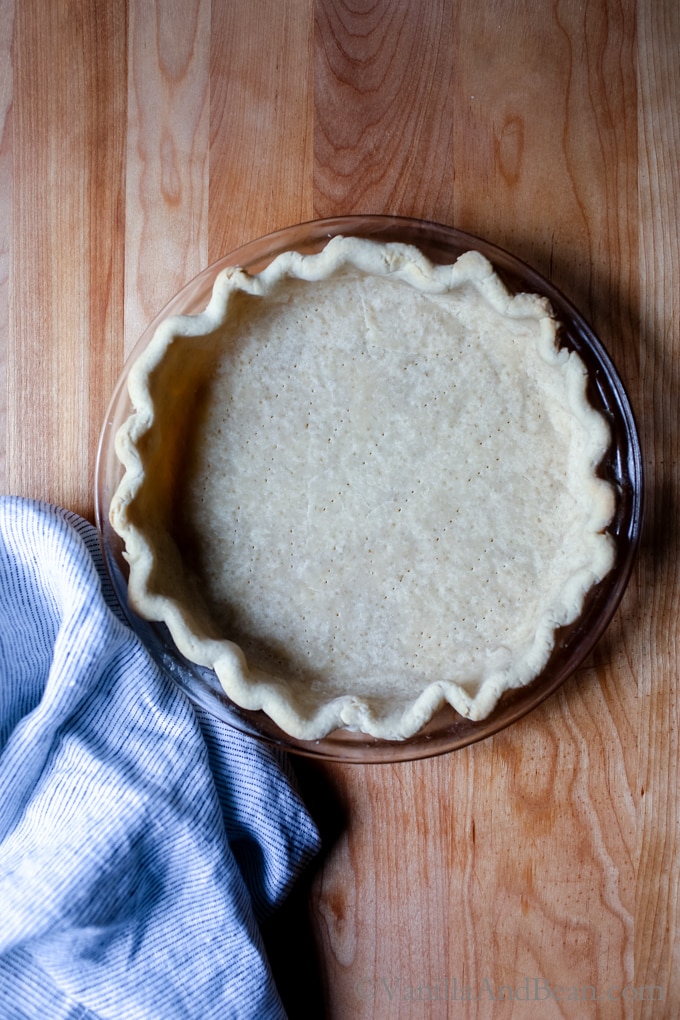
Panning and Crimping
There are many ways to crimp, from a simple fork press crimp to fancy fluting. But at the end of the day, no matter how you crimp your homemade pie dough, it’s going to be gooood! So, it’s okay if it’s rustic. Here are some tips I keep in mind when panning and crimping:
- Pan Prep: be sure to lightly oil your pie pan. It isn’t always necessary, but I’d rather be sure the pie isn’t going to stick to the pan and ruin an otherwise perfect homemade pie. Just a little insurance!
- Temperature Control: it’s okay if the ready to roll chilled dough comes to the cool side of room temperature. It’s easer to roll, and maneuver.
- No Stretching: when placing the dough into the pan, let it fall, gently nudging it into place. Stretching it can cause shrinkage once in the oven. It’s okay to gently press the edges into the pie pan, but noooo stretching!
- Tuck Under: tuck the dough overhang under the edges of the dough to form an edge on the lip of the pie plate, then give it a gentle pinch all the way around the pan so the edges of the dough is of uniform shape. Before crimping, I put the pie dough in the refrigerator for 15 minutes so that the gluten relaxes and makes the dough easer to flute. After crimping, don’t skip the next crucial step.
- Chill: before baking, put the pie plate in the refrigerator to chill for 30 minutes. If you need longer, wrap it in plastic. Resting for at least 30 minutes aids in relaxing the gluten, reducing the possibility of shrinking while baking. It also resolidifies the butter.


Traci’s Tips
- Pie Plate: I typically bake in a glass pie plate so I can keep an eye on the bottom crust. Ceramic is my second pick because they’re so pretty. I’ve had my glass plates forever, an old Pyrex, like this Pyrex pie plate. It’s a 1 1/4 inch deep standard 9 inch pie plate.
- Kitchen Tools: I recommend weighing your ingredients using a digital kitchen scale for the best outcome (affiliate links).

Handmade Flaky and Buttery Sourdough Discard Pie Crust
Ingredients
For A Single Crust (13 1/2 ounces / 386 grams) :
- 9 tablespoons (125 grams) Unsalted Butter refrigerated (1 stick + 1 tablespoon)
- 1 cup + 3 tablespoons (165 grams) All Purpose Flour
- 1 tablespoon Organic Cane Sugar
- 1/2 teaspoon Fine Sea Salt
- 1/4 cup (75 grams) Sourdough Discard 100% hydration
- 2-3 teaspoons Ice Water
For A Double Crust (27 ounces / 773 grams):
- 18 tablespoons Unsalted Butter refrigerated (2 sticks + 2 tablespoons)
- 2 1/3 cup + 1 tablespoon (330 grams) All Purpose Flour
- 2 tablspoons Organic Cane Sugar
- 1 teaspoon Fine Sea Salt
- 1/2 cup (150 grams) Sourdough Discard 100% hydration
- 1 tablespoon + 1-2 teaspoons Ice Water
Instructions
- Prep the Butter: cut the butter into 1/2 inch (12 mm) pieces. An easy way to do this is to use your bench scraper to cut the stick lengthwise, rotate 1/4 turn and cut lengthwise again. Then cut crosswise into small cubes. Transfer to a bowl and into the refrigerator while you assemble the remaining ingredients.
- Mix the Dough: In a large bowl, whisk the flour, sugar and salt. Toss the cold, cubed butter into the bowl (tip: make sure the pieces aren't sticking together). Using your hands, toss the butter and flour so that the butter is coated. Use your finger tips to press the butter between your thumb, index and middle fingers, flat, into about the size of a quarter – craggy edges are okay. Work quickly and continue until all the butter is flattened. The butter should still be cold. If it gets melty, pop the bowl in the refrigerator for about 10 minutes.
- Add the Discard and Water: Drizzle in the sourdough discard mixture over the surface of the butter/flour mixture. Holding out 1-2 teaspoons of water, drizzle in the water. Use a silicon spatula to incorporate the sourdough discard, stirring and tossing first, then switch to you hand, scooping up, folding and pressing the mixture. Do this 5-7 times. Use a fork to scrape off your hand – the mixture will be shaggy.To assess hydration, grab a handful of dough and squeeze it. If it holds together, don't add any additional ice water. If it's still crumbly or falls apart, drizzle in 1/2 – 1 more teaspoon of ice water and continue folding and pressing to a shaggy consistency. Be sure to target those bits hanging out in the bottom of the bowl (you can flick/drizzle a touch water there too).Tip: if you need just a touch more water, dip your fingers into the ice water and flick water onto the dough, to add just a touch of water. A little goes a long way!
- Lets Fraisage! Dump out the shaggy dough onto your work surface. Give yourself plenty of room to work. Using a bench scraper, fold and press the dough at least 3-4 times, eventually shaping the mixture into a rough rectangle about 1/2 inch (12mm) thick. Use the heel of your hand to press the dough away from you, smearing the dough between your hand and work surface. Do this in three increments working from one end of the rectangle to the other. This helps to hydrate the dough and build flaky layers. Repeat once more. Use a bench scraper to gather the dough and divide it in half (386 grams / 13 1/2 ounces each) if making a double crust. Shape into a 5 inch disk: use a flour sack towel to do this, placing the clumps of dough in the center of the flour sack. Gather the ends of the towel like a purse and twist the dough ball tight so that the pie dough is forced into a tight ball. Wrap in plastic wrap, wax paper or double wrapped parchment paper and rest in refrigerator for at least 2 hours, but preferably overnight or up to two days. To freeze for longer storage, place in a sealed plastic bag and store for several weeks. Thaw in the refrigerator overnight.Tip: Take the dough out of the refrigerator and rest at room for a about 20 minutes to soften slightly. This will help to make it more pliable when rolling out. Before unwrapping the dough to roll out, turn it on its side, and gently roll it like a wagon wheel to seal any cracks along the edges.
- The dough is ready to use in your galette, pie or pastry recipe.


Leave a Comment & Rate this Recipe