


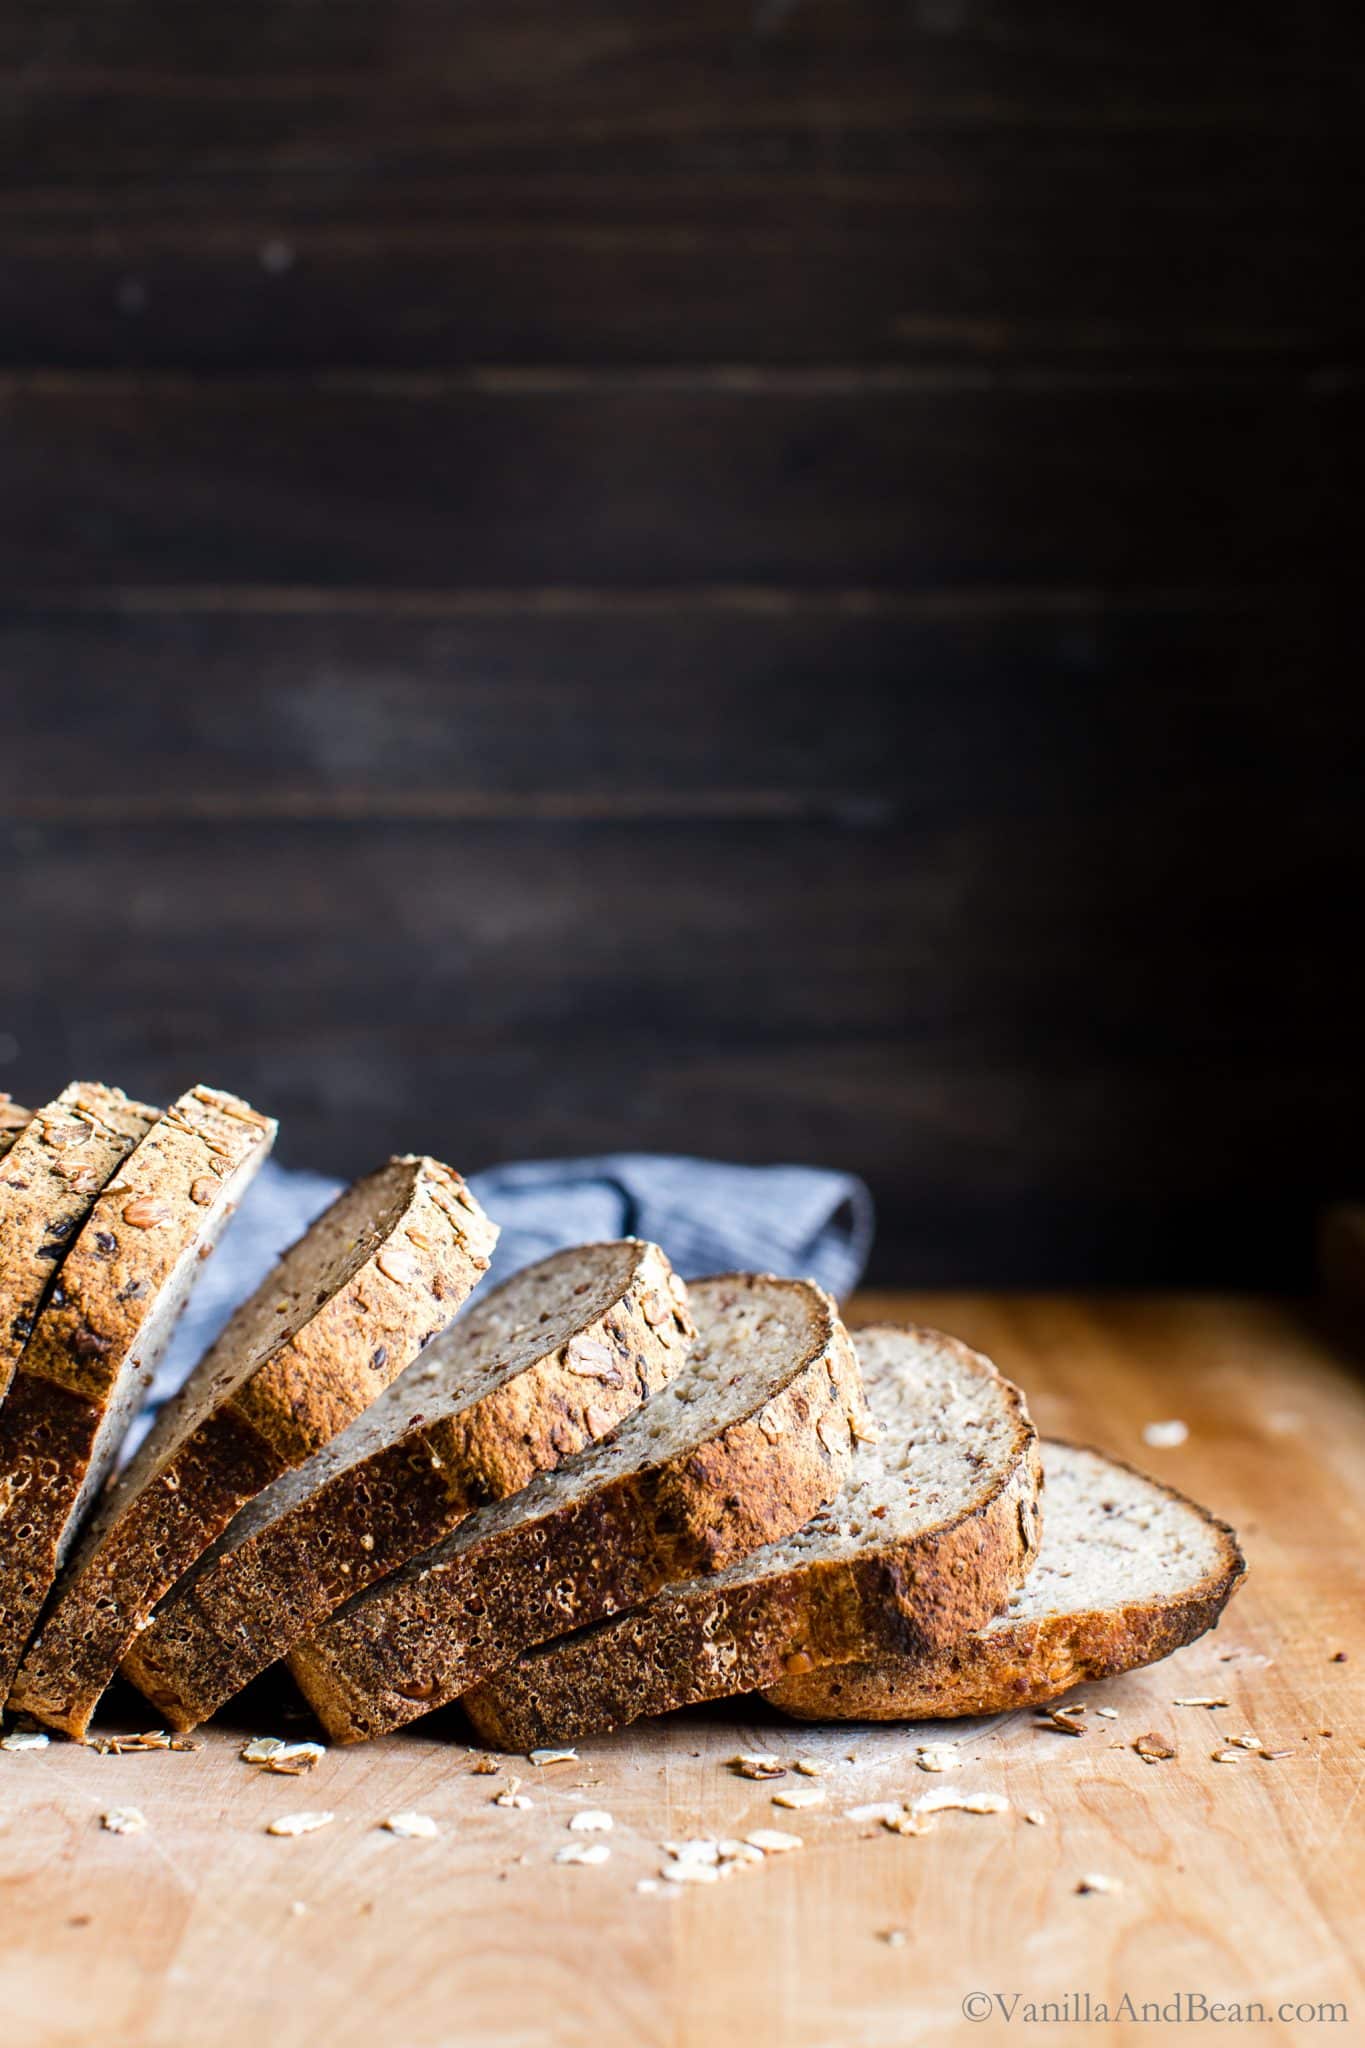
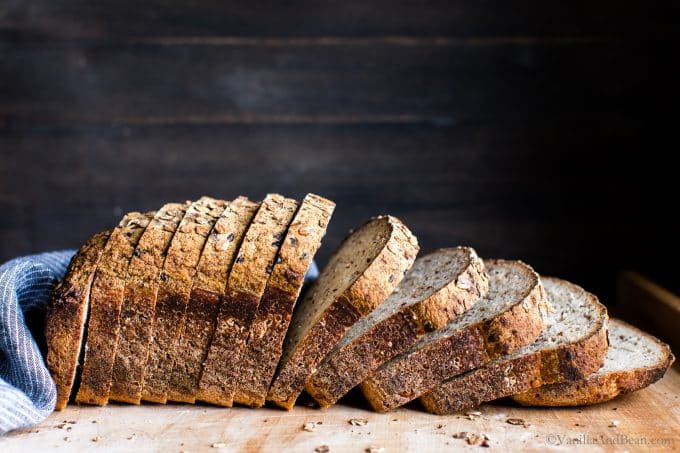
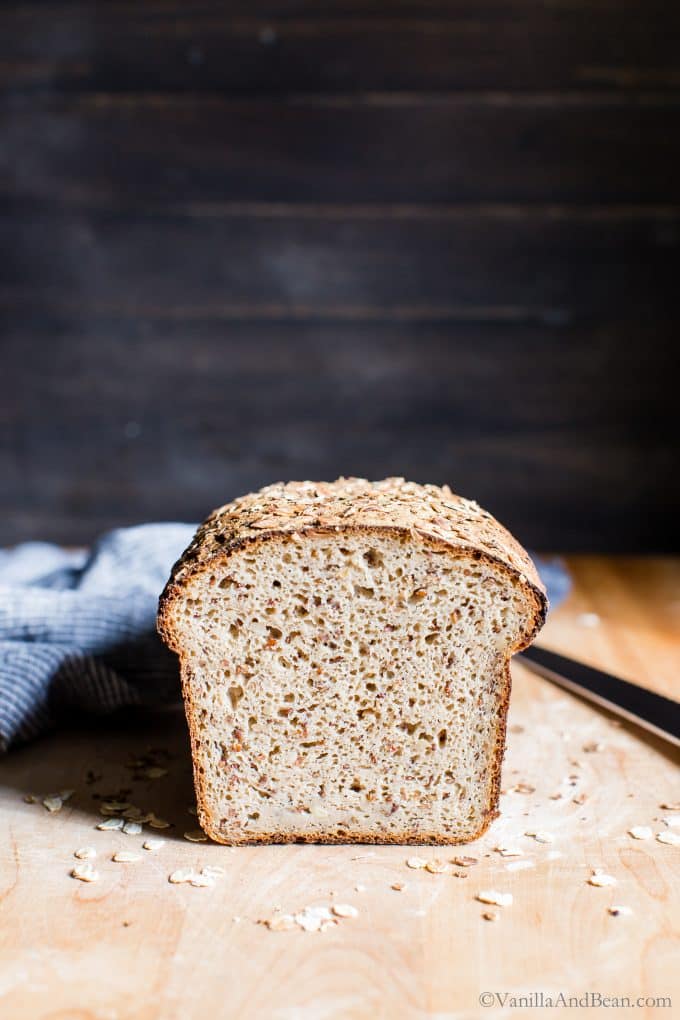
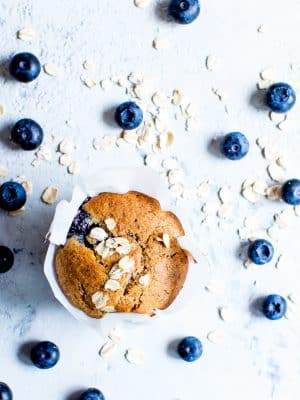
Texture rich, flavorful and tender, homemade Seeded Multigrain Gluten Free Sourdough Bread is gluten free bread you’ll look forward to eating. Use your Gluten Free Sourdough Starter to make this whole grain gluten free bread and love bread again!
Going Gluten Free
Going gluten free for a trial period in the summer of 2018 meant I had to give up my beloved homemade sourdough. After a few weeks of throwing internal fits, I finally decided to explore gluten free flours, and learn the nuances of gluten free baking. I knew it wouldn’t be easy, but I finally embraced the challenge.
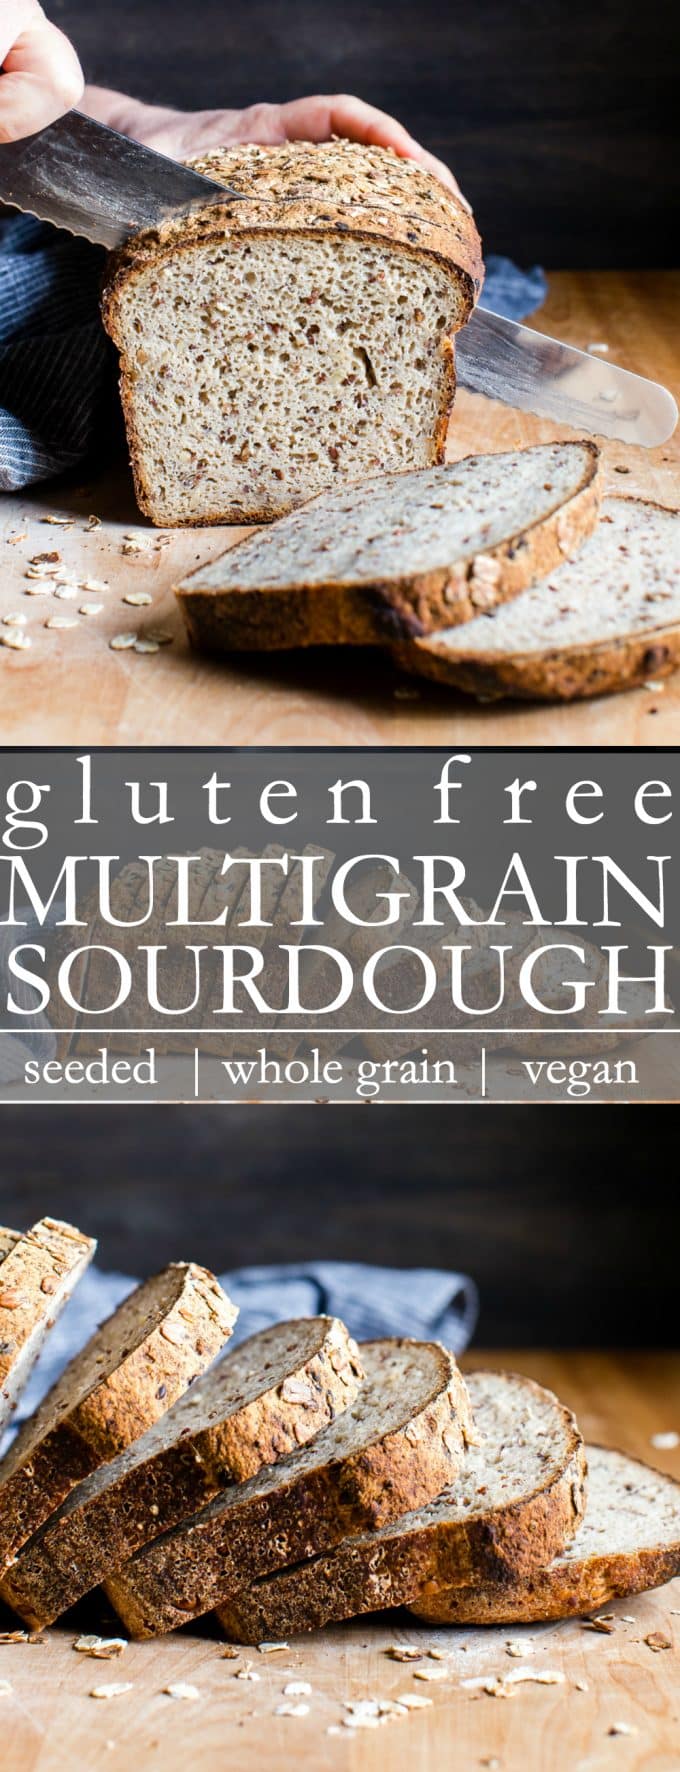
After much research, creating a gluten free sourdough starter and baking many loaves of gluten free sourdough bread, testing, tweaking and taking notes along the way, I’m sharing my best loaf yet: Seeded Multigrain Gluten Free Sourdough Bread.
Although I’m eating gluten again, this bread remains one of my most beloved recipes on the blog. I hope you enjoy it as much as my family, friends and V&B readers have.
At a Glance:How to Make Gluten Free Sourdough Bread
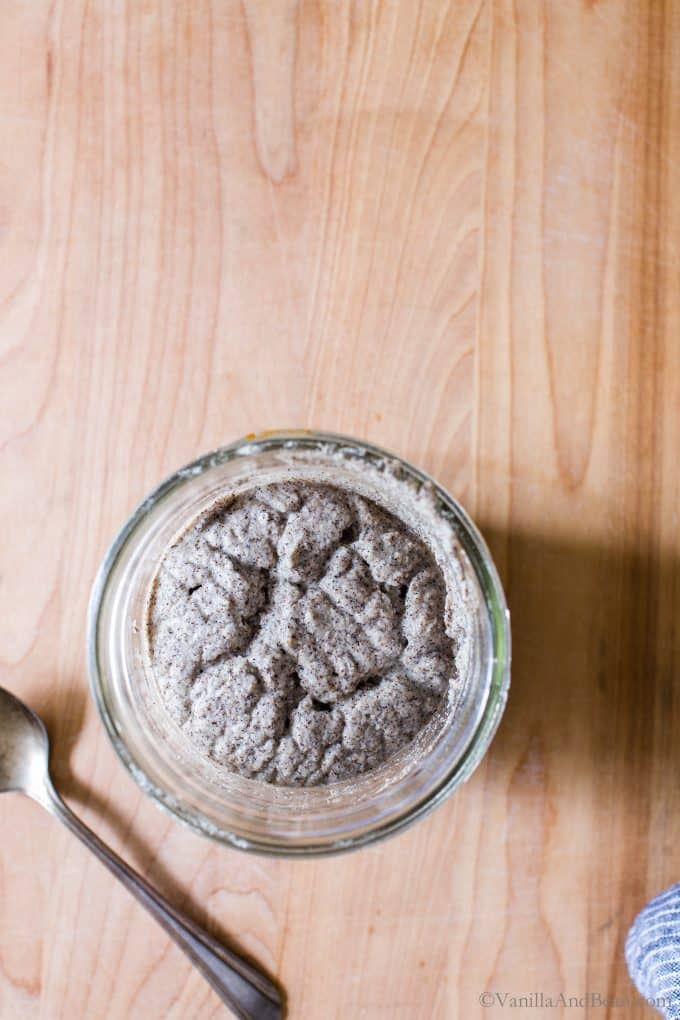
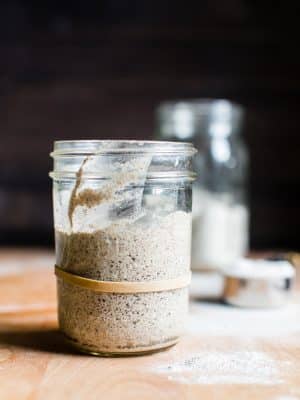
This gluten free sourdough bread recipe is simple to make, but you’ll need a gluten free sourdough starter. My starter recipe takes six to seven days to develop, but once you create it and continue to refresh (feed) it, it’ll be on stand-by next time you’re ready to bake!
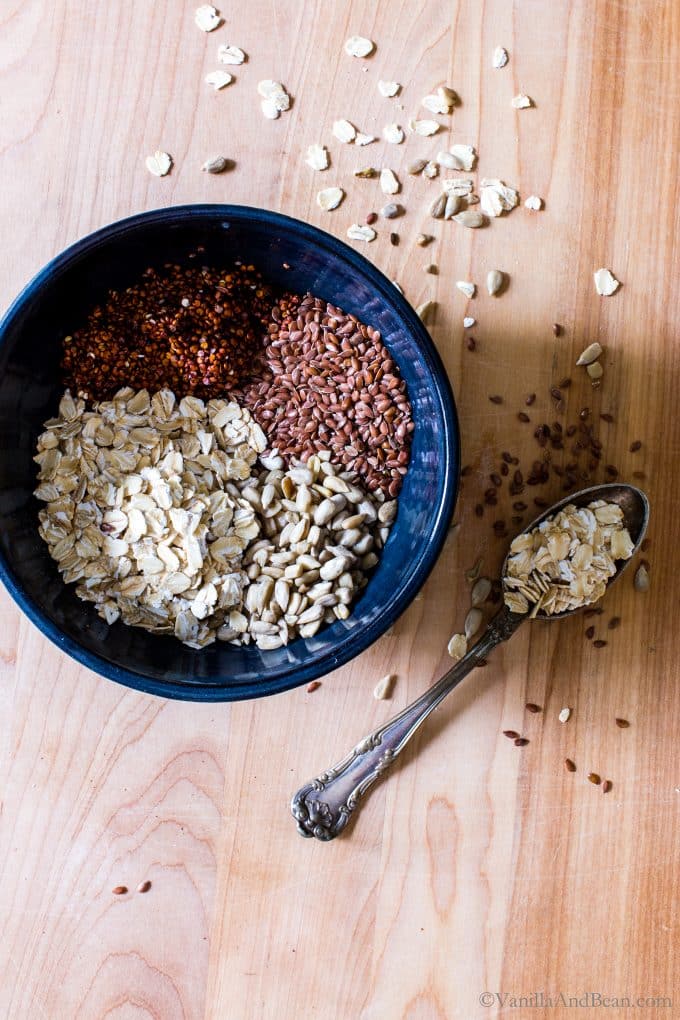
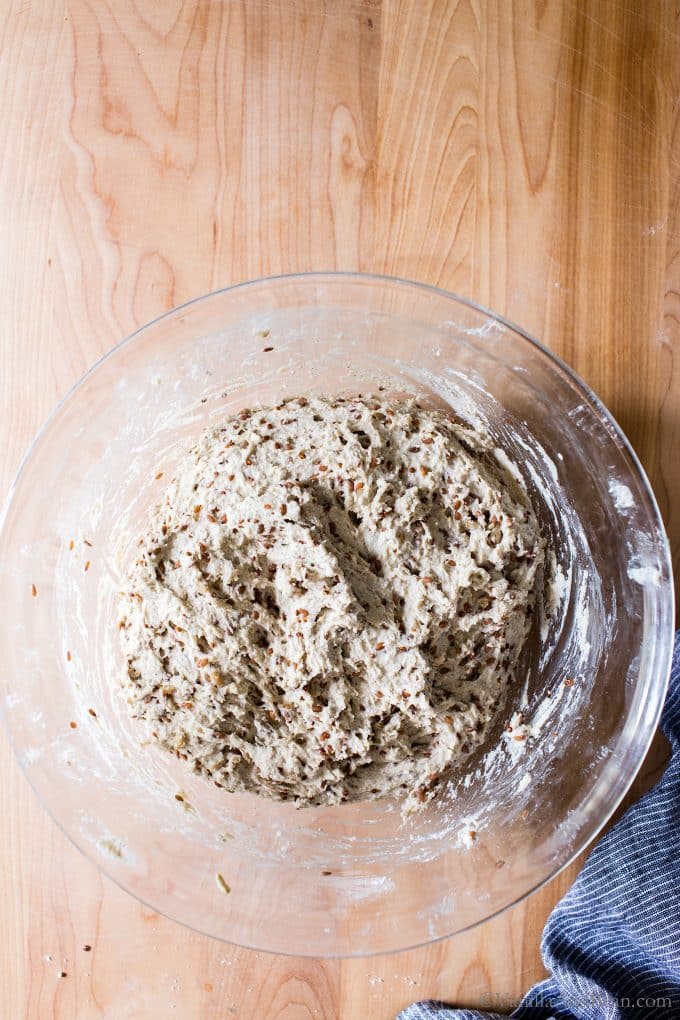
- First, prepare the soaker by placing the flax, oats, quinoa, and sunflower seeds into a small bowl with temperature water. Allow to sit overnight.
- Second, in a medium bowl, whisk the flours including oat, brown rice, millet, tapioca with psyllium husk powder and salt.
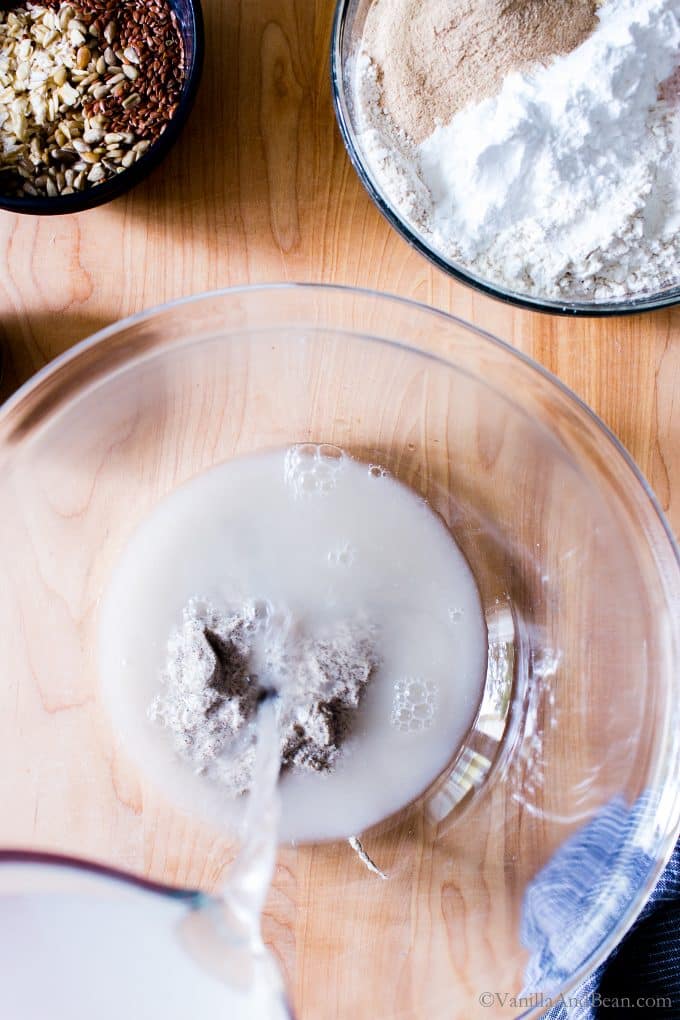
- Third, in a large bowl, whisk your fed and active starter, water, and maple syrup or honey. Add the flour mixture to the starter/water mixture and mix with a fork.
- Fourth, hand mix in the soaker.
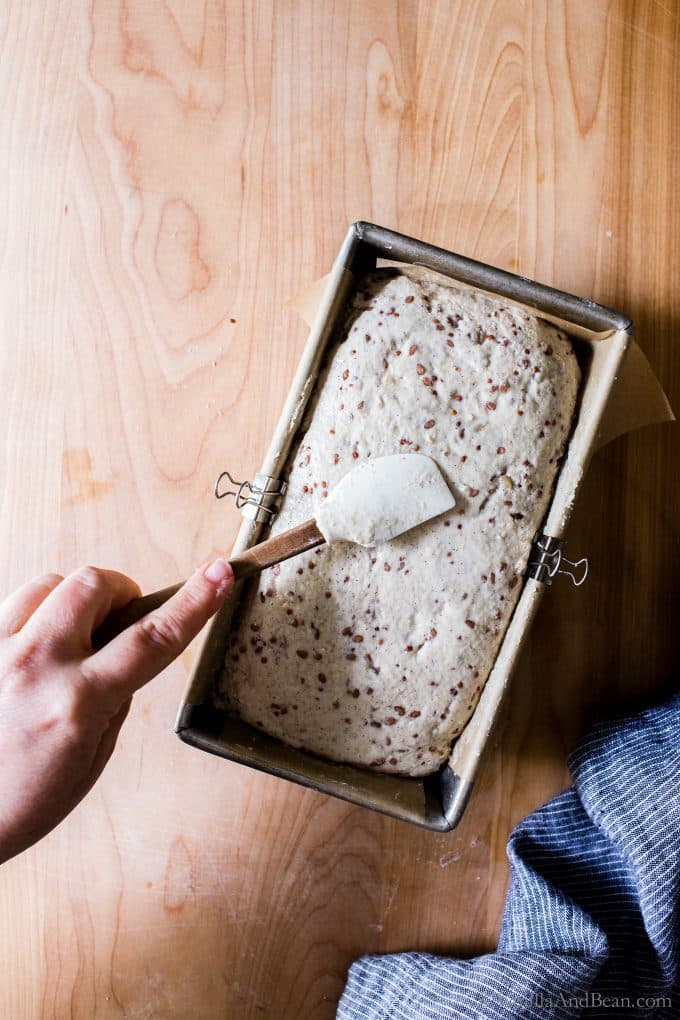
- Fifth, transfer the GF sourdough to a prepared loaf pan, while patting and smoothing the top and rounding the edges of the dough.
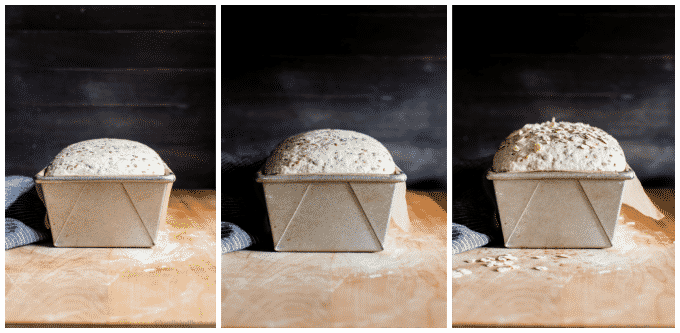
- Next, cover with a damp tea towel and ferment for 12-14 hours at room temperature.
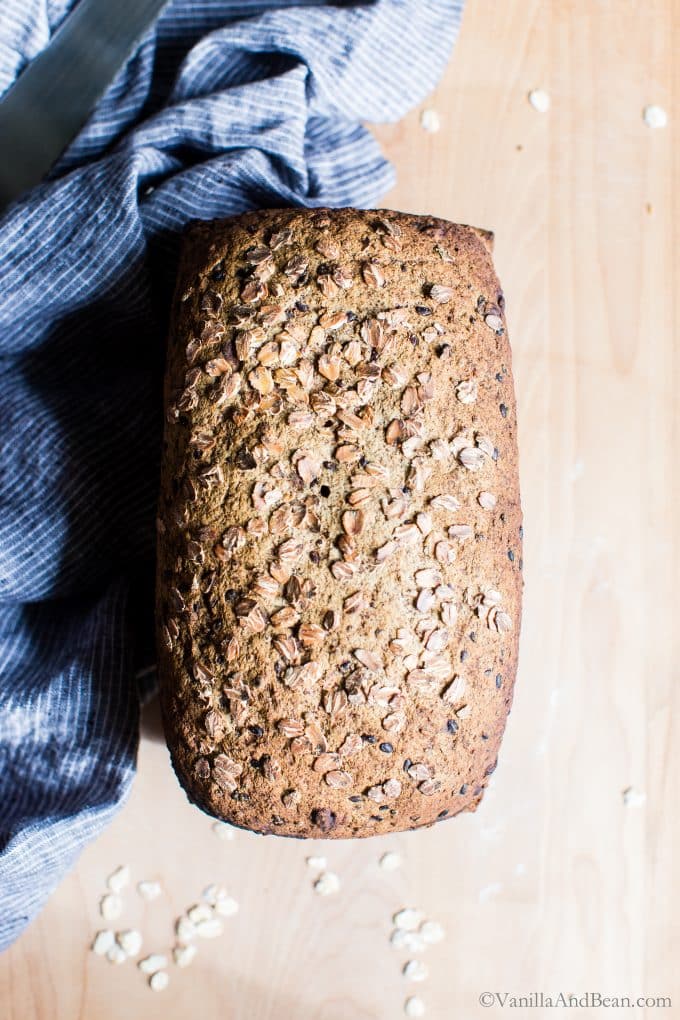
- Last, bake the loaf for about an hour.
You’ll notice there is no proof for this recipe, meaning it only rises once (fermentation). Once the loaf is shaped and undergoes bulk fermentation, it’s ready to bake.
After baking, the gluten free sourdough needs to cool completely, at least a few hours before you slice into it! Waiting until the following day is even better as it allows the bread time to cure.
Using Other Gluten Free Flours in this Recipe
You can certainly give it a go! I’ve tried subbing buckwheat and amaranth flour for millet in this recipe but the bread wasn’t as tender and light. I’ve found thorough trial and error that millet helps give loft to gluten free bread without adding more starch. Also, amaranth was a little too strong for my taste.
How Gluten Free Sourdough Bread Tastes
In a word, earthy in such a good way! This GF sourdough bread is texture rich due to the seeds/grains, has a mild oaty flavor, and a chewy interior thanks in part to the binding power of psyllium husk powder, with a nice crisp crust (after toasting).
Because this bread is gluten free, egg and dairy free (yes, vegan gluten free sourdough bread!), mostly whole grain, free of fillers and large quantities of starches, you’ll notice the interior is moist/tacky to the touch. So, it needs to be toasted to bring out its best texture. Sometimes I’ll double toast for breakfast toast, aka, avocado with egg toast.
Storing and Toasting
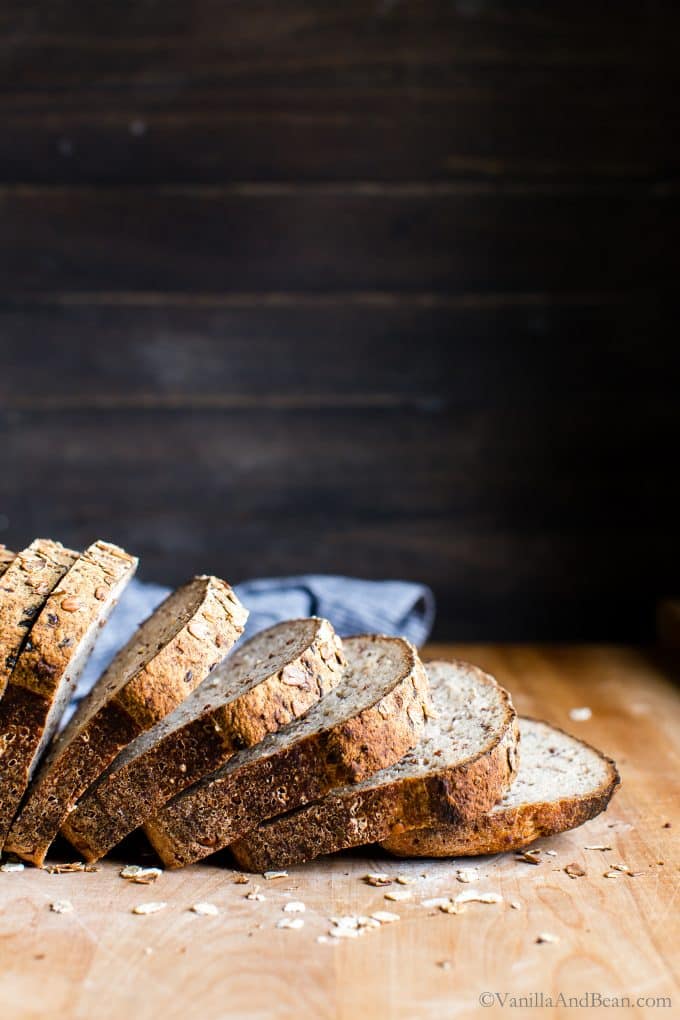
After the bread is completely cool, slice it with a serrated knife. The slices can be stored at room temperature in a closed container for up to three days or frozen for longer storage. For freezer storage, slices can go from freezer to toaster directly – this is also when I’ll double toast a slice.

Traci’s Tips
- Sourdough discard? Save it, put it in a covered container in the refrigerator and then, make these Gluten Free Sourdough Pancakes, Gluten Free Sourdough Waffles, or Gluten Free Sourdough Pizza!
- Dutch oven? I’ve tested this recipe in a Dutch oven in an effort to make a boule. Without walls of a loaf pan to hold the dough together, it spread way too much and was flat. Stick to a loaf pan ( if not experimenting :D ) .
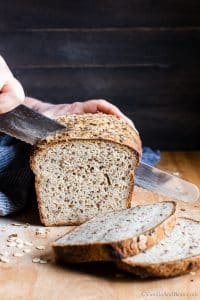
- Shaping and then transferring the dough to the pan is sticky business. I’ve included two ways in the recipe to get the hardest part of the recipe done: a. shaping prior to putting the dough into the pan or b. shaping the dough after putting it in the pan. I prefer method a. as it produces a better shaped loaf – but it’s harder to do. Note the photos show method b.
- With a 119% hydration, this dough is sticky. But I’ve discovered through my testing, gluten free loaves with higher hydration and low starch content have a better rise and produce a more tender crumb.
- One of the flours used in this recipe is oat flour. I DIY oat flour and have a tutorial on the blog if needed.
- Substitutions: I do not recommend subbing any other ingredient for psyllium husk powder. It soaks up the water, gives the bread it’s chew like gluten-full bread has and holds the dough together.
- I’ve tried subbing buckwheat and amaranth flour for millet in this recipe but the bread wasn’t as tender and light. I’ve found millet helps give loft to bread without adding more starch. Also, amaranth was a little too strong for my taste.
- I’ve not attempted subbing a different flour for oat flour.
- Use a scale. In baking, weighing ingredients is important for optimal outcome. I find that especially true in gluten free baking. I recommend investing in a good digital kitchen scale.
Makers Notes
So happy to read y’all are enjoying the bread in the comments below. Please note, I’ve not tried the following substitutions, but want to share what the community has offered. Here are a few community notes that may be helpful when making this recipe:
- Maya commented: “I used sorghum flour for the oats and half buckwheat, half white rice for the millet. It might not have risen as much as your photo, but it still turned out great.”
- Kate said: “It worked great – I substituted the same amount of arrowroot powder for the tapioca flour.”
- Sarah said: “Slice thick and when toasted you get the crusty edges and soft spongy center.”
- Jill said: “…substituted the brown rice, millet, and tapioca for an even exchange of the King Arthur cup for cup gluten free. This loaf came out SOOOOO GOOD!”
- Leah said: “…sorghum for the oat flour and teff for the millet. I got a nice rise and it came out SO good! The teff really gives it a wheaty flavor, almost like pumpernickel. Both times I left out the soaker and it didn’t seem to be a problem.”
Seeded Multigrain Gluten-Free Sourdough Bread
Ingredients
For the Soaker:
- 3 Tbs Whole Flax Seeds
- 3 Tbs Whole Rolled Oats gluten free
- 3 Tbs Red or Tricolor Quinoa rinsed under running water
- 3 Tbs Hulled Sunflower Seeds
- 1/3 C (80g) Water room temperature
For the Bread:
- 1/3 C + 2 Tbs (100g) Gluten Free Sourdough Starter previously fed, and doubled in size
- 2 1/2 C + 2 Tbs (605g) Water 80F (27C)
- 3 Tbs Maple Syrup or Honey
- 1 C (145g) Brown Rice Flour
- 1 C (150g) Millet Flour
- 1 1/4 C (130g) Oat Flour gluten free
- 1/2 C + 1 Tbs (80g) Tapioca Flour
- 2 1/4 Tbs Psyllium Husk Powder I use Terrasoul Psyllium Husk Powder
- 3 1/2 tsp Fine Sea Salt or reduce to preference *See note on salt adjustment
- 1-2 Tbs Whole Rolled Oats for sprinkling on top, gluten free
Instructions
For the Soaker:
- Prepare the soaker by placing the flax, oats, quinoa, and sunflower seeds into a small bowl. Pour room temperature water over the top of the soaker. Leave out at room temperature for about 6-8 hours. If you forget to do this, you can pour hot water (hot to touch) over the soaker before you start preparing the ingredients for the bread.
For the Dough:
- Line the inside of a 8.5L x 4.5W x 2.75H inch loaf pan (23cm X 13cm) with criss crossing parchment with enough hangover on all sides to later help shape the dough and to be used as handles for removing the bread from the pan. If you have clips to clip the parchment to the sides, use them.
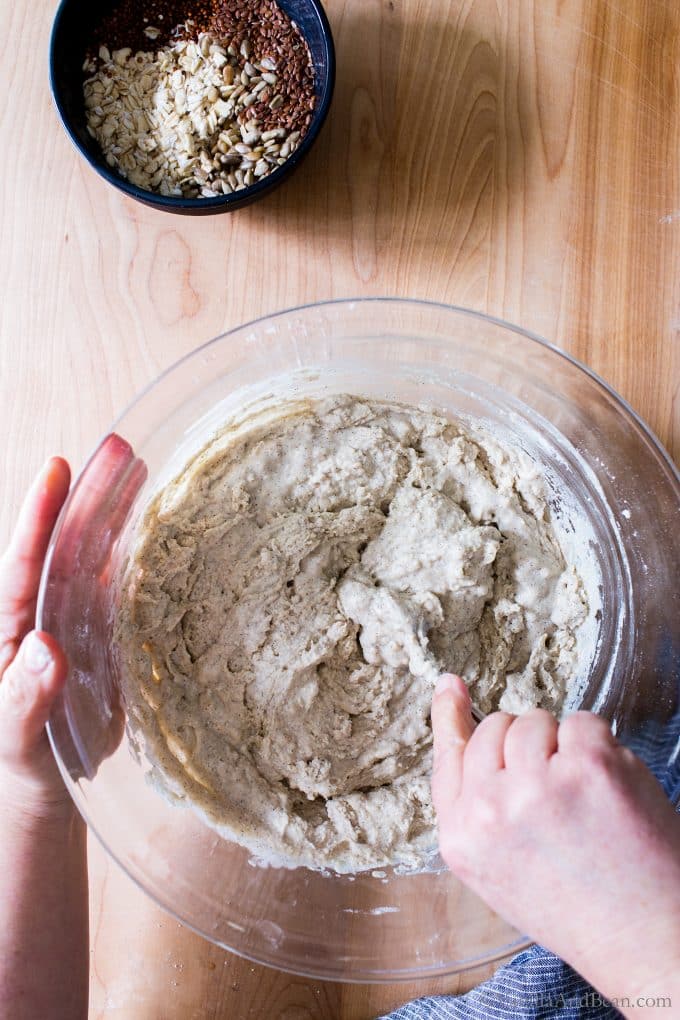
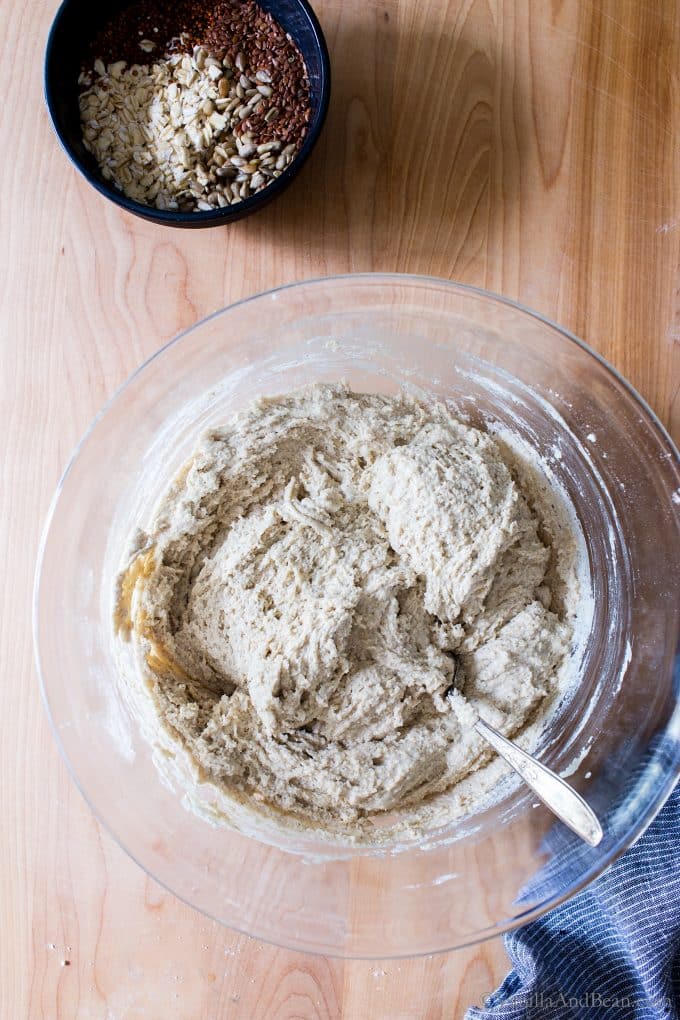
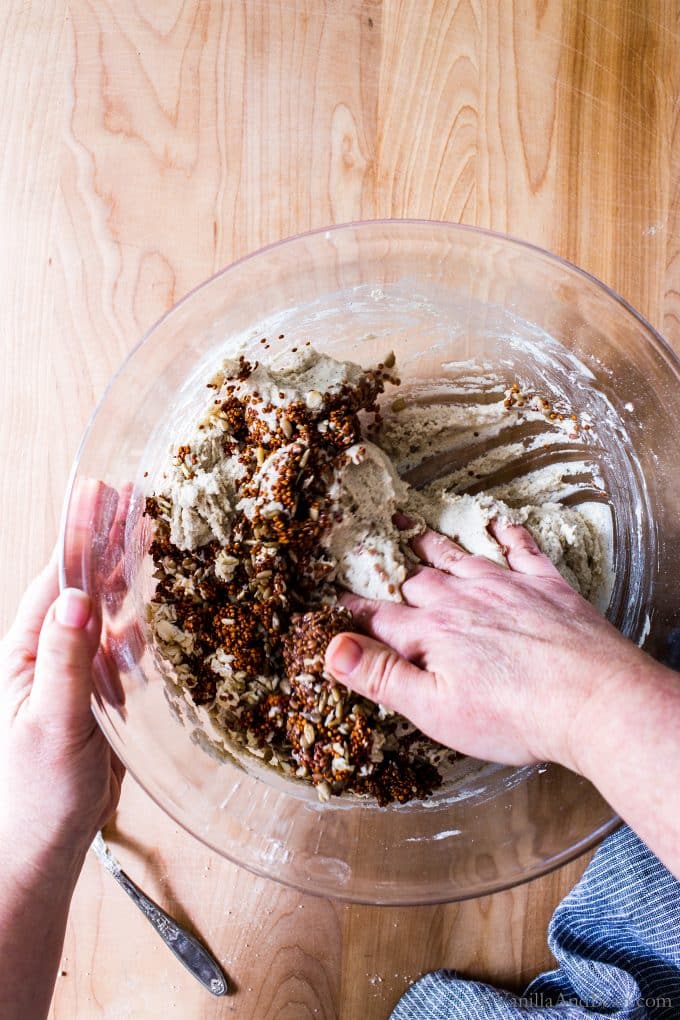
- UPDATE 5/20: Some makers have commented that they "poured" the dough into the baking pan. Please note that the dough should be of a sticky thickish batter-like consistency where it is scraped into the pan and holds together. The dough should not be pourable. In order to achieve this batter-like consistency, Psyllium Husk Powder is essential. I do not recommend substituting this ingredient. Mix the Dough: In a large mixing bowl, add the starter, water and maple syrup (or honey). Whisk until the starter is incorporated. Set aside.In a medium mixing bowl whisk the brown rice flour, millet flour, oat flour, tapioca flour, psyllium husk powder and fine sea salt. Mix throughly so that when the psyllium husk powder hits the water, it wont clump. To the water/starter mixture add the flour mixture. Use a fork to mix the flour into the water until the dough starts to stiffen, about one minute. The dough will feel like a thick batter. Add the soaker and knead the dough with your hand, incorporating the soaker until the mixture is evenly distributed, about one minute. Use the fork to scrape any excess dough off your hands and fingers. The dough will be very sticky. Set the bowl aside for about 10 minutes to rest. It will stiffen a bit as it rests.
- Shape and Pan the Dough: There are two ways to approach shaping. a. if you're in a hurry or b. if you have a bit more time and patience. Either will work but I find I get a better shape out of b. (note that a. was used in the images seen above). A. Scrape the batter into the loaf pan. Use a moist rubber spatula (remoisten as needed) to gently shape the top nudging the edges of the loaf inward to produce a nice dome shape loaf bread is known for. This takes a little practice and finessing. Just do the best you can. Use the 'handles' of the parchment and pull opposite sides inwards towards the center of the dough, helping to round and shape the edges. Moisten your fingers or small spatula and smooth the top to rid any lumpy areas. B. A bench scraper for this method is needed. Moisten your work surface with a bit of water (I use a spray bottle and sprits it a few times). With moistened fingers, nudge the dough out of the bowl and onto the moist surface. The dough will be very sticky. Re-moisten your hands and pat the dough into a rough rectangle/log a little smaller than the size of the loaf pan using the bench scraper as needed to move the dough. Pat and smooth the edges as needed using wet hands (no flour here), rocking the dough back and fourth to help shape it, smoothing and rounding the top into a rectangular dome. This takes a little practice and finessing, just do the best you can. Using one swift move, scoop up the shaped dough with a bench scraper and transfer it to the loaf pan. Use the 'handles' of the parchment and pull opposite sides inwards towards the center of the dough, helping to round and shape the edges. Do this several times. Moisten your fingers or small spatula and smooth the top to rid any lumpy areas. Use a moist rubber spatula to gently shape the top nudging the edges of the loaf inward to produce a nice dome shape loaves of bread are known for.Now is a good time to refresh (feed) your starter and store it for next time.
- Bulk Ferment: Remove the clips from the pan if using. Cover the dough with a wet tea towel and allow the dough to ferment overnight at room temperature (it's okay if the wet tea towel touches the top of the loaf). Fermentation will take anywhere between 12-14 hours depending on how active your starter is and ambient temperature. In my chilly kitchen at 66F, the dough takes about 14 1/2 hours to rise overnight. There is no proof for this recipe. Go right into baking the loaf after bulk fermentation. The loaf is ready to bake when the dough increases to 1 1/2 times in size and has risen to about 1.1/2" (3.8cm) above the lip of the pan at the center. The dough will spring back when gently pressed on top.
- Bake the Loaf: Place a oven rack in the center of the oven and preheat the oven to 550F (288C). Lightly spray or brush the top of the dough with water and sprinkle 1-2 Tbs of rolled oats over the top. Decrease the oven temperature to 475F (246C) and bake the loaf 55-60 minutes or until the internal temperature of the bread is between 200F-205F. If the bread starts getting too dark on top, tent the bread with foil. The bread pictured here is untented. After 10 minutes out of the oven, transfer the bread to a cooling rack. Cool completely, at least for two-three hours, better if cured overnight, before slicing into it. You'll notice the bread is very hard, but will soften as it cools.
- How to Store and Enjoy!: After the bread is completely cool, slice it with a serrated knife. The slices can be stored at room temperature in a closed container for up to three days or frozen for longer storage. For freezer storage, slices can go from freezer to toaster directly.You'll notice the interior of the bread to be tacky. This is normal. I find this gluten free sourdough needs to be toasted before it's enjoyed... sometimes double toasted to bring out its best flavor and texture.


I love this recipe! Thank you!! I made a few substitutions and my bread didn’t rise and came out a little too doughy… But it still tastes good and I’ll try to make it better next time!
Hiii Nancy! Thank you for your note. SO happy to hear you’re making the recipe work for you and using it to jumpstart your own GF SD adventures! Keep us posted!
Hi I’ve been making this bread now since I
Commented a couple months ago, It absolutely delicious, I eat at least one piece a day and things have changed in my digestive system. I no longer need to take anything for regularity! I do have a question on the starter, do I add sweet rice and buckwheat flour to the starter at the time of making the bread or do I just remove it from refrigeration, warm It up and let it rise from the last feeding and then use it.??, I ask this because the rise I get doesn’t seem to double but is still very good.
Hi Carol! Thank you for your note and sharing your experience with the bread. SO happy to hear the good news(!!). For the starter, you’ll need to feed it, let it double, then mix your bread. I usually feed mine before I go to bed, then mix in the morning (or feed in the morning and mix in the afternoon). If the starter isn’t doubling, you can opt to feed it twice within a 12 hour period. This will strengthen the starter and help it achieve that doubling in size. I hope this helps. Please keep in touch!
I’m really interested in trying out this recipe! I was wondering if the maple syrup / honey is required or if the amount can be reduced. I wasn’t sure if it was added for taste or as a food source for the yeast/bacteria.
Hi Sneha! Thank you for your note. The maple/honey is to add to the bread’s flavor profile, and it also provides a boost to the yeast, by how much I’m not sure since I’ve not tried leaving it out specifically in this recipe.
Thank you for the amazingly detailed instructions on gluten-free starter and bread! My first attempt I used the America’s Test Kitchen all-purpose flour blend + sorghum for the oat flour. I made the mistake of not allowing the starter to fully double, and my bread came out very dense (though still tasty). For my second attempt, I spent 3 days feeding the starter until it was good and ready, and got a much better result. I used your flour suggestions this time with two substitutions: sorghum for the oat flour and teff for the millet. I got a nice rise and it came out SO good! The teff really gives it a wheaty flavor, almost like pumpernickel. Both times I left out the soaker and it didn’t seem to be a problem. Thanks again!
So happy to hear Leah! Thank you for your review, tips and subs! I’ll add them to the list. So happy you’re enjoying the recipe!
I am trying this recipe for a second time but it is soupy like batter. Followed all the measurements by weighing everything. What have I done wrong?
Hi Connie. I’m sorry your batter is soupy. The only other time I’ve heard of a soupy batter is from Elise (a commenter below) who said it was soupy before baking the bread. She wrote again after baking the bread and commented again “it really puffed up” in the oven. The only thing I can think may be a problem is scale calibration. Also, are you whisking the psyllium husk with the flours before adding it to the water/starter mixture?
Is it possible you are using whole psyllium husks instead of ground? That will make a difference in how the dough holds together I have learned.
Thank you for your note Jenny and sharing what you’ve learned!
Hi! Can I sub the whole flax seeds for ground flax seeds or chia seeds?
Hi Chloe! I’ve not tried ground flax, so I’m not sure it would work or not. If you give it a go, please keep us posted. I wouldn’t recommend chia seeds simply because they would change the texture of the bread.
I have baked a lot of gluten free sourdough breads and this one is excellent! The texture is perfection. You don’t even need to toast it like most other gf breads. Plus it’s loaded with nutrients from sunflower seeds, flax, and whole grains. I have celiac disease and really appreciate the notes from the other bakers on substitutions! Many of us celiacs have cross reactivities, allergies, and/or intolerances so this was wonderful to see. Make this recipe and double it. It is that good :) Thanks for sharing this great recipe!
Thank you for coming back, leaving a note, and rating! I loved seeing your bread on Instagram <3 !SO happy to hear you're enjoying the bread and that the notes from bakers are helpful! I'll update this section as I receive more notes. Hooray for good bread!
Hi!
I made a loaf of this bread and we had it in the oven for 55 mins and noticed that when we pulled the thermometer out, the inside was still doughy. We put it in the oven for 10 more mins and then 5 mins after that since we were experiencing the same issue (thermometer reading 200 degrees consistently). We pulled the bread out of the oven for fear that it would burn and are hoping it is still cooking. Has anyone else found this issue? Note: the dough was risen perfectly in the pan this morning.
Thank you!
Hi Alanna… I always temp my bread, but I don’t recall if it comes out doughy in this recipe. 200F degrees is spot on! Remember too that while the bread cools, there’s a bit of what’s called overrun, meaning the bread is still baking even after it comes out of the oven. That’s one reason why the bread needs to cool completely before slicing into it. I hope this helps!
The 605g of water seems to be a typo. When I used that measurement I noticed it was really watery. Then I put 2cups and 2tbsp in a bowl and it was 505 grams. Will start over tomorrow. Not confident I will get anything to rise.
Hi Cris! The recipe calls for 2 1/2 C + 2 Tbs of water, not 2 C + 2 Tbs. I reweighed the water to make sure there’s no typo, and as indicated in the recipe, 2 1/2 C + 2 Tbs of water weighs 605g. As indicated in the blog and recipe, this bread recipe purposely has a high hydration because I found after much testing, the dough rose better with more water. I hope this clarifies and you enjoy the recipe!
Today will be my third time experimenting with your recipe. It’s the absolute best gf vegan bread I’ve had. Thank you! I’m going to reduce the water some as each time I’ve made this recipe my “dough” is much more of a thick batter and impossible to shape in a way. I just pour it into a loaf pan and let it rise For 10-12 hours. It comes out perfect at 60 minutes with and internal temp of 210 degrees Fahrenheit. It’s a bit tacky to the touch when I slice it the next day but I freeze the sliced loaf and take what I need and toast before using.
Hooray hooray! Thank you for your note and tips, Aimee! So happy to hear you’re enjoying the bread!
Baked my second loaf of this today, and it turned out well. I waited until it was barely warm, then gave in to temptation and cut a slice. I think it’s a little better than the first loaf, mainly because I used a little less liquid and baked it a little longer. It’s still a bit on the rubbery side, but is closer to a good bread texture and not gummy at all. The details:
This loaf started two days ago when I took my saved starter out of the refrigerator and refreshed it. It hadn’t been long since I’d used it last, and it came back strong, so I decided to use it without further refreshes. Yesterday late afternoon I did all the measuring and started soaking the seeds. I used a somewhat different seed mix, cutting back to 2 tablespoons of flax, using steel cut instead of rolled oats, cutting back to 1 tablespoon of (red) quinoa, chopping the sunflower seeds, and adding 2 tablespoons each of hemp hearts and sesame seeds; I used slightly more water to account for the additional seeds.
Then about 1 AM (I’m a night owl), I mixed the dough, using 190 grams of my starter, which works out to about 118 grams of water the way I mix my starter. I’m not sure of the water content of your starter, so I’m not sure who our hydration levels compare, but based on my first loaf (which was too moist), I cut back to 450 grams of water (about 568 grams including the water in the starter, plus that in the soaker). I cut back to about 2 tablespoons of honey since I don’t like bread to be noticeably sweet. I only had 50 grams of tapioca starch, so made up the starch with 30 grams of arrowroot starch. And I cut back to 3 teaspoons of salt. This produced a very thick batter which after resting a few minutes was more of a soft dough. I spooned this into my parchment-lined pan and, since it wasn’t sticky, smoothed it with the back of the spoon, then covered it and let it stand overnight to rise.
About 12 hours later it had risen nicely, so I started the oven and about 1:35 pm (oven up to 500F) applied the water and rolled oats and put the loaf in the oven. After 45 minutes, I covered the loaf (which had risen just a bit more) with foil and continued baking. I checked the internal temperature three times, taking the loaf out after a total baking time of an hour and 20 minutes at an internal temperature of 210F. It is a little dark, but not burned.
I really like this bread. I think the changes I made were not so extreme as to make it a different recipe, so I rated it.
SO happy to hear you enjoyed the recipe! Thank you for sharing your notes and adaptations. I’m happy to hear it’s easily adjustable!
This was very helpful. I followed your steps on covering up my bread with foil after 45 minutes of baking, and then baking it for another 35 minutes for a total of 1 hour and 20 minutes. I have the best results from that so far. I’ve made this bread over 25 times and I’m quite pleased by how the bread turned out to be. Thanks for sharing. And thanks for the recipe, Traci!
Hi Kevin! Thank you for your note and giving the recipe a go! So happy to hear the adaptations are working for you!
I have been baking GF bread for 5 years, but just recently braved attempting sourdough. The details in this recipe are exceptional. I followed your instructions (but used instant GF oat instead of oat flour. I was lazy! And skipped parchment paper because I used a silicone pan). I was so worried that my dough would overflow the pan over night, but next time I will let it rise a bit longer. Thanks!
So happy to hear you enjoyed the recipe Ginna! Thank you for your note, kind words and rating!
I have just made your bread and it looks beautiful at least on the outside. But could you please tell me how have you calculated the hydration to 119%
Hi Vishal! Thank you for your note. To calculate hydration I used “bakers percent” calculation. To simplify, I calculated hydration based on the core recipe (since the starter is 100% hydration). To find hydration I divided the weight of water by the weight of the flour (total). It can get much more complex if using the starter and the soaker to calculate, and I estimate the hydration would be slightly higher – please let us know what you find if you give it a go!
I cooked it for 50 minutes and it burned so I recommend checking it at 40 minutes :)
Thank you for your note Lauren. Good to keep an eye on it since oven temperatures vary so much. I hope you enjoyed the bread!
Can I eliminate the seeds? Or use only oats (not as much as the total of all seeds) – and reduce water?
Hi Diane! You can leave them out or add 6Tbs of oats and quinoa mixture – although the texture of the bread will be different. I wouldn’t change the water, as this is what helps the bread rise. Please keep us posted!
After a month or so of searching for gluten-free sourdough bread, I decided on this recipe.
My concern is that, formthe starter, I could get brown rice flour to do anything even though I followed your instructions exactly. It just sits there. So I tried using buckwheat flour that I ground myself from groats. By morning, it had already doubled in size.
I will continue your instructions for the next 6 days but I’m wondering if it is necessary given how quickly it doubled.
I would be wonderful if you would comment for a fellow Washingtonian
Hi MaryAnne! Thank you for your note and giving the recipe a go! So happy to hear buckwheat is working for you. Indeed, keep feeding your starter for at least a few more days. It will need to be strong enough to raise the sourdough. Remember, you’re building a strong microbiome and this takes a bit of time. Additionally, building your starter over time develops its flavor/character. Give it a bit more time. THANK you for your tip on grinding your own buckwheat flour. Are you using a mix of buckwheat and sweet rice flour for your starter?
I made the starter and then bread and it came out beautifully and tasty.
I was wondering if any body has tried using commercial yeast instead.
Hi Shosho! Thank you for your note. SO happy to hear you’re enjoying the sourdough! Thank you for coming back, rating the recipe and leaving a note :D . I’ve not heard form anyone that’s tried commercial yeast.
I have used bakers yeast when my starter got moldy. It works just fine. About the same amount of rise. This really is a wonderful recipe.
Such a good tip Ann! Thank you for your note. How much bakers yeast did you use?
Hi Ann,
How much yeast did you use, and how did the recipe change? I would love to know.
Thank you!
Has anyone tried baking this in a bread machine? I don’t have an oven and would love to try this recipe.
Hi Tamara! I’ve not received any notes regarding making this in a bread machine. If you give it a go, please let us know how it goes.
Hello, I made this loaf and substituted the brown rice, millet, and tapioca for an even exchange of the King Arthur cup for cup gluten free. This loaf came out SOOOOO GOOD! I almost wish that it didn’t so I wouldn’t want to eat the entire loaf! Thank you for this amazing recipe.
Hiii Jill! Thank you for your note and rating! That is AMAZING! Thank you for sharing your note on the KA cup for cup gf flour! Hooray! I’m thrilled to hear you’re enjoying good bread. Your note makes me so happy!
I made this last week in two smaller loaf pans using my brown rice starter, and subbing sorguhm flour for the millet. It came out quite nice, a little chewy with a tangy sourdough flavor. It took a long time to rise (its cold here, and the house reflects that) so after a night on the counter top, I put it in the oven with the light on for a couple of hours and that helped.
I’m not thrilled with the “gumminess” of it, but I toasted my little slices in a cast iron skillet with some grass-fed butter and that was delicious.
Hi Jeanne! Thank you for your note! Indeed, the temperature can really slow the rise of the dough as you observed. Turing on the oven light is a perfect way to get that dough moving! Exactly my reason for recommending toasting the bread, to help it dry out further. To make this recipe dryer, a lot more starch would be needed (from my experience) and it was my goal to make this loaf with mostly whole grains.
I’ve made this bread twice and it’s fantastic. However, my starter now has separated and doesn’t look like it did before. It is refrigerated. Should I try to feed it anyway or do I need to start from scratch?
Hi Barbara! Thank you for you note. I’m so happy to hear you’re enjoying the bread! For your starter, how does it smell? Does it smell sweet and ripe or off? Is there a liquid layer? Is there any off coloring or moldy growth? Hooch is normal, a liquid layer which indicates a starter in need of feeding. If everything smells and looks okay with no off odors or colors, stir in or pour off the hooch and give it a feed once a day for several days in a row, to strengthen it, before you bake again. Remember, the starter is ready when it doubles in size. If there is any off odor or color, throw it out and start from scratch. I hope this helps! Please keep us posted!
Thank you. I will give it a shot.
Hi,
I am going to try this recipe and I have a quinoa allergy. Is there something you would recommend ad a substitution for the quinoa?
Thanks, Tiffany
Hi Tiffany! You can easily sub 3 Tbs of flax and/or sunflower seeds (or a mix of the two) for the quinoa. I hope this helps and you enjoy the recipe!
Hi, I’m celiac and very allergic to psyllium too. How can I substitute the 3 tbsp of Psyllium in this recipe?
Thanks, Elsa
Hi Elsa… thank you for your note. While I’ve not made/tested this recipe with a binder other than psyllium, I did a quick search and found that ground flax or chia seed (1 to 1 replacement) may work. If you do give it a go, it’ll be a bit of an experiment. Please let us know if it works for you! I hope this helps.
It looks amazing and I can wait to try, but I think I will need to do a couple of changes. I am having trouble finding millet flour so I’ll sustitute it with sorgum, and I am intolerant to flax seeds so I was thinking to either put a spoon more for each of the other three ingredients for the soaker or maybe substitiute it with sesame seeds. What would be your suggestion? Also, I might go for buckwheat oats, as I do not have regular oats at home at the moment. And one last question: would it be ok to spray the baking loaf pan instead of using baking paper?
Hi Simona! Your subs sound just fine. I think sesame seeds would be a nice addition, but you can sub more of any of the other three ingredients in the soaker if you like. I tested this recipe without parchment, using coconut oil instead to grease the pan. The result was a darker, crispy crust where the oil met the dough. So it will work, but the bread will not be as soft and it will be darker in color. I hope this helps Simona and that you enjoy the recipe!
I just made this for my family. My daughter has celiac disease, and I am allergic to bakers yeast, so gluten free sourdough is perfect for us!
I adjusted the recipe though because she can’t have oats, and I can’t have millet so I thought I’d share: I used sorghum flour for the oats and half buckwheat, half white rice for the millet. It might not have risen as much as your photo, but it still turned out great.
My daughter bit into it and said it’s the best bread she’s had since we found out that she had celiac disease 5 years ago. Thank you so much!
Hiii Maya! Oh my goodness! Thank you so much for sharing your adjustments and notes. I’ll add a few notes to the recipe for others. This is Super helpful! And I’m thrilled to hear your daughter is loving the bread. Hooray!! Thank you again, Maya!
Hi there, as a coeliac I cannot eat oats, as most coeliac’s can’t. You might want to include a disclaimer about this somewhere in your recipe incase someone makes it for a coeliac friend. What do you suggest as a substitute for oats?
Hi Lauren, thank you for your note! For the oat flour (in the same quantity – volume, not by weight), I’m thinking buckwheat could work just fine although the flavor will be a stronger. When I was testing this recipe, I used buckwheat in place of millet and it worked, but the flavor is very buckwheaty :D Not a bad thing, but something to be aware of. I’ve not tried subbing any flour for oat flour, so please let us know if you give it a go. It will be a bit of an experiment. I hope this helps!
Have you ever tried a light buckwheat flour? I know of two brands, Bouchard Family Farms and Haldeman Mills. (Bouchard is a little lighter.) They are as much different from the Bob’s Red Mill dark buckwheat flour as white wheat flour is from dark rye flour. Anthony’s is somewhere in the middle (works well for French-style buckwheat crepes).
I’ve not heard of light buckwheat flour, but will be on the lookout for it! Thank you for sharing those brands!
I am currently making my first gluten free sourdough starter and can’t wait to try to bake my first loaf of bread with it when it finishes! I have celiac disease and have not yet tried reintroducing quinoa or oats (some people with celiac disease have sensitivity or reactions to these grains too). Could you please tell me what I could substitute for quinoa and oats in this recipe and at what quantities? I look forward to hearing from you!
Hi Rebekah! I hope your sourdough starter is coming along. Thank you for your note. For the quinoa, you can leave it out or add any of the other soaker ingredients in its place. For the oat flour (in the same quantity – volume, not by weight), I’m thinking buckwheat will work just fine although the flavor will be a stronger. When I was testing this recipe, I used buckwheat in place of millet and it worked, but the flavor is very buckwheaty :D Not a bad thing, but something to be aware of. I’ve not tried subbing any flour for oat flour, so please let us know if you give it a go. It will be a bit of an experiment. I hope this helps!
Grind your own buckwheat flour from raw groats (in your blender) and you will have a much milder flour than the purchased flour. I believe that the commercial buckwheat flour may be from roasted groats, and so is much stronger. My buckwheat pancakes are a hit with everyone and they are very mild.
Thank you for your tip Jeanne!
I have made this bread twice now. We just love it. Your instructions are detailed and clear. This time around I doubled the recipe so that I would have two loaves and not have to bake as often. My two loaves are cooling on the counter. Can’t wait to cut into them. Thanks for this great recipe. Definitely a keeper. Have you tried freezing an unbaked loaf?
Hi Pat! Thank you for your note and five star review! So happy to hear you’re enjoying the recipe. I’ve not tried freezing an unbaked loaf, but I’m thinking it could be frozen then thawed in the fridge then for it’s final rise, at room temperature. if you do give it a go, will you let us know how it goes? Thank you again!
This is a fabulous recipe. It works for me. Finally a gluten-free bread that tastes great. Plus it’s easy to make. Thank you very much for publishing it!
Hi Simone! Thank you for coming back and leaving a note. I’m SO happy to hear the recipe worked for you and you’re enjoying the bread! And easy FTW! Yessss!
Hi,
We tried both your sourdough starter and multigrain bread recipes gluten free. The starter is alive but is not doubling in height. The bread did rise but it caved or there’s a hole throughout the between the crust and the top. Any thoughts or recommendations? I can send you a picture of need be also. Thank you
Hi Michael! I’m sorry to hear the recipe didn’t work for you. If the starter isn’t doubling in height, then it’s not ready to use in a recipe. It needs to double in size for it to be strong enough to rise and support oven spring. Give it more time to double in size. If that doesn’t work, give it a few more refreshments/feeds before testing for doubling in size again. Did you use different flours then what the recipe called for? Did you use a scale to weigh the ingredients? How many hours are you waiting to see if the starter will double in size? How does the bread taste otherwise? It’s hard to tell what went wrong without more information. Please let me know!
Hi Traci. I had the exact same issues as Michael Kagan described. I used the recipe exactly as is weighing all ingredients. I have a big hole under the top crust which I think might be due to very high oven temperature. I used a thermometer to check for doneness but it was nowhere near ready after 1 hour in the oven. So I ended up with a gummy/wet crumb and a big hole throughout. Next time I’ll bake it at lower temperature and see how it goes. I do like the taste of this bread. I bake GF sourdough breads weekly and I usually bake them at 375F for 1.5 hours. I hope it will solve the hole and gumminess. What do you think?
Hi there… oh no.. so sorry to hear about the gummyness and a hole, but happy to hear you like the taste of the bread. This gumminess issue could be due to over fermentation. Watch your dough carefully during the end of bulk and measure the rise (at the edge of the pan) as indicated in the recipe. I tested this recipe extensively, but didn’t bake it at a lower temperature. If you do give the lower bake temp. a go, please let us know how the bread turns out for you!
I also had this result! The caverning may be a result of over-proofing the bread, which is especially easy (and tragic) with gluten free loaves. What happens is when the bread is rising before the bake, huge holes develop inside that are so big, the crumb structure collapses once in the oven. Since there isn’t a gluten network, the bread can’t hold together to accommodate the air. This is my best guess. The sweet spot between underproofing and overproofing is quite small especially with gluten free things, so its best to just try, try again and make notes of all the small tweaks you make.
If you google “bread cavern overproofing” or “flying crust bread” you can read more about it!
Ohhh nooo! Thank you for your detailed notes and resources, Alejandra! I’ve not experienced this before in gf sourdough – but have with glutoneous sourdough. Please let us know if you give the sourdough a go again and any additional tips you can share from a successful loaf?!
I followed the recipe for the starter and I refreshed it last night and it’s been 12 hours but it hasn’t grown at all:( what would you recommend?
Hi Bella! In order to make a recommendation, I need a bit more information. How many days have you been feeding your starter? How does it smell? Are there any bubbles present?
I’ve been feeding it for seven days, it smells sour, and there are no bubbles.
Thank you Bella, give it a few more days to develop, feeding it once per day. The presence of a sour smell tells me something is happening, but it does need to be puffy before preparing it to use in a gf recipe. I hope this helps.
Thank you so much for this, I have been looking around for a gluten free sourdough and this is amazing! Even the kids like it which is great (and always a good test of my cooking!) thank you x
Hi Vanessa! Thank you so much for your note – it totally made my day! So happy you and the kiddos are enjoying it…. it really does make good PB&Js! Toasted of course! :D
This was my first atempt at GF bread. I have eaten some GF breads and have not been impressed. Other than I burnt the top, because I didn’t notice the part about tenting it, it is a great load of bread. It’s not crumbly and has great texture. I personally might decrease the satl a little, but the flavor is great! I think I’m going to use this as my basic bread recipe and try adding different mix ins like Rosemary, or sun-dried tomatoes etc.
Thanks for a great recipe!
Hi Teresa! Thank you for your note and five star review! So happy to hear you’re enjoying the bread! It’s that sourdough that helps make it SO flavorful – and of course oat flour which I’m completely smitten with! Do try tenting next time – I think you’ll like the results!
Can I put the bread pan in my dutch oven and bake it that way? If so, what would be the baking times covered and uncovered. TIA Looks amazing!
HI Yafa! I’ve not tried that technique. If you give it a go, I’d bake for 20 minutes with lid on, then remove the loaf and pan from the DO and bake right on the rack. That way the bottom of the loaf has a chance to get baked. I hope this helps. Please let us know how it goes!
Hi there,
I’m looking forward to baking this bread. Just two questions, My son is Coeliac Could i substitute the three Tablespoons of oats for equivalent Quinoa flakes. And also could i substitute hemp seeds or sesame seeds for the flax seeds.
Hi Amanda! Your subs should be just fine. I’m thinking sesame seeds, tho, would be a good match for this bread. They’re so earthy! I hope you enjoy the process and the bread Amanda.
Has anyone tried substituting the tapioca flour with arrowroot flour?
Hi Mackenzie! I’ve not heard from anyone who has. The little reading I’ve done indicates it could be a good sub because it’s the psyllium that’s doing the binding here rather than the starch. And because their’s other flours involved, I think it could work, but I just can’t say without testing it. If you do give it a go, please let us know how it goes!
I plan to try arrowroot instead of tapioca – my mom cannot have tapioca because of her strong sensetivity to potato (it’s often derived from potatoes, strangely). I’ll report back. This bread is very intriguing. I’m only a few days into my starter, so it will be a few more days.
It worked great – I substituted the same amount of arrowroot powder for the tapioca flour. 👍
Hi Kate! Thank you for your note! How did you and your mom like the bread?
Traci It was delicious. She just asked me to make a second loaf, which I will bake in the morning. She doesn’t eat a ton of bread, so we cooled it, sliced and froze it with patty paper in between the slices and it lasted a few weeks for her! So glad you posted this. Thank you.
Hi Kate! Thank you for your note. Hooray for a second loaf! So happy to hear freezing is working for your mom! I freeze all the bread I make too.. it just works and keeps it fresh for longer!
I messed this recipe up more ways than you’d believe. First I had to use a wheat starter because it’s all I had. Then I added about a cup of extra water. Oops. So then I had to add more flour, 1 cup of almond meal and 1/2 cup of sorghum to each bowl, because I split it in two. I couldn’t really knead it because it was still kind of soupy. Then I let it prove for an extra 12 hours because it was too hot to turn on the oven to 550, which is higher than my oven goes anyway (it’s a Viking! WTF?), so I did 500 instead. I don’t have a thermometer and I was putting the kid to bed, so my husband just guessed on when it was done. My pans were the wrong size, I didn’t use parchment paper and no cooking rack, just left them in the baking dishes for a few hours.
😂
I just tried a little slice. It’s so good.
Oh my gosh, Amanda! What a journey you had with this recipe! But that it came out to your liking makes me SO happy! I lol at your Viking! So happy to hear in the end, it worked out and that you’re enjoying it! Thank you for your note and 5 star review!
I’m excited to try this recipe. Have you tried but fermenting in the fridge? If so how long did you ferment in the fridge?
Hi Pat! Thank you for your note. While I’ve not tried fermenting in the fridge, I wouldn’t hesitate giving it a go. Since this recipe rises similar to glutonous bread (which I do ferment in the fridge sometimes), I’d give it 18-24 hours. Just be sure that you take it out of the fridge and let it warm up and get to appropriate rise before baking. Also, be sure to cover it well with damp tea towels (double up here) because we don’t want the top to dry out in the fridge. I hope this helps!
I made the bread and followed the recipe and proofed on the counter not in the fridge. It didn’t have much of a crumb and it was gummy. I cut into a good 6 hours after it came out of the oven. Apart from the gumminess, it tastes great.
I’d sen pics but I don’t know how.
Hi Pat! I’m sorry to hear the bread came out gummy. I’ve not heard of this from readers who’ve made this recipe so far. I’m curious about oven temperature, an essential part of proper baking. Do you have an external oven thermometer? That’s the only thing I can think of that may have gone wrong. I hope this helps.
Also, Pat, and I just came across this, that not all tapioca flours/starches are created the same. One commenter on another blog indicated that their results were gummy, but now they use Bob’s Red Mill and get consistent results. I use BRM and have consistent results every time. I’ve never tried any other brand.
I react badly to millet, has anyone found a good substitution?
Hi Mindy… I’ve not tried it but sweet white rice flour may be a good stand in for millet. Before using millet flour this gf sourdough bread recipe, I was using buckwheat in its place. The dough didn’t get as lofty as this loaf, and the flavor was more earthy, but it made a decent loaf of bread. If you give it a go, let us know how it goes!
Is there a substitute for ground psyllium?
Hi Joanne! The psyllium holds the bread together, so you could give an egg or two a try (although I’ve not tried it). If you give it a go, please let us know how it goes!
I baked it hearth style. Thanks
Hi again, just to add to my previous comment… I made the bread again today and this time tried a small pan of boiling water on the lower rack (I boiled around 1 cups of water and just pouring it into the pan already on the rack just after putting in the loaves to bake) and quickly closed the oven door. I found it helped my breads to rise a bit more and hold their “dome” shape and get brown on top. Everyone who has had this bread wants more…… FYI.
Hi Sarah! Thank you for your note! That steamy environment is fabulous for sourdough. What a great idea to apply it to gf sourdough too (omg – I’ve done this with regular sourdough)! So happy to hear it’s working for you and that the bread gets a bit more dome shape. Thank you for sharing your tip with us! And I love that you’re enjoying and sharing this bread!
Wow this is the best gluten-free sourdough bread recipe I have made yet and I have been trying different once for years. My last recipe had so many steps it was hard to do them all at the right time and also have a life/work!
So I made this with just the sunflower seeds ( I thought it would be the best for the people I am serving the bread to) and did boiling water over the seeds for 10 minutes. The rest of the loaf was exactly as written. I did find the first time I made it I had too much batter for the standard loaf pan I had so I sliced off what flowed over in the fermenting stage and baking that in a mini loaf pan and that came out perfect, not sticky at all when sliced ( hehe I had to cut into the mini loaf within 30 minutes), so that gave me the idea to make the recipe and put in two longer, narrower european style loaf pans that I have from France. The recipe was the perfect size for two of those loafs.. they are baking now. I put in only 1/2 teaspoon salt as we have to watch sodium and it tastes perfect. Was amazing toasted. Slice thick and when toasted you get the crusty edges and soft spongy center. I highly recommend.
Hi Sarah! Oh my goodness! Thank you so much for giving another GF SD recipe a go and coming back and leaving a note. Reading it makes me so happy! Your adaptations worked beautifully and I appreciate your sharing them with us! Isn’t the crust and interior so nice when toasted?
How essential are the seeds in this recipe? Would the sourdough base alone bake successfully? Thanks! (and I really love the pictures!)
Hi Karl! While I’ve not tried this recipe without the seeds, I’m sure it’ll be just fine without them. You could use more quinoa if you like. I hope this helps and you enjoy the process! Please let us know how it goes.
I answered my own question. Saw a link to the recipe further up. Thx. Can’t wait to try it.
Oh, good, you found it! Thank you Teri! I hope you enjoy the recipe and process!
I have to ask a strange question. Is the starter and soaker the same? If not, do you have a recipe for the starter? Thx
What an amazing recipe! I wish I’d let my loaf cure longer – but I was just too excited to cut into it. My starter was nice and active, but my preferment was stubborn. I went ahead and made the loaf anyway, and it really sprung up in the oven. The flavor is complex and earthy, quite sour but nicely tempered with the honey! Brilliant. My new go-to!
Thank you for coming back and leaving a note, Paula… And I totally get about wanting to cut into it – lol! The rise is sluggish for me too, but somehow the last few hours it really takes off. Ooohhh yes, the honey really balances the sour nicely. So happy you’re enjoying it!
Hi,
I followed all instructions and had a great starter, but there seemed to be too much liquid when making the dough — it’s more like a batter. Did you mean 2 1/2 cups or just 1/2 a cup of water??
Hi Elise! Thank you for your note. This dough is a high hydration dough (119%) as indicated in the notes which means it is very sticky and yes, that is a good description, like a thick batter. The water measurement is accurate. Please see Shannon’s post, linked below – to Instagram – for her positive review and picture. Did you bake the bread?
I just took it out of the oven and it really puffed up! I was worried I was screwing something up— I can’t wait to have a slice tomorrow. Thank you for your quick response!
Ahhhh yesss! The magic of a thriving starter! You had good oven spring and the starter (and all that water) did its job! So happy to hear, Elise. Thank you for coming back and leaving a note. I was worried too!
First to make it! Thank you for sharing Shannon!! https://www.instagram.com/p/BxTkwQLAOjF/
Thank YOU for an amazing recipe! I followed your directions to the “T” and everything turned out beautifully. The instructions were very clear and well detailed. My husband (who recently shifted to a “less gluten” diet) and I think it’s the best GF bread we’ve ever tasted… as do all our friends who tasted it! Now that I have the starter established, I will definitely be making it again and again. I have quite a large GF customer base for my cakes and desserts and I’m always asked about GF bread. I will certainly be sending them your way. I know how much work went into the development of this recipe and I, for one, appreciate it. Keep up the good work and happy baking!
Hi Shannon! Thank you so much for coming back and leaving a note, giving the recipe a go and sharing it! I’m so happy to read that you and your hubs are enjoying the bread :D ! Hooray for an established starter too.. no doubt it’ll be much easier to whip up on the next round. Knowing you’re a baker, if you do any adaptations or modifications off this recipe, I’d love to hear about them! Thank you again, Shannon! :D
For health reasons we need to give up gluten, but my son is allergic to rice. Do you have any recommendations on what I can use as a substitute?
Hi Sandra! Thank you for your note. Because I am very new to gluten free baking, I’m hesitant to offer advise here, but I did reach out to a gf friend who is a blogger and gf baker. She offered that you could give corn flour a go. It’s a high protein flour like brown rice flour. My concern is the flavor profile of this bread will be off. So, I just can’t say if it will work or not. If you do experiment a bit, please let us know how it goes. I hope this helps.
Hi! Beautiful loaf!
Can you tell me how much are 3 tbsp psilium husks in grams? Thank you! I want to make this bread.
Also, powder, it means you grind the psilium husks?
Hi Codruta! 3 Tbsp of psyllium husk powder is 36g. I use preground psyllium husks (in powder form), so I’ve never worked with whole psyllium husks. I hope this helps!
Thank you for this beautiful recipe! I just made my first loaf and used 3 tablespoons of whole husk psyllium, as I did not have powdered. It turned out amazingly well! Next time I will weigh it to make sure that I’m a bit closer to your calculations.
Btw, if you don’t allow the bread to cool for the full length of time, will it be gummier inside? I let mine cool for about an hour and could not wait any longer, as we were having it with our lunch. The outside was perfectly crisp, but it was a bit more difficult to slice through the inside. I would not say it was gummy, as it was fully cooked, but more floppy. I’m also curious if the curing process changes the flavor of the bread at all? Next time I’ll have to plan extra time for this.
Hi Karen… thank you for your note and sharing your tip about whole husk psyllium. Indeed, allowing the bread to cool completely improves its texture. I didn’t notice a flavor difference from curing it for a day, bit it does make a difference in improved texture. I hope this helps!
Thank you! :)
I had whole psyllium husk and ground it. When I weighed the ground husk it was about 6 Tablespoons for 36 grams. Should it matter if whole or ground is used if it’s being weighed?
Hi Pat… I’m afraid I have no experience with whole psyllium husk. I’m just not sure if the substitution would work because the difference in surface area of the ground psyllium husk vs powder may have different absorption properties. If you go ahead with it, please let us know if it works out!