


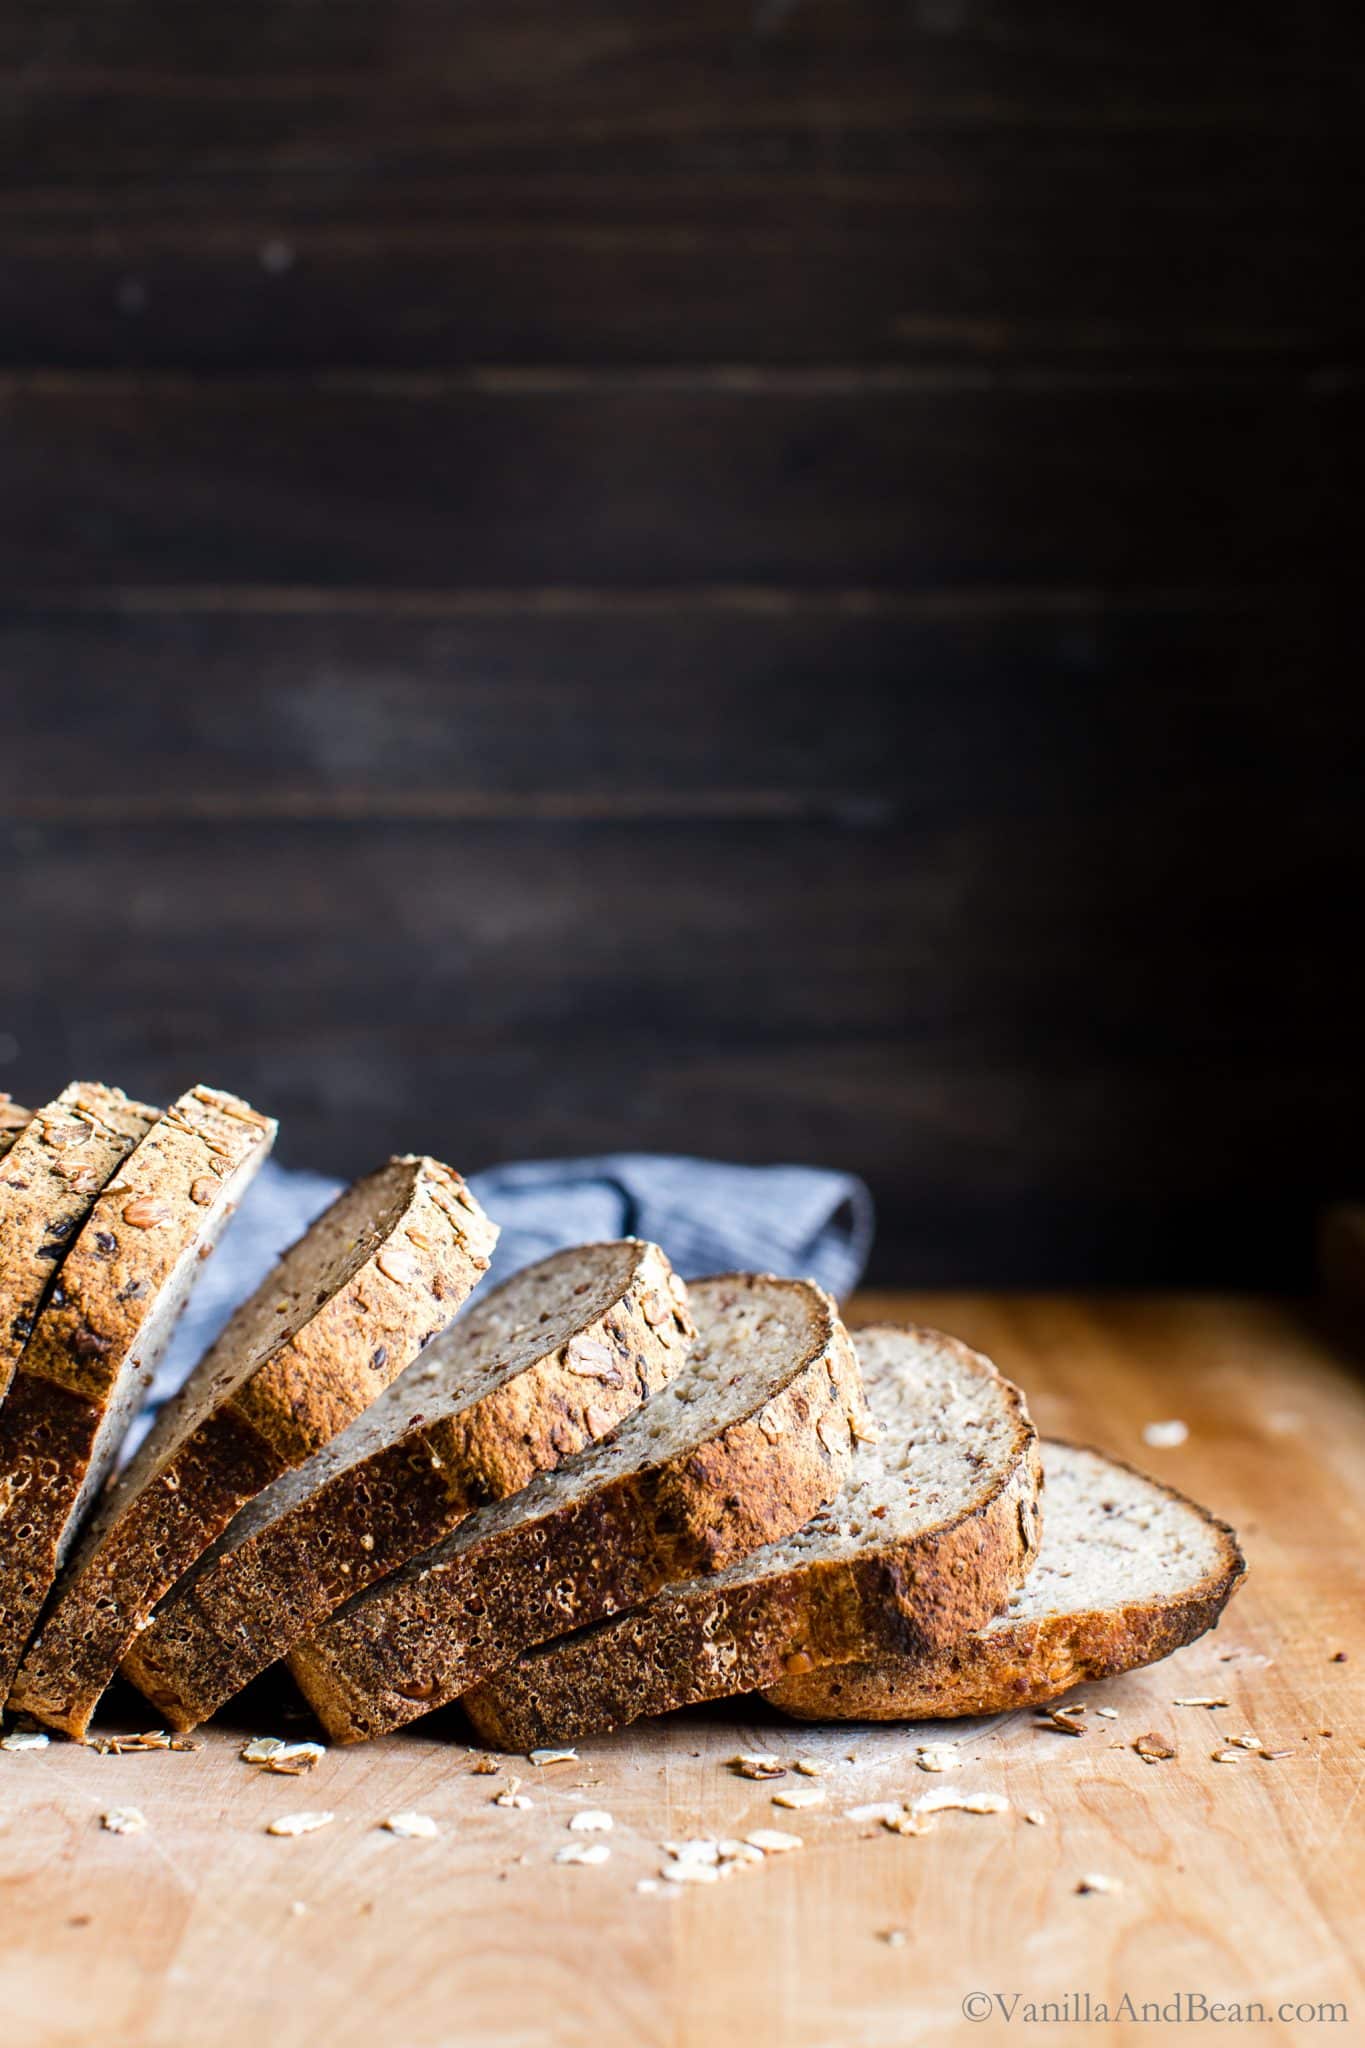
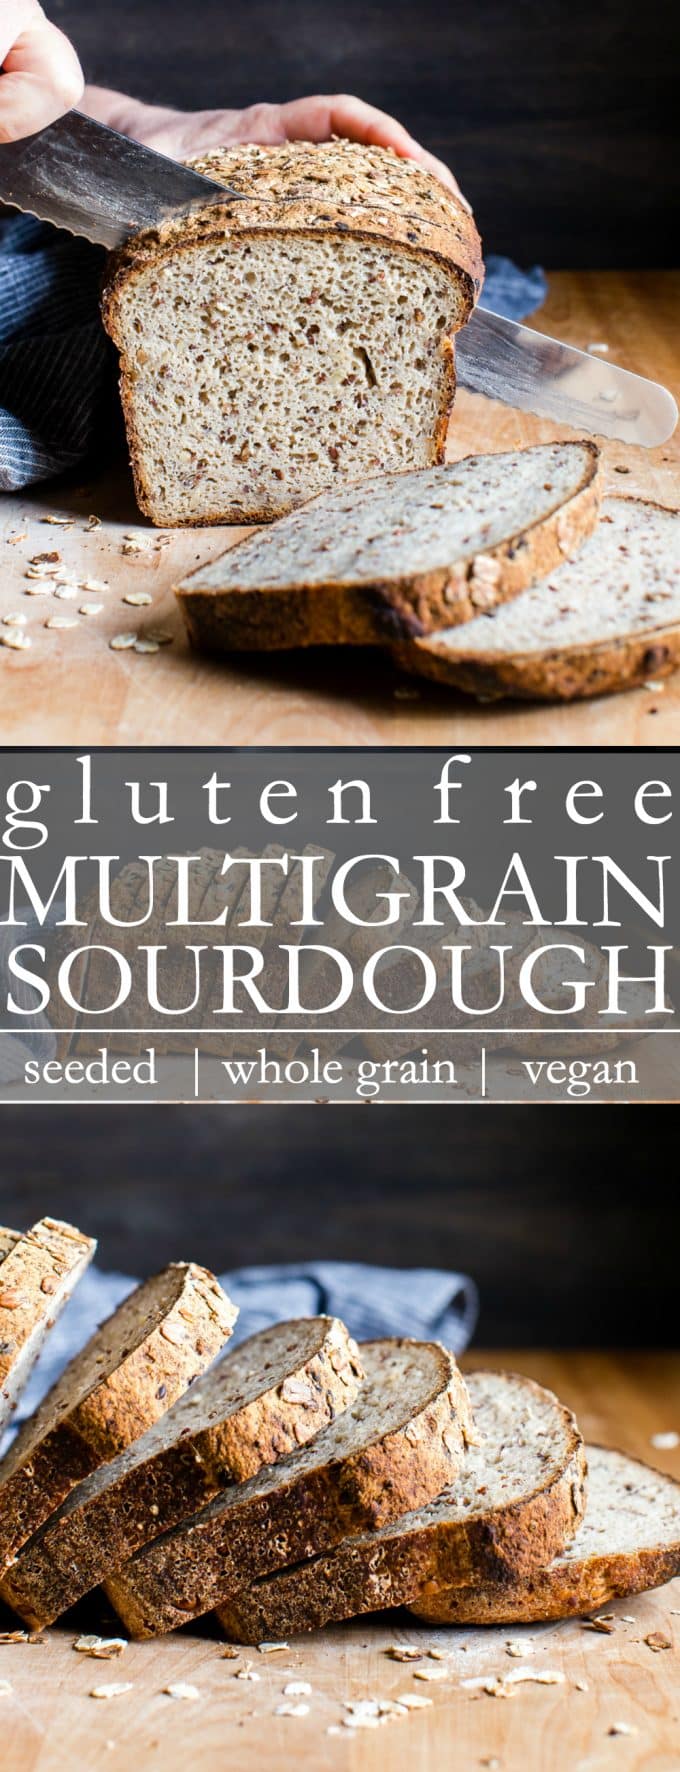
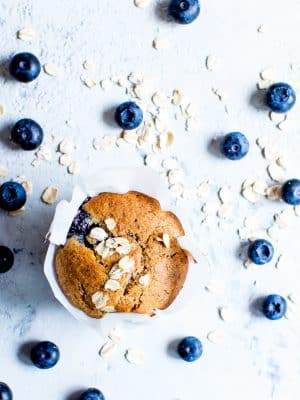
Texture rich, flavorful and tender, homemade Seeded Multigrain Gluten Free Sourdough Bread is gluten free bread you’ll look forward to eating. Use your Gluten Free Sourdough Starter to make this whole grain gluten free bread and love bread again!
Going Gluten Free
Going gluten free for a trial period in the summer of 2018 meant I had to give up my beloved homemade sourdough. After a few weeks of throwing internal fits, I finally decided to explore gluten free flours, and learn the nuances of gluten free baking. I knew it wouldn’t be easy, but I finally embraced the challenge.
After much research, creating a gluten free sourdough starter and baking many loaves of gluten free sourdough bread, testing, tweaking and taking notes along the way, I’m sharing my best loaf yet: Seeded Multigrain Gluten Free Sourdough Bread.
Although I’m eating gluten again, this bread remains one of my most beloved recipes on the blog. I hope you enjoy it as much as my family, friends and V&B readers have.
At a Glance:How to Make Gluten Free Sourdough Bread
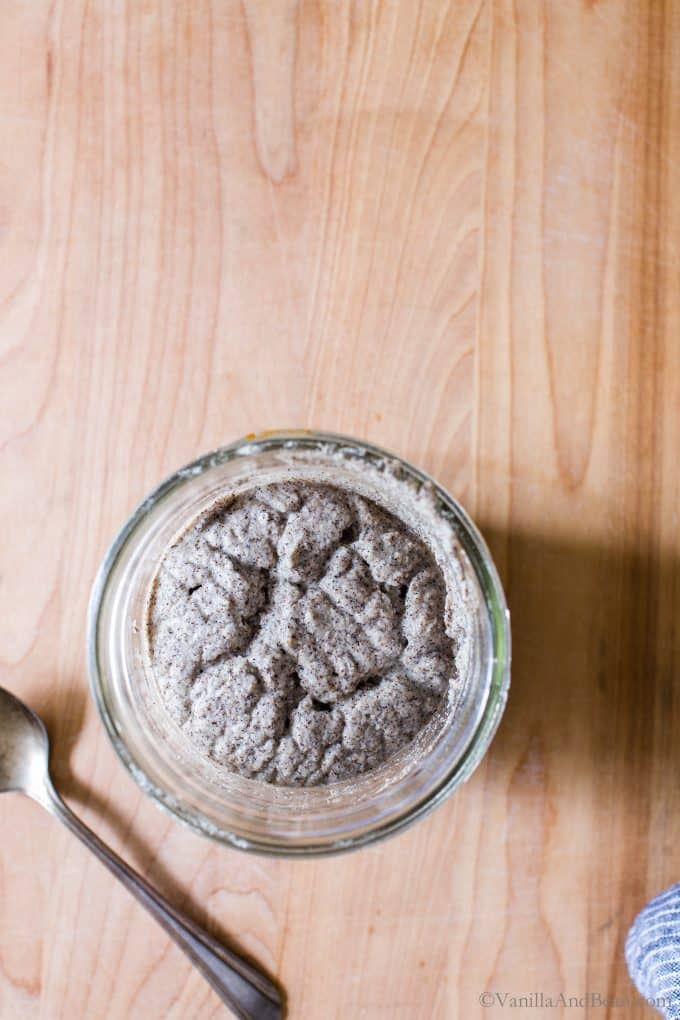
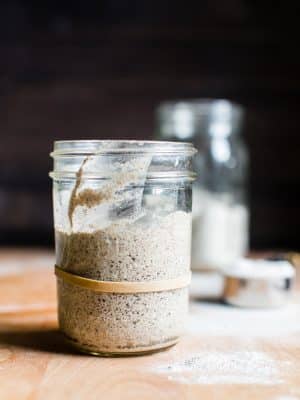
This gluten free sourdough bread recipe is simple to make, but you’ll need a gluten free sourdough starter. My starter recipe takes six to seven days to develop, but once you create it and continue to refresh (feed) it, it’ll be on stand-by next time you’re ready to bake!
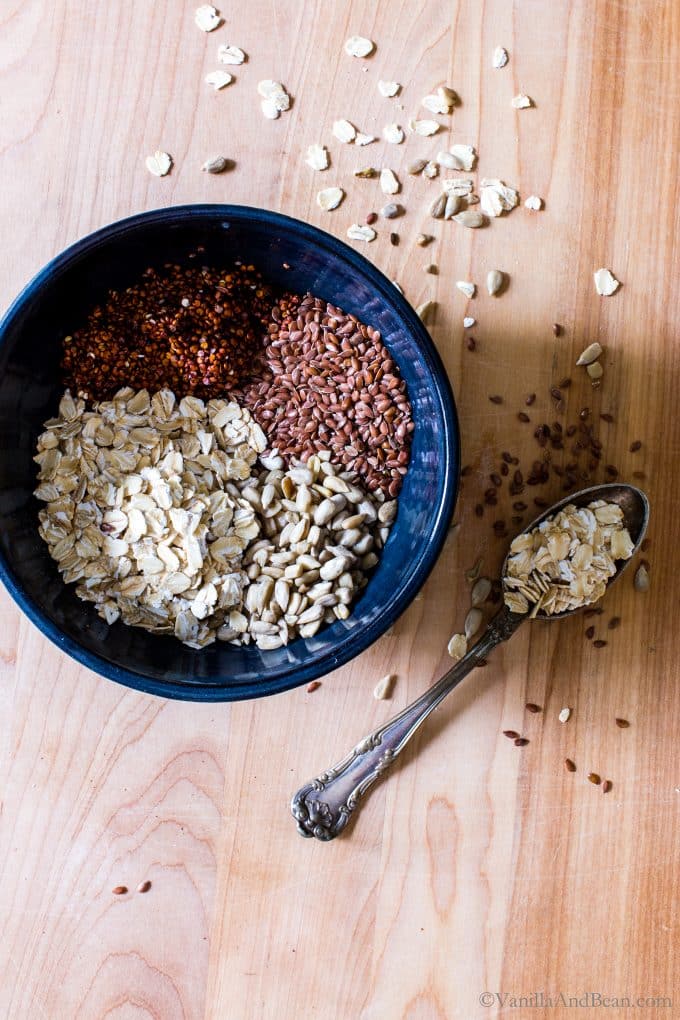
- First, prepare the soaker by placing the flax, oats, quinoa, and sunflower seeds into a small bowl with temperature water. Allow to sit overnight.
- Second, in a medium bowl, whisk the flours including oat, brown rice, millet, tapioca with psyllium husk powder and salt.
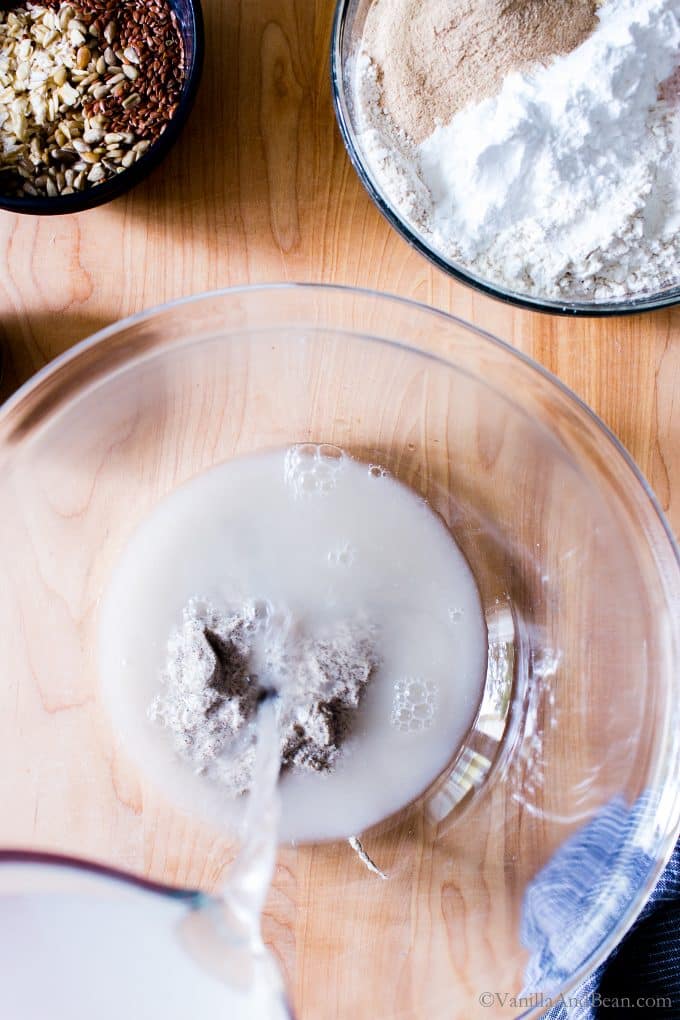
- Third, in a large bowl, whisk your fed and active starter, water, and maple syrup or honey. Add the flour mixture to the starter/water mixture and mix with a fork.
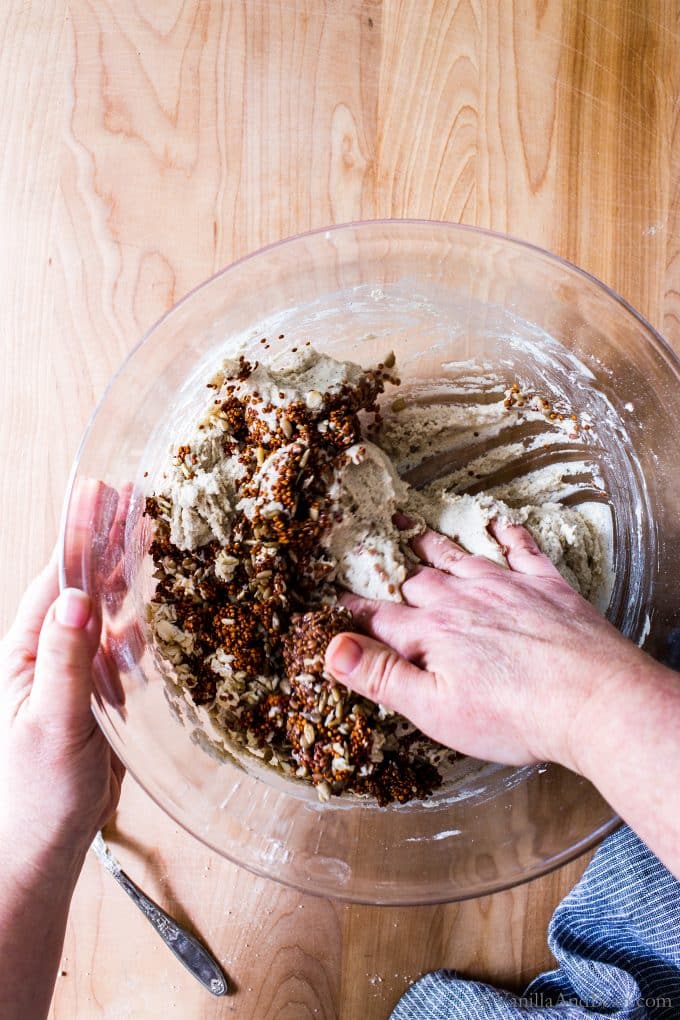
- Fourth, hand mix in the soaker.
- Fifth, transfer the GF sourdough to a prepared loaf pan, while patting and smoothing the top and rounding the edges of the dough.
- Next, cover with a damp tea towel and ferment for 12-14 hours at room temperature.
- Last, bake the loaf for about an hour.
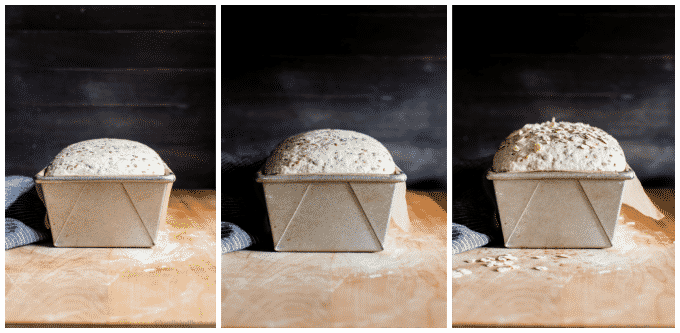
You’ll notice there is no proof for this recipe, meaning it only rises once (fermentation). Once the loaf is shaped and undergoes bulk fermentation, it’s ready to bake.
After baking, the gluten free sourdough needs to cool completely, at least a few hours before you slice into it! Waiting until the following day is even better as it allows the bread time to cure.
Using Other Gluten Free Flours in this Recipe
You can certainly give it a go! I’ve tried subbing buckwheat and amaranth flour for millet in this recipe but the bread wasn’t as tender and light. I’ve found thorough trial and error that millet helps give loft to gluten free bread without adding more starch. Also, amaranth was a little too strong for my taste.
How Gluten Free Sourdough Bread Tastes
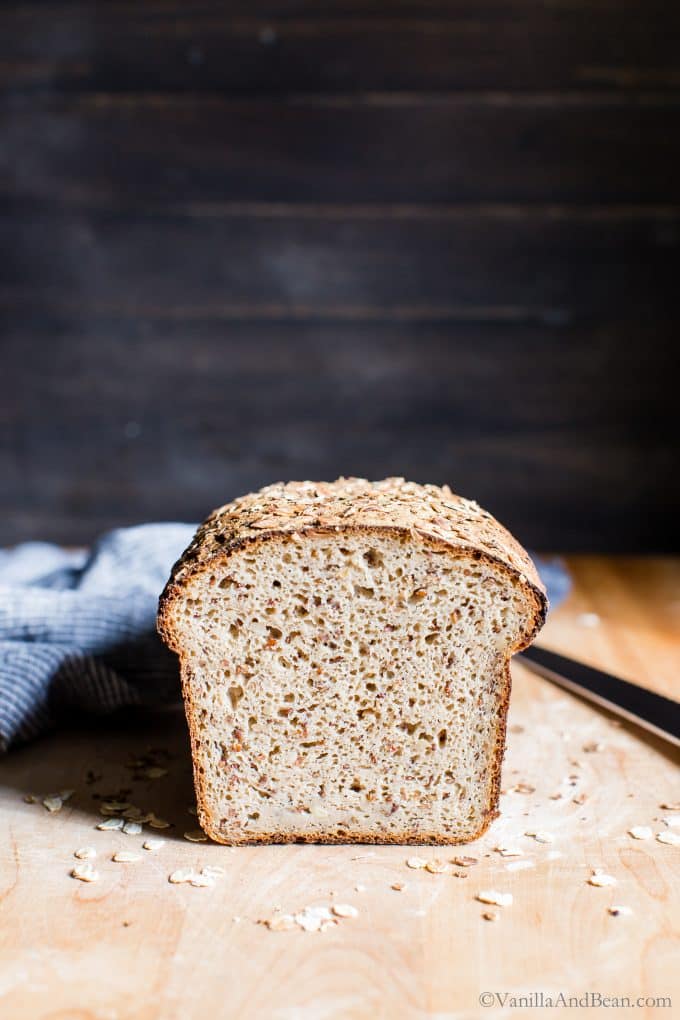
In a word, earthy in such a good way! This GF sourdough bread is texture rich due to the seeds/grains, has a mild oaty flavor, and a chewy interior thanks in part to the binding power of psyllium husk powder, with a nice crisp crust (after toasting).
Because this bread is gluten free, egg and dairy free (yes, vegan gluten free sourdough bread!), mostly whole grain, free of fillers and large quantities of starches, you’ll notice the interior is moist/tacky to the touch. So, it needs to be toasted to bring out its best texture. Sometimes I’ll double toast for breakfast toast, aka, avocado with egg toast.
Storing and Toasting
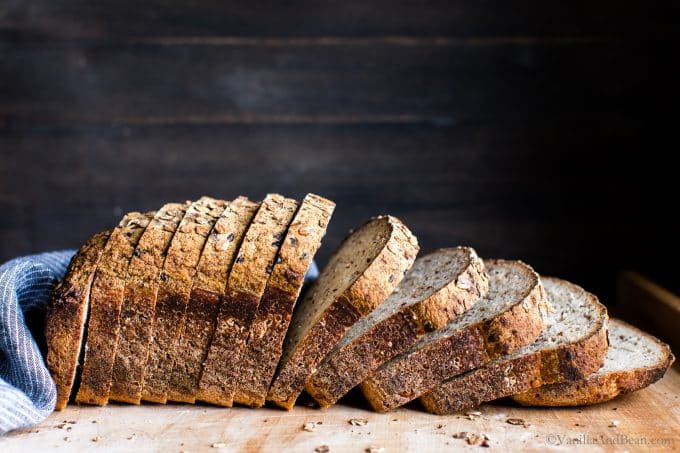
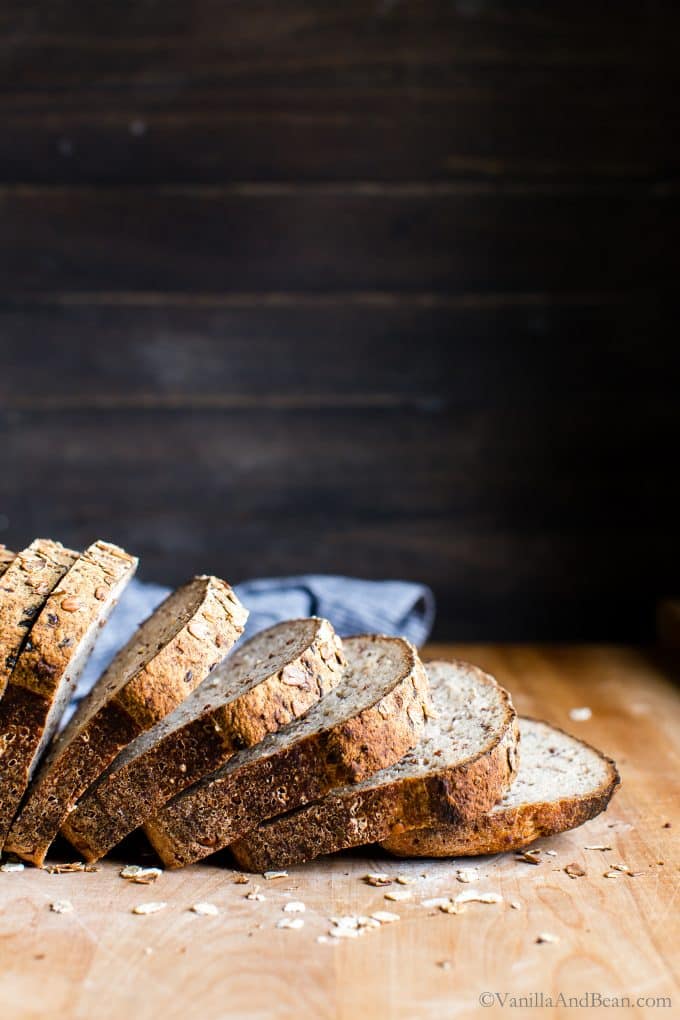
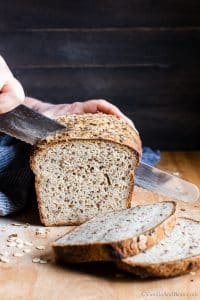
After the bread is completely cool, slice it with a serrated knife. The slices can be stored at room temperature in a closed container for up to three days or frozen for longer storage. For freezer storage, slices can go from freezer to toaster directly – this is also when I’ll double toast a slice.

Traci’s Tips
- Sourdough discard? Save it, put it in a covered container in the refrigerator and then, make these Gluten Free Sourdough Pancakes, Gluten Free Sourdough Waffles, or Gluten Free Sourdough Pizza!
- Dutch oven? I’ve tested this recipe in a Dutch oven in an effort to make a boule. Without walls of a loaf pan to hold the dough together, it spread way too much and was flat. Stick to a loaf pan ( if not experimenting :D ) .
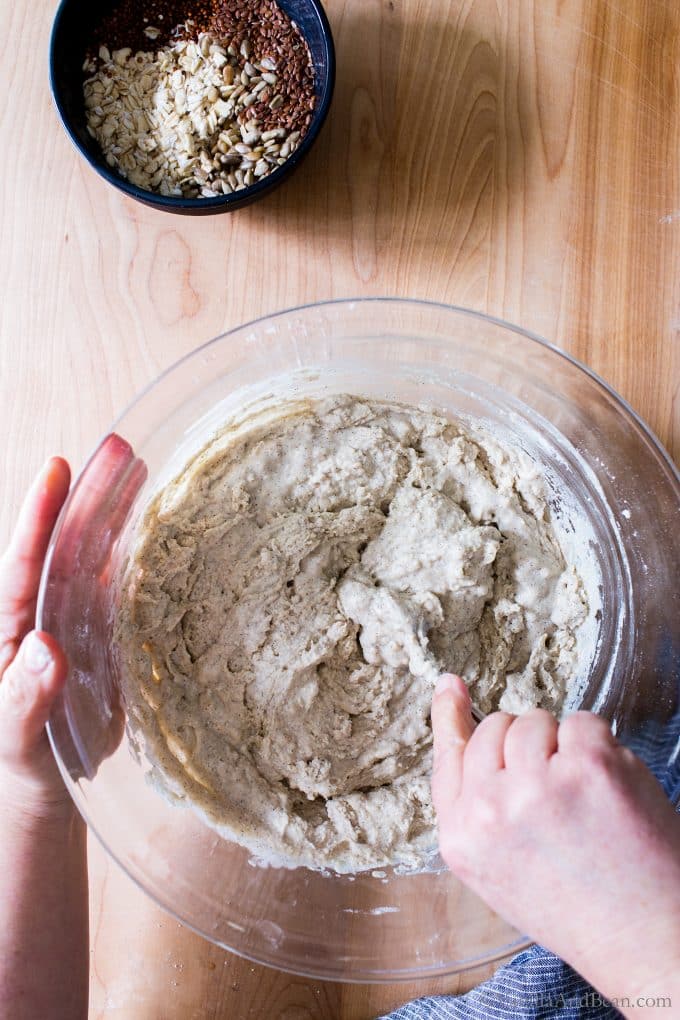
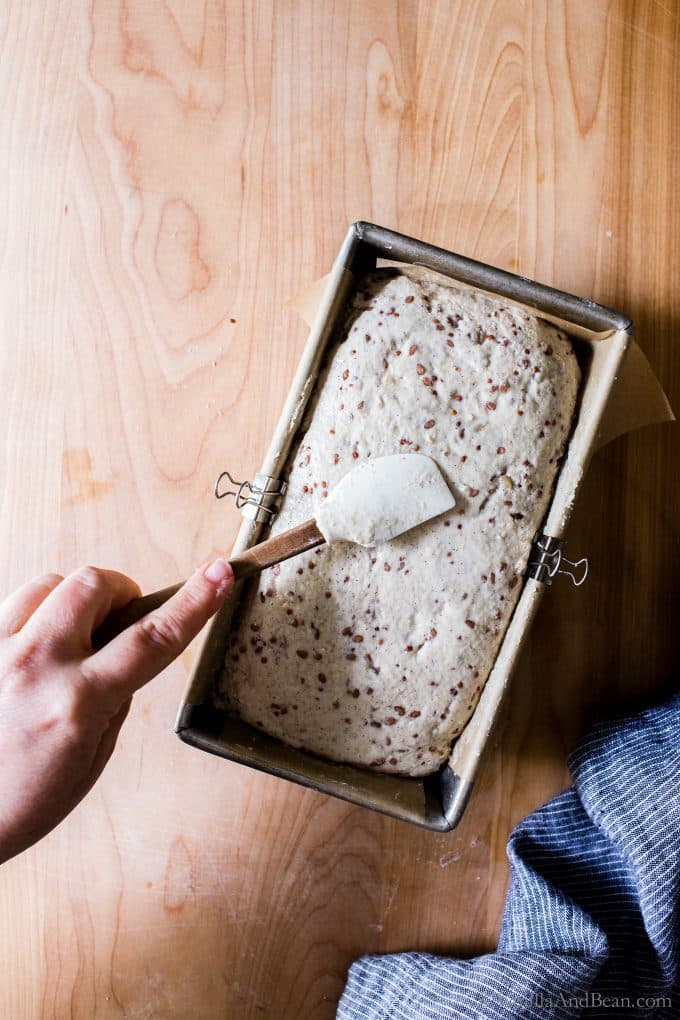
- Shaping and then transferring the dough to the pan is sticky business. I’ve included two ways in the recipe to get the hardest part of the recipe done: a. shaping prior to putting the dough into the pan or b. shaping the dough after putting it in the pan. I prefer method a. as it produces a better shaped loaf – but it’s harder to do. Note the photos show method b.
- With a 119% hydration, this dough is sticky. But I’ve discovered through my testing, gluten free loaves with higher hydration and low starch content have a better rise and produce a more tender crumb.
- One of the flours used in this recipe is oat flour. I DIY oat flour and have a tutorial on the blog if needed.
- Substitutions: I do not recommend subbing any other ingredient for psyllium husk powder. It soaks up the water, gives the bread it’s chew like gluten-full bread has and holds the dough together.
- I’ve tried subbing buckwheat and amaranth flour for millet in this recipe but the bread wasn’t as tender and light. I’ve found millet helps give loft to bread without adding more starch. Also, amaranth was a little too strong for my taste.
- I’ve not attempted subbing a different flour for oat flour.
- Use a scale. In baking, weighing ingredients is important for optimal outcome. I find that especially true in gluten free baking. I recommend investing in a good digital kitchen scale.
Makers Notes
So happy to read y’all are enjoying the bread in the comments below. Please note, I’ve not tried the following substitutions, but want to share what the community has offered. Here are a few community notes that may be helpful when making this recipe:
- Maya commented: “I used sorghum flour for the oats and half buckwheat, half white rice for the millet. It might not have risen as much as your photo, but it still turned out great.”
- Kate said: “It worked great – I substituted the same amount of arrowroot powder for the tapioca flour.”
- Sarah said: “Slice thick and when toasted you get the crusty edges and soft spongy center.”
- Jill said: “…substituted the brown rice, millet, and tapioca for an even exchange of the King Arthur cup for cup gluten free. This loaf came out SOOOOO GOOD!”
- Leah said: “…sorghum for the oat flour and teff for the millet. I got a nice rise and it came out SO good! The teff really gives it a wheaty flavor, almost like pumpernickel. Both times I left out the soaker and it didn’t seem to be a problem.”
Seeded Multigrain Gluten-Free Sourdough Bread
Ingredients
For the Soaker:
- 3 Tbs Whole Flax Seeds
- 3 Tbs Whole Rolled Oats gluten free
- 3 Tbs Red or Tricolor Quinoa rinsed under running water
- 3 Tbs Hulled Sunflower Seeds
- 1/3 C (80g) Water room temperature
For the Bread:
- 1/3 C + 2 Tbs (100g) Gluten Free Sourdough Starter previously fed, and doubled in size
- 2 1/2 C + 2 Tbs (605g) Water 80F (27C)
- 3 Tbs Maple Syrup or Honey
- 1 C (145g) Brown Rice Flour
- 1 C (150g) Millet Flour
- 1 1/4 C (130g) Oat Flour gluten free
- 1/2 C + 1 Tbs (80g) Tapioca Flour
- 2 1/4 Tbs Psyllium Husk Powder I use Terrasoul Psyllium Husk Powder
- 3 1/2 tsp Fine Sea Salt or reduce to preference *See note on salt adjustment
- 1-2 Tbs Whole Rolled Oats for sprinkling on top, gluten free
Instructions
For the Soaker:
- Prepare the soaker by placing the flax, oats, quinoa, and sunflower seeds into a small bowl. Pour room temperature water over the top of the soaker. Leave out at room temperature for about 6-8 hours. If you forget to do this, you can pour hot water (hot to touch) over the soaker before you start preparing the ingredients for the bread.
For the Dough:
- Line the inside of a 8.5L x 4.5W x 2.75H inch loaf pan (23cm X 13cm) with criss crossing parchment with enough hangover on all sides to later help shape the dough and to be used as handles for removing the bread from the pan. If you have clips to clip the parchment to the sides, use them.
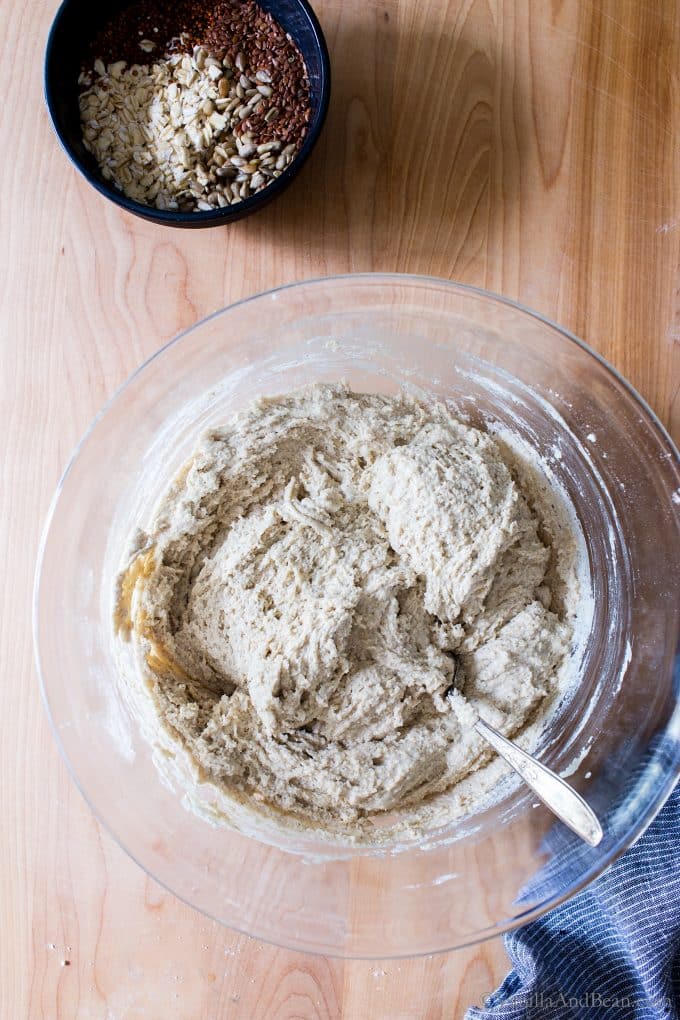
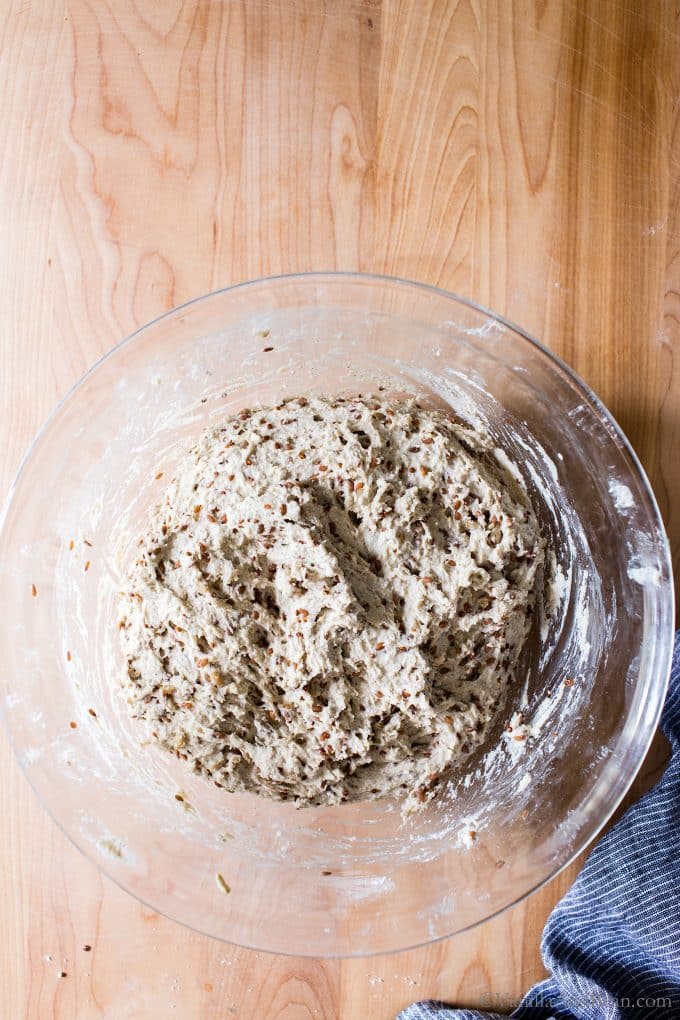
- UPDATE 5/20: Some makers have commented that they "poured" the dough into the baking pan. Please note that the dough should be of a sticky thickish batter-like consistency where it is scraped into the pan and holds together. The dough should not be pourable. In order to achieve this batter-like consistency, Psyllium Husk Powder is essential. I do not recommend substituting this ingredient. Mix the Dough: In a large mixing bowl, add the starter, water and maple syrup (or honey). Whisk until the starter is incorporated. Set aside.In a medium mixing bowl whisk the brown rice flour, millet flour, oat flour, tapioca flour, psyllium husk powder and fine sea salt. Mix throughly so that when the psyllium husk powder hits the water, it wont clump. To the water/starter mixture add the flour mixture. Use a fork to mix the flour into the water until the dough starts to stiffen, about one minute. The dough will feel like a thick batter. Add the soaker and knead the dough with your hand, incorporating the soaker until the mixture is evenly distributed, about one minute. Use the fork to scrape any excess dough off your hands and fingers. The dough will be very sticky. Set the bowl aside for about 10 minutes to rest. It will stiffen a bit as it rests.
- Shape and Pan the Dough: There are two ways to approach shaping. a. if you're in a hurry or b. if you have a bit more time and patience. Either will work but I find I get a better shape out of b. (note that a. was used in the images seen above). A. Scrape the batter into the loaf pan. Use a moist rubber spatula (remoisten as needed) to gently shape the top nudging the edges of the loaf inward to produce a nice dome shape loaf bread is known for. This takes a little practice and finessing. Just do the best you can. Use the 'handles' of the parchment and pull opposite sides inwards towards the center of the dough, helping to round and shape the edges. Moisten your fingers or small spatula and smooth the top to rid any lumpy areas. B. A bench scraper for this method is needed. Moisten your work surface with a bit of water (I use a spray bottle and sprits it a few times). With moistened fingers, nudge the dough out of the bowl and onto the moist surface. The dough will be very sticky. Re-moisten your hands and pat the dough into a rough rectangle/log a little smaller than the size of the loaf pan using the bench scraper as needed to move the dough. Pat and smooth the edges as needed using wet hands (no flour here), rocking the dough back and fourth to help shape it, smoothing and rounding the top into a rectangular dome. This takes a little practice and finessing, just do the best you can. Using one swift move, scoop up the shaped dough with a bench scraper and transfer it to the loaf pan. Use the 'handles' of the parchment and pull opposite sides inwards towards the center of the dough, helping to round and shape the edges. Do this several times. Moisten your fingers or small spatula and smooth the top to rid any lumpy areas. Use a moist rubber spatula to gently shape the top nudging the edges of the loaf inward to produce a nice dome shape loaves of bread are known for.Now is a good time to refresh (feed) your starter and store it for next time.
- Bulk Ferment: Remove the clips from the pan if using. Cover the dough with a wet tea towel and allow the dough to ferment overnight at room temperature (it's okay if the wet tea towel touches the top of the loaf). Fermentation will take anywhere between 12-14 hours depending on how active your starter is and ambient temperature. In my chilly kitchen at 66F, the dough takes about 14 1/2 hours to rise overnight. There is no proof for this recipe. Go right into baking the loaf after bulk fermentation. The loaf is ready to bake when the dough increases to 1 1/2 times in size and has risen to about 1.1/2" (3.8cm) above the lip of the pan at the center. The dough will spring back when gently pressed on top.
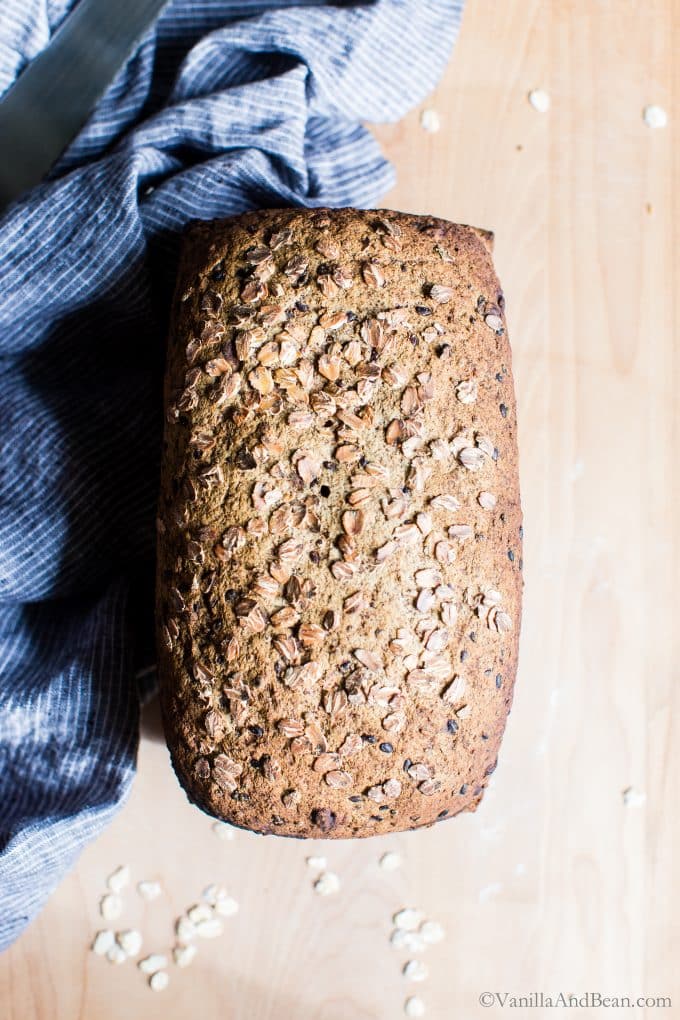
- Bake the Loaf: Place a oven rack in the center of the oven and preheat the oven to 550F (288C). Lightly spray or brush the top of the dough with water and sprinkle 1-2 Tbs of rolled oats over the top. Decrease the oven temperature to 475F (246C) and bake the loaf 55-60 minutes or until the internal temperature of the bread is between 200F-205F. If the bread starts getting too dark on top, tent the bread with foil. The bread pictured here is untented. After 10 minutes out of the oven, transfer the bread to a cooling rack. Cool completely, at least for two-three hours, better if cured overnight, before slicing into it. You'll notice the bread is very hard, but will soften as it cools.
- How to Store and Enjoy!: After the bread is completely cool, slice it with a serrated knife. The slices can be stored at room temperature in a closed container for up to three days or frozen for longer storage. For freezer storage, slices can go from freezer to toaster directly.You'll notice the interior of the bread to be tacky. This is normal. I find this gluten free sourdough needs to be toasted before it's enjoyed... sometimes double toasted to bring out its best flavor and texture.


I made this and love the flavour, plus it’s quite soft and a lot less dense than other gf breads I have made. I did reduce the salt by 1/2 tsp following what others have said. I also substituted millet for quinoa as I didn’t have any quinoa. I used psyllium husks, not the powder, and the dough was a bit thin but it still rose wonderfully overnight. The cooking temperatures didn’t mean much to me as I have a fan oven with a maximum temperature of 230’C so I had to guestimate. I didn’t quite cook it long enough so the bottom was just a little undercooked, but I know for next time. Definitely my favourite gf bread so far!
Hi Penelope! SO happy to hear! Thank you for your note and sharing your tips. Yes to next time and a bit longer in the oven :D Can you tell us how much psyllium husk you used?
What is a soaker?
Hi Kris! A soaker is a term used to describe any seedy mixture soaked in water prior to adding it to the dough.
At first glance of my finished product, I did not think the bread would taste good – but boy was I wrong! It was delicious.
The outside looked burnt and was rock hard when I took it out of the oven. I have a very small oven, so I cooked this bread at 450 for 60 minutes. However, I now think the outside being hard is what makes it good sandwich bread (the inside was nice and moist).
I had some issues with rising (my house is quite cold) after 16 hours it hadn’t risen at all. I ended up putting it in the oven with the light turned on for a few more hours and it rose perfectly!
Hi Amanda! Thank you for your note and sharing your experience with the sourdough bread. I’m SO glad you put the dough in the turned off oven with the light on. What a difference it makes! Hooray for tasty GF Sourdough!
Really nice for gluten-free bread. I couldn’t get oat flour or psyllium husk powder, so I ground up rolled oats and psyllium husk in the blender and it seems to have worked just fine. Also, one tip if you already have starter for gluten bread: I added half a teaspoon to the rice and buckwheat flour when first making the starter and it took immediately, so if you don’t have to be Celiac-level gluten-free you can use that as a shortcut.
Hi Hanna! Thank you for coming back, leaving a note and sharing your tips! SO happy to hear you’re enjoying the sourdough and that the subs worked!
Has anyone tried caraway seeds in this recipe? Thanks!
My first gluten free sourdough bread, finally. I didnt have millet in my kitchen but plenty of cassava flour which is quite common to bake gf bread/cakes/cookies where i live. With approx 10 hrs bulk fermentation it already doubled in size, then bake as directed. Very nice flavor. But curious how to get more open crumbs like in the picture. Thanks
Hooray! Finally, Sophie! I’m so happy to hear your results. Thank you for your tip on cassava flour. In order to open the crumb up a bit more, try slowing down the fermentation process. You can do that by popping the bread in the fridge for a few hours. Just be sure to cover it with two damp tea towels so it doesn’t dry out. I hope this helps!
I LOVE this recipe. It is literally the only gluten free bread I can make successfully that fits into my wide array of foods that must be avoided. I make it for a friend who has similar dietary limitations and it is such a joyous thing. All that said, I often have a problem with the bread rising well but collapsing as soon as I start to bake it. With both longer and shorter proof times I’ve never gotten a sturdy spring back when touching the loaf like is mentioned in the recipe. Any ideas what I may be doing wrong?
Hi Meri! Thank you for your note and review. SO happy to hear you and your friend are enjoying the sourdough! I’ve not encountered the bread collapsing as soon as you bake and I’ve not heard this before from the community. I’m baffled! If the bread was collapsing after a too long proof time, could see why. Usually a collapsed baked good would mean there’s not enough structure (egg or gluten) to hold it up. Maybe increase the psyllium husk powder slightly? I’m just not sure. I’m sorry I can’t be more help here. Please let us know if you find a solution.
Hi Traci,
I started my rising time too late in the day (2:30pm). Can I put the pan in the fridge overnight, complete the rise time the next morning and bake it then?
Thank you!
Hoping for great things!
Hi Isabelle! Yes! It should be just fine. Be sure to cover the bread with double moist tea towels else it’ll dry out. I hope this helps! Please keep us posted :D
Thank you for this recipe! My husband has celiac and this has become a staple at our house. It is one of only two recipes that I have taped up on the inside of a cupboard door. It has always worked perfectly, even when I’ve run out of a particular flour and had to substitute something else. (I always use a kitchen scale to measure ingredients in case this helps solve the pourable dough mystery.) I appreciate all the hard work you put into making this recipe that now lives on at our house, and is eaten here every single day!
Hi Hillary! Oh my gosh, thank you for your note and sharing your tips. I’m thrilled to hear you and your family are enjoying the sourdough!
I prepared the soaker but then tried for 3 days to get the starter to rise without any luck.. had to throw it away today as it developed a pink layer of mould on top :(
Will try again! But for now I’m wondering if you have any ideas of how to use up that soaker? Thanks!
Hi Alejs! I’m so sorry your starter didn’t rise. Had it risen before? Placing it in a turned off oven with the light on may help get it going. For the soaker, you can cook it like a porridge for breakfast! I hope this helps!
I am just eating my first toasted slice of this absolutely beautiful bread. but I have to confess that i sped the process by adding at the last minute half a tablespoon of yeast. I know, I am impatient. I also substituted, like someone else half and half buckwheat flour and sorghum flour for the oats. I am a celiac and do not tolerate oats very well. In all my years of making my own bread I never was able to make sourdough, until I found your recipe. I am eternally grateful.
Hi Silv! Oh my, I’m thrilled to hear this. Thank you for your note and sharing your tips! I totally understand adding the yeast… in fact, this is not totally uncommon in the sourdough world. It’s the best of both worlds: the flavor of sourdough, on a quicker timeline! In fact, I’m working on a GF SD Pizza recipe that includes yeast and sourdough… there are benefits. I’m so happy you’re enjoying the sourdough. Thank you again, Silv!
This bread has ruined me. I started with gluten free sourdough early in the pandemic because I was jealous of all my gluten-eating friends and their sourdough projects. This has become my go-to sourdough bake. It’s a long process and requires a lot of ingredients but yours is one of the easiest-to-follow recipes I’ve found, and the results are amazing. (Thanks for not requiring a stand mixer.) I can’t buy grocery store bread anymore. It’s just nowhere near as good. As for modifications: I regularly use white rice flour instead of brown and sub Bob’s Red Mill all purpose flour for millet, and I always start with 2/3 the recommended water and add more later as needed. I’ve gone back and forth between chia and flax seeds and sunflower and pumpkin seeds, and it’s all been great. I also do the hot water quick soaker method and it works perfectly. My advice to others let the baked bread rest as long as you can before slicing into it for best structural results. I have a loaf that’s about to go in the oven and I’m going to try to wait until tomorrow morning to slice into it. Send me strength!
This bread was really good. Next time, I will definitely reduce salt to 2 tsp and rotate the loaf in the oven midway through since the back edge burned.
I didn’t make any ingredient substitutions and when I checked the loaf at 55 minutes, the temperature read 206F so I took it out, but it was still slightly wet inside after letting it cool completely for nearly 4-5 hours – do you have any suggestions? Thanks!
Hi Tas! Thank you for your note and sharing your experience. Indeed, oven temperatures fluctuate and so this can vary outcomes sometimes in baked recipes. I’m curious if you utilize an external oven thermometer? For example, when I set my oven to 350F, I have to adjust it by about 15 degrees up for the oven to actually reach 350F. I use two external thermometers just to be sure. Tenting the bread with foil will help reduce the bread getting too dark. Also, this gluten free sourdough bread recipe benefits from curing or resting for 24 hours. This helps the interior dry out further. I hope this helps!
Thanks for your response! I do use an external oven thermometer and let the dough rise for about 14 hours. I’ll try for 24 hours next time! Thanks for the suggestions!!
I got rave reviews btw, and the end product was nice and soft, even after freezing and defrosting – thanks for the recipe!
Thank you for your note, Tas! Hooray for rave reviews! Be sure to keep an eye on the height of the dough above the rim of the pan at center for proofing. That rise is the determining factor for when the bread is ready to bake. Keep us posted!
Hi after looking over this recipe I see that the sodium is Sodium: 8164mg. First is there a reason why the sodium is so high or anything I could substitute? I have to have a low sodium diet. But I’m thrilled to see a multi grain gluten-free recipe.
Hi Kim! The nutrition label is for the entire loaf, so the number slices you cut will determine the sodium for each slice. You can reduce the salt as desired as it’s not essential, but the bread will taste flat. As for a substitute, I’ve not tried anything, but I’m thinking a salt free seasoning blend or may nutritional yeast could work. Please keep us posted if you give it a go!
oh my goodness! I was just about to look up how many slices you had because I quickly read the nutritional value and thought it was really high for the ingredients. How silly of me to not realize the numbers were for the entire loaf!! In that case, it’s terrific for every diet in our family. The loaf is terrific! But I also reduced the salt to one and a half teaspoons, tasted it, and thought it was a little salty so I added some honey, about a tablespoon. I followed the recipe exactly the first time and substituted millet flour for two cups of the flour. Both loaves were terrific and everyone loves it!!
Hi Jeannine! Thank you for your note and sharing your subs. SO happy to hear you and your family are enjoying the sourdough! No doubt the calorie count will depend how how thick or thin the bread is sliced… reason I left it at loaf :D
Very excited to try this! One question, is the maple syrup important for the rise? I much prefer breads with no sugars/sweetness. Could I safely leave it out? Thank you!
Hi Tanja! Although I’ve not tried it in this recipe, you can make it without, however the flavor profile will be different and it *may* not rise as much. The sugar does give wild yeast a boost. I hope this helps and you enjoy the soudough!
Hello again – I made my soaker 24hrs ago and due to circumstances haven’t been able to continue with the baking… Will the soaker be bad? Can i still use it?
barbara
Hi Barbara! I’m sure it’ll be fine. Let us know how it turns out!
Well it worked – although the taste test has yet to happen… ended up waiting to use the soaker for nearly two days because the starter was ‘struggling’… was in the oven with light on, and even after oven had been on. Two or three feedings and then it
finally it looked good. However even after 15hrs of fermentation (cool kitchen) the dough never really rose much above the side of the pan… It still looks good though, and feels strong. Thanks for your advice, as ever. )))
Hi Barbara! Hooray! Starters can be finicky, especially in colder conditions. So glad to hear the feedings helped despite a slow and looong fermentation (I had a loaf take over 16 hours on the kitchen counter last week). I hope you enjoy the taste test! Thank you for keeping us updated!
Best one I’ve ever made! And just for the record I never change a single thing in this recipe I have to say! I follow it Exactly. It’s the absolute best. Thank you.
Oh Barbara! Thank you for your note. That makes me SO happy to hear! Hooray!
Great recipe! Do you think this dough recipe is viable for making pizza (without adding the soaker, that is)? If not, do you have any recommendations for how to tweak your recipe to make pizza dough? Thanks!
Hi Ariel! Thank you for your note! I’m working on a GF SD Pizza recipe. In the mean time, if you’d like to play with a GF pizza recipe, you can take a look at my recipe here. I hope this helps!
So I tried this bread today… unfortunately, it didn’t rise at all in the bulk ferment stage. It did rise a teeny bit during baking. It definitely did not look as fluffy as your bread Tracy! Its dense but ok… after enjoying regular sourdough, I find the taste quite interesting… will try it again.
Hi Alexandra! I’m sorry your bread didn’t rise during the bulk. To help me troubleshoot, I need a bit more information. Were there any ingredient substitutions? What is the temperature of the surrounding environment (that the bread rose in?)? How long did it bulk ferment? Was your starter doubled in size, bubbly and active? Indeed, this doesn’t taste like regular sourdough bread – and it won’t simply because GF flours are different in flavor profile. Let me know if I can help.
Love this recipe! My gluten eating friend says it’s the best bread he’s ever had! I make a few small adjustments – sorghum instead of millet (easier for me to find, and I like the texture better), much less salt. And to stop the bread from slipping over the side of the pan when rising, I clip the top of the parchemin paper with a metal clip so the bread goes up, and not over the edge. I rise it in a covered tray with a bowl of water (I’ve always found that the wet tea towel just dries out. Remove the clip before baking!
Hi Sarah! Thank you for your note, giving the sourdough a go and sharing your tips with us! I can’t believe your gluten eating friend said it’s the best bread he’s ever had! That’s amazing!!
Can I use some other flours instead of rice?
Hi Zosia! I’ve not subbed other flours for the rice flour however, many makers have and reported success. Please see “Makers Notes” above the recipe card for their suggestions! I hope this helps and you enjoy the sourdough!
I wanted to thank you once again for this amazing recipe. I have altered it a ton with a great success: replaced oat and rice with tiger nut flour and buckwheat. It is truly a delicious bread for my family. Thank you!
Hi Amy! Thank you so much for your kind words and sharing your tips. It means so much to hear from people like you who are making, enjoying and using this recipe as a base for their own baking adventures! I’m thrilled to hear you and your family are enjoying the sourdough!
Hi, i just made this bread and I definitely had to add more flour. Because i thought why not add all the water right away.. i learned my lesson there.
But it also tastes really sour, quite salty and almost not edible… could it be to much salt because i added 3,5 tsp (16 gr) or do you have any idea what i did wrong?
I added more millet and sorghum flour (used some sorghum instead of tapioca).
Hi Hinke! Thank you for your note, but I’m sorry the flavor isn’t quite what you’re after. The sourness comes from the sourdough. Can you tell me how long you’re fermenting for and at what temperature? A longer fermentation creates a more sour bread. The salt addition is correct. I’ve had one other maker say it was a bit too salty for them too, so please feel free to adjust the salt down to taste. Tapioca helps soak up moisture much more so than sorghum and other gluten free flours, so that could be a reason the dough was so moist. Different flours have different absorption capacities. Were there any other substitutions? Did you use psyllium husk powder? I hope this helps!
Hi Traci, thank you for your quick response! I fermented it for 14-ish hours, at 19-21 degrees celcius. The texture was good, but the flavor is just too sour.
Time and temperature sound good! I’m not sure why it would be *too* sour. The only suggestion I have is to increase the frequency at which you feed your starter. This should make the bread taste more mild which should reduce the overall acidity of the dough (this from Cultures for Health). I’m sorry I’m unable to help further.
I have baked this recipe many times over the past 4 months. It was always gummy in the middle despite many experiments (cook time, rise time, temperatures, water, etc), until I replaced the Tapioca with more of the other flours. Maybe the tapioca is different in North America…? Always delicious too! Thx for the recipe.
Didn’t this recipe used to be different? Or have you had a different gluten free sourdough loaf in the past that you no longer share? I was referring back to your page to make this loaf I’ve been making occasionally for a year now and this isn’t the same one. I really loved the og recipe am I crazy hahaha
Hi Bella! This is the only gf sourdough loaf I’ve ever shared on my blog to date. No changes have been made.
Can I use xantham gum instead of psyllium powder?
I made this loaf and it was the best gluten free loaf ever! Thank you so much.
My husband is able to eat oats, but my daughter can’t. What would be a suitable alternative for the oat flour please?
Hi Anthea! Thank you for your note and sharing your thoughts. For substitutions, please see makers notes just above the recipe card and there’s more sub’s from makers in the comments below the post. While I’ve not tried these subs, it may be helpful when trying new GF flours in the sourdough. I hope this help!
Hi Traci
The bread turned great but tacky. Tastes perfect though. I followed the recipe exactly. While making the dough, the texture I thought was also perfect. It had a perfect rise as well. It rose 1.5 times. Didn’t change or substitute anything. Because it was tacky, I had to double toast it.
Any idea why it was so tacky? What can I do to make it not be tacky?
Hi Traci
Waiting for your response.
Hi Kavita… from the recipe card… “ You’ll notice the interior of the bread to be tacky. This is normal. I find this gluten free sourdough needs to be toasted before it’s enjoyed… sometimes double toasted to bring out its best flavor and texture. ” I wrote more about this too in the blog post… I hope this helps!
Hi Traci, When you click on the hyper link for the pan size it takes you to a different size pan. What depth are the pans you use as i can’t get the bread to rise higher than the side of 4″ deep pan, i am using a 9x4x4. I have made this bread several times now and want to get it better because its delicious Regards Michael
Hi Michael! Thank you for your note….. the hyper link is the correct size 9x5x2.75 (from on the recipe card). I just remeasured my pan (rim to rim all dimensions). The pan your using is deeper than mine and will still work, but the shape will be a bit different. I hope this helps!
Looking at this recipe it sounds amazing! I usually get organic sprouted grain bread from the store, but I have been thinking about trying to make my own. None of my local grocery stores carry all the items needs, and on Amazon I was looking at $120+. I’m a little scared to invest that much, because I am not much of a baker, and definitely even less so when it comes to bread. How difficult or forgiving would you say the recipe is? I was also wondering if you figured out an approximate cost per loaf on the recipe? Thanks!
Hi Eileen! Thank you for your note. Please feel free to read the comments regarding your first question. Sourdough isn’t always the easiest bread to start with if new to making your own bread. I do not have an approximate cost per loaf. I hope this helps!
I decided to have some fun with this recipe, I had some sourdough starter that I had frozen that I feed for a few days. The starter never became very active so I decided to use what I had knowing that I would have to add some yeast. I know taboo in sourdough making. I used 300 grams of a high moisture and 405 grams of water, then followed the recipe. I needed to use about 60 grams more of oat flour to get the consistency that I wanted. The loaf just went into the oven so we’ll see how it turns out in about 50 minutes, looking good so far
Hi Jay! Thank you for your note and sharing your tweaks! Looking forward to hearing back soon :D
Thank you so much for this recipe! It’s wonderful. I am vegan and can’t eat gluten, and it’s been years since I was able to eat a sandwich on such delicious bread. This is my go-to bread recipe now. Thank you!!
Hi Megan! Thank you for your note and giving the recipe a go! SO happy to hear you’re enjoying bread again!
We liked this loaf and appreciate that it was easier to slice than the boule I usually bake. Have you ever done a second ferment if the refrigerator with this recipe. I’de like it to be a bit more sour.
Thank you for the recipe.
Hi Jo! Thank you for your note and giving the recipe a go! Since this recipe only requires bulk fermentation (no proof), if you want to do that in the fridge, or partially in the fridge, you can do that. For how long, I’m not sure, but just keep an eye on the rise (above the rim at center) to determine bake time. If you put in the fridge, make sure to put two moist tea towels on top so it doesn’t dry out. Keep in touch!
Hi Traci,
I didn’t try the fridge, as I had planned, but the bread was more sour this time and equally tasty. Great recipe.
The first time I made the loaf, I put the pan my oven with the light on and the door ajar( so about 76degrees in there) and in six hours it was an inch and a half above the pan rim. Maybe the fast rise is why it wasn’t as sour, but still a winner.
I’ve never made this loaf with the soaked grains and seeds, must try today.
Thank you again.
Wondering if you’ve a recipe for GF sourdough Pizza?
jo
Hi Jo! Thank you for your note and letting us know how the sourdough turned out for you! I’ll be posting a GF sourdough pizza recipe this Fall!
This looks and sounds wonderful, but I have issues with rice. Would there be an appropriate sub for the brown rice in this recipe?
Hi Carol! While I’ve not tried it, a few makers have subbed an all purpose GF flour for it (in the comments) – also see maker’s notes above the recipe card. I hope this helps. Please keep in touch!
Absolutely best gluten free bread ever.Tried so many for year.
Finally. A bread I can actually eat and enjoy.
So happy to hear Natacha! Thank you for you note and giving the recipe a go!
Make it every few days. Can’t get enough
Where did you get the weights of the flours from? I dont think they are correct. I.e. 1 cup of millet flour is 120 g, not 150 g
Hi Katelyn… I weigh all of my ingredients in each recipe I post to this blog. This recipe, like all my recipes, are throughly tested and measured by weight before sharing here. They are accurate. The difference between what you’re weighing and what I’m weighing is most likely due to the fact that US standard measurements (cups) are not accurate – they vary from brand to brand. This is why bakers weigh their ingredients – so, please weigh your ingredients if making this recipe (as noted in the recipe).
Hi Traci – thanks for the response. I do weigh all my ingredients and if a recipe is in cups will convert it to grams. I reference the chart below for conversions which for some reason does not match yours. I.e. 1 cup of brown rice = 128 g vs 145g in recipe above. So I am just wondering why the difference.
https://www.kingarthurbaking.com/learn/ingredient-weight-chart
Hi Katelyn… there’s much written on this very subject! Even at the bottom of KA’s chart, there’s a disclosure. Food52 has a quick read on it, Cupcake Project has an in depth article, and Love and Olive Oil offers another angle. In baking, if a recipe offers weight, that’s what I use (and another reason why I weigh ingredients in grams for recipes on my blog). I hope this helps!
Great thanks! I”ll take a look through those articles.
I was told by my inlaws and partner this was not just the best gluten free bread they’d had, but the best bread they’d ever had (probably being kind, but they ate it quickly without me pushing it). Thank you!
I used Bob’s GF AP in place of the Millet & Brown Rice flours. I let the dough rise for ~16 hours in 80-90 degree weather, and I let the bread sit for ~8 hours after baking. The bread was not tacky at all. Strangely, it took forever to toast, but it really didn’t need it. Honestly, the bread went so fast, I’m hoping I can just remember how I made it the first time.
Either way – thanks for the great recipe!
Hi Ryan! OH my goodness, what a generous note and I’m thrilled to hear it went quickly! lol! I’m forever amazed at sourdough, sometimes the time it takes to rise depends so much on starter activity. It’s sometimes a mystery! Thank you for your notes and giving the recipe a go! SO happy to hear!
Have you tried the base (without the extra soaker seeds) and added raisins? Would love a gf raisin bread….
Hi Vanessa! I’ve not tried it, but it sounds so good. I imagine you could do it, adjusting the overall hydration slightly down. If you play with it, please keep us posted!
So I love this bread but what could I use instead of millet?
Hi Diana! I’ve tried subbing buckwheat and amaranth flour for millet in this recipe but the bread wasn’t as tender and light. I’ve found thorough trial and error that millet helps give loft to gluten free bread without adding more starch. Also, amaranth was a little too strong for my taste. While I don’t think there’s a one to one sub and still achieve the same texture (and perhaps hydration), feel free to adjust to your needs/tastes. It may take a bit of trial and error, however.
Some people use whole grain corn meal
Thank you for your reply and the fantastic recipe.
I assumed you were in the US where tablespoons are 15ml and in Australia our tablespoons are 20ml, but thought I’d better check.
I’ve made the bread and its amazing!
Hi Traci
Just wondering if the tablespoon measurements are using 15ml or 20ml tablespoon?
Hi Kaz… oh gosh, I didn’t know there is a difference! I just measured two of my Tablespoons, and they both measured 15mL. Please let me know if you have any other Qs!
Hi Traci, we are working on the starter right now. I am hoping to have a less sour flavor, if possible. How sour is your bread normally? Can I use 1/2 teaspoon of baking soda when making the dough to tame the flavor and make it less sour? Or would that distroy the recipe?
Thanks a lot, Rita
Hi Rita! For this recipe, the sour flavor comes from the amount of time spent in fermentation and proof and I would say this loaf isn’t really sour. I personally wouldn’t use baking soda. Maybe a non sourdough recipe would be better suited? Give my yeasted multigrain Bread a go… it’s similar but without sourdough. https://vanillaandbean.com/multigrain-bread/ I hope this helps!
WOW!!!!!! This bread is the absolute BEST gluten free bread I have made and had! It’s crunchy and golden on the outside, and soft, light, and chewy on the inside. JUST what I want in a bread. I made some substitutions thought because I didn’t have everything. 1) I swapped the millet for sorghum flour. 2) arrowroot for tapioca starch. And 3) pumpkin seeds for sunflower seeds. I also used the starter from Fresh Is Real. Mine didn’t rise overnight at all which I thought was interesting, but nevertheless it rose in the oven nicely and I was extremely pleased with the outcome!😊 Thx for this recipe!
Hi Alana! Thank you for your note and sharing your tips! SO happy to hear you’re enjoying the sourdough. Interesting that it didn’t rise, but hooray that it had good oven spring!
So looking forward to baking this bread in a couple of days. This afternoon will start day 6, and I have noticed a change in the starter since day 1. Have bubbles under the surface ready to break through. I would like to ask could you make bread rolls with this? Would proving time be the same or at least until they double in size?
Hi Elizabeth! I’ve not made rolls with this recipe, but I’ll put it on my list to test! Proofing time will be different since the mass of the dough would be smaller for rolls. Additionally, if you do give it a go, put the rolls in individual muffin tins so that they have some structure. Otherwise, they’ll probably go flat. Please let us know how it goes if you give it a go!
Thanks Traci. Well I’ve hit a hurdle. I had to postpone making the actual starter for a couple of days but I continued with the development and it was just right. So I refreshed my starter to get ready for bread making – it rose about half original size and has stopped there. I have it in the oven with the light on and noting has happened. After reading your notes I should do another refresh to start again? The terms confuddle me a bit so hope I’m using the right ones!
Hi Elizabeth! Yes, another refresh until it doubles in size and again until it behaves!
Hi Traci – the starter did exactly the same thing again. Was rising nicely, got to about half height of the original amount and then started collapsing. Can I use this to start my bread?
Hi Elizabeth.. are you feeding twice a day? You can give it a go at 1/2 height, but I’m not sure if your bread will rise fully. If you give it a go, please keep us posted!
Yes Traci I thought about doing that. Like you before GF I also made sourdough bread. Could you use the proofing basket (mine is oblong) and then bake in the Romertopf clay baker?
Hi Elizabeth… I’ve attempted this recipe in a Dutch oven, but unfortunately without the walls of a loaf pan to hold it up, it spreads out like a pancake. I’m not familar with a Romertopf clay baker. If you give it a go, please let us know how it goes!
Can I use this recipe to make rolls? Would it take just as long to ferment and how long would they bake for?
Thanks
Hi Rudi! I’ve not made rolls with this recipe, but I’ll put it on my list to test!
Came out PERFECTLY!!!
I’m so impressed by the bread recipes on this site, both regular and now gluten-free. Please keep them coming (perhaps some with inclusions like figs or berries or something?).
Thank you for sharing!
Hi Hayley! Thank you for your note, review and kind words! Yes to inclusions… I’m working on that (gf sourdough is not a quick process :/ ). Please keep in touch!
Awesome thanks so much
What if my starter is doubled and seems ready to work with but I’m not ready to bake? I have a refreshed starter that I fed this morning, but suddenly it seems really really ready and I want to mix the dough in the morning. I wonder if it will ruin it to wait? I guess we’ll see when I wake up but advice for future would be great.
Hi Laura! Put it in the fridge! That’ll slow the little yeast down. Hopefully it’ll hold its doubled in size state overnight.
This recipe is a revelation! I have made it many times ow and my family loves it, my BF loves it and best of all, my dear friend who recently was diagnosed with Celiac Disease really loved it! She was able to have toast again! I made a loaf for the first time yesterday for my mom and she just called me to exclaim about its delicious flavor and texture. This is going into permanent rotation. I’m beginning to get requests and may just start a little GF baking business based on this lovely wonder! Thank you so much for the inspiration! (P.S. I have added hemp seeds and sesame seeds to the seed mixture with great results!)
Hi Karen! SO happy to hear you and those you’ve shared it with are enjoying sourdough! Hooray! Thank you for your note and sharing your tip about the hemp seeds and sesame seeds. Yes to toast and tasty bread!
Just wanted to give you another little update on my experimentation with your wonderful recipe.
First, regarding those with “pourable” dough…it’s possible that they forgot to let the batter rest for 10 minutes (during which time it goes from batter to dough). Don’t ask me how I know!
Second, I found a very small tip in Jeffrey Larsen’s book “Gluten Free Baking at Home” – hope it’s okay to mention it here – I noticed that he included a tsp of baking soda with many of his bread recipes and so, I gave it a try with this, changing nothing else. Well it was WONDERFUL, gave a bit more structure and better texture when baked. Didn’t alter the flavor, of course, but it really made a much better, sturdier, but less dense loaf. I’d love to know what you think if you try it.
Hi Karen! Thank you for your note and sharing your tip from Jeffrey Larsen! I’ll give it a go next time I bake GF Sourdough. I’m intrigued! You know, I’ve not heard any further about “pourable” batter since I added the note in the recipe “do not substitute psyllium husk powder”. I suspect that was the culprit… it is an essential ingredient! Thank you again for sharing your experiment with us Karen!
Hi, I have made your loaf many times; it has become a staple in our house!
This time around, I will not be able to bake it after 12 hours of a bulk ferment (as it will be the middle of the night). It will be more like 20-24 hours of a bulk ferment. Do you think I can put my loaf in the refrigerator? If so, should I let it be out for a while to ferment at room temperature before placing in the refrigerator? Or do you think it should be in the refrigerator for the entire 20-24 hours? Alternatively, I can start it in the refrigerator and bring it out for a while in the morning before I bake it.
Any advice would be much appreciated :)
Thank you!
Hi Rebekah! So happy to hear. Thank you for your note. While I’ve not bulked this recipe in the fridge, I do many of my glutenous sourdough recipes, so I wouldn’t hesitate putting this one in the fridge. If you do, make sure you double tea towel it (and moist), so it doesn’t dry out. The goal is to have the dough rise as indicated in the recipe, how long that takes in the fridge (or fridge then at room temp) I just don’t know, since I’ve not tried it. You can bake it straight from fridge or from room temp, as long as the rise is at the right height. I’d love to hear your results, and I know it would help others!
Can this recipe be doubled to make a larger loaf?? I just made my first loaf today and it is delicious.
Hi Jenny! So happy to hear! I’m afraid the dough wouldn’t all fit in one loaf pan if doubled…