


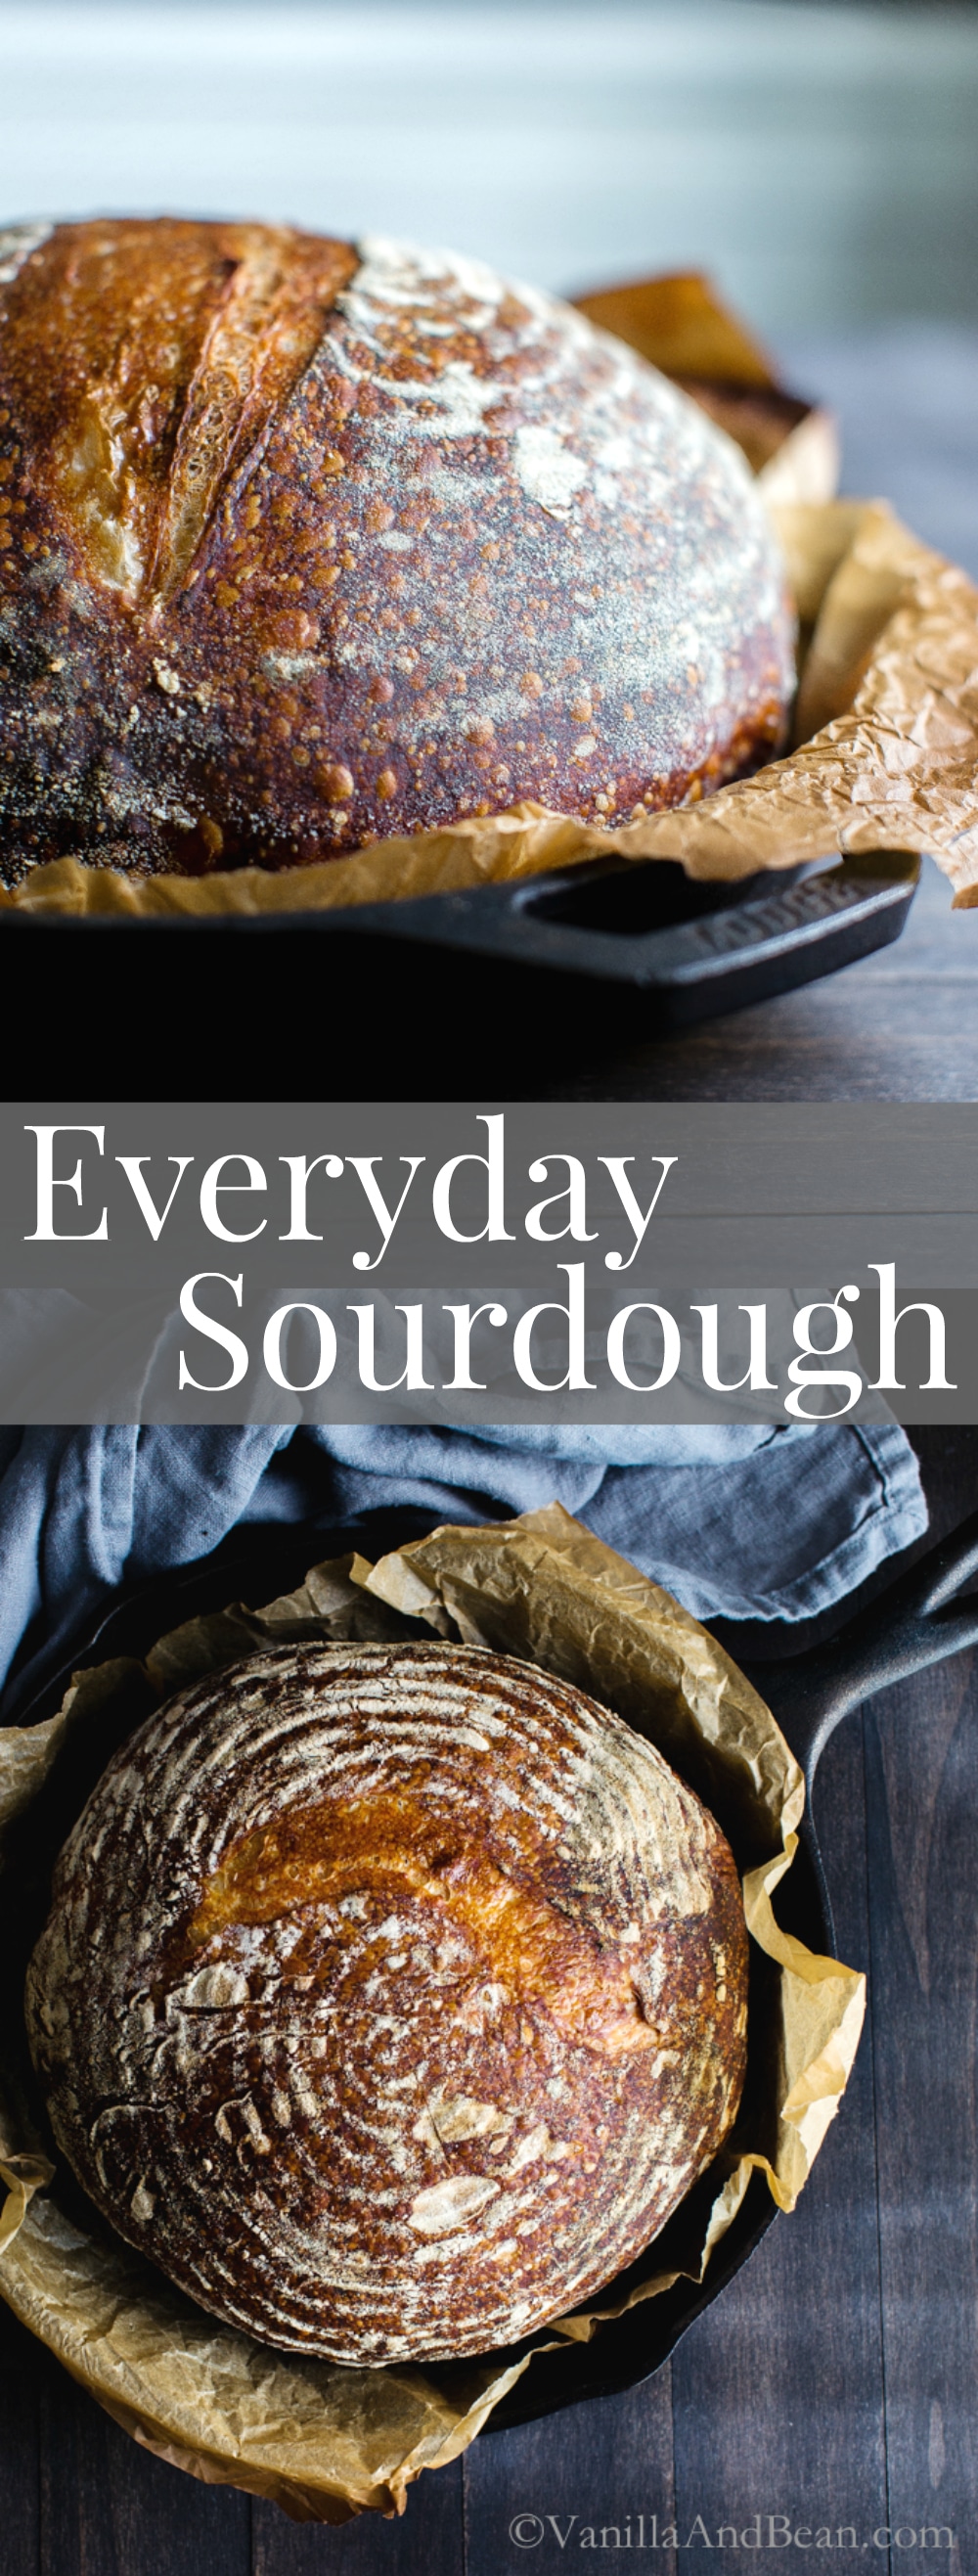
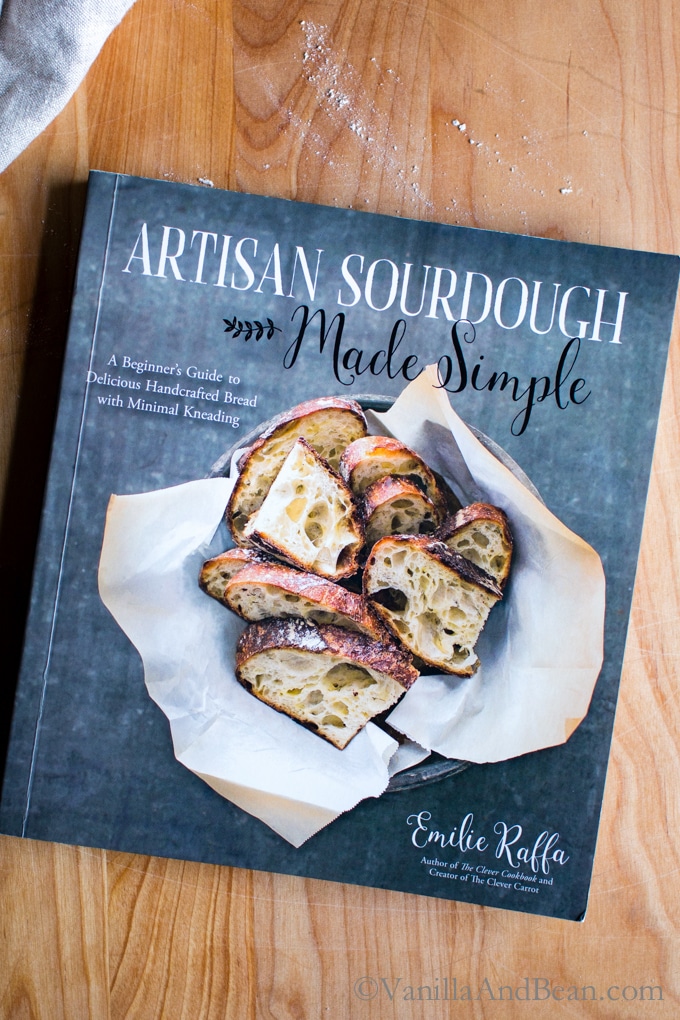
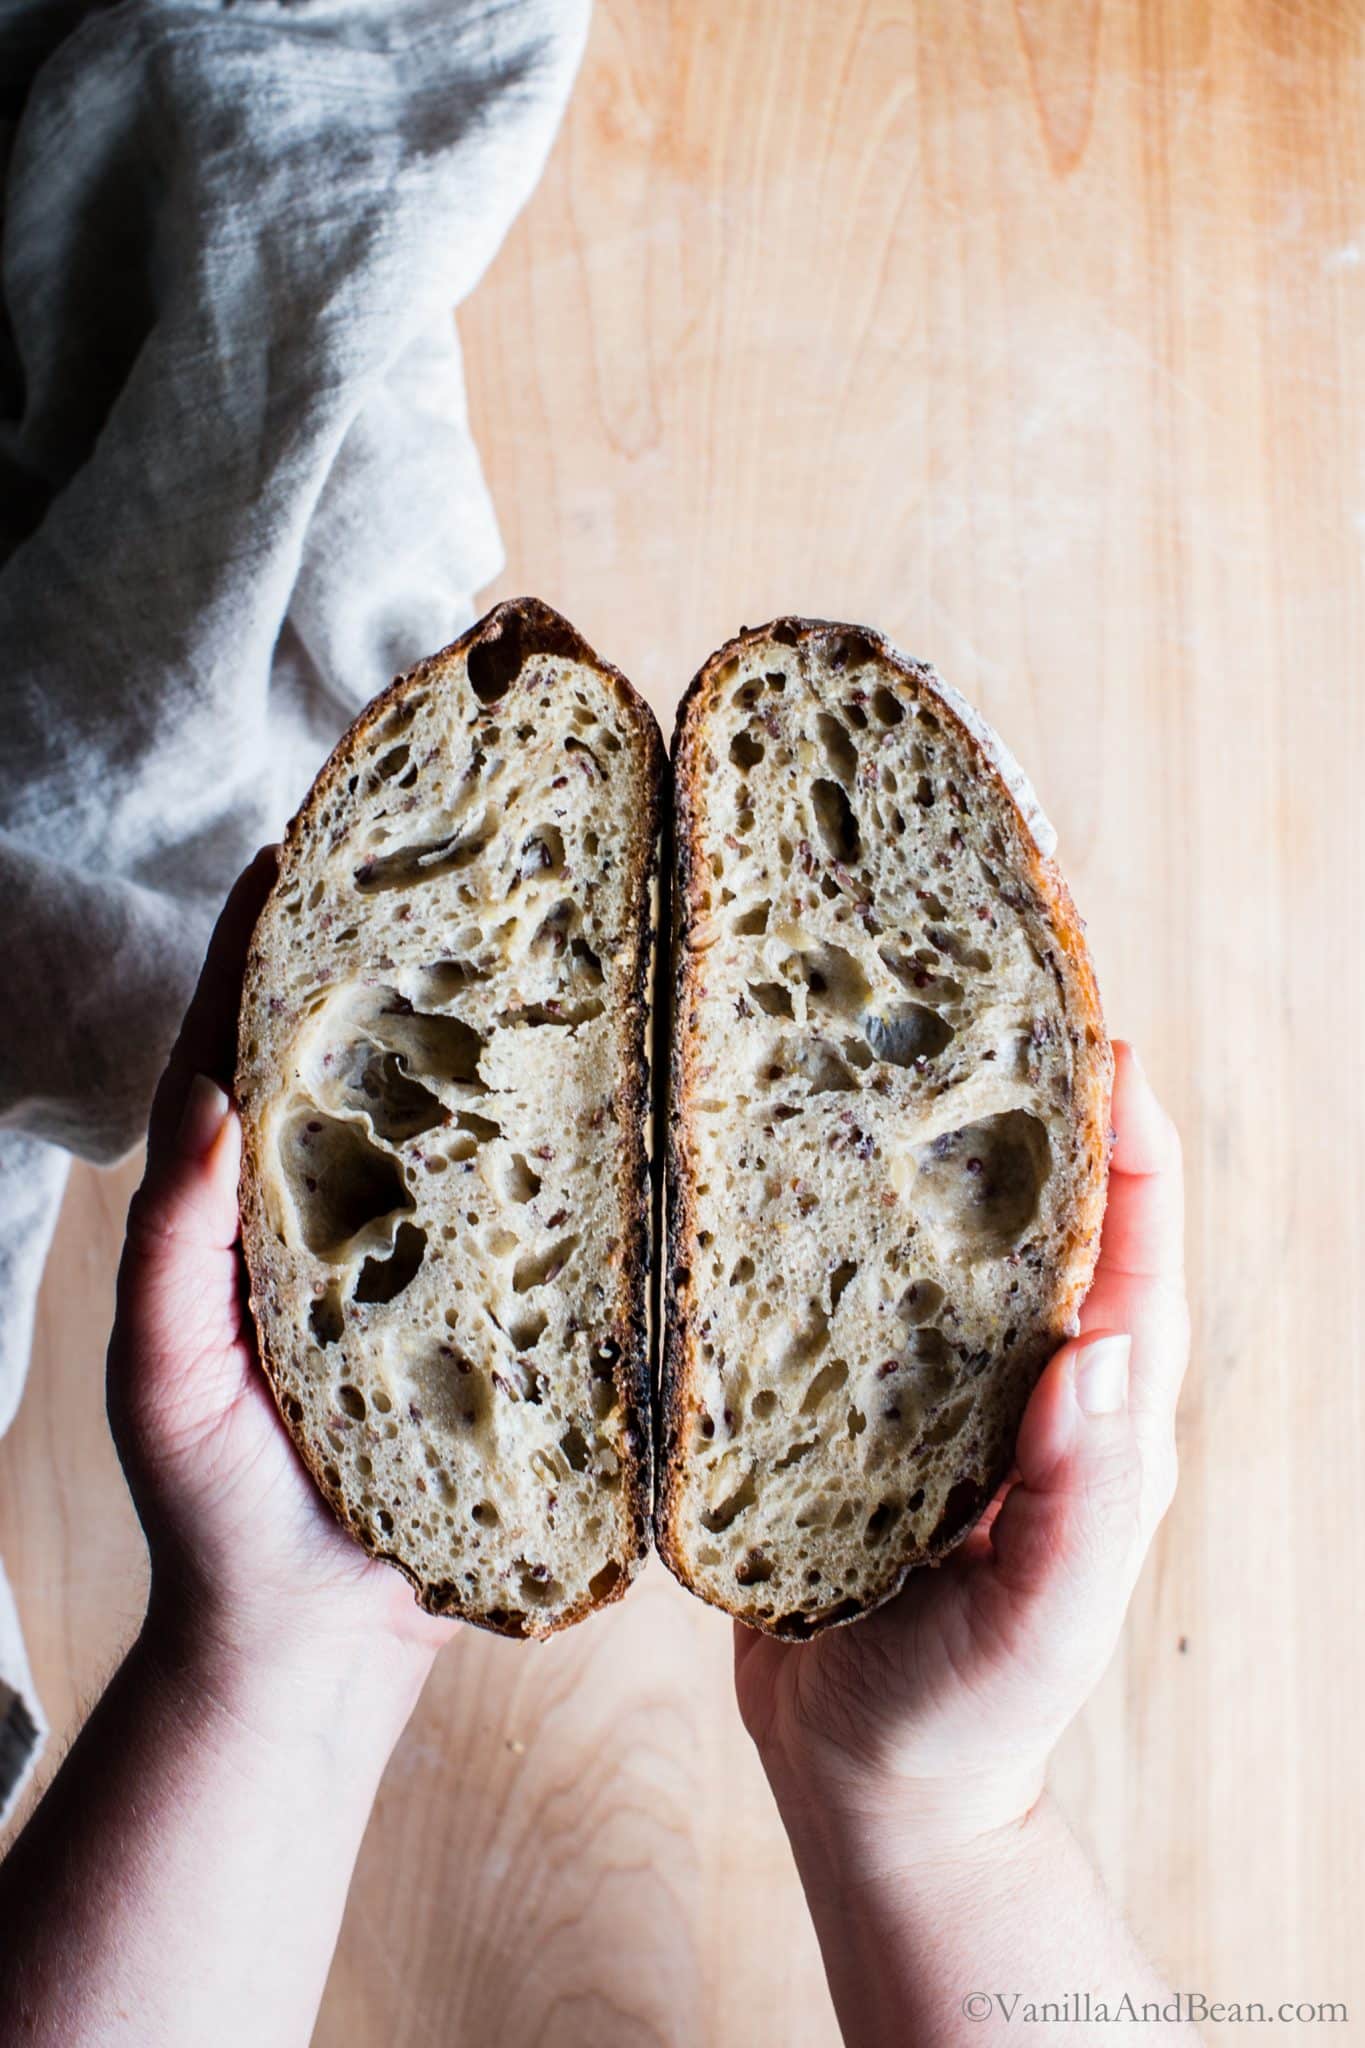
New to homemade sourdough bread or simply improving your craft? Everyday Sourdough from Emilie Raffa’s book Artisan Sourdough Made Simple is a fabulous starting point for new sourdough bakers or simply to hone your sourdough skills. DIY a Sourdough Bread Starter to create a beautiful wild yeast sourdough loaf!
Disclosure: I received a copy of Emilie’s new book and am thrilled to be able to share her book in this space (with permission). All opinions are my own.
A Sourdough Journey
Prior to going to pastry school, I’d never tried making homemade sourdough bread, although I had read books about it. Intimidated by the terminology, flours, feeding schedules, shaping techniques and knowing, I never took the time or had the courage to dive in.
During pastry school I worked with yeasted bread until I could make it in my sleep. But it was naturally leavened sourdough that mystified me. Only having a few opportunities in school to work with it, I never really gained the hands on knowledge I’d anticipated. So, I continued to read about it, gleaning little nuggets that would some day make me the bread baker I wanted to be.
related: make an Easy Homemade Sourdough Starter.
A friend of a friend offered some sourdough starter, knowing my interest. I promptly killed it after attempting sourdough again. Then, I carried some of my mom’s starter back to Whidbey with me after a visit to Texas.
I persisted, yet…
I couldn’t quite get the dough to its fluffy pillowy softness, the crumb to its tender-chewy texture, or the crust to its crusty bliss as I had tasted, seen in books, bakeries.
I tried again, still not producing the loaf of my dreams. Why is this SO hard?
I gave up sourdough baking early last winter with the hopes of starting again this fall.
Sourdough Success!
Enter Emilie Raffa’s new book Artisan Sourdough Made Simple. When I heard she was publishing a book on her sourdough method, I knew it would be my best chance yet to finally learn how to make the perfect loaf. I’ve been following Emilie’s blog, The Clever Carrot, for a while now.
After diving into sourdough again using Emilie’s thorough and approachable new book and in a short period of time, I can confidently say,
I am a sourdough baker.
Making everything from Sourdough Sandwich Bread, Sourdough Pie Crust and Homemade Sourdough French Toast to this simple Buttery Sourdough Discard Cornbread recipe.
And, you can do it too!
Artisan Sourdough Made Simple Includes
- Photography of every recipe
- Illustrations and photography for basic tools, handling, shaping, and scoring patterns
- FAQ section – so helpful
- Sourdough terminology – explained simply
- Good to Know tips in each section
- Sweet and savory loaves
I’ve baked three everyday sourdough loaves, and a cheddar-jalapeño chive loaf (omgeeee!), and made gruyere-chive crackers and waffles with leftover sourdough starter. I love them all and can’t wait to try her basic no-knead focaccia, mighty multigrain, and cinnamon raisin swirl among so many others. I’m just getting started!
An Essential Resource
Emilie’s book is for the beginner or more advanced sourdough baker. So if you’re just starting sourdough, intrigued or have been baking for a while, this book is for you. Her recipes are approachable, creative, completely mouthwatering and clearly written for success. Her photography and gentle nudges will inform and inspire you.
Looking for a delicious Multigrain Sourdough Bread recipe to challenge your bread baking prowess? Check out this reader favorite Seeded Multigrain Sourdough Bread.
My Sourdough Toolkit (affiliate links):
-
-
- 7 Quart Dutch Oven
- 10″ Cast Iron Skillet with Deep Dish Skillet for a lid
- Bench Scraper
- Parchment Paper
- Digital Food Thermometer
- Lame – for scoring the dough
- Banneton(s)
- Digital Scale
-

Emilie's Everyday Sourdough Recipe
Ingredients
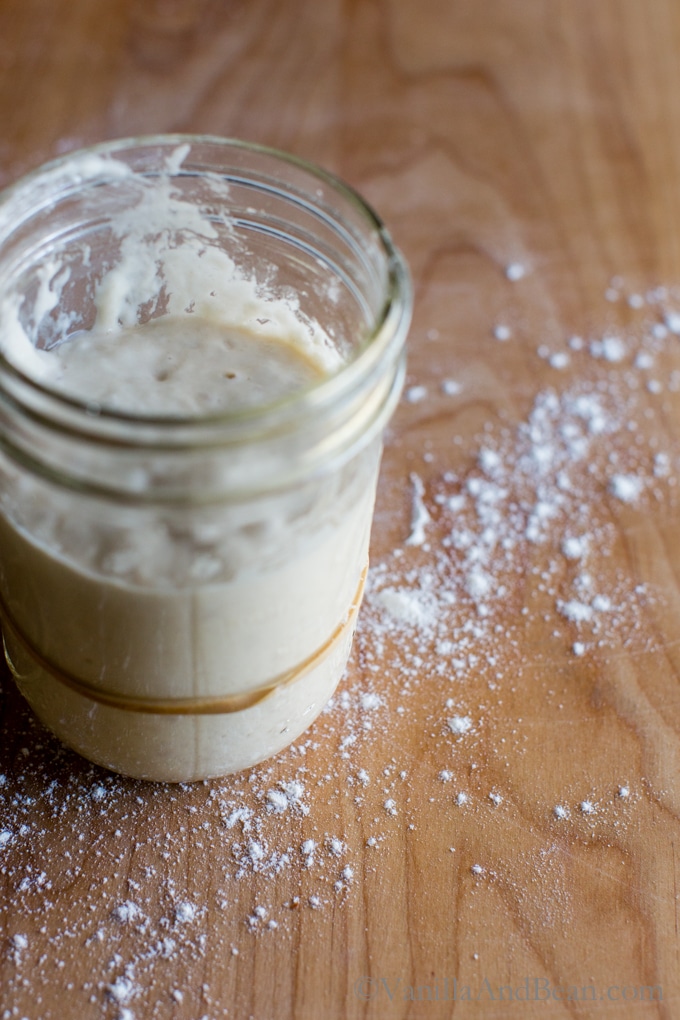
- 1/4 cup (50g) Sourdough Starter previously fed, active and bubbly
- 1 1/3 cup + 2 tablespoons (350g) Warm Water about 80f (26c)
- 4 cups (500g) Bread Flour
- 1 1/2 teaspoons Fine Sea Salt
Instructions
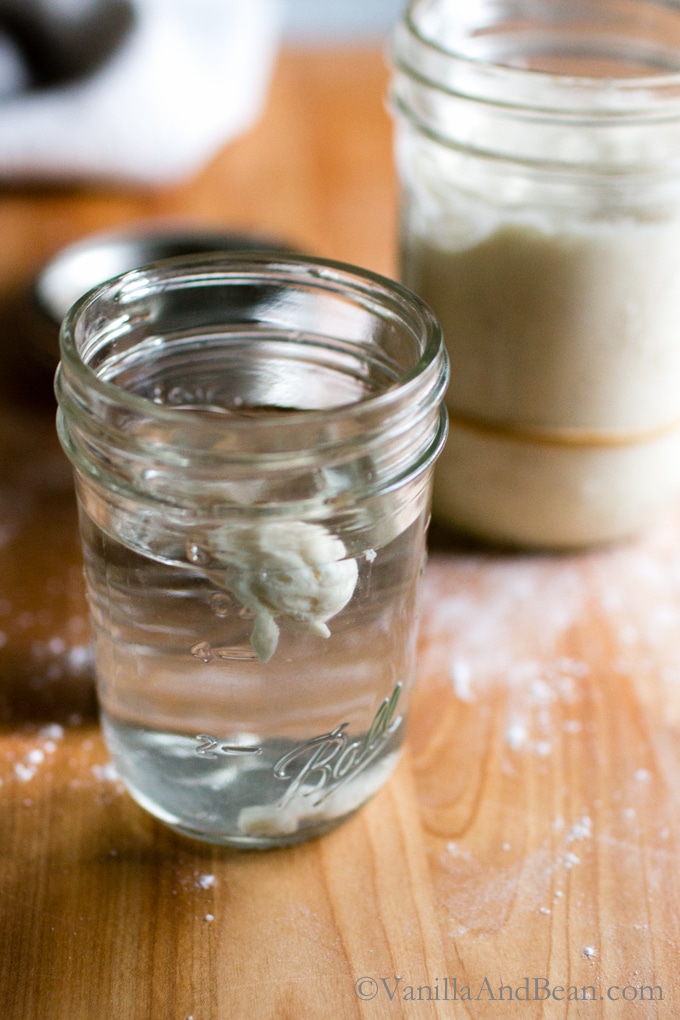
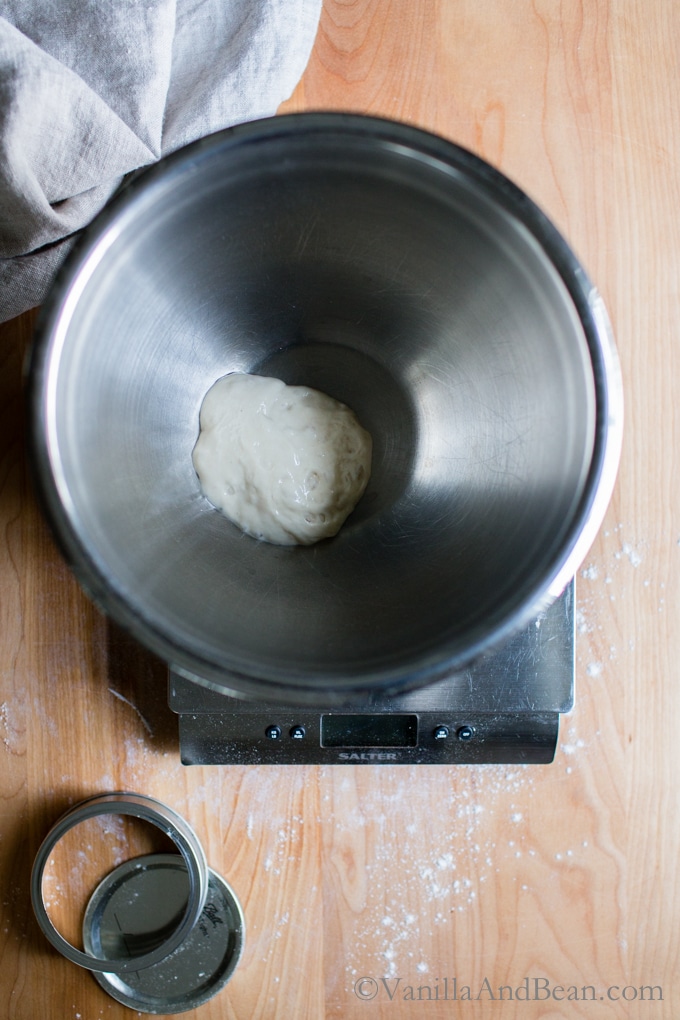
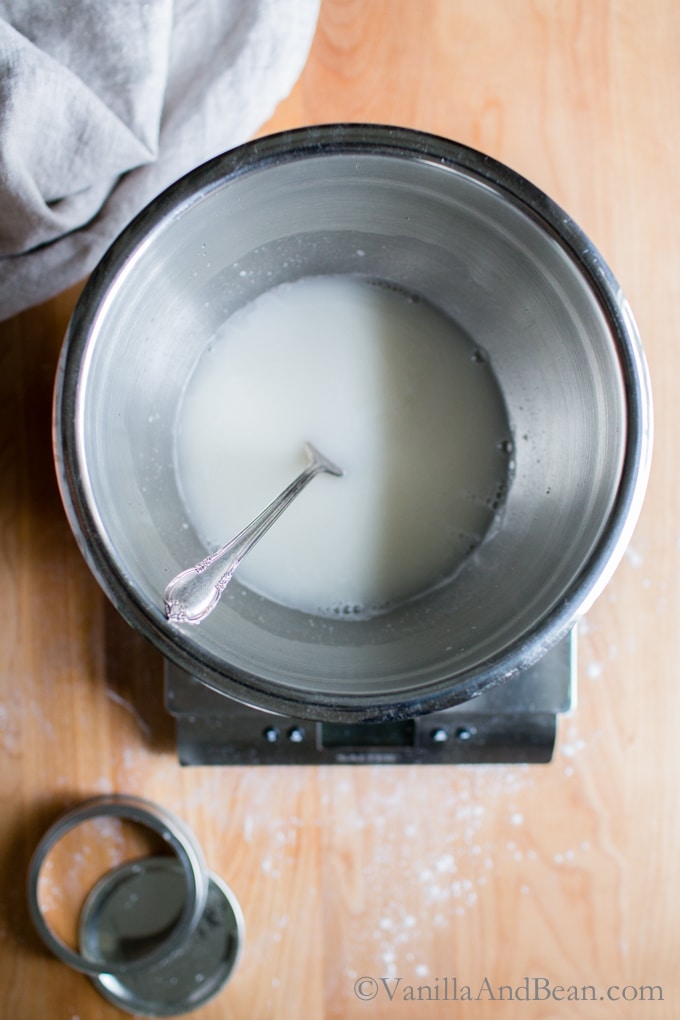
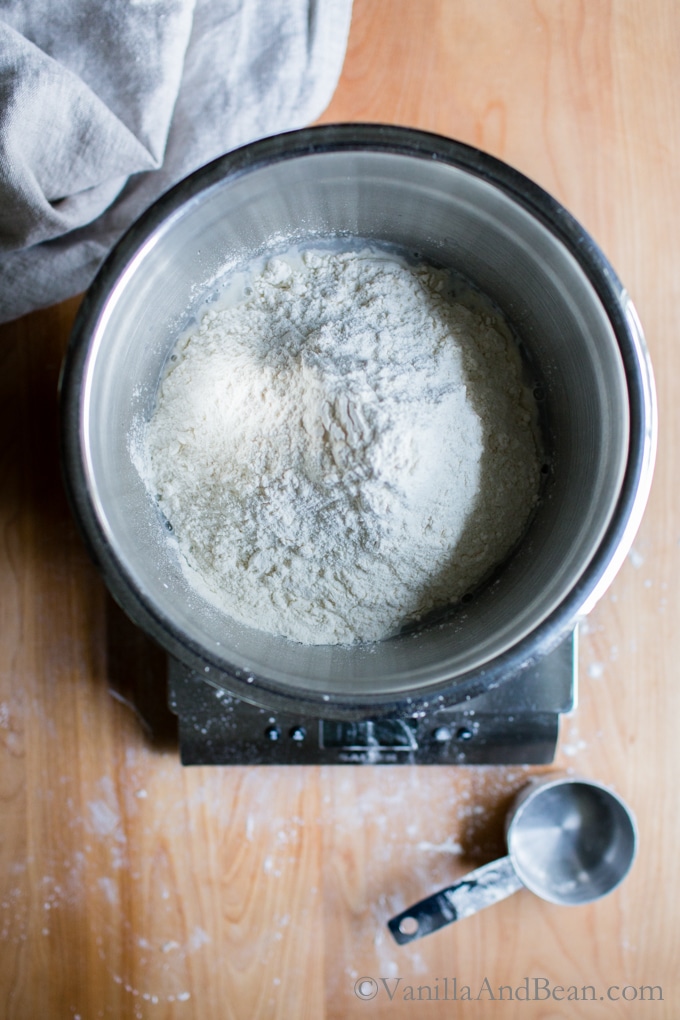
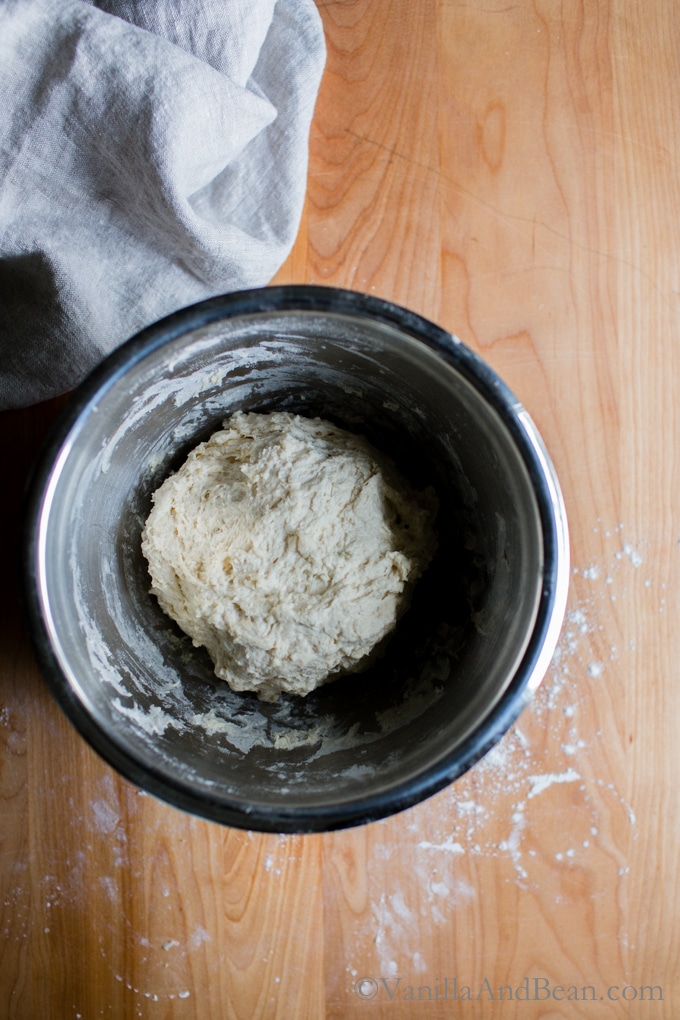
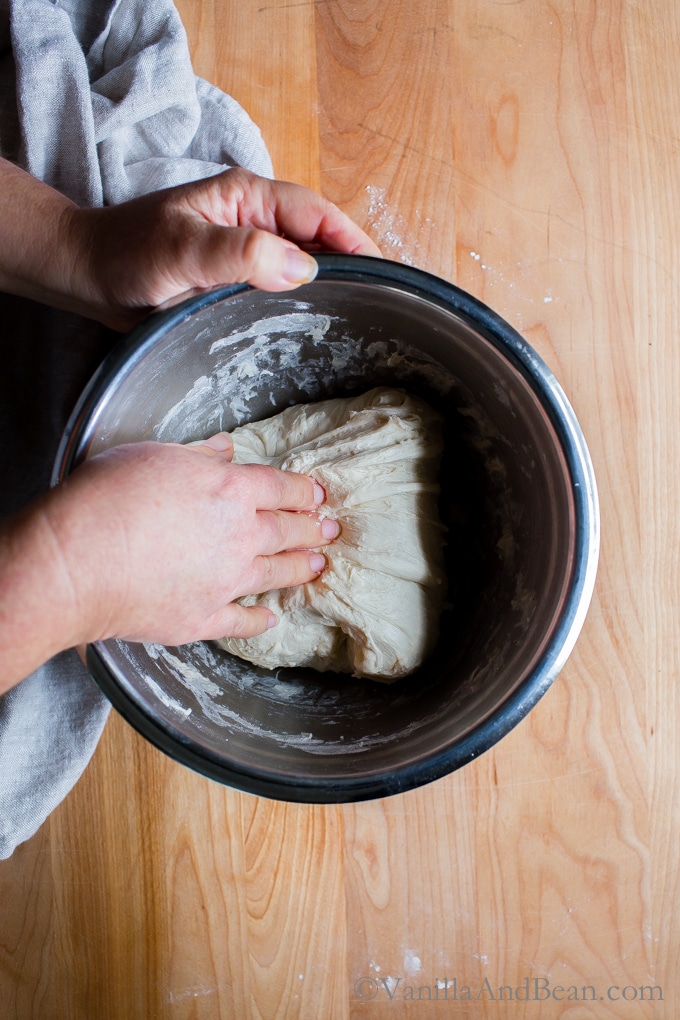
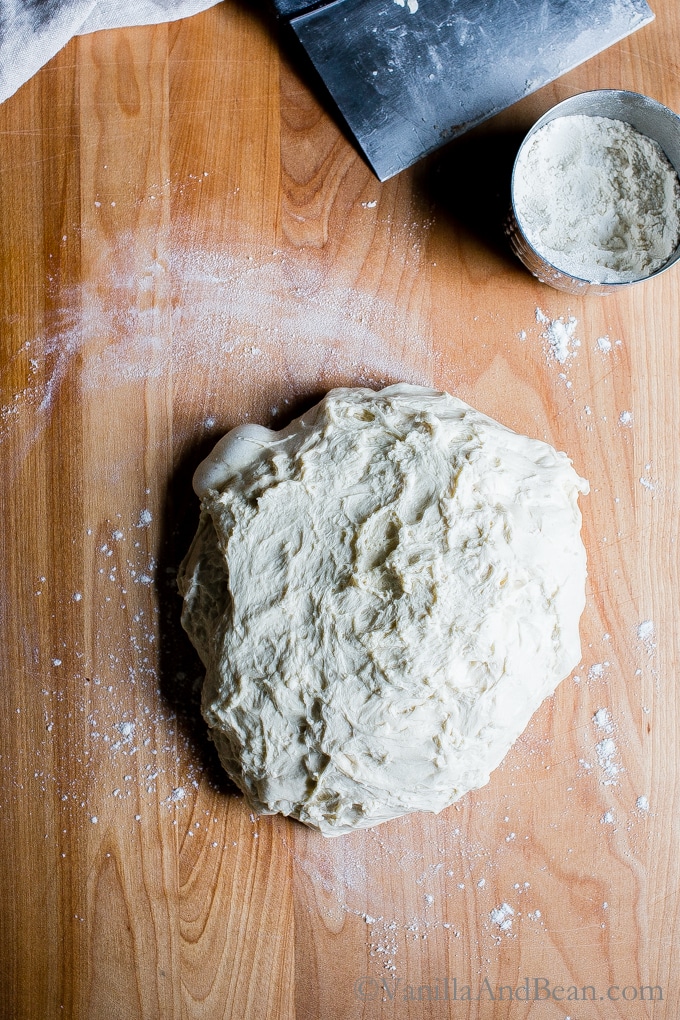
- Make the Dough: In the evening, whisk the starter and water together in a large bowl with a fork. Add the flour and salt. Combine until a still dough forms, then finish mixing by hand to fully incorporate the flour. The dough will feel dense and shaggy, and it will stick to your fingers as you go. Scrape off as much as you can. Cover with a damp towel and let rest for 30 minutes. Replenish your starter with fresh flour and water, and store according to preference. After the dough has rested, work the mass into a fairly smooth ball. To do this, grab a portion of the dough and fold it over, pressing your fingertips into the center. Repeat, working your way around the dough until it begins to tighten, about 15 seconds.
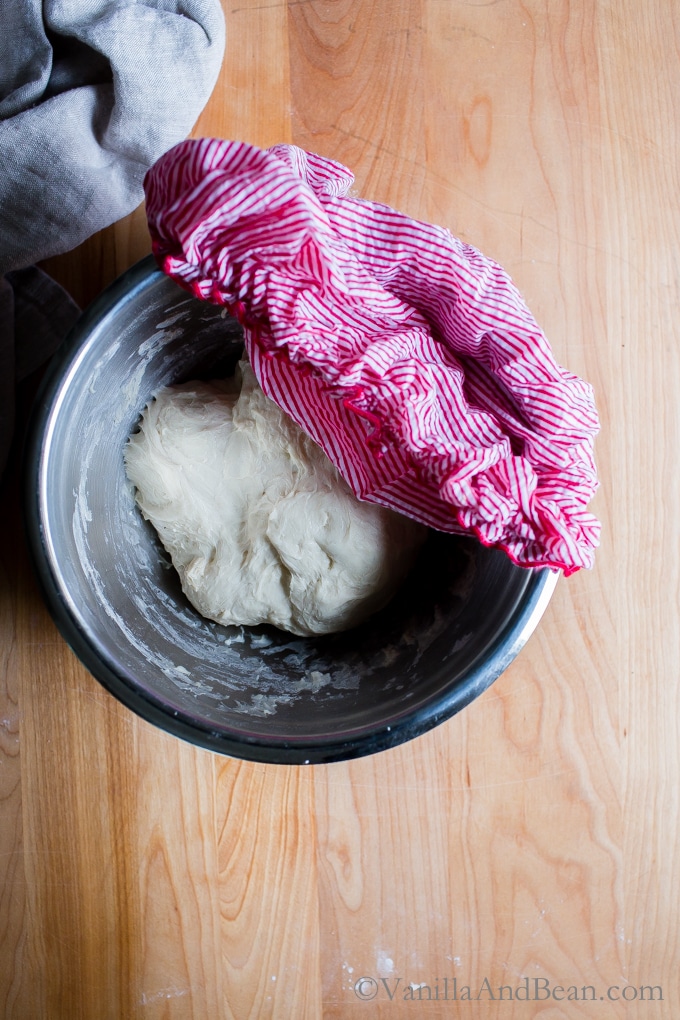
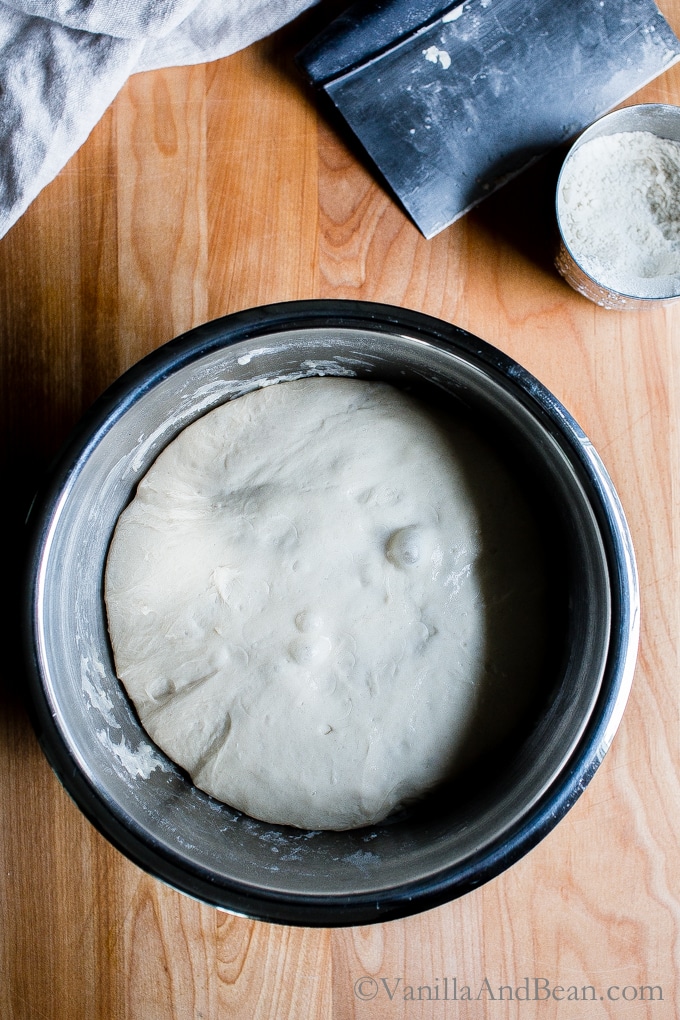
- Bulk Rise: Cover the bowl with a damp towel and let rise overnight at room temperature. This will take about 8-10 hours at 70F (21C). The dough is ready when it no longer looks dense and has doubled in size. (Traci's Note: Mine generally takes 12-13 hours to rise, but I have a chilly kitchen!).
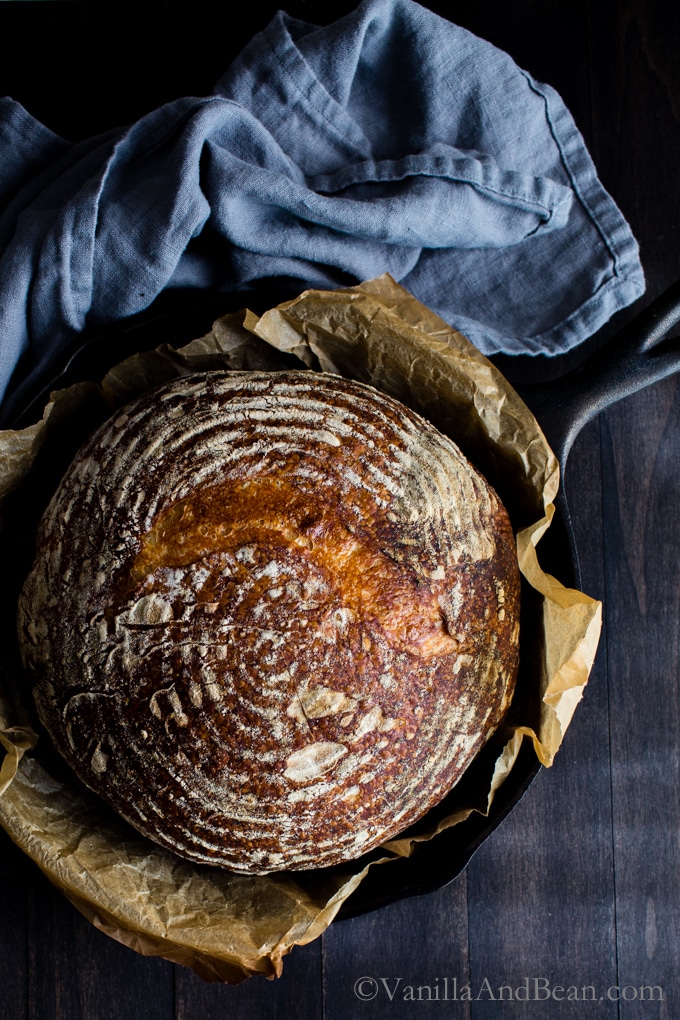
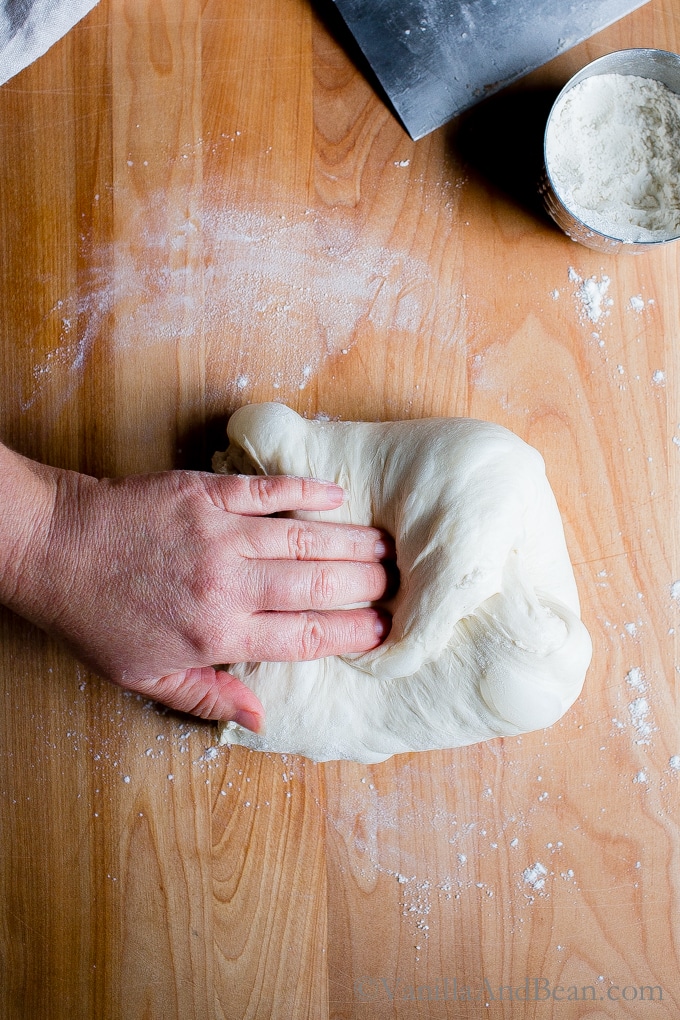
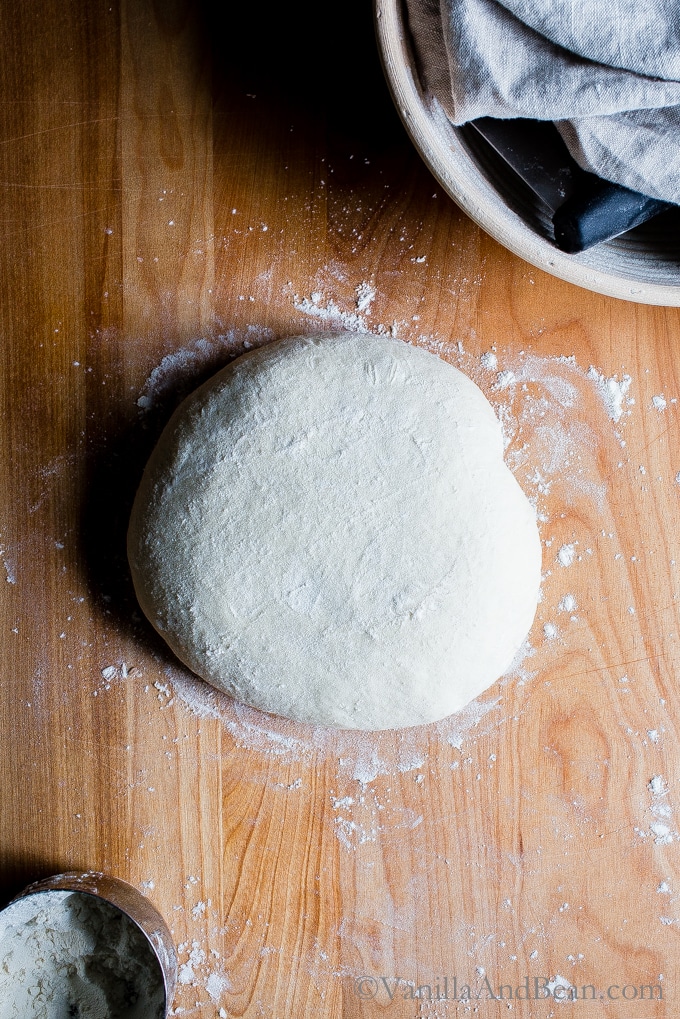
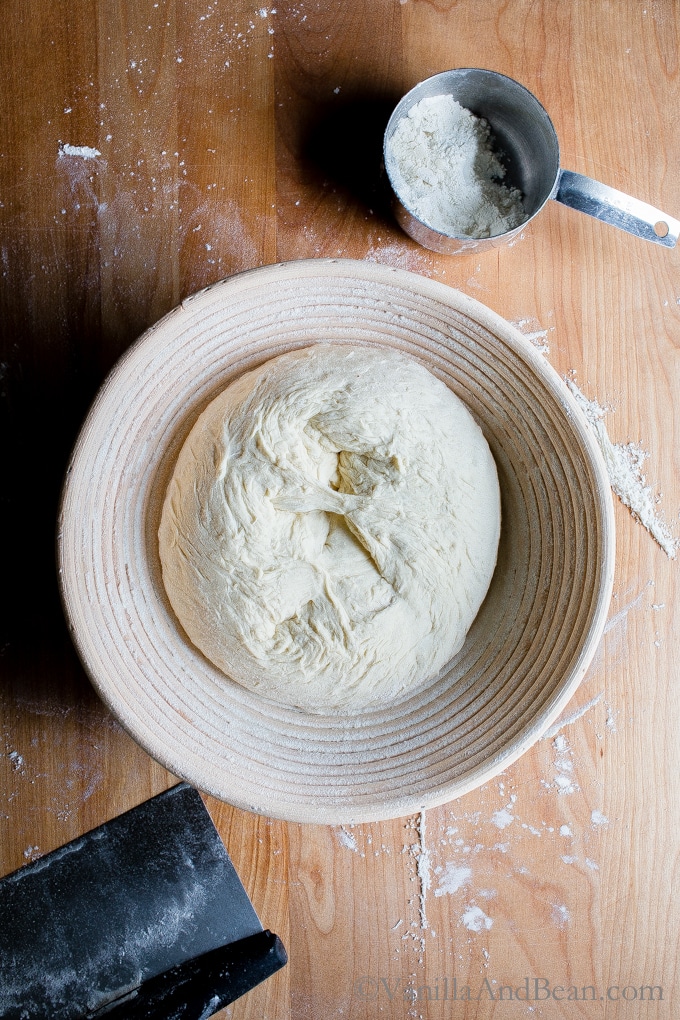
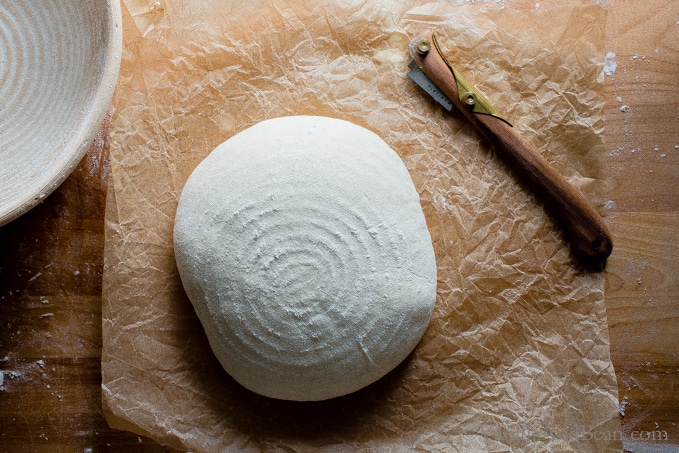
- Shape: In the morning, coax the dough into a lightly floured work surface. To shape it into a round, start at the top and fold the dough over towards the center. Turn the dough slightly and fold over the next section of dough. Repeat until you have come full circle. Flip the dough over and let rest for 5 to 10 minutes. Meanwhile, line an 8-inch (20cm) bowl with a towel (or use a banneton) and dust with flour. With floured hands, gently cup the dough and pull it toward you in a circular motion to tighten its shape. Using a bench scraper, place the dough into the bowl, seam side up.
- Second Rise: Cover the bowl and let rest for 30 minutes to 1 hour. The dough is ready when it looks puffy and has risen slightly but has not yet doubled in size. Preheat the oven to 450F (230C). Cut a sheet of parchment paper to fit the size of your baking pot leaving enough excess around the sides to remove the bread. **UPDATE (5.20)** Place a sheet pan on an oven rack directly under the oven rack you'll be baking the bread on. This protects the baking vessel from the intense heat of the oven and helps prevent a too-dark or burnt bottom. (See notes for more information).
- Score: Place the parchment over the dough and invert the bowl to release. Sprinkle the dough with flour and gently run the surface with your hands. Using the tip of a small, serrated knife or a razor blade, score the dough with a cross-cut pattern about 1/3" (8mm) deep and about 2-3" (5-7cm) on the top or any way you like. Use the parchment to transfer the dough to the baking pot.
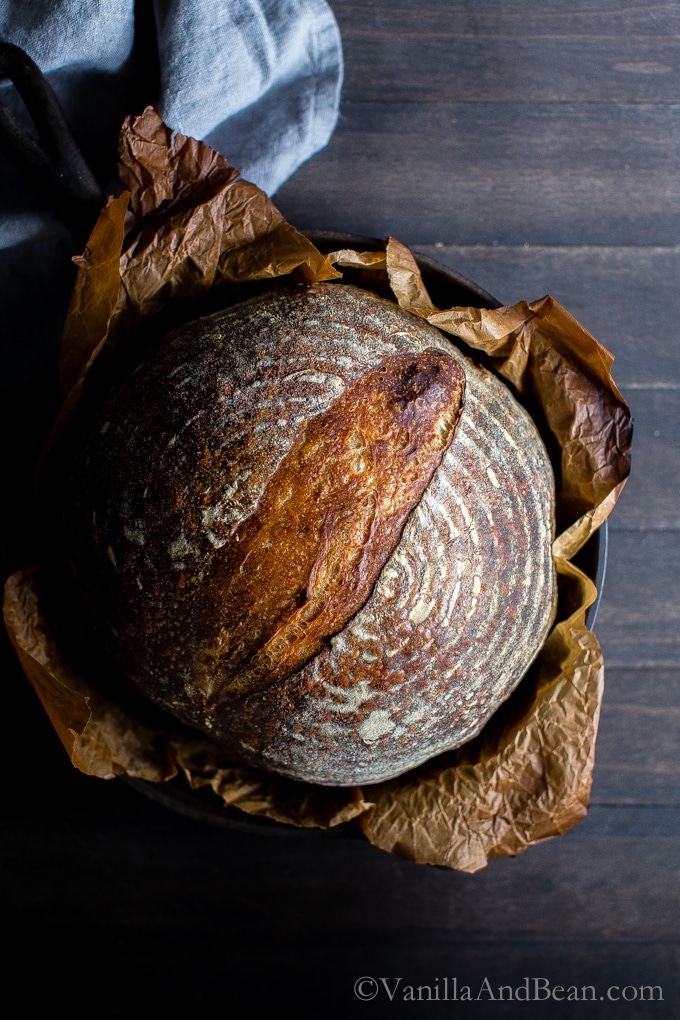
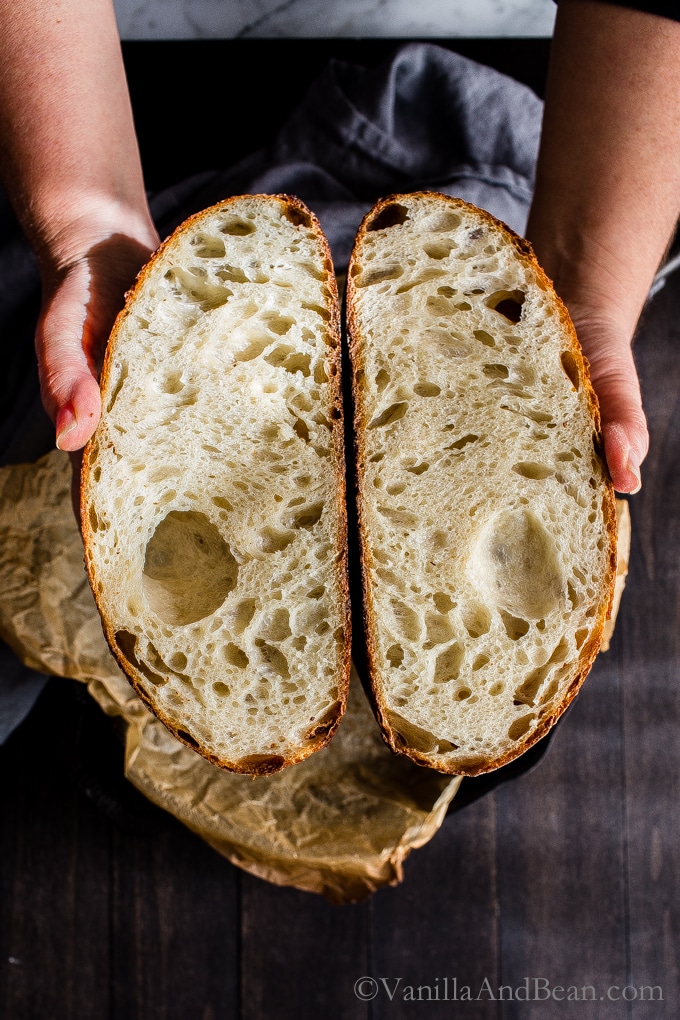
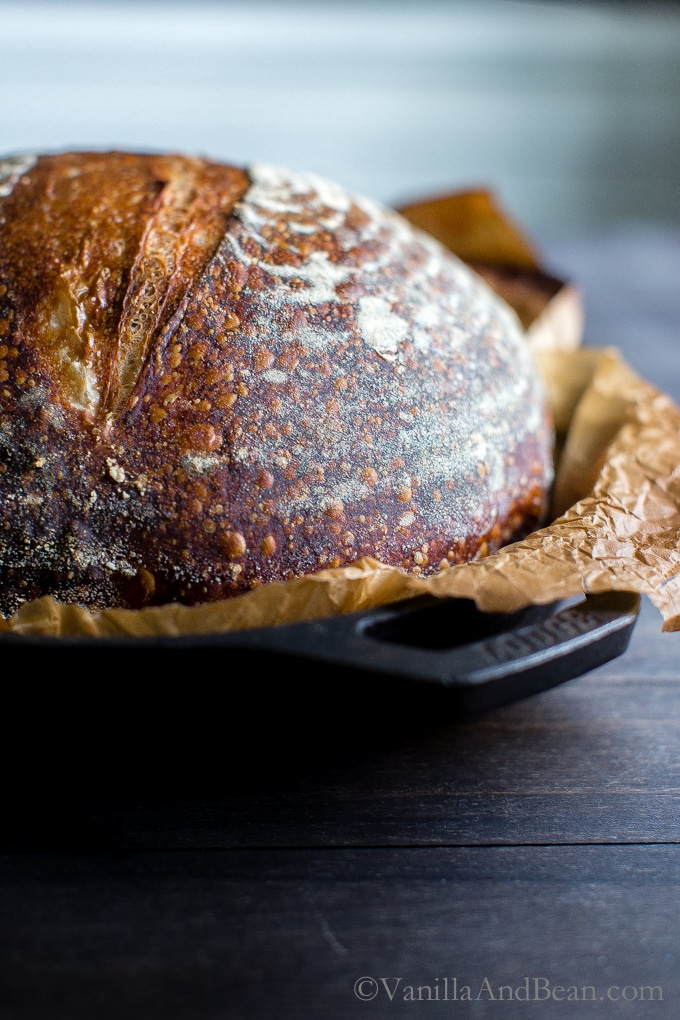
- Bake: Bake the dough on the center rack for 20 minutes, covered. Remove the lid and continue to bake for 30 minutes. Then, carefully remove the loaf from the pot and bake directly on the oven rack for the last 10 minutes to crisp the crust. (To check if the bread is ready, check the internal temperature of the loaf. It should read between 190F-205F when done.) When finished, transfer to a wire rack. Cool for 1 hour before slicing. Sourdough is best consumed on the same day it's baked. To maximize freshness, cool completely and store at room temperature in a plastic bag for up to one day (My sourdough is generally storing for between 3-4 days.)


My results were delicious! Thanks for sharing the step by step. I have had a sourdough starter for years and it was fun to try a new recipe. I followed recipe exactly so i could have a foundational understanding. To your excellent point somewhere in the thread above there are always nuances for flour type, moisture content and even the temperature and humidity and make a difference in the end game. Going to repeat this one next week and maybe go for somewhere between 3-3.5 cups of flour going more with the feel in order to achieve a less dense product. Mine did not have the amount of porosity as yours. Looking forward to ordering this book based on your beautiful coverage.Thanks!!
Hi Debra! Thank you for your note and sharing your experience! Indeed, sourdough is a process, but it sounds like you have a grasp of how loafs can vary from one to another even using the same recipe! You’re going to love Emilie’s book – it’s truly one that I refer to again and again. I highly recommend the crackers with discard and the Cheddar Jalapeno loaf (it’s all I want! lol!).
Yes, yes and YES to the Cheddar Jalapeño loaf! I’m looking forward to use this new tasty starter for my sourdough waffles. I look forward to finding out more about you and your recipes.
This recipe is great. I live in a dry, high altitude climate so I found that doubling the starter plus adding 1/2 tablespoon of olive oil and honey yielded a yummy result. I’ve doubled and quadrupled the recipe too with great success too.
Thank you for your note Cathy and sharing your tips!! Ooh the honey and olive oil sounds perfect to soften the loaf – delicious!
Hi there!
I have been loving this recipe! Question though.. if you make 2 loafs at the same time, what does the baking time increase to?
I haven’t made the bread yet but plan to this week. I have a question – do you preheat your Dutch oven? I’ve seen a couple of recipes / videos that say to preheat the Dutch oven (including on The Perfect Loaf site). Suggestion is up to an hour. Appreciate your thoughts on this
Hi Sue… Indeed, a lot of recipes say to do this, and I used to preheat. But following Emilie’s lead, and through her book, I no longer preheat. I find it’s unnecessary. I encourage you to give it a go both ways and see which way you prefer! I’d love to hear what you discover :D
Hi Traci, I followed the recipe and didn’t preheat the dutch oven and the recipe worked perfectly so that’s the way I’ll go in future. After reading & watching lots online, your recipe seemed like one that is good for newbies as many seem more time consuming. I’ve now got some wholemeal flour so will have a go at making wholemeal loaf this weekend.
A question re using the ‘discards’ in other recipes – I don’t always have time to use the excess immediately so I’ve been adding to a separate jar of discards which is in the fridge. Is this okay? In order to use it for other recipes, does it need to be fed again before using? I assume at the very least I should bring it to room temp before using? Would like to use the discards instead of wasting them but still trying to understand the how & when of using them
Hi Sue! Thank you for your note and follow up. Hooray for a perfect loaf! Good for you on lots of reading, and cross referencing… there are SO many ways to a fabulous loaf, but indeed, Emilie’s method is the most straight forward I’ve found too. RE: discards – Storing the discard in the fridge is fine. That’s where I store mine. I try to use mine within at least two weeks. It does not need to be fed again before using, just stir down and use. Room temperature is preferred as it incorporates into the recipe’s liquid and flour better. When using discard, use a recipe that indicates discard use until you start creating your own recipes with it. It makes a difference! Please keep in touch!
Hi Traci, thanks for the quick response re using the discards.
My partner is keen to have a brad with wholemeal flour instead of white. If I used half and half do you think I’ll need to increase the amount of water? I know from baking cakes etc using wholemeal flour, they tend to need more liquid to prevent them being heavy and dry
Thanks, Sue
Hey Sue – I often go up to half whole wheat with this recipe and find I don’t need to change the water content at all. I have tried WW bread, regular and pastry flour, rye and teff (better kept to 10%) all with good results. There is quite a lot of water between the regular amount in this recipe and the seed soaker (I leave out the 10 grain because its just too much seed to work with). My bread turns out lovely and porous with good rise, but not the giant bubbles. I do do the additional bulk ferment in the fridge most times. Hope that helps!
Hi Jenny! Thank you for your note, giving the recipe a go and sharing your tips! I think you’re comparing this recipe to my Seeded Multigrain? If so, yes there is more water, mainly due to the seeds soaking up water and the whole wheat flour used in the recipe. There’s no giant bubbles due to all the inclusions and whole wheat (whole wheat is “heavier”). If you’re looking for giant air pockets, go with all bread flour and increase the hydration. A higher hydration in an all bread flour dough yields bigger air pockets!
This is a great recipe for a beginner like me. Directions are easy to follow, and the bread is delicious! The crust is darker than I probably would have wanted, but the entire family said it was great. I made it in a 3.75 qt. cast iron Dutch oven, and it baked very nicely.
HI Cindy! Thank you for your note and giving the recipe a go! So happy to hear you’re enjoying the sourdough!
The baking sheet, do you put it in the oven before you preheat or after at the same time you load the loaf in the oven?
Hi Edward! I put it in there while the oven is preheating, but either way should work.
Thank you for your helpful post.
I’m new to sourdough baking and was having a little trouble with my rise. Your instruction got me there. My bread was delicious and beautiful.
SO happy to hear Rebecca! Thank you so much for your note!
Hello! I’m wondering if you usually measure your ingredients by volume or weight? I made two loaves by volume and although it was very difficult to incorporate the flour, the loaves turned out really nice with some big air bubbles. I recently got a scale and using the weight measurements you have, my dough ended up very wet and impossible to shape. Ended up tossing two batches of dough because it became such a sticky mess when I was trying to shape. Wondering if you have any guidance on this.
PS. Fair play for responding to all of these comments!
Hi Lauren! Thank you for your note. On my recipes, I provide volume and weight as a convenience (I physically weigh and measure each ingredient). However, this recipe is a recipe from a cookbook I received from fellow blogger and sourdough expert, so I offered the recipe as written (with permission). The images in this post are from bread I made and with weighed ingredients. Weight measurements are always more accurate and reason why professional bakers exclusively weigh ingredients. With regards to volume measurements, none of my three sets of measuring cups are equivalent, so I DO recommend weighing ingredients. To complicate matters, brands of flour and their moisture content (or ability to absorb water) vary AND local humidity (seasonal) conditions will/can impact dough hydration. As you become more familiar with sourdough baking and varying hydration, you’ll notice the difference. Even a little bit, more or less, of water can go a long way – even a few Tablespoons – when it comes to bread making.
The more you work with sourdough, the more familiar you’ll become with hydration levels. I still experience plenty of learning opportunities! You’ll know to hold back a bit of water or if it needs more water while mixing. Let the dough be your guide as you gain more experience. I hope this helps, Lauren.
Hello! I tried baking this loaf, it tasted great and had a good texture and crunchy crust. But I didn’t get a much of an oven spring and it was fairly dense in the middle/bottom but with bigger holes at the top. Any suggestions for improvements and why this might have happened? Thanks Martha
HI Martha… Thank you for your note… so happy to hear it tasted great! Regarding oven spring and density, I’m curious about a few things: was your starter doubled in size, active and bubbly? How about bulk fermentation, for how many hours and at what temperature – did it double in size? Do you use an external oven thermometer to verify oven temperature?
Yes my starter was active, bubbly and doubled in size. I use a rye starter though would that make a difference? For bulk fermentation, I bulk fermented for around 12/13 hours. It definitely seemed to grow, but I didn’t see bubbles. I let it proof in the fridge overnight, left it out at room temp in the morning before shaping (about 1.5/2hours)
I didn’t use an external thermometer but I ordered one this week and it arrived today! Should I use that to check temperature of the dough (and if so what should that be) and also temp of the oven how should I measure that with the thermometer? I have a fan oven, so I’m unsure on how much to deduct as it is more powerful. Thank you in advance Traci, your recipes are great and I appreciate you responding to my comment. It’s very kind of you to be so attentive to your followers!
Hi Martha… Thank you for your note and kind words. A rye starter wouldn’t make any difference. I’ve little experience with proofing in the fridge, but with a bulk ferment for 12/13 hours at room temp, then an overnight proof in the fridge and another 1-2 hours at room temp, it sounds like the dough could have over proofed.
An external thermometer is super helpful to know the temperature of your oven, but to check the internal temperature of the bread, you’ll need a food thermometer (this is an affiliate link). To see if the bread is ready, check the internal temperature of the loaf. It should read between 190F-205F when done.
With regards to your oven, you’ll need to reference your manufactures owners manual for convection adjustment if any. I bake on convection exclusively, but my oven automatically adjusts for the temperature difference (using an external thermometer helps with any confusion too). I hope this helps, Martha! Please keep in touch!
Hi Traci,
Thanks for this info. I’ll try just proofing at room temp for a short period and see how that goes!
And sorry I wasn’t clear I bought a food thermometer to check the bread, but I measure on centigrade as I’m in the Uk! Thanks Traci
After a few sourdough recipe trials this one is the best one I’ve found and least hands on. The key that I’ve found is that timing isn’t a hard science. My sourdough is very slow to grow (even though it passes the float test) so my bulk rise takes almost 15-18 hours to double in size. When I first started I didn’t wait long enough and always had a dense flat loaf. Be patient and wait for it to look and act the way it should. I’m not sure why mine is so slow but it sure makes a tasty airpocket-filled loaf. I do have a question though, up to how much bread/all-purpose flour can you substitute with whole wheat flour before it starts changing the loaf in a bad way (if thats a thing)
Hi Meghan! So happy to hear you’re enjoying the recipe… isn’t the hands off time SO nice? Thank you for your note. Agreed, timing isn’t a hard science… watching the dough is important and knowing what it should look/feel like takes practice. Yes to 15-18 hours (!!)… this past winter, I was easily at 16 hours bulk at room temp. Patience is SO key. My best answer to your question is to start plying with the percent of whole wheat flour.. start with 25% and work your way up to see what you prefer. I have a multigrain recipe, if you’d like to use that as a jumping off point! I hope this helps!
So it has the acetone smell, hooch on top (most days) but it does not seem to be getting fluffy or filled with bubbles like most of the pics I’ve seen of starter.
I’ve been placing a plate over top and putting them in our oven (not on) which is a touch warmer than our home.
We have a water softener so could that be affecting the starter?
At this point I’m just continuing to feed it 1x per day and see what happens even though I think I’m on day 9.
Hi first timer here. I took my starter out of fridge this morning and fed it I had 200g of starter and fed it 200g flour and 200g water it is now sitting on the bench to activate. Is this correct. Do I make the dough when it has double in size and nice and bubbly. How long should activation take. Thankyou I do have other questions but they can wait till later.
Hi Linda… Welcome! You are creating a 100% hydrated starter. This is what I do too, although I usually only use 60g each. You can keep as much starter as you like, however! You’ll make the dough when it has doubled in size, has a pleasant sweet/sour smell and it’s bubbly. The speed at which a ripe starter doubles depends on several factors: ambient temperature, how active your starter is and the temperature of the water used to feed the starter. My starter doubles in size anywhere between 5 hours and 8 hours. If I want to speed it up, I pop it in a turned off oven with the light on. To slow it down (say it’s late and I want to go to bed), I pop it in the fridge where it will rise slowly. I hope this helps! Keep in touch!
Hi there! I can’t figure out how to leave a new comment (maybe it’s just my phone), but I can reply to old ones, so here goes – I’ve used your recipe a few times and absolutely love it! The only thing is that I don’t know how much my dough should actually be rising in the last 30 minutes – 1 hour rise before baking. It seems that in that time it’s not really doing much of all, and I’ve tried letting the dough rise in room temperature and warm places. Should the towel over top be damp or dry? Do you have any recommendations for this step?
Thanks so much
Hi Chelsea! Thank you for your note… and finding a way to comment! So happy to hear you’re enjoying the bread. For the second rise, I cover my dough with a damp tea towel, and allow it to rise for about 30 minutes. I know it looks like nothing is happening, but it does become “puffy” . I only notice this because I’ve photographed the process and have seen before and after pictures. I set the timer as a ritual for 30 minutes, then once the timer goes off, I score and bake. I hope this helps!
Thankyou Tracie. So I cooked a loaf today and it looks great on the outside and inside it has some good holes in the bread and a nice crust but it is still doughy looking. Wish I could send you pics. I followed the instructions correctly and each stage looked just like your pics then cooked it for the time specified and it sounded quite hollow. What or where could I have gone wrong. I’ve just emailed you some pics 😁
Hi Linda! Thank you for sending pics over… your bread looks great, but it’s difficult to get a feel for the ‘doughy’ nature of the bread. I’m wondering, are you allowing the bread to cool to room temperature before cutting into it? Are you temping the inside of the bread before pulling it from the oven?
Thankyou for replying yes allowing to cool before cutting. When you say temping do you mean checking the temperature? I did check the temperature and it was over the 190.
Hi Linda… Yes on temperature.. how about your oven? Do you have an external oven thermometer? I’m thinking you could give the bread another 10 -15 minutes in the oven, turned off, with the oven door ajar. This may help dry the bread out further. Keep us posted!
My favourite sourdough recipe for beginners! Love to bake a couple loaves, slice them up and freeze them, it tastes great fresh out of the toaster. I also love to sub in whole wheat flour. Delicious! Thanks for the recipe!
Hi Becca! So happy to hear! YES to freezer to toaster… I do the same and it’s SO convenient. Thank you for your note.
Hi There
Would love to know what your flour ratio is when you use whole wheat flour?
Thanks a million
Hi Tiffany! I use whole wheat flour in my Multigrain Bread recipe, a lower percentage. And this would be typical to use in this recipe as well (I’ve not done the math :D). If using WWF, you’ll need to play with the hydration because WWF is thirstier. I hope this helps, and you enjoy fabulous sourdough!
I made this today… well, I baked it today! and it turned out beautifully! Please don’t be offended but I don’t have a banneton so I just shaped and placed in parchment in the dutch oven, and let it proof there. I got decent oven spring. Next time I will proof in a bowl then transfer, and see if I get more spring. It is delicious, though! Thank you! It’s nice to see the recipe simplified.
Big smiles from me to you!
Hii Therese! Hooray for a fabulous loaf of bread! No need for a banneton… that’s just what I use. Simply place the loaf in a tea towel lined bowl. So happy to hear your enjoying homemade sourdough! Thank you for your note!
I have a question. I’m on day 5 or 6 of making the sourdough starter but it doesn’t seem to be bubbling or changing a whole lot. The first couple days it was taking on the smells described in your starter receipe but not I’m wondering if I did something or didn’t do something. I’ve had it in a medium sized glass bowl partially covered or covered with a damp towel each night but in the morning it seems to have a somewhat hardened surface which I stir up before taking out the requisite 2TBS ea day to add to the 1/4 C of flour and 2TBS + 2TSP of water. one day I did have hooch show up on top of mixture which I mixed in and then one day I fed it twice.
Maybe my climate, here in San Antonio TX. where it’s been fairly humid lately is causing it to take longer??
Any ideas??
Hi Scott! I need a bit more information… how does your starter smell – how has it changed over the course of five days? Be sure to cover it fully with a damp tea towel, or a lid (I sometimes use a small plate). The surface shouldn’t be hard rather, it can form a skin and that can be stirred in, but it shouldn’t be hard. Remember too, that patience is key. It could take longer than 6 days. That is not unusual. Keep us posted!
Ok. the plastic cover I’ve been using has been on “loosely” (ie. there are a couple inches of gap allowing air to get in. and I guess what I meant to say was not “hard” but a “skin” (your term was better). It was still able to be stirred in.
what I read is that some folks feed it more than once a day. Is that good or bad?
You can feed it more than once a day, and that’s not uncommon, but I don’t find that necessary when building a starter. I’ll do that when I’m getting ready to bake if necessary, but not when making a starter.
So it has the acetone smell, hooch on top (most days) but it does not seem to be getting fluffy or filled with bubbles like most of the pics I’ve seen of starter.
I’ve been placing a plate over top and putting them in our oven (not on) which is a touch warmer than our home.
We have a water softener so could that be affecting the starter?
At this point I’m just continuing to feed it 1x per day and see what happens even though I think I’m on day 9.
Hi Scott… I’m not sure about the water softener, thinking about this a little more… and since there’s such a strong odor, I’d increase feedings every 8-10ish hours until your starter produces a pleasant aroma. The hooch is an indicator of hunger… your micro biome isn’t getting enough to eat (or they’re gobbling up the food so fast because they’re so cozy in that oven). Setting the starter in the oven with the light on speeds their activity, so at this time, I’d leave it at room temperature. I hope this helps!
I’ve made this once and it came out so good, thank you! At what point in the recipe would I add the dough to the fridge to crank up the sour flavor? I’ve read about the acetic/lactic acid difference, but I’m dense and can’t figure out when. THanks!
Hi Charlie! Thank you for your note! So happy to hear the bread turned out well for you. If you’d like to overnight your dough in the fridge (8-14 or more) hours for part of bulk fermentation, that’s a good time to do it (just be sure to double up on damp tea towels, otherwise they tend to dry out and ruin the dough). When you remove the dough from the fridge, you’ll still want it to double in size and come to room temperature before shaping and proofing. Some people proof their shaped dough in the fridge, but I’ve very little experience with that. Good luck and please keep us posted!
Omg this was the best recipe. My bread came perfect.
Hooray! So happy to hear Rosa. Thank you for your note!
I’m a beginner of Sourdough making by an accident. I used the starter from another lady but found your recipe & method later when I searched for a Sourdough read recipe. Thank you so much for a very nice & easy methods to follow. My 1st baked was very successful & beautiful look with loads of bubbles in it. Many of my friends were so impressed & I forwarded them your link 🥰
Hi Jub! Thank you for your note and giving the method a go! Hooray for a beautiful loaf and passing the recipe on to your friends! Thank you :D
Hello! I’ve made this SD recipe twice now! It’s a keeper. I even shared some of my starter and this recipe. I had to use the stainless steel stockpot and a sheet pan over the top for 1st 20 minutes then remove sheet pan and bake for another 25 minutes. It’s come out beautifully both times. My question is can you split this dough and make 2 smaller loaves? At what point would I split the dough? Thank you again for this simply delicious recipe!!
Hi Ceriese! Thank you for your note, sharing your tips and giving the recipe a go! For two boules, here’s what I do with my Seeded Multigrain Sourdough: You’ll divide the dough after bulk fermentation, before shaping. “When baking two boules, bake as described with lid on. Then, remove the lid and continue to bake lid off for 15-20 minutes. To check if the bread is ready, check the internal temperature of the loaf. It should read between 190F-205F when done. When finished, transfer to a wire rack. Cool for 1 hour before slicing.” This method should work fine with this sourdough bread as well. I hope this helps.
It did help, thank you. :)
I didn’t see in the instructions to preheat the Dutch oven. Do I just put the dough in a non heated Dutch oven?
-thanks
Hi Megan! That is correct. No need to preheat the DO!
Turned out great but how can i get a more open crumb with this recipe? Mine had pretty small bumbles.
Hi Ryland! So happy to hear! For a more open crumb, you’ll need a higher hydration dough. I hope this helps!
Instead of leaving overnight, can I proof it in the oven at 100% to make the bread faster?
Hi Matt! I’m not sure what proof it in the oven at 100% means. You can proof overnight or during the day.. whatever fits your schedule (bakers schedule is only a suggestion). If you like, you can turn on your oven light (with the oven off). Remember that time = flavor.
I don’t know what I did wrong but my dough is sooooo tough. I’ve left it to rise longer and I’ll still attempt to bake it.
Hi Jennifer… oh goodness. Can you add about 10g of water to loosen it? Are you beyond bulk fermentation?
I’m making my 1st loaf of sourdough. What’s the best way to bake the bread if I don’t have a dutch oven or an iron skillet?
Irina commented below “ I baked my bread directly on a pizza stone without any container. I just put a roasting pan with some water on the bottom of the oven, to create steam and put the dough directly on the hot stone. Bread rose and came out with a crusty crust.” I hope this helps!
I use a stainless steel stockpot and put a sheet pan over the top for the first 20 mins, then remove for the last 25-30 mins. Works great, did a lot of research because I also do not have a dutch oven.
This is my go-to sourdough bread recipe. I’ve shared it with others and they’ve had great success. Thank you for simplifying sourdough.
Hi Teresa! Thank you for your note, sharing your success and sharing the recipe with others! Hooray! I’m SO happy to hear. :D
I used 25% spelt flour and the rest AP and turned out beautifully! Some of the yummiest bread I’ve baked yet. Thank you!
YES to spelt, Kelly! Hooray! Well done! So happy to hear you’re enjoying the yummiest bread!
I am a first time sourdough baker and my bread turned out beautifully!
Hi Rebecca! Way to go YOU! That makes me SO happy! Thank you for your note :D
If I have a smaller dutch oven and need to split the dough into 2, should the bake times remain the same or do I need to adjust? Thanks for an easy to follow recipe!
Hi Kelsey! Here’s what I do with my Seeded Multigrain Sourdough: “If baking two, 1 lb boules, bake as described with lid on. Then, remove the lid and continue to bake lid off for 15-20 minutes. To check if the bread is ready, check the internal temperature of the loaf. It should read between 190F-205F when done. When finished, transfer to a wire rack. Cool for 1 hour before slicing.” This method should work fine with this sourdough bread as well. I hope this helps.
Thank you! Just baked my first loaves this morning and they are the best tasting loaves I’ve done yet! I noticed they don’t have a very open structure or large air bubbles inside. I noticed after my bulk proof and shaping they didn’t really rebound in puffiness during 2nd proof. Any tips? More starter? Wetter dough? The bread is still soft and delicious but has more the appearance of sliced sandwich bread.
Hooray Kelsey! So happy to hear. I think what you’re after is a high hydration dough which produces lovely large holes. The trade off is a challenging dough to work with because It’s so wet. This recipe produces a tighter crumb because of the hydration. As far as proofing, you could give it a bit more time to create a little more puff. Remember, it’s the dough to keep your eye on rather than the time. I hope this helps! And thank you again for your note!
Hi! I wasn’t able to get my sourdough to rise. Any tips? I let it sit on the counter overnight with a damp towel on top. Also felt my dough was not quite the right consistency. Could I add more starter?
Hi Jenna! I’m so sorry your dough didn’t rise. I know it can be disappointing. A few things come to mind. Did you do the float test to see if your starter was ready? What was the temperature of your kitchen? I find my dough takes much longer during Fall, Winter and Spring than summer because I have such a chilly kitchen. Sometimes up to 16 hours! Did you weigh your ingredients? Maybe give the dough more time to rise if your kitchen is chilly.
I did do the float test and it was ready! I also gave the dough extra time to rise. I tried a second batch and it seems to better but we will see! Maybe weighing ingredients would be better since there is so much air in the starter.
Thanks for the help!
Thank you for this! At every stage I was convinced i was doing it wrong, but I kept going and got this beautiful loaf! It was so straightforward and much easier to understand than other recipes. This is the first bread I’ve ever made! I don’t know how to post pics otherwise I would- I do agree with some commenters that it wasn’t very sour, but that could also be because my starter is relatively young. Thank you!
Hi Elizabeth! Thank you for your note and pressing on through this recipe! I completely understand the feeling of being convinced one is doing something wrong, lol. I’m SO excited you kept going and now, you’ve made sourdough! Hooray! What’s next? The sourness can come from the age of the starter, but also I find, the longer I can stretch out the bulk fermentation, the more flavor I can pull from the dough. Sometimes I’ll slow fermentation down by putting the dough in the fridge for 8-10 hours, then pull it to finish bulk fermenting on the kitchen counter overnight. I’m so excited for you! Keep going!
PLEASE make a “skip to recipe” button at the top
Hi John! It’s right under the title. “Jump to Recipe” I hope this helps!
This is now my go-to recipe for sourdough bread. I’m new to this art, but I’ve not ever had an issue with burning the bottom as the first baking pan I tried was my wife’s RockCrok Dutch Oven from Pampered Chef. The crust baked evenly top and bottom and the glass lid lets me see when the loaf has stopped rising and started crusting, signaling to me when I should remove the lid. I find that 25 minutes covered is optimal, followed by 15-20 minutes open dish baking and 5 minutes on the rack to finish it off. (If interested, find the RockCrok here: https://www.pamperedchef.com/pws/camberjones)
Hi Clint! Thank you for your note and sharing your tips! So happy to hear you’re enjoying good bread!
I beaked by bread directly on a pizza stone without any container. I just put a roasting pan with some water on the bottom of the oven, to create steam and put the dough directly on the hot stone. Bread rose and came out with a crusty crust.
Hi Irina! Thank you for your note, tips and rating! I love that technique and am so happy to hear you created a beautiful loaf!
Hi there – Is there a recipe or link somewhere for the starter that I’m not seeing?
thank you for your time-
Cheers, Allen
Hi Allen… unfortunately I don’t have a starter recipe up on my blog yet, but please check out Emilie’s starter recipe on her site. You can find it here: https://www.theclevercarrot.com/2019/03/beginner-sourdough-starter-recipe/
First time I made this I thought there was way too much flour. Second time I added less flour and more liquid. It came out perfect!
Thank you for your note Maureen! SO happy to hear you were able to make the recipe work for you!
I got starter from a friend and found your recipe for my 1st sourdough. I am confused, though. I see nothing that looks like kneading in the Instructions. Am I missing something? Please help! Thanks!
Hi Andy! You’re not missing anything. Using Emilie’s method, you don’t have to knead the dough, rather, you simply mix, then perform a “fold” and then allow the dough go into bulk fermentation (bulk rise) overnight. Please keep in touch and let us know how you like the bread!
Report #1: it *looks* amazing. Taste test in 1 hour. Can we post photos in the comments?
Hi Andy! SO happy to hear! Unfortunately I don’t have that functionality here on the blog. If you’re on Instagram or Facebook you can post it there and tag me @VanillaAndBean.
Done.
Report #2: AMAZING! Time to start another loaf…
Hooray! So happy to hear Andy. Thank you for your note and rating!
Do you bake in the lid or the vessel?
Hi Mary! I’m not sure I understand your question.
No dutch oven, so I had to make do with a cast iron skillet topped with a cake round for the first 20 minutes. It still ended up being the best sourdough I’ve ever baked. As it cooled, I could hear the crust crackling. So good! Thank you for the recipe Traci.
LOVE that solution, Michael! Hooray! That crust crackling is addictive…. Watch out!
I’ve read over 100 comments and no one has addressed my problem. I put my dough in banneton with flour lightly brushed on top and put the damp towel around it for the night. In the morning it has doubled in size but has a dried out layer on top. I there anyway to prevent this. Appreciate your help. Penny
Hi Penny… oh that’s so frustrating. Here’s what I do: while it’s setting overnight, top the bowl/banneton with two very moist tea towels. This way the top towel protects the bottom towel from drying out. I do this in bulk fermentation too, with a light spritz of water on the dough, when I refrigerate it overnight. I hope this helps!
I loooooove the dark bottom on this bread actually. My 5 year old and I fight over it! Over time, I’ve adapted to use 75g starter and 2 tsp salt. Great great recipe.
Hi Maria! SO happy to hear you’re liking that dark bottom… I don’t mind it either. So happy you two are enjoying it!
Do you preheat the Dutch oven or put it in cold?
Hi John! No need to preheat.
This turned out amazing. Simple to follow instruction and the loaf turned out beautifully.
Hi Lalita! Thank you for your note and rating! So happy to hear you’re enjoying the sourdough. Hooray!
Do you have an option to not do the overnight bulk fermenting, and to bake same day? Thanks!
Hi Kaylee! If you get up early enough to mix, you could bulk that day and bake at night. That’s the beauty of sourdough.. you can work it into your schedule!
I used this recipe for my first ever sourdough baking attempt. It turned out amazing. I definitely need a beyte bread knife but I’ll definitely be coming back to this recipe
Hooray! Hooray, Renee!! So happy to hear you’re enjoying the recipe. Yes, do get a good bread knife. It’s a must!
I have made this bread no less than 6 times in the last 3 weeks and absolutely love it! For ease of slicing, I make it in a bread pan rather than a round loaf. Delicious!!
Oh myyyy you are well practiced, Brenda! So happy to hear you’re enjoying the sourdough. Thank you for your tip about the bread pan!
Would I put all of the dough or only half for a bread pan?? Thanks!!!
Hi Jessica… to answer your question I referred to my Sourdough Sandwich Bread which includes 400g of flour + 100g of oats. So, I’m thinking this recipe could fit in a loaf pan. Half would be too small. Please keep in touch!
Do you have a recipe for sour dough starter?
Hi Ruth! I don’t have one on the blog, but am working on a recipe. If you need, check out The Clever Carrot’s starter recipe. I hope this helps.
I’m about to try making my first sour dough loaf. I was wondering how you get that concentric circle pattern?
Use a banneton for the second rise…
I have cooked this twice it’s so delicious! I love the simplicity of the recipe! I don’t have a cast iron pan but used a spring form pan and a pizza stone, covering the loaf with foil for the first 20 mins on the second position with a rack above it the crust comes out perfect when cooking it uncovered for 30 mins I decided to not cook it for the final 10 because the crust looked good to me! Thank you so much for the recipe!
Hi Richard! Thank you for your note, rating and sharing your tips for a no cast iron pan bake! So happy to hear you’re making delicious bread! Hooray!
Thanks for the recipe . Work well except the crust is a bit much for my knives lol. Would like the bottom and the crust a little easier to cut. Possible?
Hi Bill! Are you looking for a knife recommendation? I use a sturdy, large serrated bread knife like this one (affiliate link) and it cuts right through that bottom. I hope this helps!
Hello! My bread always seems to come out to dark on the bottom and tastes burnt. I live near Denver Colorado, should I be adjusting the temperature because of the altitude? I am following the directions and I use a Le Cruset Dutch oven. The bread it self is wonderful it’s just too dark on the bottom.
Hi Amanda! I’m sorry to hear your bread is too dark on the bottom. I’ve read about this before, and in the comments of this recipe too. I find the bottom crust gets darker for me when I use my Staub DO vs my Lodge double cast iron set up. I imagine different materials can yield different results. You can try putting a layer of cornmeal down on or under the parchment paper. Kelly commented below that she: “i started putting a tin pan like you would make lasagna in under my dutch oven. Sit the dutch oven right on the tin pan. This allows more air flow under the dutch oven and it also takes the direct heat off the bottom of the dutch oven.” When all else fails, I use a serrated knife to skim off the bottom. The Perfect Loaf has an article about this problem (it’s not uncommon – scroll about 1/2 way down). I hope this helps and you’re enjoying good bread!
Also, I forgot to add, King Arthur Flour has information regarding high altitude baking. I just don’t know enough about it to say if that’s having an effect on the outcome of your bread.
I have made my 2nd batch of this bread and it is Beautiful! It is soft and flavorful and if I was on the GBBS Paul would probably smile!
SO happy to hear, Jessica!
This recipe turned me into an instant bread master! I love this recipe. I’d like to try and make it more sour. Suggestions? Sorry if this has been asked before. I saw the discussion of longer bulk rise in the fridge but not the outcome?
Hii Sarah! I experimented with making the bread more sour last week. For bulk rise, I put it straight in the fridge for 12 hours and then let it sit out for an extra 6 hours the next day which did the trick as it didn’t rise at all in the fridge. Next time, I would let it sit out on the counter for an hour or two to get going before placing in the fridge. The bread turned out fine but it still wasn’t as tangy as I want it to be!
Hi Sarah… I recently made sourdough with an extra long bulk ferment in the fridge. I think it edged upwards of 16+ hours and then an overnight rise at room temp. I didn’t write down the exact times, but my hubs said it was very sour. I thought it more sour, but not VERY like he said, lol! I hope this helps. Let us know if you experiment!
I think if you let it prove longer overnight it should be a bit more sour. The second time I made this bread I left it out for 12+ hours as I slept really long that night, it was also spring/ summer so decently warm in my kitchen. It was way more sour than the first loaf I made which was out for 8 hours.
Thank you for your note, Tiffany!
Add a quarter tsp of citric acid,
Emilie,
Your “Everyday Sourdough bread” recipe in your book just convinced me not to give up on making bread! It turned out beautifully, with a nice crust and soft, flavorful interior. The six is perfect; 2 loaves are unnecessary for we “empty nesters”!
Thank you so much!! (Also, using the Dutch oven is a great idea!)
Hi Linda! Thank you for your note. So happy to hear bread making is a joy for you – and not frustrating anymore! I’m Traci… I shared Emilie’s book on my blog because she is the ONE who changed my sourdough making life from one of frustration to sheer excitement and a feeling of I CAN DO THIS! SO happy to hear she’s helped you too! And yes to the DO!