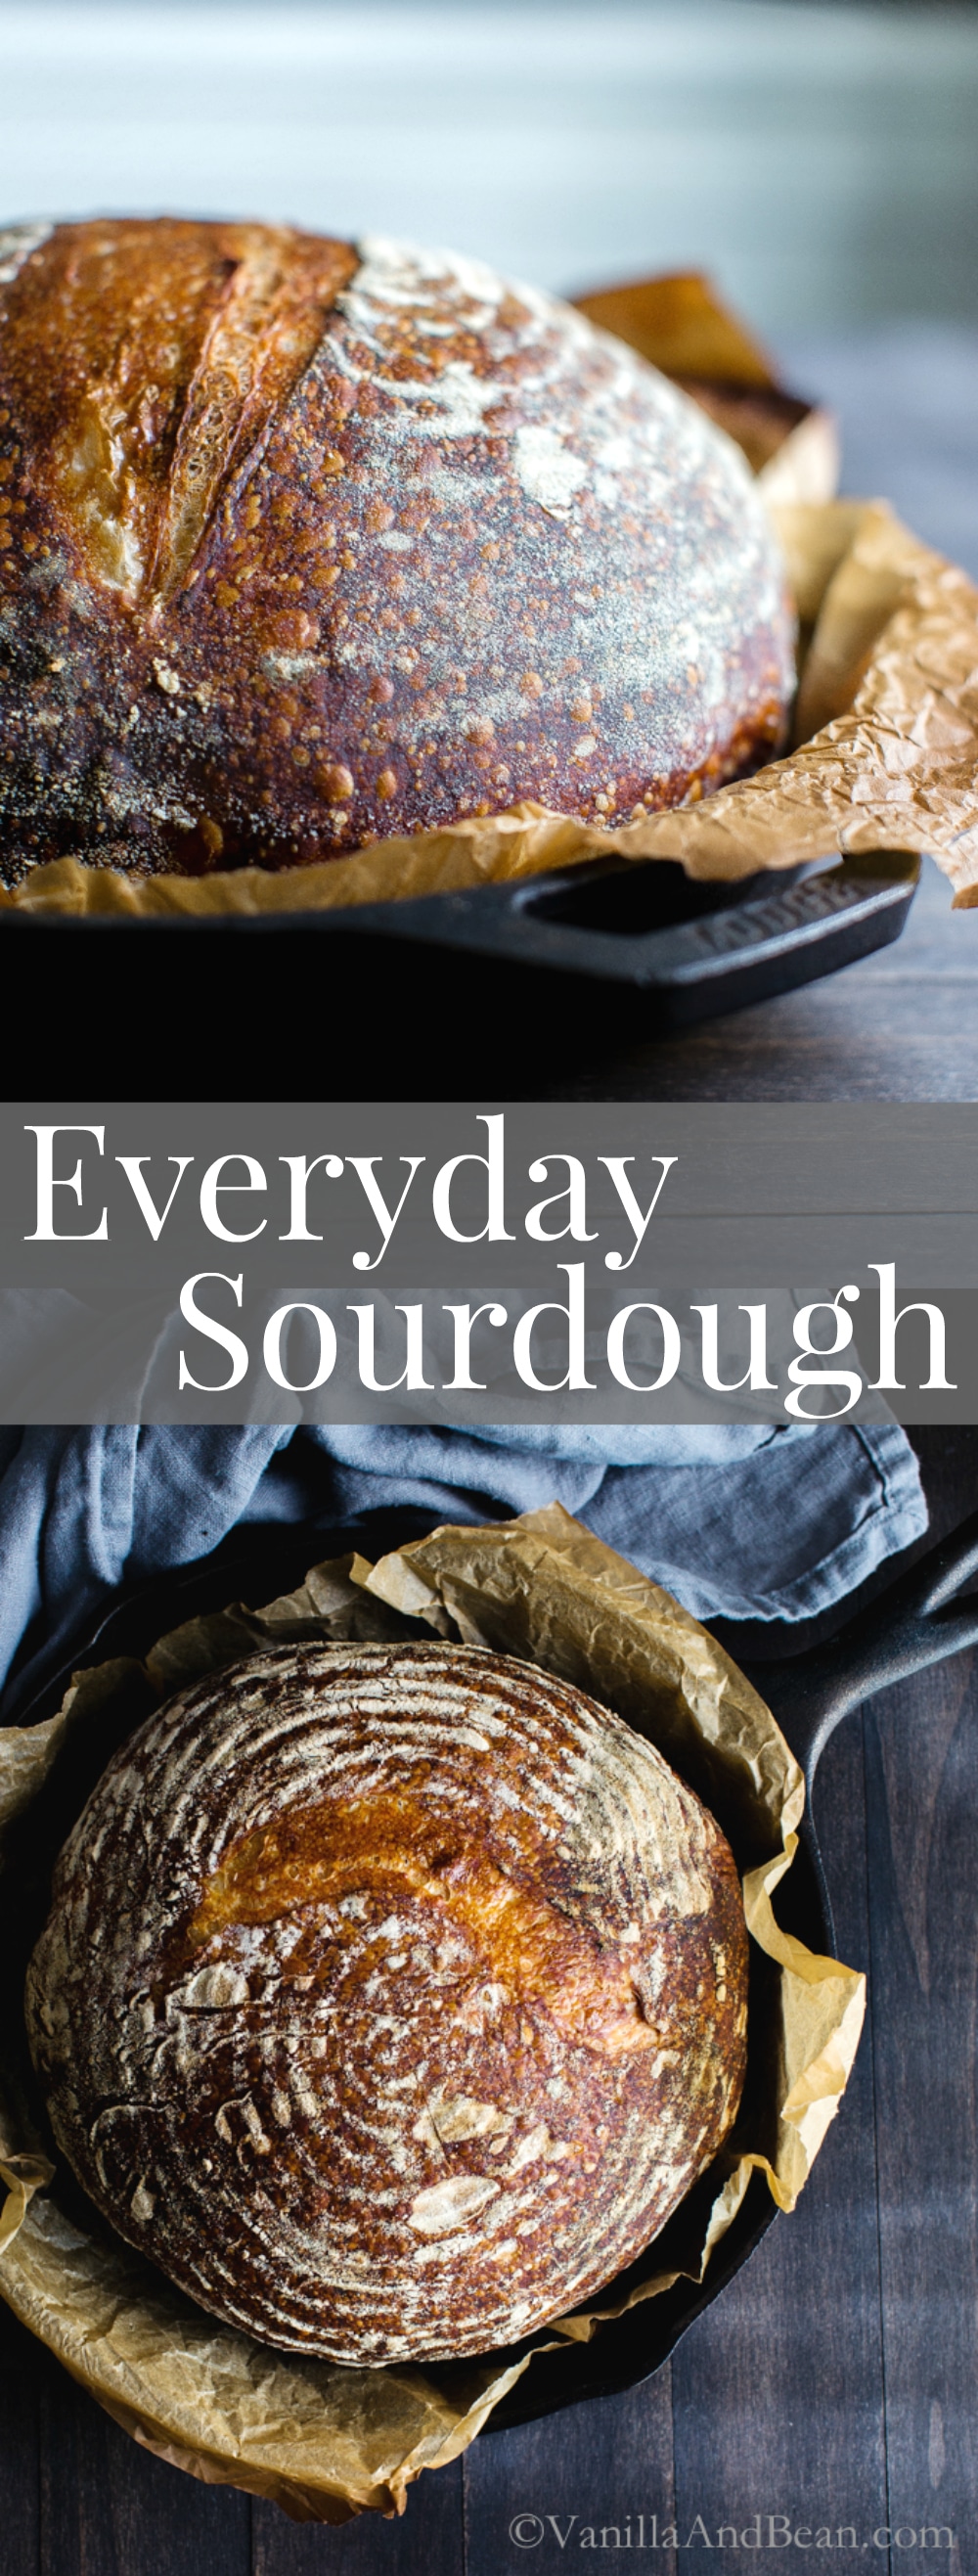
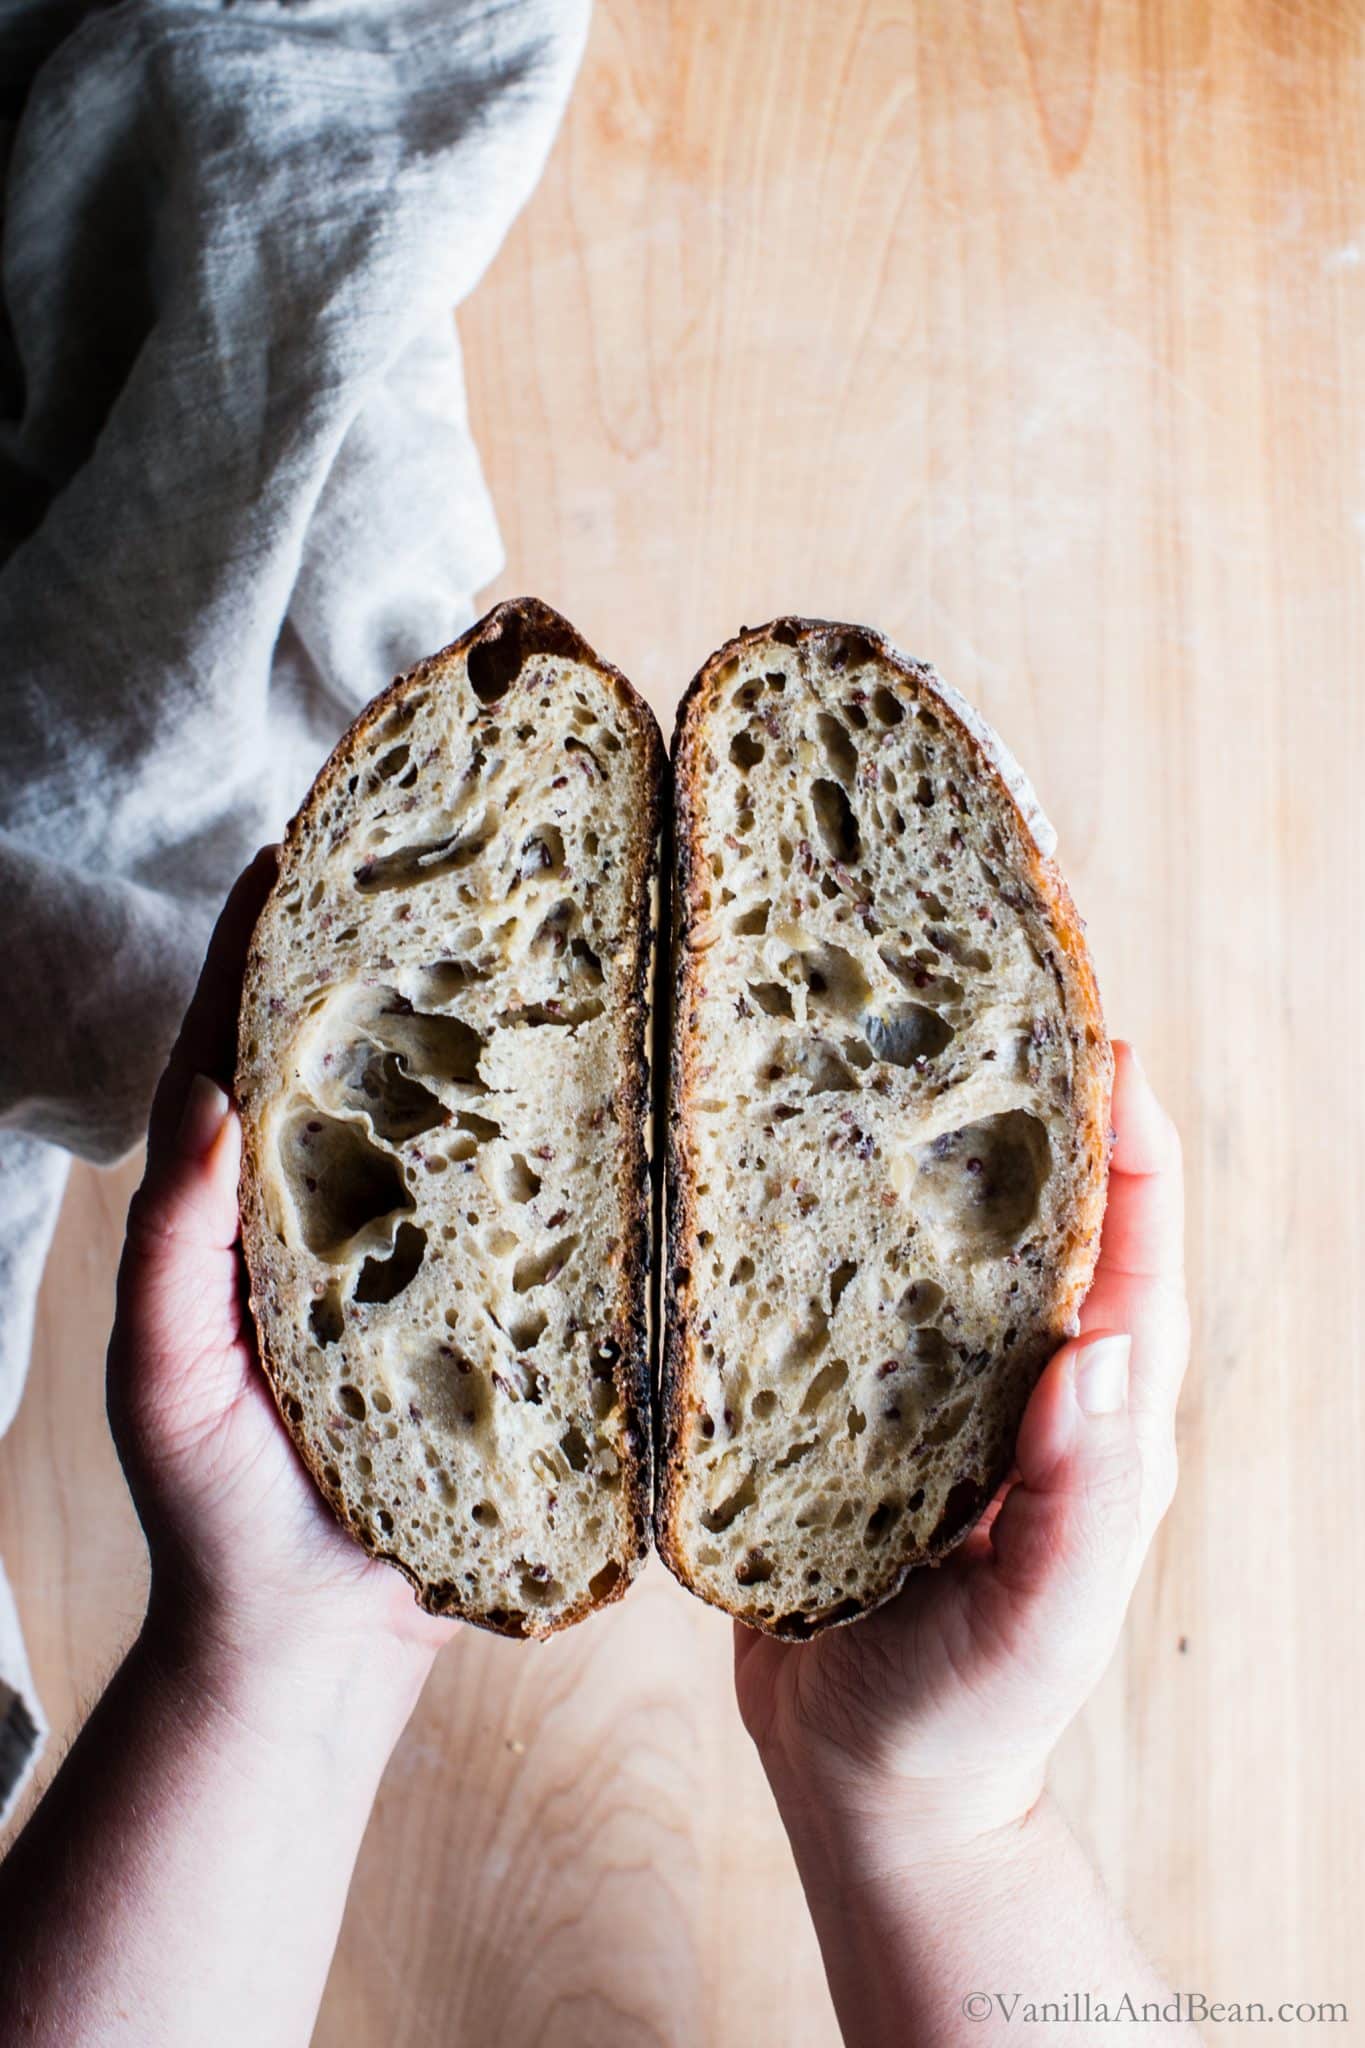
New to homemade sourdough bread or simply improving your craft? Everyday Sourdough from Emilie Raffa’s book Artisan Sourdough Made Simple is a fabulous starting point for new sourdough bakers or simply to hone your sourdough skills. DIY a Sourdough Bread Starter to create a beautiful wild yeast sourdough loaf!
Disclosure: I received a copy of Emilie’s new book and am thrilled to be able to share her book in this space (with permission). All opinions are my own.
A Sourdough Journey
Prior to going to pastry school, I’d never tried making homemade sourdough bread, although I had read books about it. Intimidated by the terminology, flours, feeding schedules, shaping techniques and knowing, I never took the time or had the courage to dive in.
During pastry school I worked with yeasted bread until I could make it in my sleep. But it was naturally leavened sourdough that mystified me. Only having a few opportunities in school to work with it, I never really gained the hands on knowledge I’d anticipated. So, I continued to read about it, gleaning little nuggets that would some day make me the bread baker I wanted to be.
related: make an Easy Homemade Sourdough Starter.
A friend of a friend offered some sourdough starter, knowing my interest. I promptly killed it after attempting sourdough again. Then, I carried some of my mom’s starter back to Whidbey with me after a visit to Texas.
I persisted, yet…
I couldn’t quite get the dough to its fluffy pillowy softness, the crumb to its tender-chewy texture, or the crust to its crusty bliss as I had tasted, seen in books, bakeries.
I tried again, still not producing the loaf of my dreams. Why is this SO hard?
I gave up sourdough baking early last winter with the hopes of starting again this fall.
Sourdough Success!
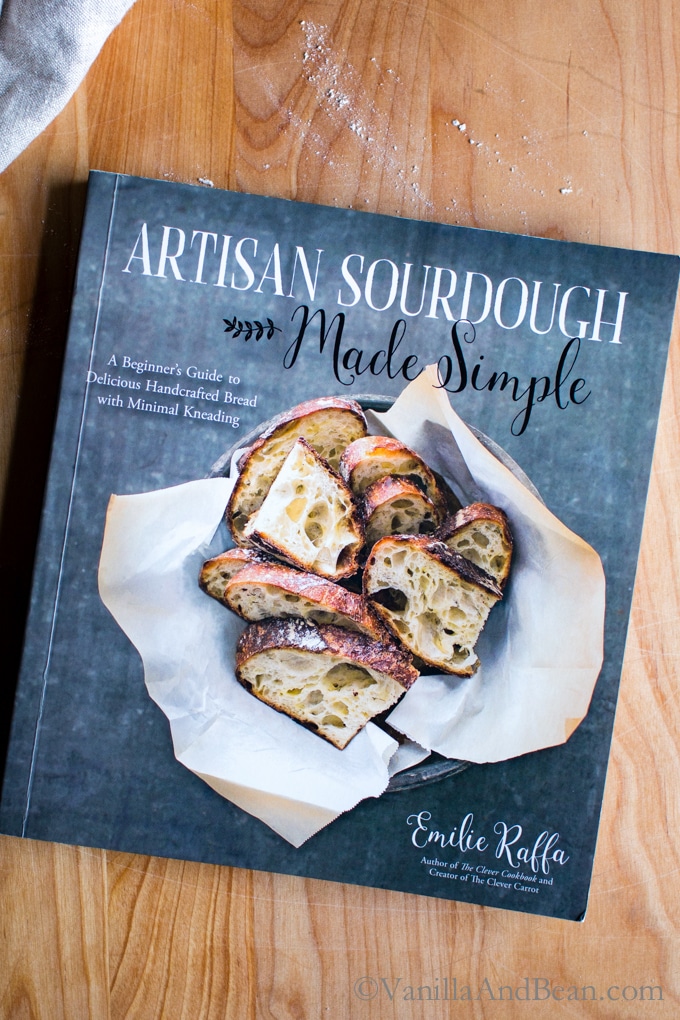
Enter Emilie Raffa’s new book Artisan Sourdough Made Simple. When I heard she was publishing a book on her sourdough method, I knew it would be my best chance yet to finally learn how to make the perfect loaf. I’ve been following Emilie’s blog, The Clever Carrot, for a while now.
After diving into sourdough again using Emilie’s thorough and approachable new book and in a short period of time, I can confidently say,
I am a sourdough baker.
Making everything from Sourdough Sandwich Bread, Sourdough Pie Crust and Homemade Sourdough French Toast to this simple Buttery Sourdough Discard Cornbread recipe.
And, you can do it too!
Artisan Sourdough Made Simple Includes
- Photography of every recipe
- Illustrations and photography for basic tools, handling, shaping, and scoring patterns
- FAQ section – so helpful
- Sourdough terminology – explained simply
- Good to Know tips in each section
- Sweet and savory loaves
I’ve baked three everyday sourdough loaves, and a cheddar-jalapeño chive loaf (omgeeee!), and made gruyere-chive crackers and waffles with leftover sourdough starter. I love them all and can’t wait to try her basic no-knead focaccia, mighty multigrain, and cinnamon raisin swirl among so many others. I’m just getting started!
An Essential Resource
Emilie’s book is for the beginner or more advanced sourdough baker. So if you’re just starting sourdough, intrigued or have been baking for a while, this book is for you. Her recipes are approachable, creative, completely mouthwatering and clearly written for success. Her photography and gentle nudges will inform and inspire you.
Looking for a delicious Multigrain Sourdough Bread recipe to challenge your bread baking prowess? Check out this reader favorite Seeded Multigrain Sourdough Bread.
My Sourdough Toolkit (affiliate links):
-
-
- 7 Quart Dutch Oven
- 10″ Cast Iron Skillet with Deep Dish Skillet for a lid
- Bench Scraper
- Parchment Paper
- Digital Food Thermometer
- Lame – for scoring the dough
- Banneton(s)
- Digital Scale
-

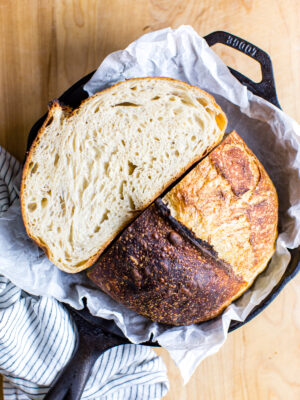
Emilie's Everyday Sourdough Recipe
Ingredients
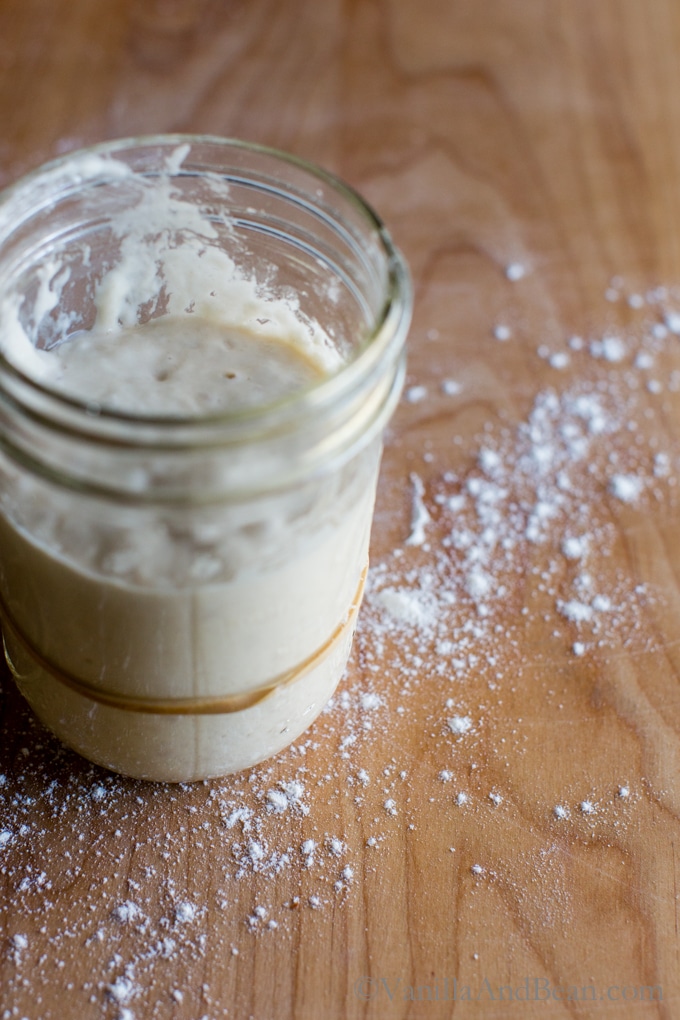
- 1/4 cup (50g) Sourdough Starter previously fed, active and bubbly
- 1 1/3 cup + 2 tablespoons (350g) Warm Water about 80f (26c)
- 4 cups (500g) Bread Flour
- 1 1/2 teaspoons Fine Sea Salt
Instructions
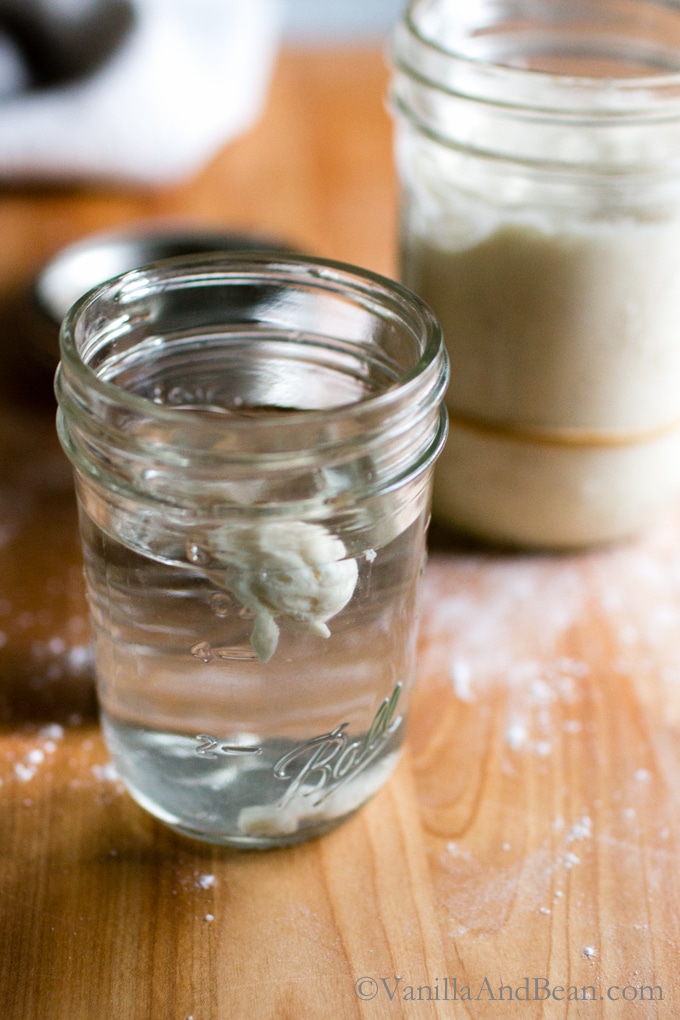
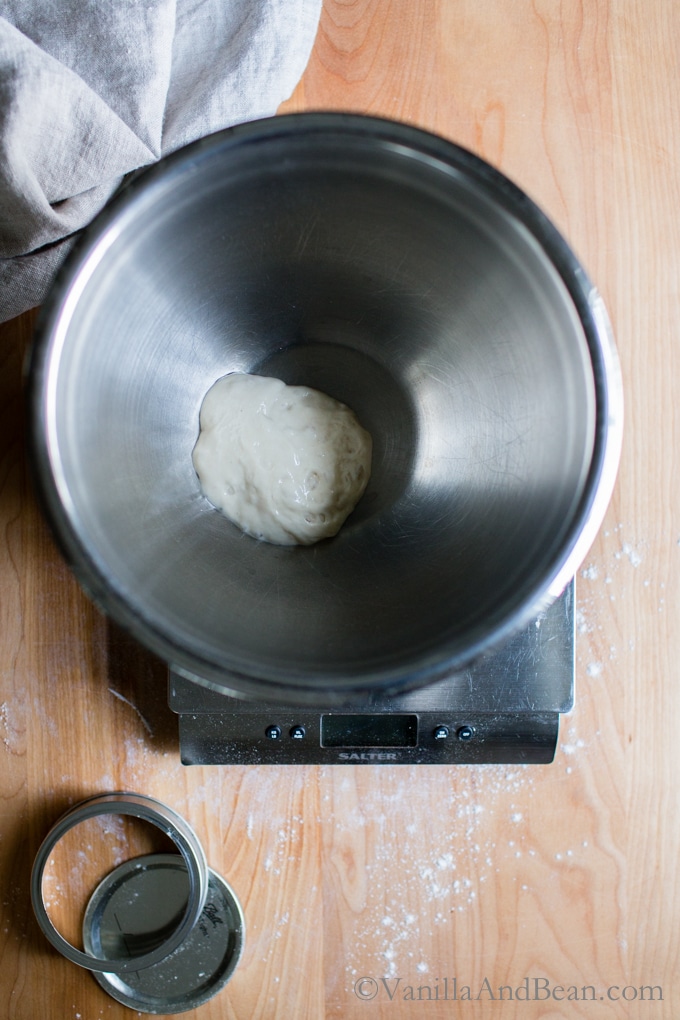
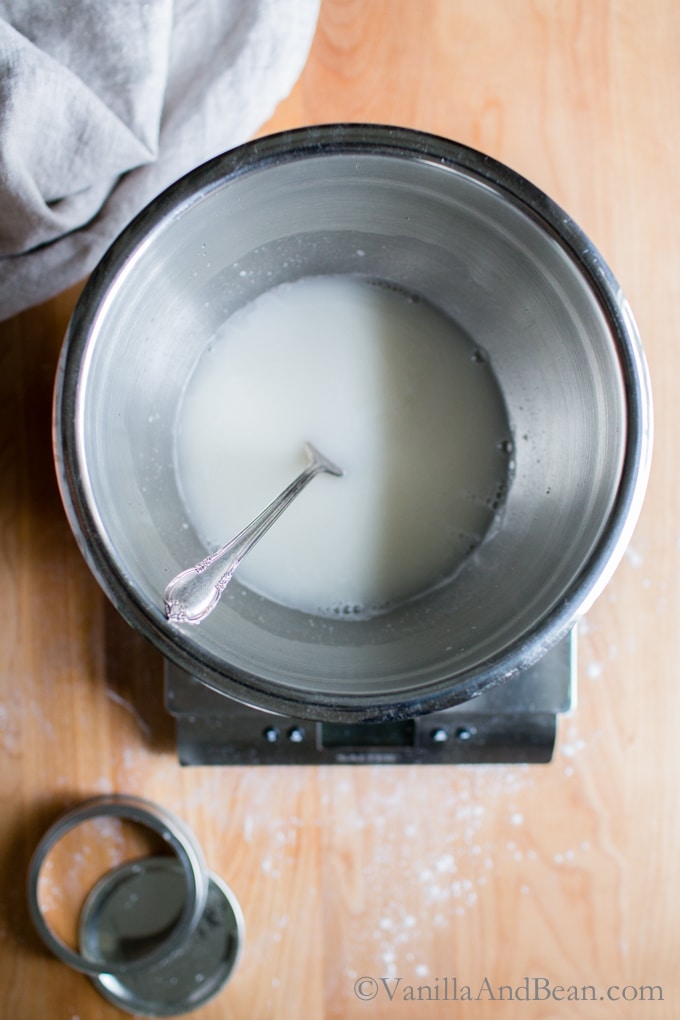
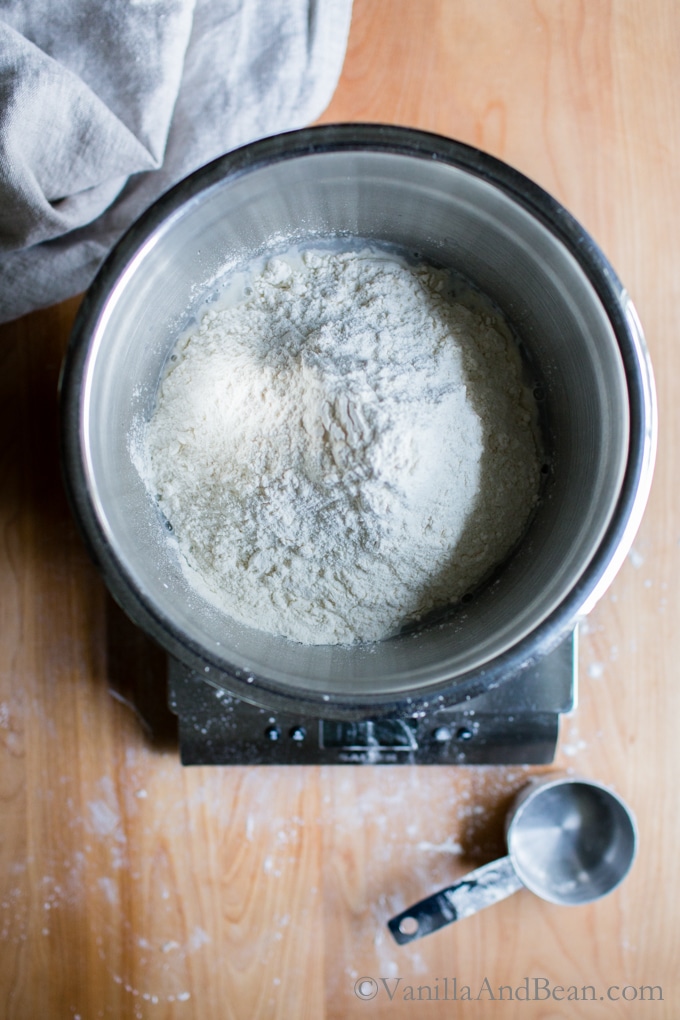
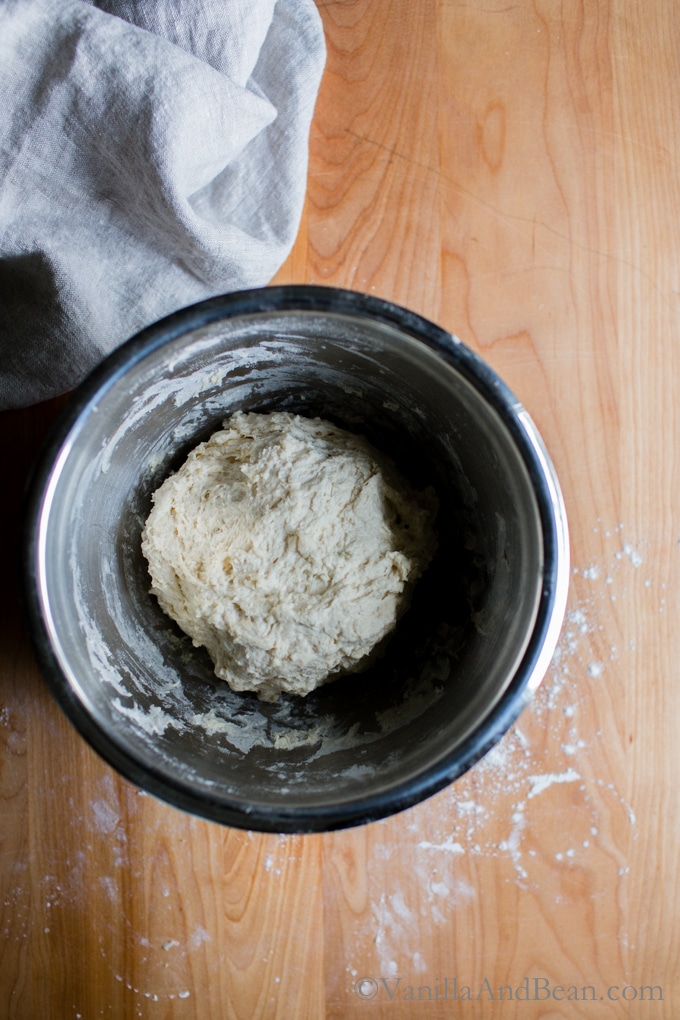
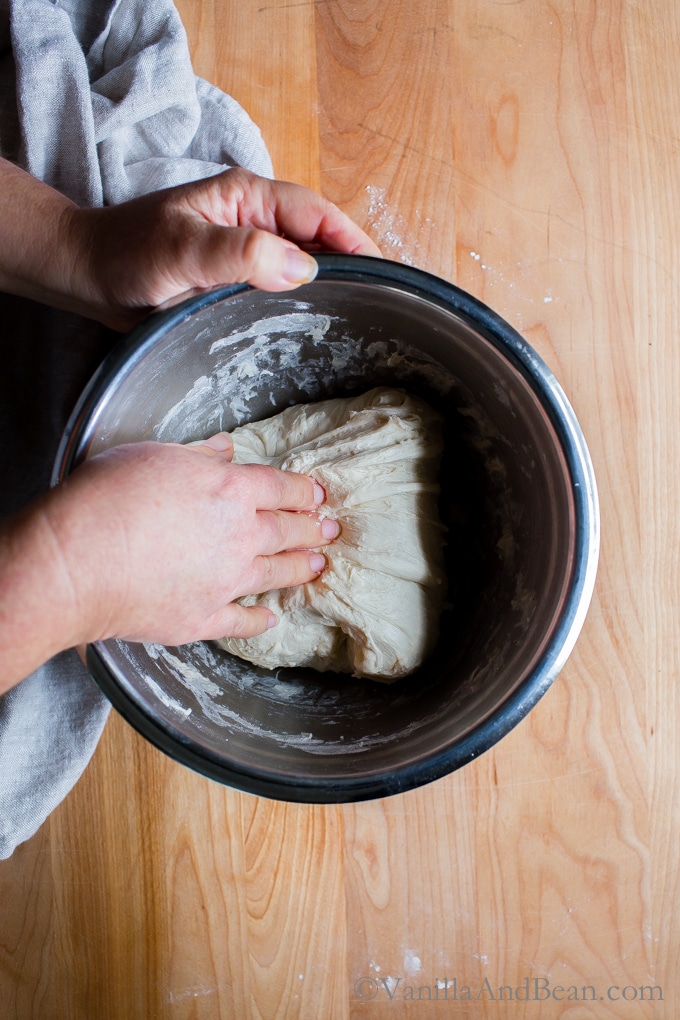
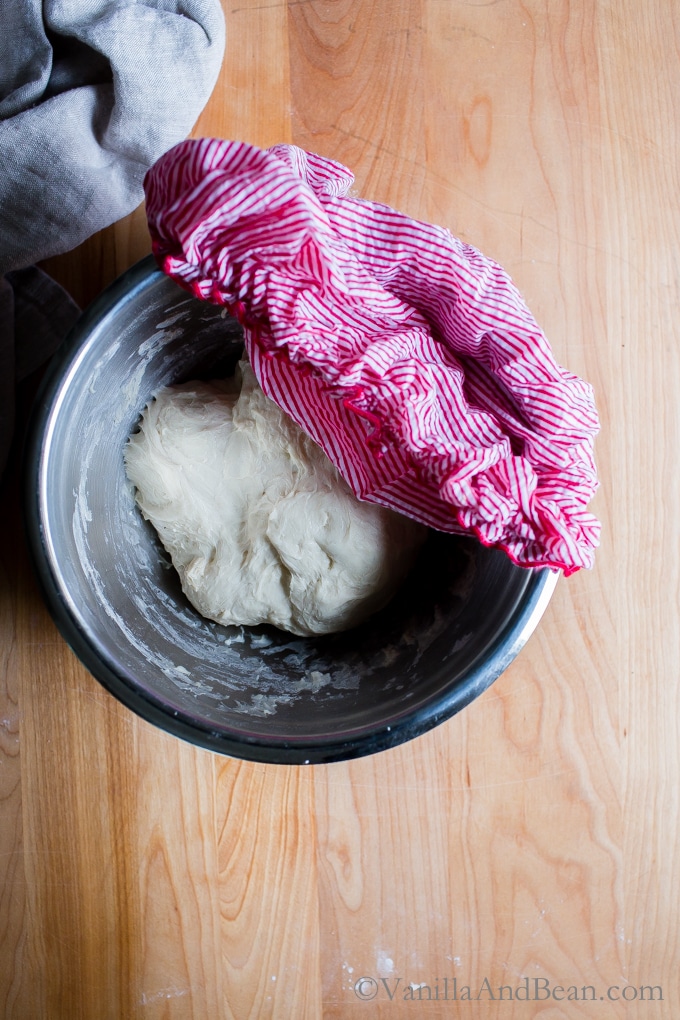
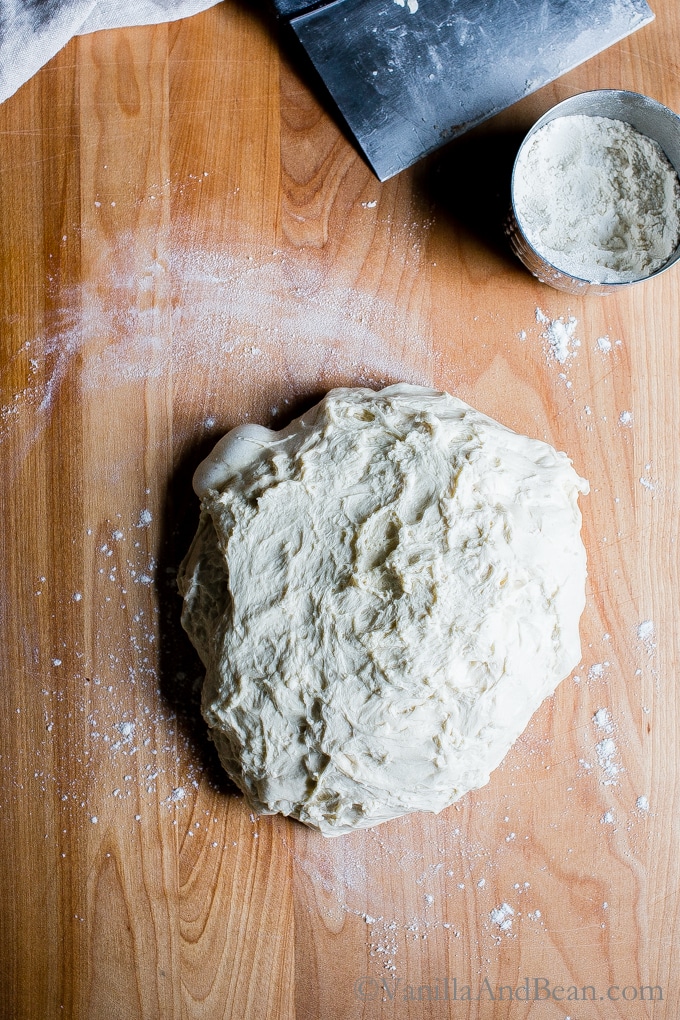
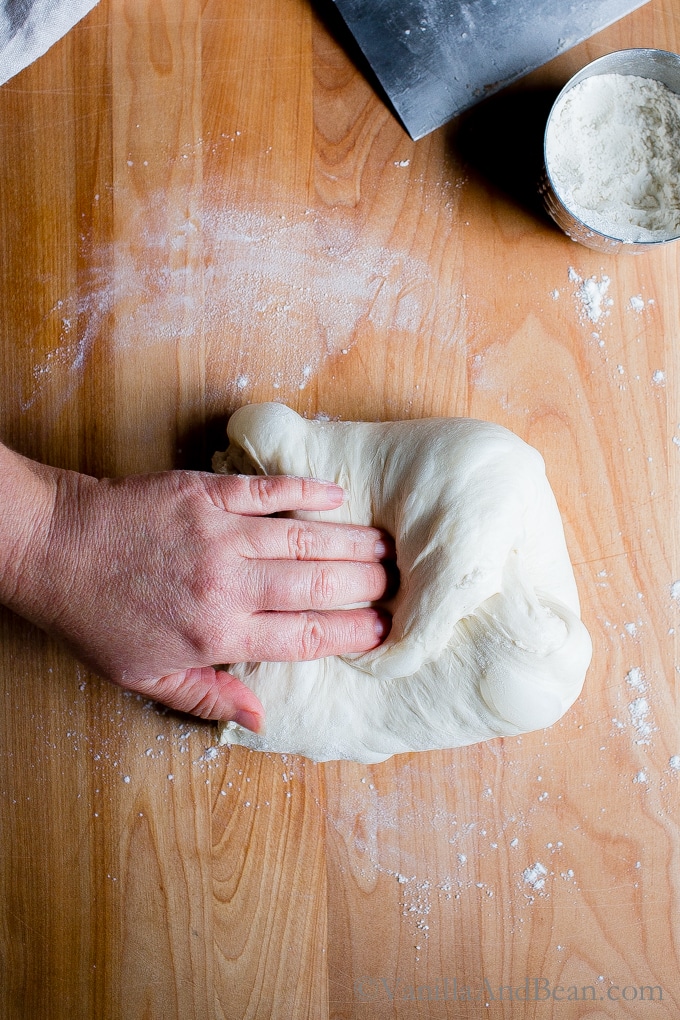
- Make the Dough: In the evening, whisk the starter and water together in a large bowl with a fork. Add the flour and salt. Combine until a still dough forms, then finish mixing by hand to fully incorporate the flour. The dough will feel dense and shaggy, and it will stick to your fingers as you go. Scrape off as much as you can. Cover with a damp towel and let rest for 30 minutes. Replenish your starter with fresh flour and water, and store according to preference. After the dough has rested, work the mass into a fairly smooth ball. To do this, grab a portion of the dough and fold it over, pressing your fingertips into the center. Repeat, working your way around the dough until it begins to tighten, about 15 seconds.
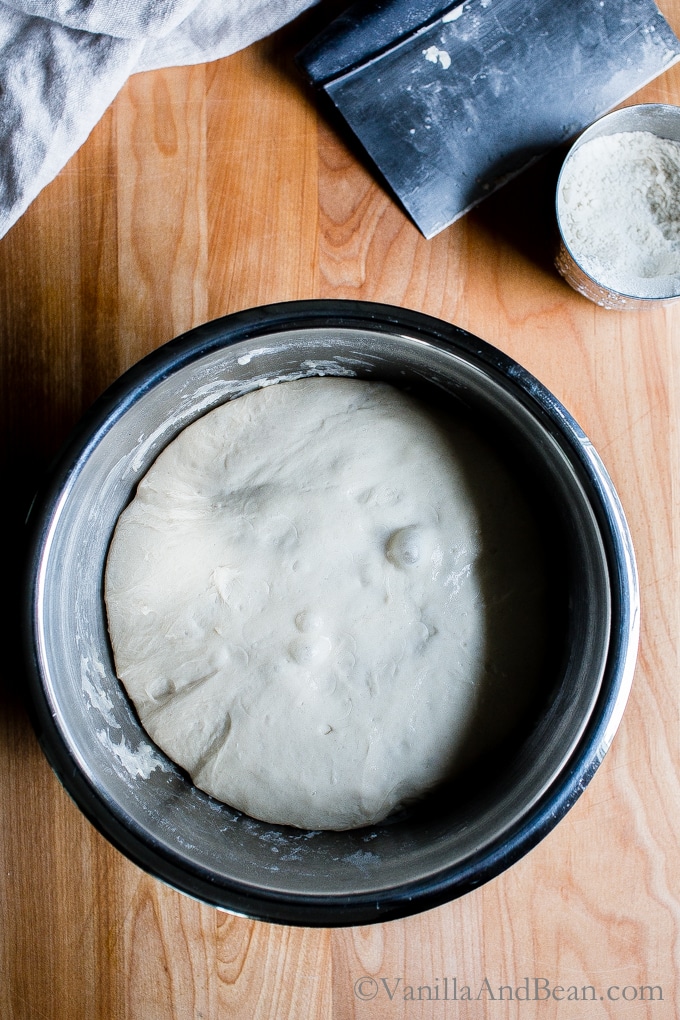
- Bulk Rise: Cover the bowl with a damp towel and let rise overnight at room temperature. This will take about 8-10 hours at 70F (21C). The dough is ready when it no longer looks dense and has doubled in size. (Traci's Note: Mine generally takes 12-13 hours to rise, but I have a chilly kitchen!).
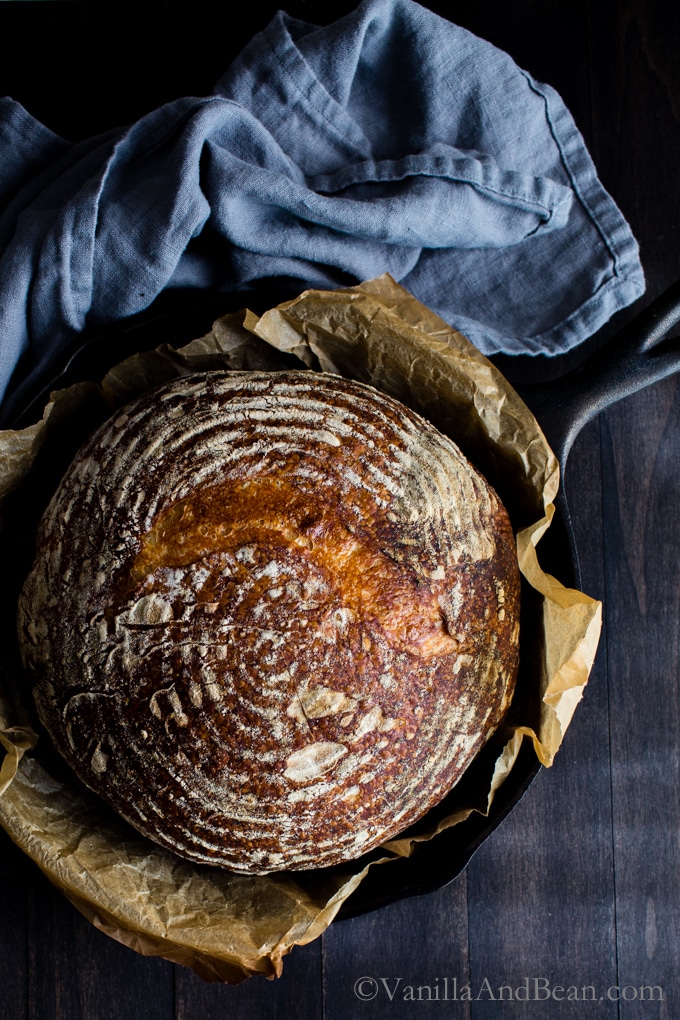
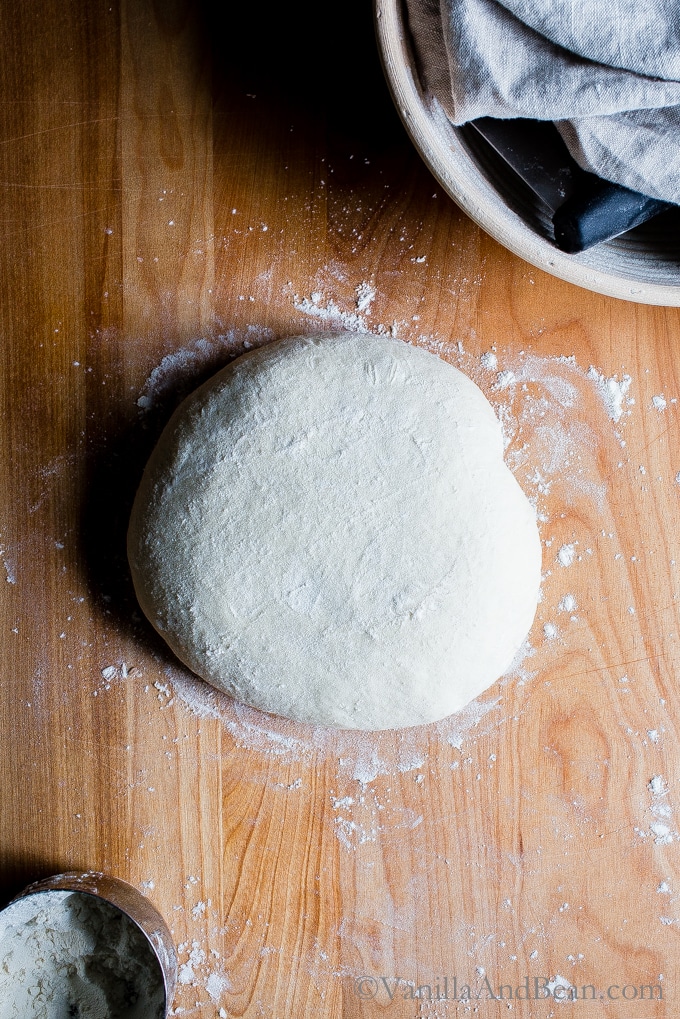
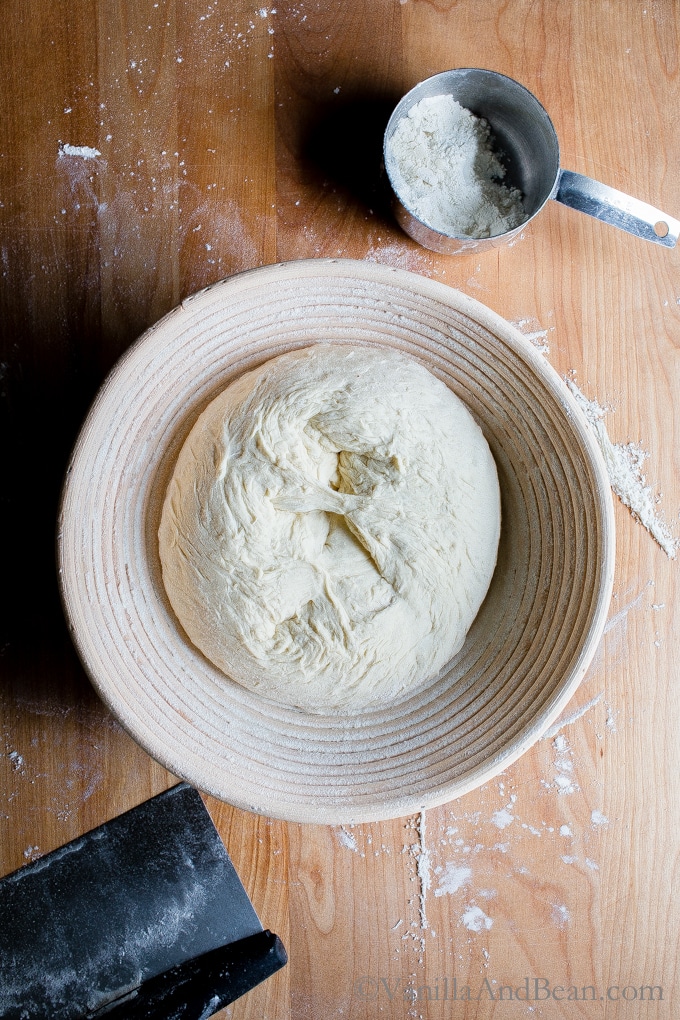
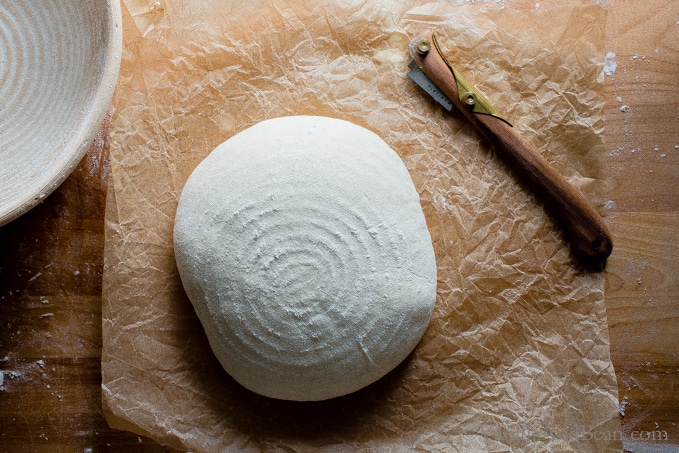
- Shape: In the morning, coax the dough into a lightly floured work surface. To shape it into a round, start at the top and fold the dough over towards the center. Turn the dough slightly and fold over the next section of dough. Repeat until you have come full circle. Flip the dough over and let rest for 5 to 10 minutes. Meanwhile, line an 8-inch (20cm) bowl with a towel (or use a banneton) and dust with flour. With floured hands, gently cup the dough and pull it toward you in a circular motion to tighten its shape. Using a bench scraper, place the dough into the bowl, seam side up.
- Second Rise: Cover the bowl and let rest for 30 minutes to 1 hour. The dough is ready when it looks puffy and has risen slightly but has not yet doubled in size. Preheat the oven to 450F (230C). Cut a sheet of parchment paper to fit the size of your baking pot leaving enough excess around the sides to remove the bread. **UPDATE (5.20)** Place a sheet pan on an oven rack directly under the oven rack you'll be baking the bread on. This protects the baking vessel from the intense heat of the oven and helps prevent a too-dark or burnt bottom. (See notes for more information).
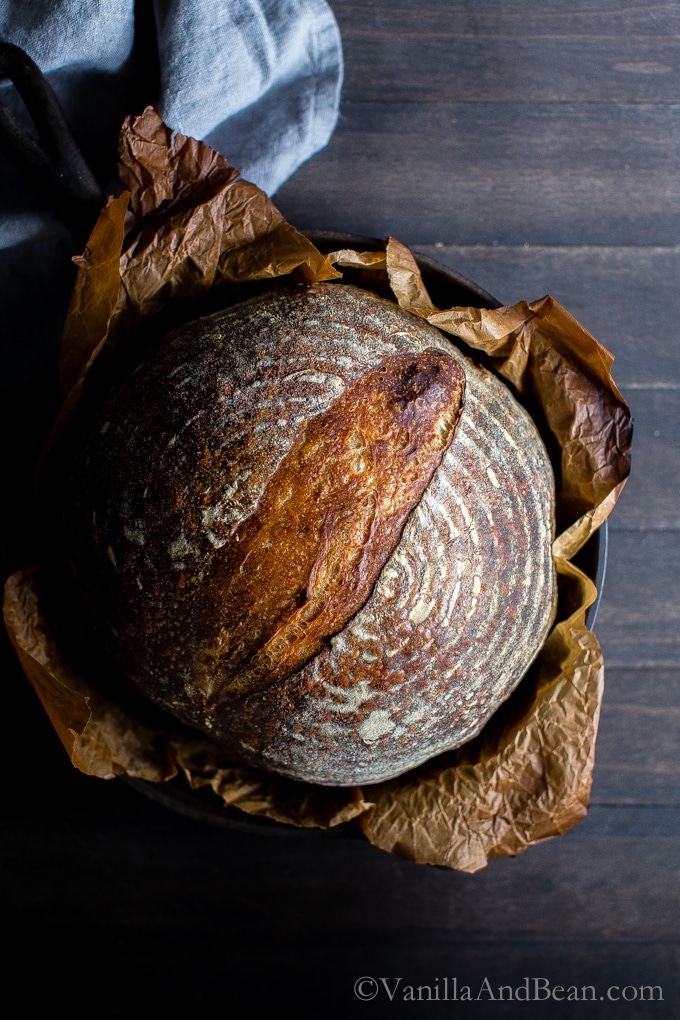
- Score: Place the parchment over the dough and invert the bowl to release. Sprinkle the dough with flour and gently run the surface with your hands. Using the tip of a small, serrated knife or a razor blade, score the dough with a cross-cut pattern about 1/3" (8mm) deep and about 2-3" (5-7cm) on the top or any way you like. Use the parchment to transfer the dough to the baking pot.
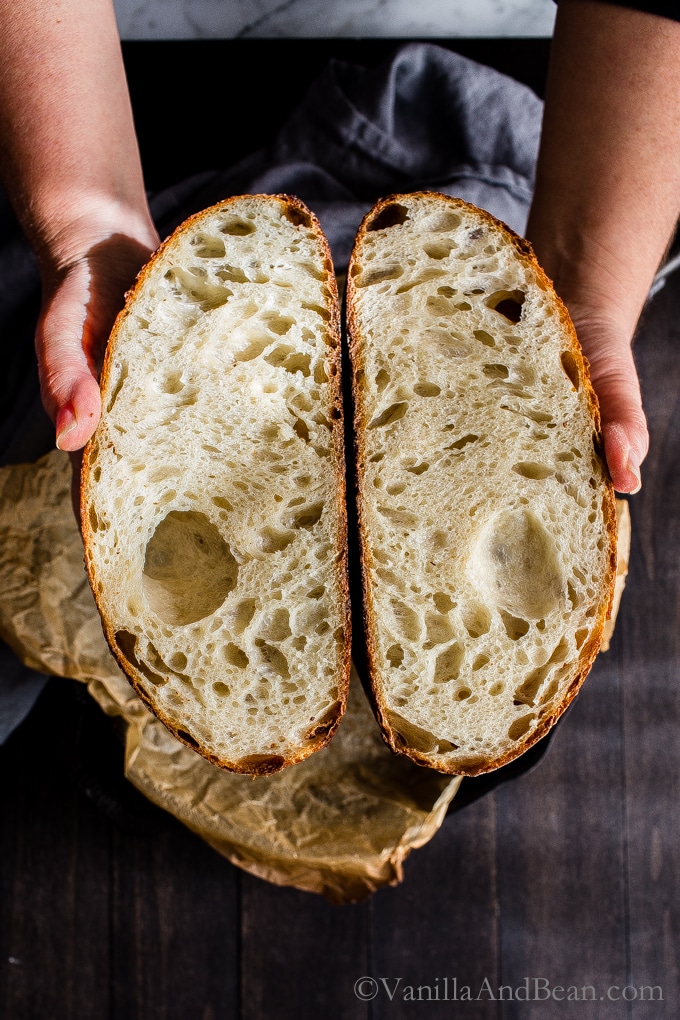
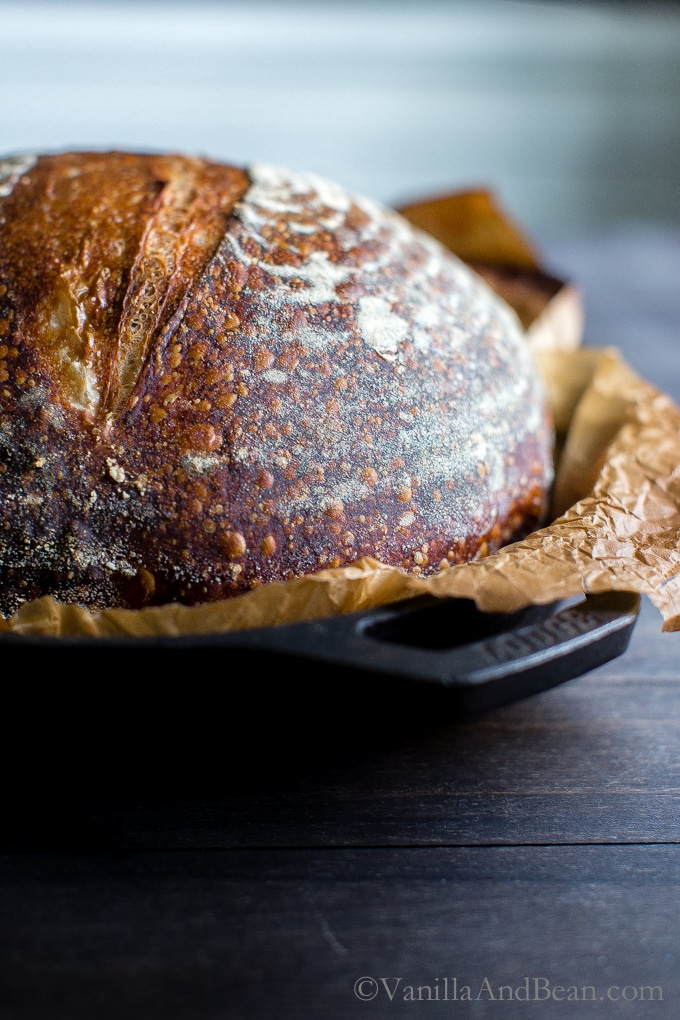
- Bake: Bake the dough on the center rack for 20 minutes, covered. Remove the lid and continue to bake for 30 minutes. Then, carefully remove the loaf from the pot and bake directly on the oven rack for the last 10 minutes to crisp the crust. (To check if the bread is ready, check the internal temperature of the loaf. It should read between 190F-205F when done.) When finished, transfer to a wire rack. Cool for 1 hour before slicing. Sourdough is best consumed on the same day it's baked. To maximize freshness, cool completely and store at room temperature in a plastic bag for up to one day (My sourdough is generally storing for between 3-4 days.)


I have made this recipe several times and when I share my starter with friends, I always give a cope of Emilie’s book. There are now 7 of us enjoying the fun of making sour dough!
Love hearing this, Marya, and what a wonderful (and delicious) way to friends together. Thank you for your note and giving the sourdough a go!
I have Emile’s book, I’ve followed her instructions for making the starter – my starter looks great the problem I’m having is that on the over night rise it’s not rising. I’ve made the first bread recipe in the book for beginners – too dense & I made the facacia – too flat & hard. What am I doing wrong – my starter is beautiful & bubbly.
Hi Nickie! Hooray for an active and bubbly starter! However, I know it’s disappointing when your bread doesn’t turn out. Can you tell me what the ambient temperature is of where your dough is rising during bulk fermentation? If your bread isn’t rising, and your starter is active, you probably need a warmer environment. Even a few degrees can make a difference. Also, if your bread is too dense, try letting your bulk fermentation go a little longer. If you like, you can use a glass vessel to let your dough rise, you can mark where it starts and monitor the point at which it doubles in size (like large glass cookie jar). This can give you a more accurate visual than allowing the dough to rise in a bowl because in a bowl, it’s more difficult to tell when the dough has risen enough. Beginning sourdough can be a challenge, but with practice, you will get the hang of it!
Hi,
My kitchen is in the mid 60 degree range at night – we turn the heat down over night. It’s on the cool side – should I put it in an off oven or microwave overnight?
Hi Nickie! That’s pretty chilly, so putting the covered dough in an off oven or microwave overnight should speed things up. Keep us posted, okay?
I’ve recently started making sourdough loaves following the precise instructions you provided, and I’m happy with the results. I use two baking trays under the Dutch oven to prevent the bottom of the bread from browning too much, and it works perfectly.
Now I’d like to add sun-dried tomatoes (and perhaps some olives) to my loaf, but I’m not sure at which stage of the process I should incorporate them. Any advice would be greatly appreciated!
Hi Elizabeth! SO glad you’re enjoying the recipe and process! To add inclusions to your dough here’s what you do. After the first 30 minute rest mix in the inclusion(s). To do this, add the sun dried tomatoes/olives to the dough in three additions. Dump 1/3 on top of the dough and begin folding the dough over and on top of itself, about four times. Repeat two more times until there are no remaining inclusions to add. Continue folding the dough, rotating the bowl as you go for about 2-3 minutes or until the inclusions are evenly distributed in the dough. The dough will become stiffer, and sticky. Cover bowl with a damp tea towel, set a timer for 30 minutes and allow the dough to rest for 30 minutes. I’d do at least one more fold after this.
So delighted with my first loaf of bread, thanks to your recipe!!!!!! I followed each instruction precisely and now I’m starting to prepare for my second loaf. A question, How much flour and water do I add to replenish the starter? Do I use the 1:1:1: ratio?
Hi Elizabeth! Thank you for sharing your success with your first loaf, and sending a smile! Hooray! You’re right about replenishing your starter. A 1:1:1 ratio is perfect. This will give you a 100% hydration starter. So excited about your second loaf!
Hi! I make this recipe all the time as-is and it always comes out amazing! My question is if I want to put it in the fridge when would I do that? I always let it bulk rise overnight on the counter and bake in the morning but there’s times when I might not be able to bake until the afternoon and I don’t think I should leave it on the counter that long…
Hi Kimberly! Thank you for your note and five star rating! SO glad you’re enjoying the sourdough. With a long overnight doubled in size rise, the dough will need a short proof (as your doing in this recipe). However, if you’d like more flexibility on when you bake, only allow the bulk fermentation to rise by 50-60%. This way, you can shape your dough, then proof in the fridge, proofing for about 12 hours or up to 24 hours. I find if I bulk ferment the dough to double in size, then proof in the refrigerator for more than an hour or so, the dough over proofs. Now, you can bulk ferment in the fridge, which can take a long time, but if my schedule gets thrown off and I’m in the bulk phase, I can put the dough in the fridge. Then when I’m ready, take it out and allow it to continue bulk fermentation, then shape and proof. I hope this helps, Kimberly!
About how long do you think it’ll take to reach 50-60%? Thank you!!
It will depend on how active your starter is and ambient temperature. In my chilly 68F kitchen this takes about 4-6 hours.
My best sourdough came out with this recipe. Will you post others with add ins for sweet sourdough and also chocolate sourdough? Other recipes don’t give me good results.
Hi Kim! Thank you for your note and requests (I really appreciate that!). I’m so glad you enjoying the everyday sourdough. I continually work on sourdough recipes and will keep your requests in mind. Have you seen my Cranberry Orange Sourdough Bread?
After mixing my dough and it was shaggy there was a ton of flour stuck on the edges of my bowl. Did I mess up?
Hi Kimmie! During mixing, the dough will be shaggy, but as you mix it, the dough will become sticky and the flour, fully incorporated. If the dough is still shaggy, you need to keep mixing. You will have some flour on the edges of your bowl, but it shouldn’t be a ton. Be sure to refer to the images in the blog post for what the dough should look like after mixing. Please keep us posted, okay?
I’ve made this recipe several times now and it’s quite nice. I’m using a mixer to kneed and my texture comes out with less large bubbles but it’s always moist and springy. I’ve had to adjust my times and temp I have a convection oven and also use a Dutch oven with legs. I’m going 400f for 20 min covered 10- 15 min uncovered and 10 in the rack. I get a crispy crust that cuts easier. I also cut a disc of corrugated cardboard covered in several layers of foil that fits my Dutch oven and the bottom comes out very nicely no burning.
Hi again, my house is not 70° at night. Usually about 66°. Any ideas how to keep my dough warm enough?
Hi, I got your book for Christmas and I’m so excited to make this recipe. My question is, “what size Dutch oven do I use? I was also gifted a 2 qt. Dutch oven. Will it be big enough? Thanks.
Hi Tonya! Traci here… you’ll love Emilie’s book! I just shared a recipe from it here, on my website. I wouldn’t use a Dutch oven smaller than 5 quart for this boule. I use a 5 or 7 quart. You can ferment your dough at 66 degrees, it will just take a little longer to double in size, about 12-14 hours (similar to my kitchen). Some bakers put their dough in a turned off oven with a light on, and this can speed up fermentation. How much will depend on temperature and starter/dough activity. But it’s a balance between speed, dough characteristics and flavor. Keep us posted, okay?
Can you use a type of gluten free flour if you are gluten free?
Hi Laura! Most likely you’ll need a different recipe. I have a Gluten Free Sourdough Recipe and GF Sourdough Starter that may be helpful!
Love this recipe! I’ve made it several times and each time my bread has had the best flavor and crumb. It’s not as demanding as some recipes
Love the recipe! My go to sourdough recipe, yummy, moist and crusty! Thank you
Hooray! Thank you for your note, Abir!
Traci, I just wanted to update you as others were also asking about bulk mixing/baking. I made 8 times the recipe and had a great result. I used it for baking sourdough bread and some for sourdough pizza. All came out beautiful and delicious! thanks
I love this recipe!! Wondering if I make large bulk batches if I would just double, triple, quadruple, etc all ingredients equally so I could use a bin as opposed to individual mixing bowls
Hi Levi! SO happy to read your note. Thank you for sharing your five star rating with us! I’ve doubled this recipe before, but haven’t taken it further. I can’t imagine making larger batches would need too much adjusting. If you do it, just watch the hydration holding out some of the water, then mixing it in as you go, depending on how the dough feels.
Great easy recipe. To combat the dark bottom, I put a silicone Matt in the bottom of the Dutch oven before putting the parchment paper in. Works perfect.
Hii Anastasia! Thank you for your note, rating and tip about a silicone matt! So glad you’re enjoying the recipe.
Used this as my “lazy man’s” first recipe, with some modifications. First, I used half bread flour and half white whole wheat flour, and reduced the salt to around half a tsp (because I’m watching my sodium). I followed the directions as written for the first rise–which was substantial from the initial assembly (around 10 pm) to the next morning (around 8 am or so) in a fairly warm kitchen.
Here’s the “lazy man” part: After the “pull and fold” the next morning, I had a well-floured ball of dough. I then cut the dough into two pieces and formed them into two somewhat elongated loaves. I placed the loaves on parchment paper on a baking sheet, slashed the tops, and let them rise for an hour or so until nice and puffy. I then baked them at 410 F, starting in a cold oven (yes, I know this is heresy, but it worked fine, and it saves energy), for about 35 minutes, until the loaves were well-browned and sounded “hollow” when you knocked on them.
Note: These loaves did not have big sourdough “holes” in them. To get them, you probably need to do more of the “pull, stretch, and fold” process in the first hours of proofing, and you might also need to have a somewhat more hydrated dough. Also, not using a dutch oven resulted in a crust that was not super-crispy-crunchy (I actually prefer the crust that way). If you wanted a more crispy crust you could try spraying the loaves with water before baking, or putting a pan of hot water on the bottom rack of the oven.
In any event, you might give this a try if you want a super-no-muss-no-fuss first attempt at a sourdough bread.
Hi Richard! Thank you for sharing your “lazy man” notes with us and review! Going to try that cold oven start!
After rise there is skin on top of dough. Should I use olive oil in bowl?
Hi Bill… that means it dried out a bit. Be sure your tea towel is moist for the duration or use plastic wrap to cover the bowl. There’s no need for olive oil.
Can you tell me if the skin is after bulk fermentation or proofing? If after bulk, it will be folded into the dough when you pre shape. If after proofing, just score and bake. Please keep us posted.
Hi there! I was gifted this book about a year ago from a bread baking friend (and many failed attempts at making sourdough!). It’s the only book I use now after making many, many loaves of bread from this book. For anyone having issues with the bottom burning, I have the solution! (I researched it myself when I was having the same issue). The solution: Put aluminum foil on the rack under your pot. Works like a charm by diffusing the heat. :) Hope it helps someone out there.
Thank you for sharing your tip, Lisa!
Finally it worked and I got a beautiful loaf. I did have to cut the last 10 mins of baking to 5. After 4 weeks of trying to get my starter to double, it was bubbly, smelt good, I was testing my yeast for another recipe, I decided instead of throwing the test away I added it to my starter and voila my starter took off and is doing great.
First time making this recipe, using a new Dutch Oven (5 qt) and I couldn’t really be any more pleased! I used the baking sheet below it, and it turned out fabulous! I probably scored a bit too deep but it is still beautiful and tastes perfect.
Super happy to read your note, Barb! Thank you for coming back and sharing your thoughts and rating. I’m thrilled that you’re pleased with the sourdough!
Hi Traci, I love your recipes, even though I am struggling with the everyday sourdough being too dark and too fast. Maybe the reason is that I am trying to make a honey wheat sourdough boule from it. Can you please post a recipe for a honey wheat sourdough boule? There is not one recipe on the internet. Thank you Denise
PS I use 100g WW flour 400 Bread flour and mix 1/8-1/4 c honey in the water and starter
Hi again! I see now why you’re having issues. Your review is for a different, adapted whole wheat and honey recipe. Honey will make sourdough brown more easily, and whole wheat bakes darker due to the nature of whole grain. This could be the culprit, but above all, an oven thermometer (even on a new oven) goes a long way to confirm accurate oven temperature. I’m actually working on a honey wheat sourdough, although It’s sandwich bread, I’ll give a boule a go next. Until then, try reducing your oven temperature by 25F.
The baking times do not work. I am good at making Sourdough and Love Vanilla Bean’s recipes but this recipe came out burned in 40 min. Covered 20 min, uncovered 15 min of the 25 and it’s burned. So I tried 20 covered, uncover 10, and then 8 min with no pan to crisp the crust and in 8 min it burned.
Hi Denise… oh no! I’m sorry to hear your bread isn’t turning out. I’m curious about your oven… Are you able to employ an external oven thermometer to check for accurate oven temperature? Is it possible the thermostat is faulty? Also, I’m curious about the interior of the bread… is it reaching 190F – 200F?. If so, you can try placing a piece of foil over the loaf after removing the lid (and also place a sheet pan on the oven rack below your baking vessel). With a little more information, maybe we can figure out what’s happening together. Let me know, okay?
It is a newer gas oven so temp is good.
Also, Traci, I make all kinds of amazing sourdough recipes. But this is the only one that is challenging. I keep making it to figure it out. And the inside thermometer of the middle is 185oF
I avoid the too dark by lowering the temp after 20 to 425… I also keep the lid on for all but the last five minutes or so… for an even crispier crust… once removed from the pot, I place back in the oven for five min with the door slightly ajar
Thank you for sharing your tips, Cyndy!
I have made this several times and it always comes out great. I would like to experiment with making this gluten free. I have your gluten free sourdough starter ready but looking for what substitutions to make.
Hi Leslie! So happy to hear you’re enjoying the sourdough and you’ve a gf starter ready. If looking to make a gf loaf, you’d need a different recipe entirely. Have you checked out my Gf sourdough bread recipe? https://vanillaandbean.com/seeded-multigrain-gluten-free-sourdough-bread/
I have made sourdough bread using this recipe nearly every week for a few years now and I find it the most versatile and most simple recipe to easily make bread weekly. But I too have had the burnt bottom issue. I live in South Los Angeles and I found that for my particular oven and kitchen, 450° is too high of a temp to bake this recipe at. The bottom burns, and the inside stays a little gummy. So I reduced the temp To 425°, reduced the amount of water in the starter, and allowed a longer bulk rise (18 -20 hrs) and then the bread performed much better. I think that adjustments just have to be made based on where you live altitude/humidity and how your particular oven performs. For me reducing the baking temp solved the burnt bottom issue and also cooked of the inside of the loaf more thoroughly. The other adjustments helped with the spongey-ness of the bread.
Hi Stacy! Thank you for your note and sharing your tips. No doubt adjusting for oven, altitude/humidy is super important. SO happy to hear you’ve tweaked the recipe to fit your needs. Hooray for a fabulous loaf!
I just want to let you know that I have been making this bread recipe during the pandemic and I love it. It took me a couple of times to make it before it came out looking normal . Thanks for this. I’ve tried other recipes on Pinterest and for me this is the best.
SO happy to hear Viki! Isn’t Emilie’s method the best? Simple, straight forward and with consistent results! SO happy to hear you enjoying fabulous homemade sourdough. Thank you for your note.
Really dumb question re: transferring the unbaked loaf to the pot with parchment. Do you slide the dough off the parchment and into the pot, or do you lower the dough into the pot still on the parchment and bake it with parchment still underneath?
Hi Stephanie! No question is a dumb question. I’m happy to help! Use the parchment as handles to lower the dough into the pot and bake the sourdough with parchment still underneath. I hope this helps and you enjoy the sourdough. Keep us posted!
Thank you Traci! Just set the dough aside for the bulk rise…can’t wait to bake tomorrow!
Keep us posted Stephanie!
Thank you for your comment re the baking sheet on the rack under the Dutch oven.
I am so proud to say, I am now a sourdough baker too! I spent years baking bread every week with a seeded no-knead recipe but always thought sourdough would be too advanced for me. No longer! I used Traci’s guide to making a sourdough starter and then tried this recipe, and while it turned out okay but rather flat the first two tries, on my third try I added a little extra water after reading Tracie’s note on a comment that a higher hydration dough results in more air holes. Although the dough was very wet and a little messy to work with, I got a beautiful and very airy loaf with a wonderful sourdough flavor! (I also invested in a scale and I think the more accurate measurements helped too!) I have a chilly kitchen too and my dough seems to enjoy spending the night on top of the radiator. A damp towel dries out too quickly with this approach, so I got a mixing bowl with a tight fitting plastic lid and that has worked fine. I can tell that my starter is developing a stronger flavor with each week so I’m excited to see how the taste of my bread continues to evolve! Thanks, Traci for this approachable recipe!
Hi Mary! What a fantastic feeling! Hooray! So happy to learn of your success. It’s such a rewarding journey! A kitchen scale is your best sourdough friend (and all baking!). Higher hydration is more difficult to work with but oh my those lofty holes are worth the effort.
Not really reliable recipe. Converting 1 1/3 cups and 2 tbsp of warm water to grams gives 310gr. Not 350 as mentioned. 40gr of extra water may give the wrong result.
So which one is it the better? The cup measurement or the good ol` reliable Eu Gram?
Hi Chris! Did you try the recipe? Not really reliable? The Eu Gram is always more reliable in baking. Reason why professional bakers always weigh their ingredients. I offer volume measurements for those that do not use or have a scale – I always weigh and measure all my recipes offered here on the blog. Because there’s no standard for volume measurements, you’ll notice measuring cups vary from brand to brand, whereas a gram is a gram – always more accurate. Last, in bread making, the recipes are pretty flexible. Dough too dry, add a splash of water. Too wet, add a bit of flour. It’s a little like cooking with spices. I hope this helps!
I got much closer to perfect sourdough than with any other recipe. Practice, practice, practice
Hooray, hooray, Brushjl! That is SO good to hear. Yes, practice practice…. (!!).
I’ve baked sourdough bread using this recipe at least 15-20 times. The first time, with a young starter it came out very good, and as I have gotten better at baking and as my sourdough starter has matured, it keeps getting better and better. Thanks for posting this and getting me started on baking again! This is a very approachable recipe for a beginning baker and the result is a loaf that would make people think it was made by a pro!
Hi Nathan! Thank you for your note and sharing your experience. I love reading that your sourdough just gets better and better. It’s the true nature of sourdough! And to see all this unfold before your eyes is so exciting and encouraging. After-all, you ARE a pro now!
Hi! I’m not a beginner sourdough baker but no expert either. I’ve used The Perfect Loaf recipe that is similar to Tartine’s and just found it too fussy. This recipe was easy, absolutely delicious and looked like it was from a pro bakery. I baked it in a Lodge pot. Next time, going to add a little wheat flour to it…. Thanks!
Hi Mimi! Isn’t Emilie’s method SO approachable? Easy, straight forward and with such beautiful results. SO happy to hear you’re enjoying the recipe!
Do you preheat with the dutch oven in there as well?
Hi Mith! I do not, but feel free to if you like.
Thank you so much for posting this. I baked a loaf this morning, and it is by far my best loaf yet. I did pretty much everything the same as I have been doing, except I let if ferment I. The fridge overnight, then brought it up to room temp before baking today. The other difference was using a damp towel to cover it. I think the dampness was the key to finally having a great loaf. Thanks again!
Hi Kathleen! Thank you for coming back and leaving a note. So happy to hear this is your best loaf yet! Hooray! Indeed, a damp towel does wonders to keep the dough nice and moist!
I love this recipe! It is easy and has given me a good result nearly every time. Thank you!
SO happy to hear Paula! Thank you for your note and giving the sourdough a go!
Hello, I had a strange problem the second time I used this recipe. The first time I used it, it worked perfectly and produced the best loaf I have ever made – it was amazing! But the second time, immediately upon mixing the dough (I followed the recipe exactly again) it was VERY wet and did not form a shaggy dense dough at all. It was like pancake batter! So I added a bit more flour, but it was still super gloppy and wet. I continued on with the recipe as written as I thought it might work out, but the dough stays really sticky and wet the entire time and was a flat mess when I pit it in the oven. Needless to say it did not rise and was a sad loaf. I have dealt with gloopy dough before with different recipes but they all seemed to work out when they baked. This did not. Any suggestions? It has been hotter than normal, but not ridiculously hot in my kitchen. Maybe around high 70s. My starter has also been peaking really quickly, like within 5 hours, but I usually don’t feed in until about 10-12 hours. Maybe that caused the wet dough? Really weird. Please help! Thanks.
Hi Michelle! I’m sorry you’re having difficulty. There are several factors that come to mind: Flours vary in their moisture content from brand to brand. Additionally, local humidity conditions will impact how your dough feels from one batch to another. Feel free to adjust the water or flour as needed. If the dough feels a bit too dry, try adding a teaspoon of water (more if needed). Too wet? Add more flour, a little at a time. You can also hold out a bit of water as your mixing. Even if you weigh your ingredients, this is not uncommon. As you gain experience in making sourdough, you’ll gain a better understanding of how your dough should look and feel. I hope this helps!
This evening I am going to make my second batch of sourdough bread utilizing your recipe. The first time turned out perfect. I have a fairly new starter so the “ sourdough “ taste was not as pronounced, but I know that will come with time. Easy and straightforward recipe. Definitely a 5 star recipe. Thank you for a great recipe.
Hi Connie! Thank you for your note. I’m so happy to hear of your success! Isn’t Emilie’s method so simple (yet effective!)? To get more sourdough flavor, you can try prolonging the bulk fermentation by putting the dough in the fridge (with a double moist tea towel on top) for 8-10 hours, then pull it to room temp to double in size. Please keep in touch!
Hi, I’m new to sourdough making. All the other sourdough recipes call for the dough to be kneaded for about 10 mins or until you create the ‘window pane effect’ You’re recipe doesn’t Say to knead for that long only 15 seconds and then shaping after the rise. Is this the case or have I read it wrong? Thank you and I’m trying this recipe this weekend.
Hi Christeen! Thank you for your note. There are as many methods to sourdough as there are recipes for hummus. This method is from Emilie’s book “Artisan Sourdough Made Simple.” You read step one correct: after mixing, rest the dough for 30 minutes, the perform one “fold” as described (you can do up to 3 more folds, 30 minutes apart each if you like). This is a no knead method so you don’t need to do the “window pane” test. What so many makers love about Emilie’s method is that it is truly simple and creates fabulous sourdough bread (take a look at the comments below if you’ve not had a chance)! I hope this helps. Keep in touch!
Wow!! This has made my year!! Watch this space and I’ll see how I get one. Thank you for such a speedy reply. X