Apple packed, lightly spiced and sweetened, this Apple Pie is gluten free and vegan, but you’d never know it. The dairy free pastry is whipped up in the food processor. While resting, sliced apples are gently cooked, cooled then strained. A tender-flaky coconut oil pastry with an easy cut out top crust makes this show-stopping homemade Apple Pie simple to assemble and a joy to share. | Disclosure: This recipe is brought to you by Bob’s Red Mill.
⭐️⭐️⭐️⭐️⭐️ Recipe Review: “This is the best apple pie I have made since I became gluten free and vegan. The crust blows us away, oh so good.” ~ Sandra
An Apple Lovers Dream Pie
This one took me a while… but after so many starts and fits, this is my best gluten free and vegan Homemade Apple Pie. It’s show-stopper for Thanksgiving, but also anytime you want to indulge in the ultimate cozy fall treat.
This Recipe Is
- bursting with apples – 5 pounds worth!
- lightly spiced, tender and sweet
- the pastry is a dream to work with (don’t worry!)
Give yourself plenty of time for this one. It’s a project! But if you do it in a few stages, it’s more manageable.
Only the Best Ingredients
As a baker and blogger, I’ve been a long time fan of Bob’s Red Mill flours and pantry staples because choosing the best ingredients is important to me.
Bob’s Red Mill Gluten Free 1-to-1 Baking Flour has helped me create light and fluffy cupcakes, delectable cookies, my popular Gluten Free Pizza Crust and Sourdough Gluten Free Pizza Crust based on gluten-full favorites. Using their Gluten Free 1 to 1 Baking Flour for this Apple Pie is an easy way to enjoy a gorgeous and delicious pie without gluten.
______________________
How to Make Gluten Free and Vegan
Homemade Apple Pie


Recipe Development
I was reminded anything worthwhile takes time, as I researched, developed and tested this gluten free dairy free apple pie recipe.
With the help of Bob’s Red Mill Gluten Free 1-to-1 Baking Flour, and familiarity with gluten full Coconut Oil Pie Dough, the pie dough comes together easily. It was the filling and baking that gave me fits.
- First, it was the overflow of juices from the sugar and apples that worked its way out of the pie while baking.
- Next, the dreaded gap emerged that sometimes develops between the pastry and apple filling after baking and cooling, an aesthetic that cannot be ignored.
- Last, the texture of the apples after baking and cooling, went from being too crunchy to mush.
I Kept Going!
And so I read, tested, and read more about this dreaded gap and other issues. Some said the gap is caused by the type of fat used in the pastry, others suggested macerating the apples, capturing the liquid, cooking the liquid down then thickening the liquid with starch, and adding it back into the apple filling prior to baking.
In the end, it was tips from Samin Nosrat, author of Salt Fat Acid Heat, Amy Traverso’s The Apple Lover’s Cookbook and also Cook’s Illustrated that helped me bring this recipe to a winning conclusion!
The Best Apples to Use in Apple Pie
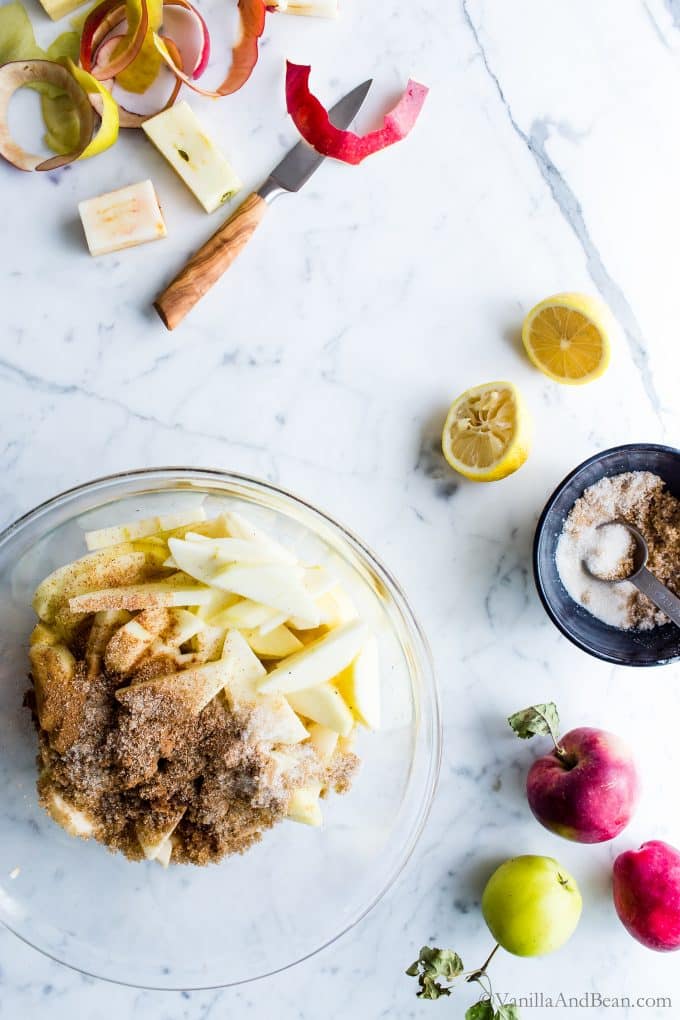
- Choose a mix of firm, tart and sweet apples such as Cortland, Granny Smith, Honey Crisp, Gravenstein, Cameo, Jonagolds and/or Pink Lady. These varieties tend to hold their structure well in apple pie.
- Using a mix of at least three different types of apples yields flavor interest, texture variety and a lovely fragrance.
- For this pie, I use Granny Smith, Gravenstein and apples from my neighbor’s tree, an heirloom variety of Golden Delicious.
Preventing a Gap Between the Apples and Pastry
To prevent the dreaded gap, there are a few steps we’re taking prior to tossing the apples in the pie pan that makes all the difference in the perfect apple pie.
- Gently cooking the apples helps set the pectin, bringing it to a heat-stable form. This prevents further cooking and dreaded mushiness (or further apple shrinkage).
- Strain the sugar and spice mixture off the apples after cooling. Doing this reduces moisture and steam build-up under the crust, which can also further cook the apples, making them too soft. Straining also prevents an overflow of apple juices from spilling over and onto the baking pan.
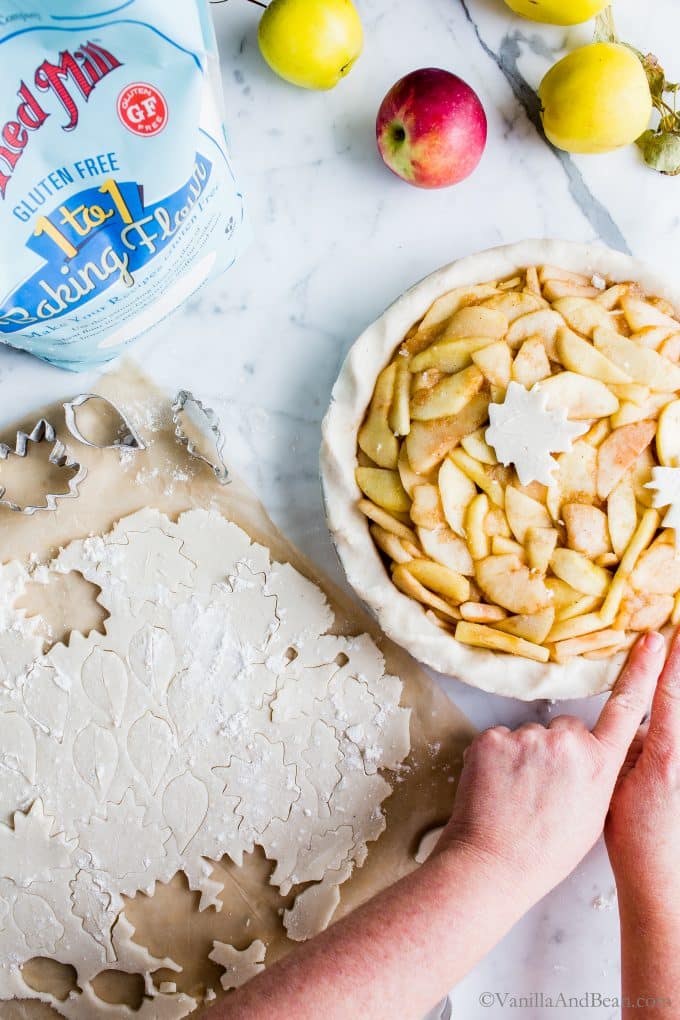
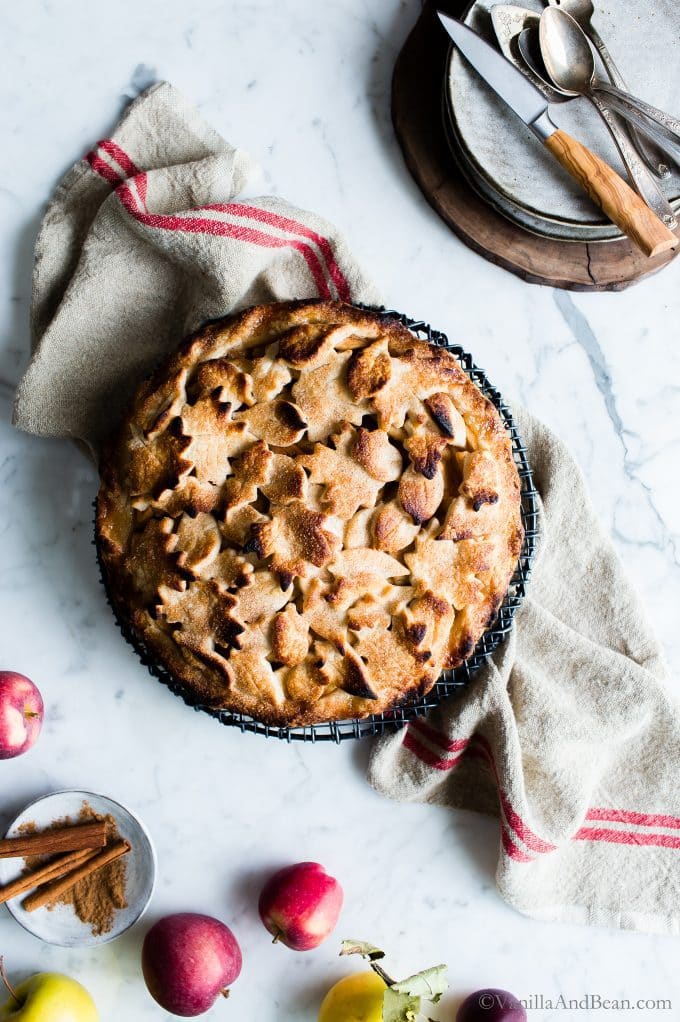
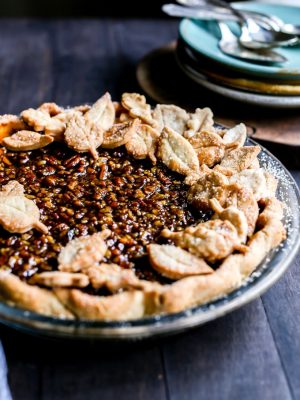
- Make sure there are plenty of steam vents in the top crust for steam to escape. To ensure this, I use a top crust made of pastry cutouts. I use leaves here, but stars or flowers would be festive too.
Traci’s Tips
- Make Ahead: the pastry can be made up to two days in advance and refrigerated or up to two weeks if stored in the freezer (thaw overnight in the fridge). Before working the dough, bring it to room temperature. Coconut oil pastry is easier to handle at room temperature (opposite of everything in a butter dough!).
- Coconut Oil Pastry: although a bit more crumbly than a gluten and butter pastry, we don’t have to worry about over-developing the gluten, so if rolling it out doesn’t work the first time, the pastry can be reworked and rolled out again still producing a tender pastry.
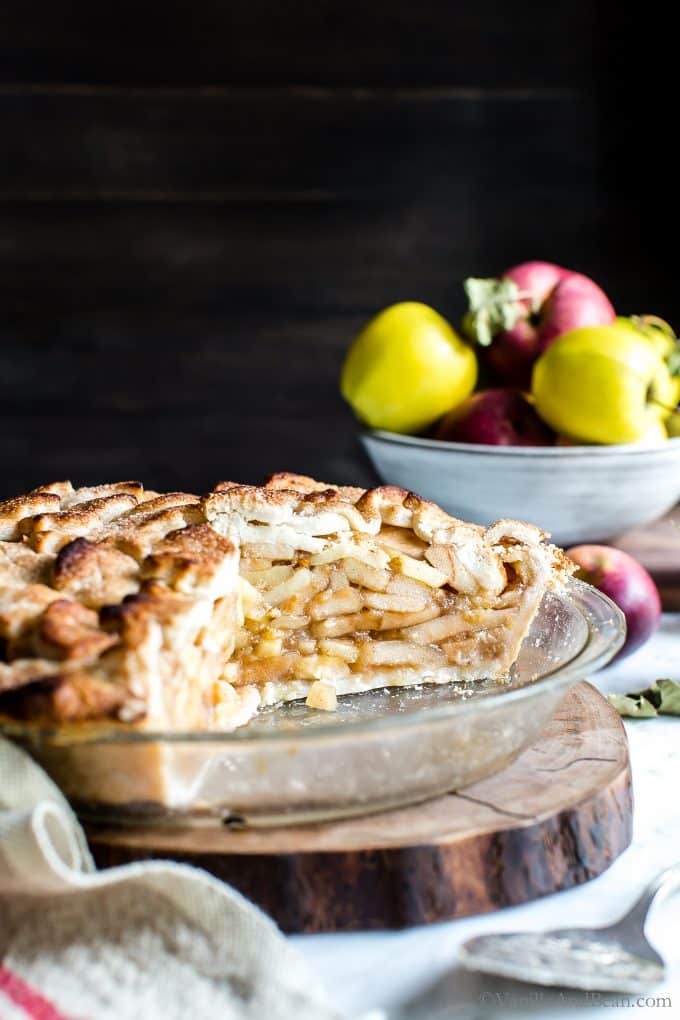
- A Lot of Apples: five pounds of apples seems like a lot, but once they’re peeled, cored, cooked, piled into the pie plate and nudged into place, it becomes the perfect amount for a lovely, mounded Apple Pie.
Show-Stopping Gluten Free and Vegan Apple Pie
Ingredients
For the Pastry:
- 1/2 cup + 1 1/2 tablespoons (135 grams) Plant Milk I use Homemade Cashew Milk
- 1 tablespoons Apple Cider Vinegar
- 2 cups (310 grams) Bob’s Red Mill Gluten Free 1-to-1 Baking Flour
- 1/2 cup (70 grams) Tapioca Flour I use Bob’s Red Mill
- 2 tablespoons Organic Cane Sugar
- 1 teaspoon Fine Sea Salt
- 1 cup (195 grams) Coconut Oil unrefined, solid
For the Apple Filling:
- 5 pounds (2.3 kilograms) Whole Apples about 11 medium apples, a mix of three sweet-tart and firm varieties* (see note)
- 1/2 cup (105 grams) Brown Sugar packed
- 1/4 cup (60 grams) Organic Cane Sugar
- 1/4 cup (65 grams) Bourbon, Apple Juice or Apple Cider optional* See Note
- 1 teaspoon Cinnamon ground
- 1/4 teaspoon Nutmeg ground
- 1/4 teaspoon Fine Sea Salt
- 2 teaspoon Vanilla Bean Paste or 2 tsp Vanilla Extract
- 1 1/2 tablespoons Lemon Juice
- 1 tablespoon Corn Starch
For Finishing:
- Plant Milk to brush the top of the pastry
- 3 tablespoons Organic Cane Sugar
- 1/2 teaspoon Cinnamon ground
Instructions
For the Pastry:
- Whisk the nut milk and apple cider vinegar together in a spouted measuring cup. Set aside to rest for 5 minutes.
- Meanwhile in the bowl of a food processor fitted with the S blade, add the gluten free flour, tapioca flour, sugar, and salt. Pulse 5-6 times to combine. Add the solid coconut oil and pulse until chunky, about 7-8 pulses. With the processor running, add the nut milk mixture, holding out about one to two tablespoons and process about 10-15 seconds or until the mixture starts to come together (it will look crumbly). To see if the dough is ready, grab a fist-full and squeeze. It should hold together. If not, add the remaining nut milk, process again and retest until it clumps in your fist.
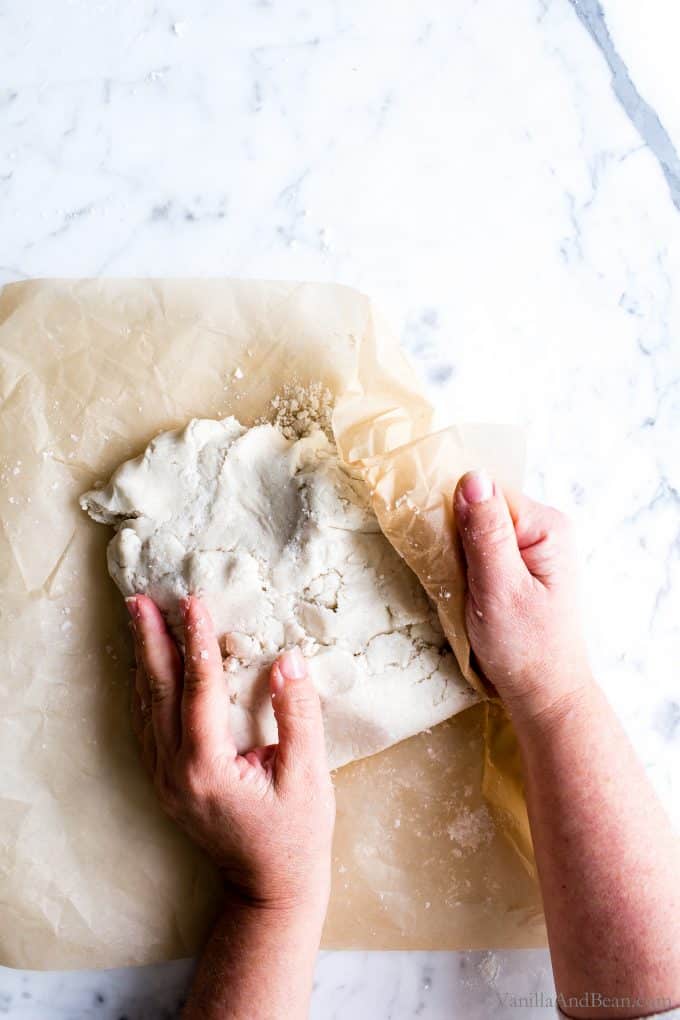
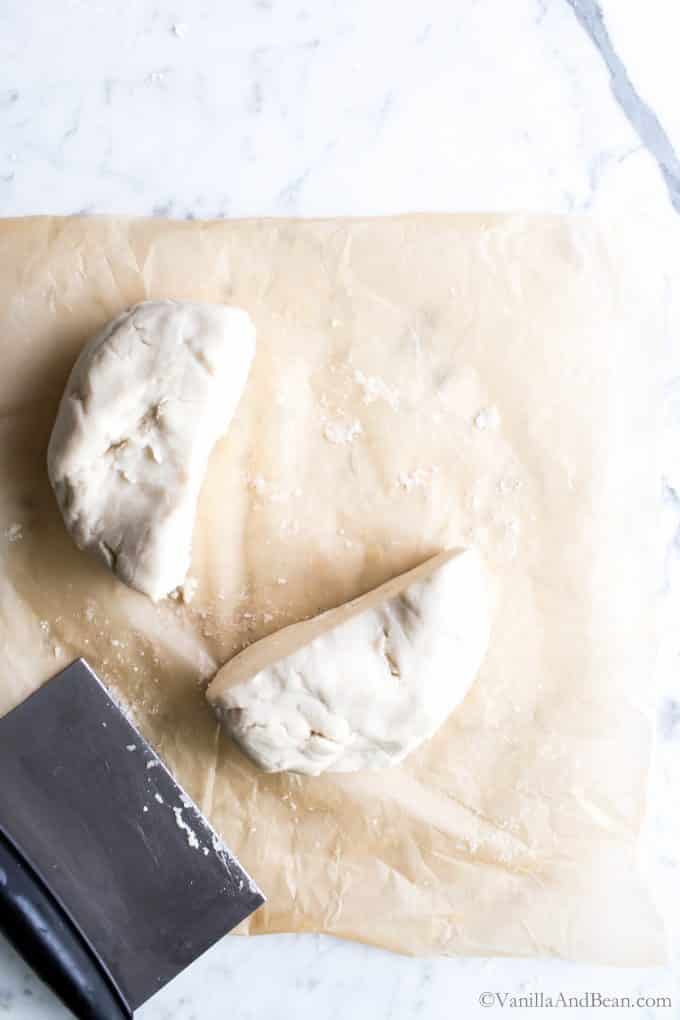
- Dump the dough out onto a large piece of parchment paper. Use the parchment paper to work the dough into a pliable piece, press and fold the bits together – folding and pressing the dough over and on top of itself until the dough comes together in one piece. Shape into a smooth thick disk, then divide in half. Shape the two new halves, patting and rounding into a 1-2″ thick (2.5-5cm) disk. You want the pastry to be smooth with no cracks if possible. Wrap the pastry in parchment paper or turn a bowl over the top of the of the disks (they can be stacked). The dough should be tacky, not sticky. If the dough is sticky, pop it in the refrigerator for about 15 minutes, then bring it out to room temperature again. Rest the pastry at room temperature while you prepare the apples.
For the Apples:
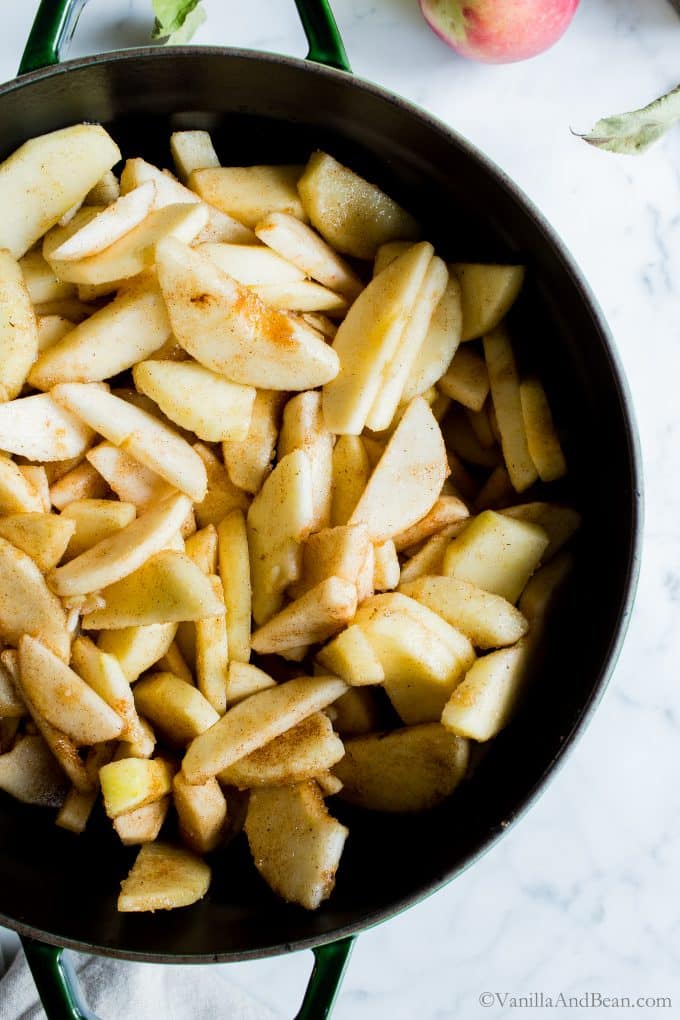
- Peel, core and slice the apples 1/4″ thick (a little over is okay). You’ll have about 16 C (1.5kg) of apples after slicing. Use your hands to gently toss the apples with the sugars, bourbon if using, cinnamon, nutmeg, salt, vanilla paste or vanilla extract, and lemon juice. Place the apples and juices into a large heavy bottom Dutch oven or large stock pot and cook on medium, gently stirring frequently, allowing the juices to simmer for 10-15 minutes. The apples should be just fork tender. I prefer a tender crisp apple so I cook for about 11 minutes. For a softer set, cook for 13-15 minutes. Remove from heat and gently stir in the corn starch.
- Pour the apples and all their juices onto a parchment lined sheet pan and spread the apples into an even layer. Place in the freezer for about 12-15 minutes to cool to room temperature. Set aside.
Roll out the Pastry:
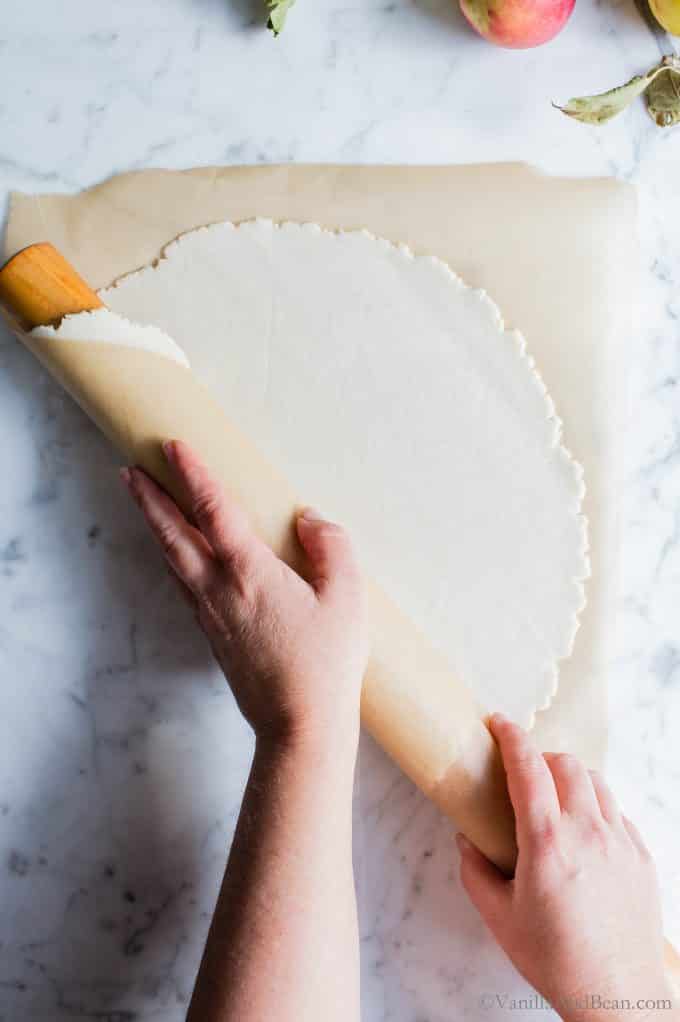
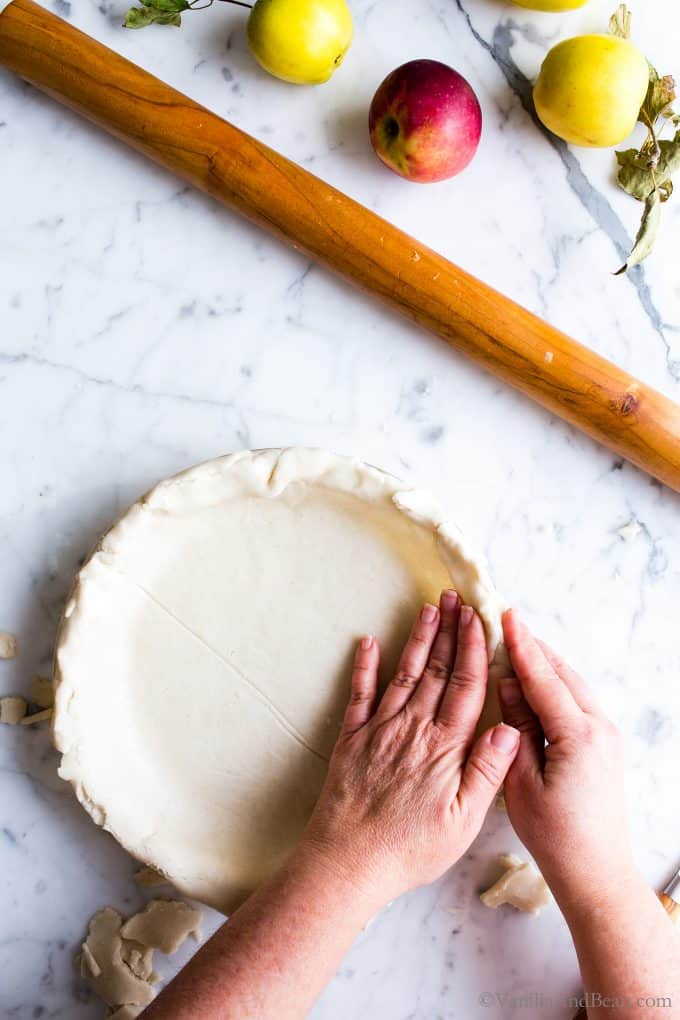
- While the apples are cooling, melt a bit of coconut oil and brush onto the bottom, sides and edges (very important (!!) get those edges) of a 9″ (22cm) pie plate (I prefer glass* – see note). Roll out the pastry between two sheets of parchment to about 1/8″ (3mm) thick – no thinner and about a 12″ (30cm) circle. Sometimes I add a sprinkle of water (1/4 tsp) over the pastry if there’s too much cracking. Gently remove the top parchment piece and using the rolling pin, roll up the pastry with the bottom layer of parchment in tact. Flip the pin over so that the pastry is now facing the pie plate, center the pastry and gently unroll. Carefully remove the parchment that is now on top of the pastry. There will be some breaking. Gently form the dough into the pie plate. Trim the edge of the pastry to about 1″ beyond the edge of the plate. Tuck the pastry edges under as best you can, patching any thin areas with dough that has broken off (think play dough). We want the dough to be of about the same thickness all the way around. A dab of water here and there will help smooth any rips, tears or rough edges. Also, if there are any tears in the pastry inside the dish, patch those up with a dab of water and a small piece of pastry where needed. Crimp the edges into a pretty shape. Here’s a tutorial, it’s not gluten free, but it works as long as your dough on the edges of the pie plate are built up (remember play dough). Start at 33:00 for the rope crimp. Run a knife around the outermost edge of the pastry to trim off any excess being careful not to cut into the crimping. Set aside at room temperature while you roll out the top crust.
- Roll out the top crust between two pieces of parchment to about 1/8″ (3mm) thick. Gently remove the top parchment, sprinkle a bit of flour over the top and cut out shapes using a cookie cutter or knife. Brush off any flour that remains on top of the cut outs. Set aside at room temperature.
Assemble the Pie:
- Strain the apples, shaking the apples to drain off juices. Discard the juice. Pour the apples into the pastry lined pie plate. Nudge the apples into the pastry, arranging them so that there are few gaps between apples. Arrange the curved sides of the apples along the edges as best you can to maximize space. Use your hands to gently press the apples down, wiggling and nudging, while creating a smooth dome.
- Gently lift the pastry cut outs with an offset spatula, and arrange one at a time on top of the apples. There should be some overlapping, so use a dab of water to ‘glue’ the pieces of pastry together. We don’t want any sliding off the pie. Arrange the cutouts in a decorative pattern leaving gaps between as steam vents.
- Place the pie in the freezer for about 15 minutes. Meanwhile, set an oven rack in the center of the oven and preheat to 425F (218C). Set a parchment lined sheet pan on the center rack while the oven preheats. Just before the oven is ready, pull the pie from the freezer and brush the pie with nut milk making sure to cover the edges and all the cut outs. Mix the cinnamon and sugar and generously sprinkle over the pie.
Bake the Pie:
- Bake the pie on a preheated parchment lined sheet pan in a 425F oven for 45-55 minutes rotating the pan 1/2 way through baking. If the pie begins to get too dark on the edges or top, cover the edges with foil or a pie protector. For the top, tent a piece of foil with a hole cut in the top for a steam vent. The pie is done when it’s fragrant, the pastry is golden brown (some dark edges are okay) and you can see a bit of the juices bubbling in the center.
- Cool the pie completely, at least two hours, before cutting or covering it. A practice in patience. Just before cutting the pie, ease the edges of the pastry from the pie plate by running a pairing knife all around the edge. Then, set the pie in a shallow pool of hot tap water for one minute. This allows the fats to soften, making it easier to cut and release from the bottom.
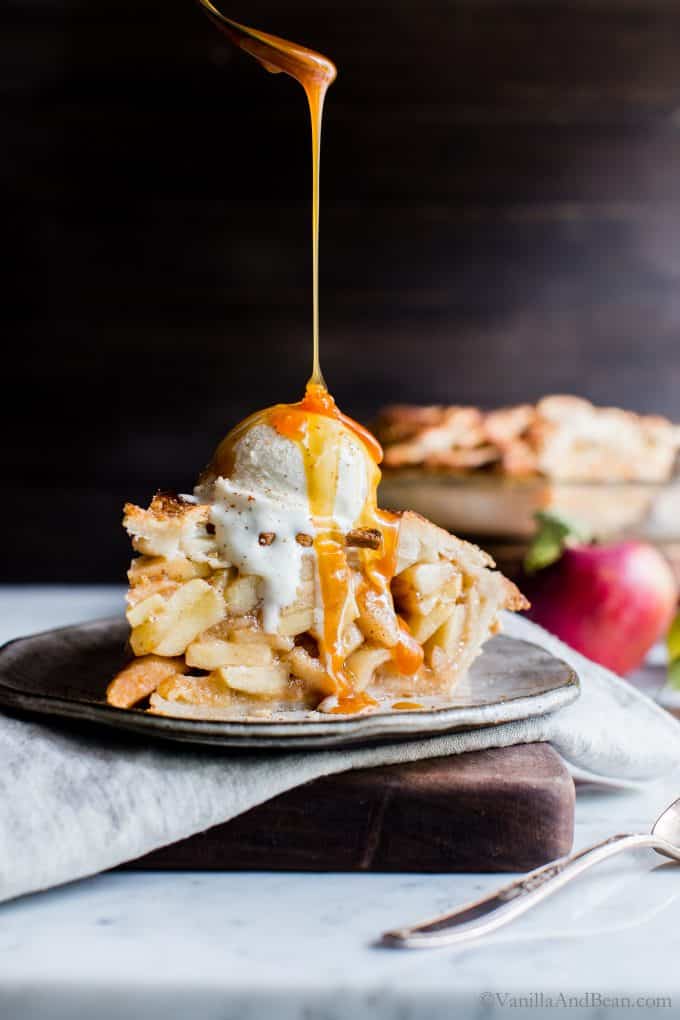
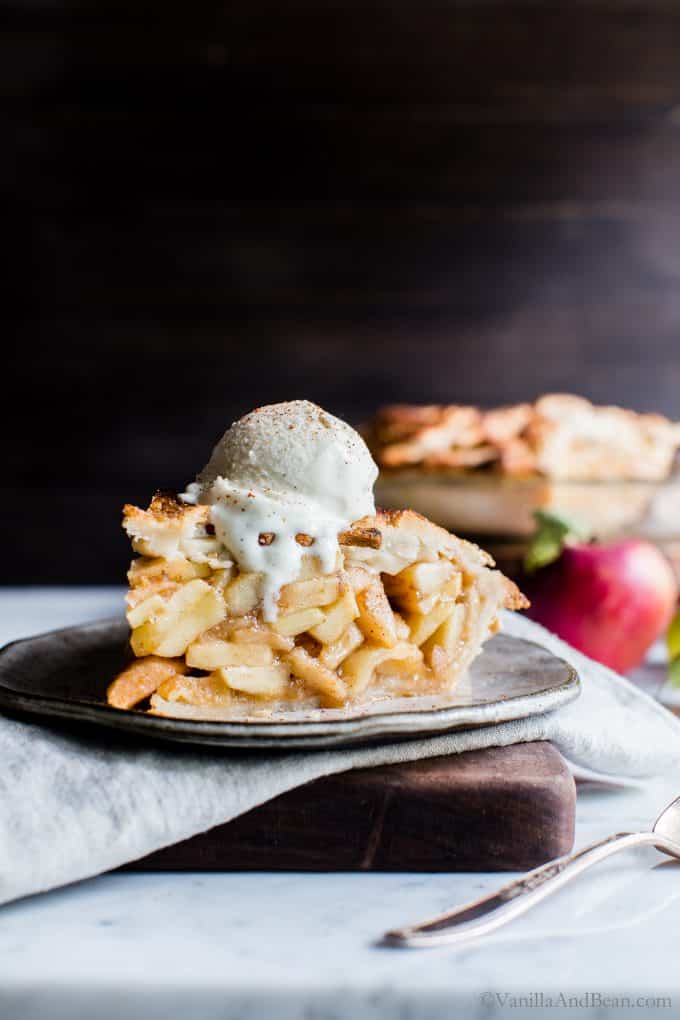
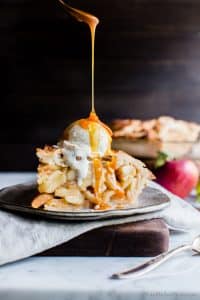
- Rewarm individual slices in a 350F (180C) for about 15 minutes. Serve with ice cream and your favorite caramel sauce. Store apple pie covered, at room temperature for up to two days. It’s best rewarmed as it refreshes the pastry and makes it crisp again. Otherwise the pastry will soften as it sets.

This worked out great! Crispy crust, lots of apple flavor, just sweet enough. I substituted coconut sugar for brown sugar, and went the cider route. Super tasty – family is GF/nondairy so it’s fun to find delicious recipes for them.
Hi Jon! SO glad to read your note and receive your five star review! Hooray for a tasty GF/DF apple pie!
Can I pre-make the apple pie filling and then freeze to make a pie later on?
Hi Veronica! It could work, although I do worry about the texture of the apples after freezing. If you give it a go, allow the mixture to cool completely before freezing. Thaw in the refrigerator. Let us know how it goes if you do freeze the filling!
I just tried this and it turned out really good. I don’t realize we’d need to make shapes so I did my best with making leaf markings on dough pieces🤣.
No soggy bottom, but still tender, crumbly. If I were on the GBBS, I might have gotten a handshake?
A girl can dream.
Took a out 3 hrs to make all together. I did forget the cornstarch, but it turned out good still
Saving this recipe!! So glad it’s vegan and gf🥹
Hi Karina! Thank you for your note, sending a smile and giving the pie a go. I’ll take a hand shake on the GBBS! ha! SO happy to receive your star rating!
Ohh, this apple pie was so worth the wait! Our family eats the trifecta (vegan, gluten-free AND nut-free) so you can imagine that I sorted through many recipes before I came across Traci’s gorgeous pie. For our Thanksgiving apple pie, I made several substitutions, including using date sugar (to keep it whole food) and 50% coconut manna (again to keep it WF) and 50% avocado (to reduce the fat content, plus I ran out of coconut manna). I blended the avocado into the nut milk (I used coconut milk). The most challenging part (besides waiting for the pie to cool, was making the dough and rolling it out – it was super sticky due to the substitutions and over mixing on my part. Next time I will probably try using coconut manna or a combo of coconut manna and coconut oil. Overall, my whole family, picky eaters and all gave this a HUGE THUMBS UP!! Thank you for your persistence, Traci. ;) p.s. I will try to post pics on Instagram too.
Hi Michele! Thank you for your note, giving the recipe a go and sharing all your tips with us! SO happy to see your pie on IG and that everyone enjoyed it.
THIS IS THE BEST APPLE PIE I HAVE MADE SINCE I BECAME GLUTEN FREE AND VEGAN. THE CRUST BLOWS US AWAY, OH SO GOOD. THANK YOU FOR YOUR EFFORT IN PUTTING THE RECIPE TOGETHER FOR US.
Hiii Sandra! Thank you for your note and giving the pie a go. SO happy to hear you’re enjoying the pie and crust!
Would it be okay if I subbed the sugar in the apple filling for either agave or maple syrup?
Hi Ann! Since you’re draining off the liquids, I wouldn’t hesitate subbing maple syrup. I hope this helps, and you enjoy the pie!
Traci, thank you so much for putting this recipe together. This has been the best gluten free and vegan apple pie I have made and the dough really made it. I’m happy it stays together and it’s easy to manipulate.
I have recently tried to make Ischler cookies and due to a lack of gluten free and vegan recipe out there I tried adjusting yours because I had such great results making the apple pie. Unfortunately my experiments was unsuccessful. The dough crumbled and wasn’t manageable. I had to incorporate about 160 g ground hazelnuts and 100 g powdered sugar (not sure if I should use granulated sugar in stead-traditional recipe is made with powdered sugar) per 300 g flour.
Do you have any suggestions? I would be so grateful!
Hi Alexandra! Thank you so much for your note and giving the recipe a go! Isn’t the dough so nice? I wish I could help with the Ischler cookies, but I’m afraid I’ve never tried making them gluten free. I’d have to give them a go before I attempted to offer suggestions.
Tastes delicious! Crust came out wonderfully flaky. I live in a warm climate, so making sure the dough is just chilled for a few minutes makes it super simple to roll out. This pie crust is actually a lot easier to roll out, tear repair is super simple and the dough does not get tough is you need to roll it back out, doesn’t stick to your rolling pin either. Only issue I ran into is in the oven, I had oversized rim crust for decoration and those melted off about 10 min into baking. A- for me overall. Great vegan baking :) great baking in general actually
Hi Veronica! Thank you for your note and sharing your experience. So happy to hear you enjoyed the recipe!
Y’ALL. This pie is literally the best pie i have ever eaten. And not just me. My father is as far from vegan as one could get and loves to make jabs about vegan food and he said this was the best apple pie he has ever had. I am personally vegan, gf, and refined sugar free and do not eat corn so I made a few substitutions to this recipe that worked out perfectly. Instead of corn starch I used Arrowroot and I also used only coconut sugar in the same measurements that she has here. Both of these substitutions were flawless! The crust was slightly darker in color because of the brown color of the coconut sugar, but tasted just as amazing. I am definitely adding this one to my Thanksgiving menu.. and at least once a month… The cook time for me start to finish was about 3 hours. SO WORTH IT. MAKE THIS. NOW.
I also used apple cider instead of bourbon and that was great too!
Hi Anastasia! Thank you for your note, tips and sharing your photos on Instagram! It’m so happy to hear the pie was father approved, and that you’re lovin’ it too! Hooray!
Hello!
I may have missed the info., but what bourbon is used to create this GF recipe?
Hi Priscilla, thank you for your note. You can opt to use what best fits your diet whether a traditional bourbon/whiskey or a sorghum based whiskey, you can leave it out or sub in apple cider (non-alcoholic). There’s much information regarding distilled spirits being okay to consume for gf individuals, but may not be okay for all. Very Well Fit has an article about the subject in more detail. I hope this helps, and I’ll add a note to the recipe!
I made this for my family. We are not able to eat gluten or dairy. The said this is the best apple pie they have ever had!
You’ve made my day Bridget!! Thank you for your note and kind words. I’m SO happy to hear y’all enjoyed it. Hooray for delicious Apple Pie!
Tried this recipe and while the instructions are very well organized, it would have been helpful to have some step-by-step pictures with it, especially when it came to the second half of the recipe (i.e. rolling out the dough over the pie plate).
Also, prep time was not 40 minutes at all! In total, with cutting the apples, cooking them and making the dough it ended up being almost 2-3 hours :(
I also ended up with extra apple slices – did you measure yours using a scale? I followed the 16 cup measurement but it ended up being double the amount of apples I actually needed. Could I freeze the leftover apple slices?
That being said, the crust turned out beautifully, almost no cracking which is amazing for a gluten free crust.
Hello! Thank you for your note and feedback. So happy to hear you enjoyed the crust! For prep time, I do my best to get as close as possible to the exact time as I can, but unfortunately I’m unable to account for comfort/skill/experience/issues that may arise for any individual, especially when it comes to shaping pastry or decorating cupcakes for example. The prep time reflects hands on time only, not hands off time, like cooling the apples or resting the dough. Regarding the apples, you’ll notice weight and volume measurements in all my recipes. This is because I weigh (using a digital scale) and measure each ingredient. According to King Arthur flour (which is reflected closely in my recipe as well): “A pound of apples will yield 3 cups; so for 8 cups prepared apples, you’ll need about 2 2/3 pounds whole apples.” All the apples go right into the pie plate, there should be no leftovers. Gently wiggling, nudging, arranging and pressing the apples into place should produce a mounded and packed apple pie. The reviews I’ve received on social didn’t have any leftovers, so I’m stumped. The leftover apples can be frozen. I hope this helps!
What are you drizzling on top od this beauty?
*of
Hi Jan! Thaank youuu! It’s caramel sauce 🙌🏻
Dear Traci, this looks like a lot of work, all the trials and the reading beforehand. It was definitely worth it. This apple pie is perfect! I will try it tomorrow if I have time… Thank you for the recipe. Lots of love and *Happy Thanksgiving* to you! Christine
Hi Christine! Indeed a practice in diligence and patience. I hope you enjoy the recipe and Happy Thanksgiving to you too! :D
Traci, this looks beautiful! I can’t wait to try it. You take the most lovely photos of your amazing creations. Thanks for all the details, too. Happy Thanksgiving!
Hi Lori! Thank you for your note and kind words. Happy Thanksgiving to you too!
What a gorgeous pie and such helpful hints and detailed recipe instructions. I always top my apple pie with leaf cutouts as well, just wouldn’t be a Thanksgiving pie without those! Years ago I used to trace actual leaves for the lattice top before I had the cutters! Enjoy your Thanksgiving and all that it encompasses.
The details… the details! Sometimes I think they may be my end – lol! Love the cutouts too and they’re just so darn easy. Tracing and cutting out leaves… how gorgeous, Jean! Happy Thanksgiving to you and yours… and thank you too for your support and encouragement.